
Proxy Mode
If your system uses Proxy in order to connect to web resources, you will be required to set up proxy within Essentials also.
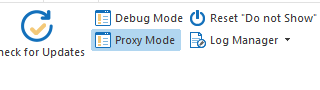
Selecting Proxy Mode from the help tab will set Metalogix Essentials to work through proxy mode for the entire application, saving users from manually setting up proxy mode within each wizard.
In order for Proxy Mode to work you must enter the proxy configuration settings.
Proxy Configuration
Sometimes a connection to an Office 365 location can be initiated only with the help of proxy settings.
To enable proxy mode please do the following:
1.Navigate to the Help tab, and select Proxy Mode.
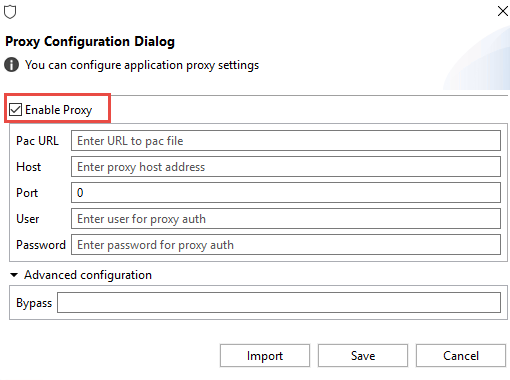
2.In the Proxy configuration screen select the Enable Proxy option. This will allow you to enter your proxy configuration settings, or import the settings from Internet Explorer by clicking the Import Settings button. Click Save.
The following is an overview of the proxy settings:
Enable Proxy - turns the entire proxy tool on/off.
Pac URL URL value for scripted PAC proxy
Host - server name / server IP to direct proxy
Port - port for direct proxy
User - user account
Password - password for user account
Advanced Settings: Bypass - white list of sites where proxy should be ignored, URLs must be separated by semicolons.
Import Settings - imports values from Internet Explorer, recommended way to set up proxy
Save - saves settings and closes dialog. if checkbox active and fields are empty - error massage "Set proxy settings "
Cancel - closes dialog without changes.
Note: The Proxy option is active after the restart of the tool or when script is running.
Proxy Configuration During Product Activation
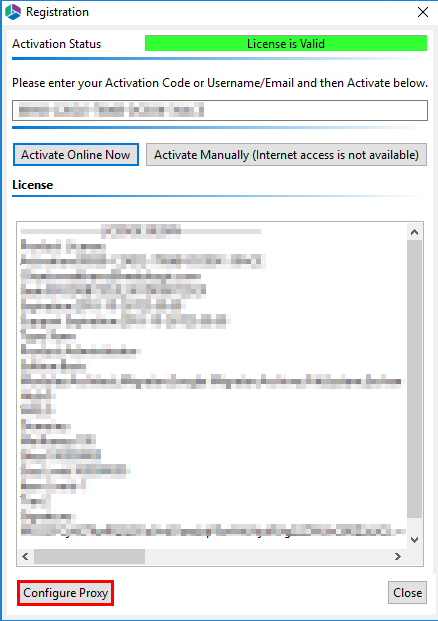
When you first install Essentials, you are required to activate the application. If your environment requires the use of proxy settings you can set them up before completing license activation. Do so by selecting Configure Proxy on the Registration window.
Azure Turbo and CSOM
By default, Essentials uses CSOM API to work with SharePoint Online when performing a migration. The Migration API uses Azure Storage as the middle man to stage content and process queues before it makes it to Office 365. As a result this is where Essentials will need to upload your content. In order to upload your content to Azure Storage, and use Azure Turbo Mode you will need to provide Essentials with your Azure Storage account name and the key associated to it.
|
|
NOTE: ·Only Standard Storage Accounts are supported for this operation. ·Minimum recommendations would be a quad core CPU, 8GB of available memory (Memory Management), 20GB of local hard drive space and as fast an upload speed as possible. Limiting any of these components can decrease the performance drastically. |

To Switch to Azure Migration API, select the option Azure Turbo, located in the Advanced Options section of the migration wizards.
You must then specify the storage location:
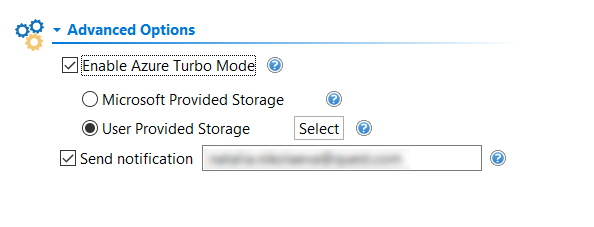
·Microsoft Provided Storage - will store the Azure packages in a temporary container that Microsoft provides. An access Key to work with this container is valid for 3 day. This means that if in 4 days you would like to get logs of operation after an azure job is done, you will not be able to access them, as the key will have expired. To avoid this situation, use the Synchronous mode of Azure Migration, or use the Azure Logs Refresh Policy for Hyper Mode jobs.
All content is encrypted by AES CBC 256 standard.
https://docs.microsoft.com/en-us/sharepointmigration/sharepoint-online-provided-azure-containers-and-queues-for-spo-migration-api
·User Provided Storage: This option allows you to provide your own Azure Storage instead of using one provided by Microsoft for the purpose of utilizing Azure Turbo Mode. It requires that you provide both your Azure Blob Storage Account Name as well as its corresponding Access Key by clicking the "Select" button to the right. If you cannot supply this information, please search our online Knowledge Base, User Manual or contact Quest Support for additional information before proceeding.
|
|
NOTE: User Provided storage will give you access to Azure logs for a longer period of time than Microsoft provided storage. It will also allow you to perform the migration faster with less throttling. |
·Send Notification - enter specific user email addresses to denote who will receive notifications. Set up User Notifications here in order to use this feature.
Differences in migration with CSOM and Azure
·CSOM doesnt support migration of Shared with me data. It can only be migrated using Azure Turbo mode.
·CSOM doesnt support version label migration; metadata and authorship will be preserved correctly, but version labeling is reset post migration.
Your Azure Storage Account
If you are creating a new Azure Storage account, consider picking the geographical location closest to where your tenant physically resides. The closer the Azure Storage data center is located to your Office 365 tenant's data center, the faster the transfer will be between the two.
To locate your Azure Storage Name and Access Key:
1.Login to your Azure Management Portal at https://manage.windowsazure.com
2.From the left navigator bar, select the option labeled Storage.
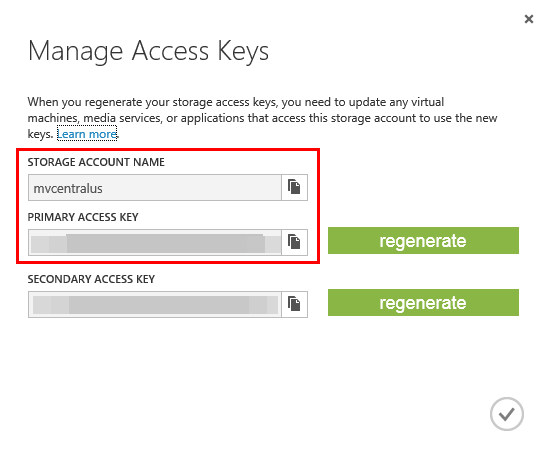
3.Select the Storage Account name from the available list that you wish to use for Azure Turbo and then choose Manage Access Keys from the bottom menu. If there are no storage accounts available or you would like to create one, click the New button displayed below the left navigator bar. For more information about how to create or manage Azure Storage Accounts, please see the following link: http://azure.microsoft.com/en-us/documentation/articles/storage-create-storage-account/
4.From the Manage Access Keys window, you will want to copy the Storage Account Name and at least the Primary Access Key value to a text file for safe keeping. These two values will need to be provided to Essentials in order to successfully use the Azure Turbo Mode option.
5.After these values have been saved to a file, you may log out of your Azure Management Portal.