
SharePoint Online to SharePoint Online Post-Migration Compare
After performing a SharePoint Online to SharePoint Online migration, you can run a report that highlights differences in the number of SharePoint objects between source and target. The report is saved as an Excel file, so it can be shared with other administrators/site owners.
|
|
NOTE: This report can only be run for tenants that use OAuth authentication. |

Creating a CSV with URL Mappings
Before the Post-Migration Compare report can be run, a CSV file with source and target URL mappings must be created. The URLs can be at the site collection, site, or list/library level. The example below shows the proper CSV formatting for both a site-level and document library-level compare.

To perform a SharePoint Online to SharePoint Online Post-Migration Compare:
1.On the Drives tab, select Post Migration Compare.

2.Enter a Project Name.

3.For both Source and Target Office 365 connection parameters, enter a SharePoint Admin Center URL, then click the Connect (or, if using multi-factor authentication, Claims ) button. Enter valid Admin account credentials, then click Connect.
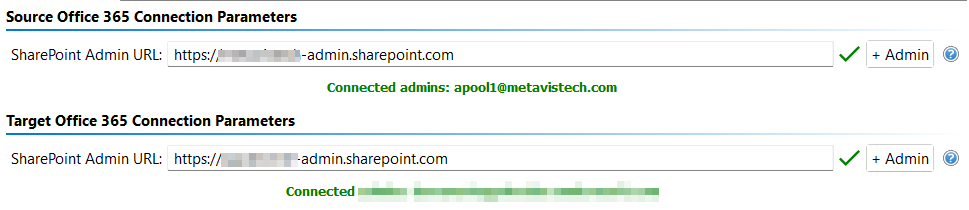
If the URL and credentials are valid, a successful connection message displays. You may also choose to add additional Admin account by selecting the "+Admin" button.
4.For Location and name for report, click the Select button, then select the name and location for the Excel output. (Essentials automatically adds the xlsx extension).

5.Click Next to display the Check for availability of sites dialog.
6.Click the Load from CSV button.
Essentials loads the mappings from the CSV file.
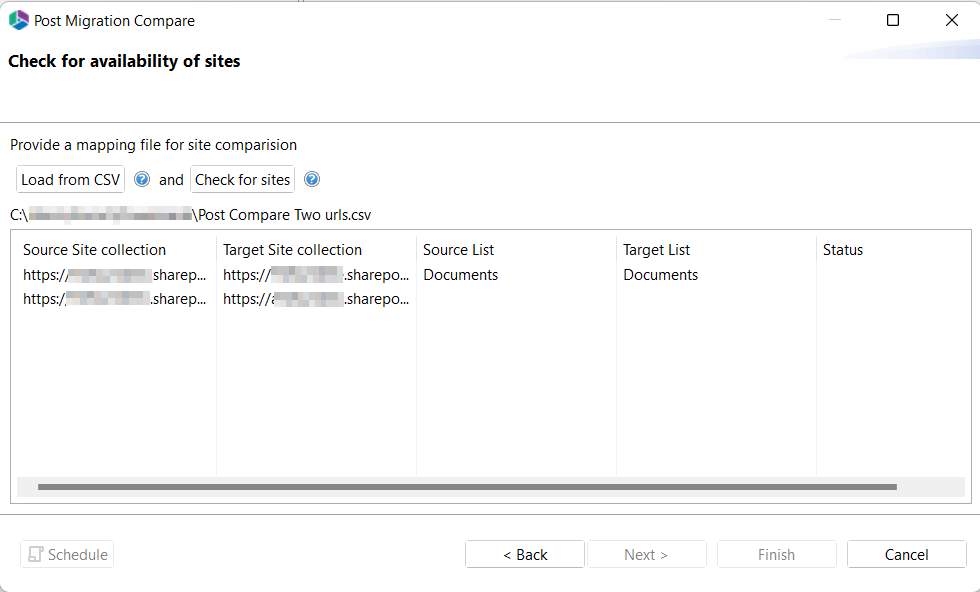
7.Click the Check for sites button.
Essentials retrieves the content for the mapped source and target.
8.Click Next to display the Configure live compare dialog.
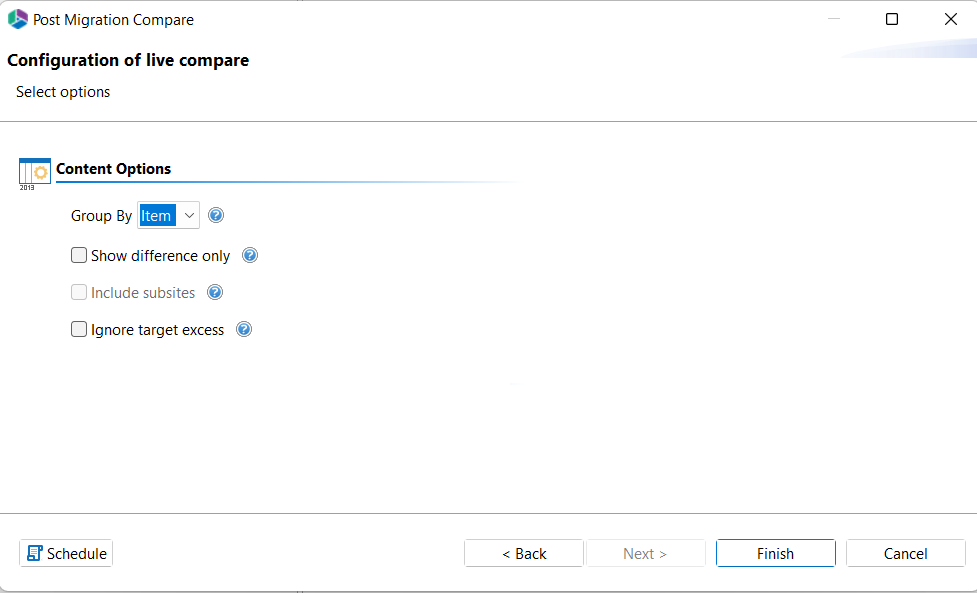
9.Select the Content Options for the report:
§Group By either List or Item.
§Show differences only: If you check this box, the report will only show SharePoint objects for which the count is different between the source and target. If you leave this box unchecked, the report will include all objects, regardless of whether the count is different.
§Include subsites: If there are no subsites to include, this option will be disabled.
§Ignore target excess: If you check this box, only objects for which the source count is higher than the target count will be highlighted in red. If you leave this box unchecked, objects for which the target count is higher than the source count will also display in red.
Now you can either:
·generate the report immediately (by clicking the Next button)
OR
·schedule the report to run at a specified time.
The report lists the count comparison between source and target for each SharePoint object. If you are comparing content for multiple source/target URLs, each will display in a separate tab.
If you accepted the default configuration options, all source and target objects will be included in the report. All differences in count between source and target are highlighted in red.
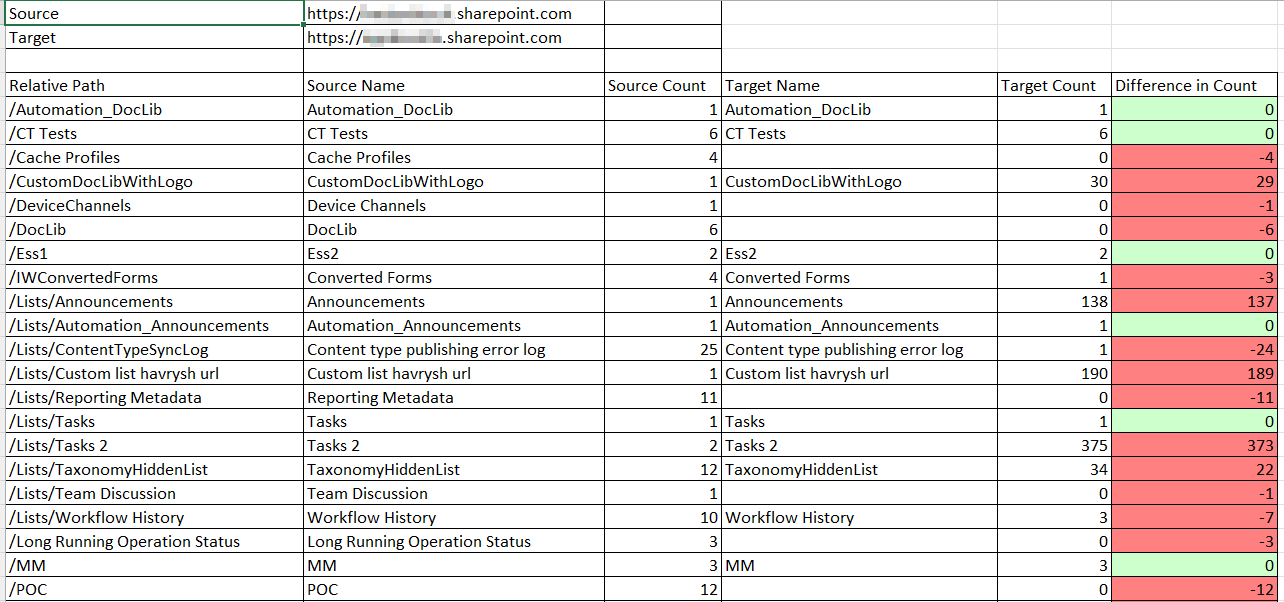
If you chose to Ignore target excess, only objects for which the count is higher on the source are highlighted in red.
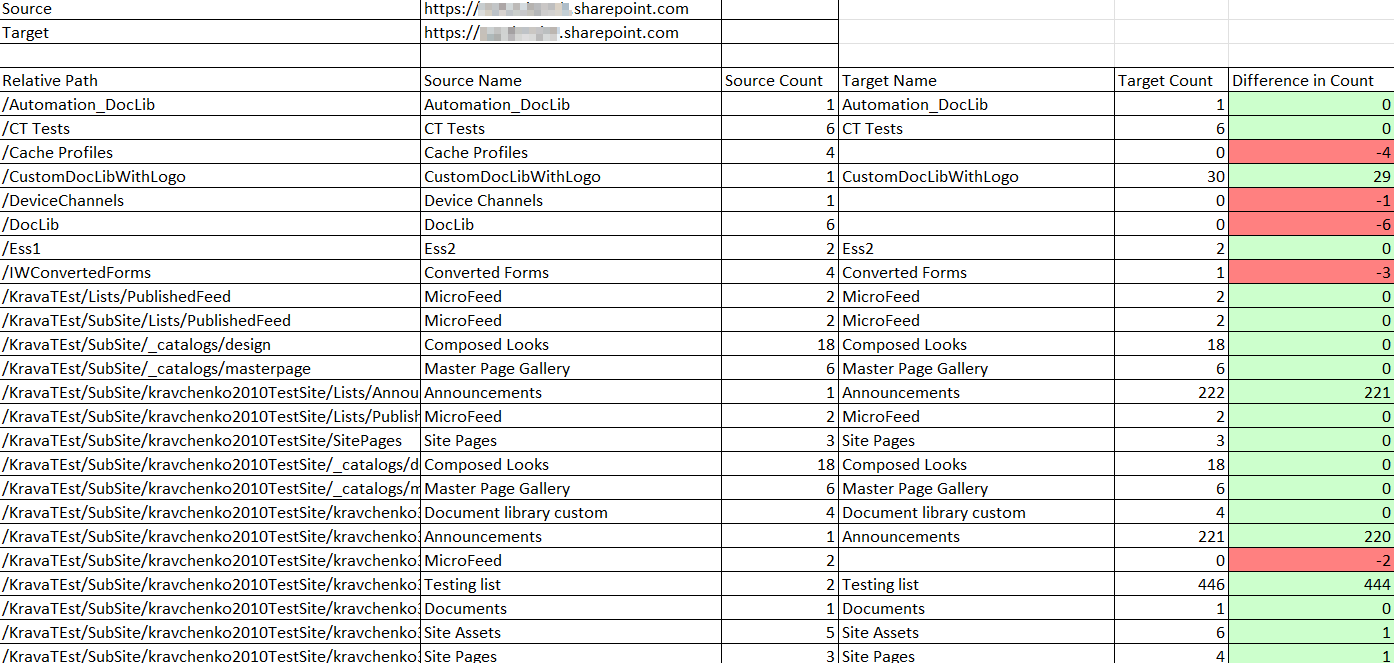
If you chose to Show differences only, objects with 0 Difference in Count are excluded from the report.
Copy Box
Metalogix Essentials for Drives provides a simplified, wizard driven experience to migrating content in, out, or between various drive management systems (local or cloud based). It can also provide additional functionality to managing some or all OneDrive for Business sites within a specific Office 365 tenant.
Copy Box to OneDrive for Business
This option allows Box and Office 365 administrators to copy content from within multiple Box Drives to their respective OneDrive for Business sites in a single migration.
|
|
NOTE: If you attempt to connect or open a Box drive through the software and it does not respond, please review the section Alternate Framework. |
This operation has the following requirements for use:
·The account used to perform the migration from Box needs to have Full Enterprise Admin access to the Box tenant.
·The account used to perform the migration into OneDrive for Business needs to be a minimum of Site Collection Administrator Role in this Office 365 tenant.
·The person performing the migration will need to know the relationship (user mapping) between each user's Box user account and their corresponding Office 365 user account.
·Each user account must have either a SharePoint or OneDrive license assigned to it in Office 365 and can not be in a 'Blocked' state.
Once the requirements above are satisfied, you can proceed with your Box to OneDrive for Business migration.
1.Switch to the Drives tab and click the "Copy Box" option and select the Copy Box to OneDrive button.

2.Give your project a name.

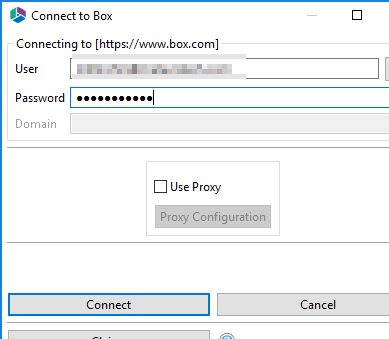
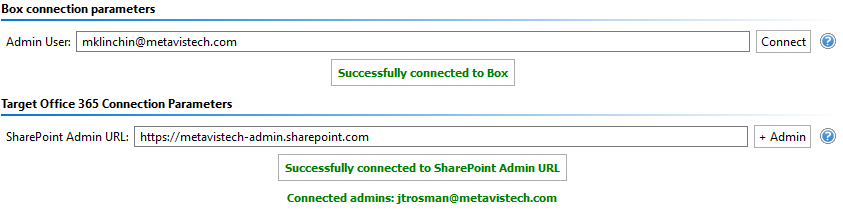
3.Enter the username of your Box Administrator and click Connect. 
4.When the popup appears, enter this Admin account's password and click Connect. Then "Grant access to Box" and you will return back to the migration configuration where a "Successfully connected to Box" message will appear.
|
|
NOTE: If you attempt to connect or open a Box drive through the software and it does not respond, you may require an alternate framework. Please review the section Alternate Framework for instructions on how to install the alternate framework. |
5.In the Target Office 365 Connection Parameters section, specify your tenant SharePoint Administration Center URL and then click Connect (i.e. https://tenant-admin.sharepoint.com). When prompted, enter your Office 365 Global Administrator or SharePoint Administrator login and password. Click Connect. If you receive any message other than Successfully connected to SharePoint Admin, double check the URL and make sure you are supplying a Global Administrator or SharePoint Administrator login for this tenant. If you are still experiencing issues, please contact Support for further assistance.
6.Click the "Load from Box" button to load in a list of available Box drives to include with this migration. For performance reasons, if you have a large number of Box drives in your tenant you may wish to create a single column CSV file with the user accounts and choose the option "Load from CSV" instead.
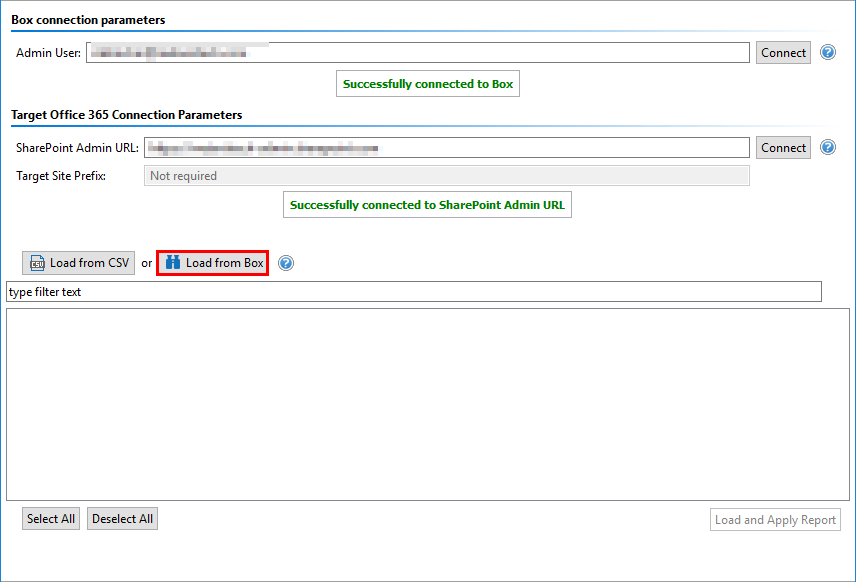
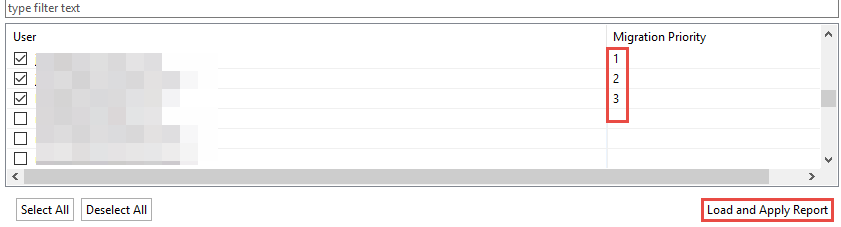
7.Select the Box drives that you wish to include with this migration, or select the Load and Apply Report button, which allows you to load and apply an Analyze Box report, which then sets the Migration Priority for each user mentioned in the report. Click Next to continue.
|
|
NOTE: Each Migration Priority value can be changed if you click on the value in the Migration Priority columns (without user selection). It changes the migration queue but does not change the original report file. Priority in the wizard is not saved after the wizard has been closed. |
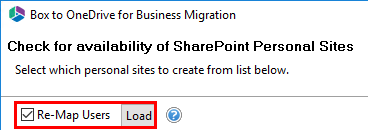
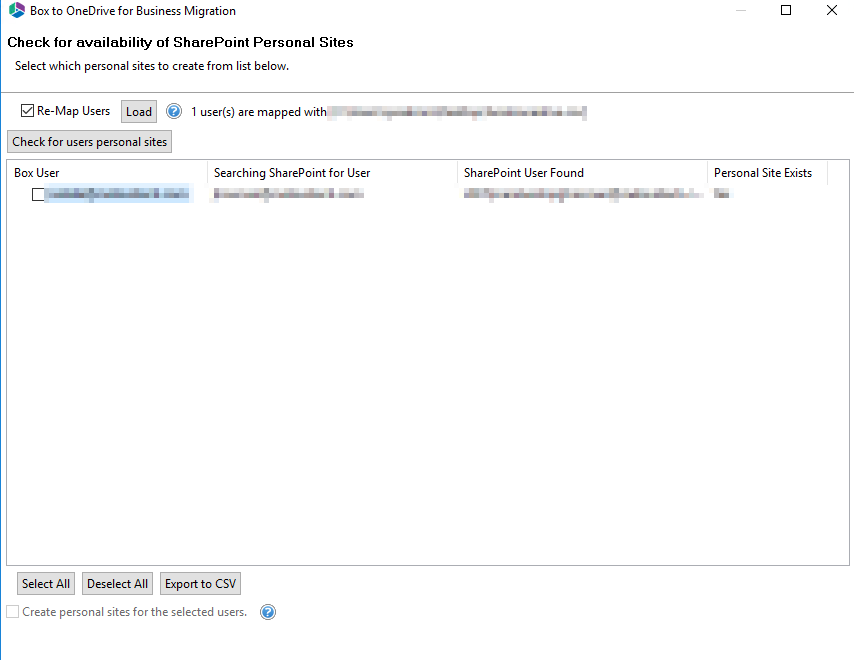
8.Select Re-Map Users option and load a user mapping CSV file. User mapping is required so the software can properly resolve the differences between your users' Box and Office 365 accounts. Please see the User Mapping section if you require further instructions on creating a CSV file for user mapping.
9.Click Check for users personal sites in order to begin the validation process. This process will validate that the supplied user mapping is correct (Office 365 user accounts were located) and check to determine if each user currently has a OneDrive for Business for site provisioned. If any of the valid users do not have a OneDrive for Business site currently provisioned, you can select them and check Create personal sites for the selected users option.
10.Click Next to continue.
11.The final page provides a few options to configure how the content portion of the operation should be configured.
Content Options
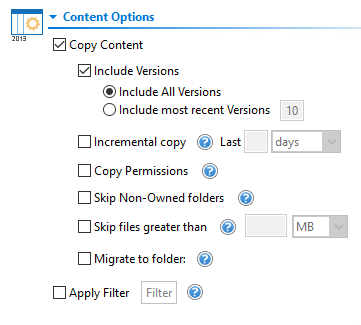
Copy Content - A flag to determine if content is or is not included with this operation. When not included the remainder of the options will become disabled.
Include Versions - The process in which Box version history will be converted into OneDrive for Business versions.
Incremental Copy - When enabled, the migration process will identify and migrate only that content which was created, modified or versioned within the defined interval (days, weeks or months).
Copy Permissions - Will convert Box permissions (known as Collaborators) into OneDrive for Business permissions.
Skip Non-Owned Folders - This option addresses the scenario where folders appear in a user's Box account which are not owned by this user; meaning the user is a folder collaborator and not the folder "Owner". Skipping these folders will prevent duplicates from being migrated into OneDrive for Business because the folder will be migrated only once when the folder "Owner" is migrated. Please refer to the in-application Help button for additional details.
Skip Files Greater Than - When enabled, this option will skip any source files that are greater than the value specified (in MB or GB). An entry will be added to the post-migration log indicating which file(s) were skipped due to this configuration.
Migrate to Folder - When this option is enabled, you can create a (or use an existing) root folder structure in the destination library where your source content will be migrated. You will need to define the path like this example:
/My Source Content/2017
In the above example, the folder "My Source Content" and subfolder "2017" will be created in the root library of your destination and all source content will be migrated to this folder location.
Apply Filter: Creates and assign any number of filter parameters to be used to include or exclude content from the upload process, including but not limited to file extensions, size and dates.
Advanced Options
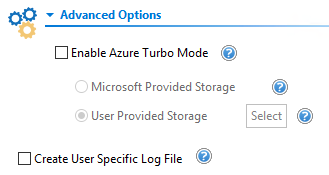
Enable Azure Turbo Mode: When enabled, this option utilizes Microsoft's SharePoint Online Migration API to increase the migration performance and throughput. A recommendation for optimal use of this API is larger sets of data; the more content, the better the throughput. Please review the User Manual for additional information as well as recommended configuration as this process is a resource intensive operation.
Because this API uses Azure storage as a staging area for the migration, it requires that you provide an Azure storage location. The options are to either utilize Microsoft supplied storage or to provide your own Azure storage location. If you wish to use your own Azure account, you must provide both the Azure Account Name as well as the corresponding Acces Key. If you cannot supply this information, please search our online Knowledge Base, User Manual or contact Support for additional information before proceeding or consider using the Microsoft Supplied Storage option. For more information please see the Azure Turbo Mode section.
|
|
NOTE: this function is optional and is only used to increase the migration performance to SharePoint Online or OneDrive for Business in Office 365. It does not provide any additional functionality that is not available when this option is disabled. |
·Microsoft Provided Storage: This option allows you to use Microsoft provided Azure storage instead of providing your own for the purpose of utilizing Azure Turbo Mode.
·User Provided Storage: This option allows you to provide your own Azure Storage instead of using one provided by Microsoft for the purpose of utilizing Azure Turbo Mode. It requires that you provide both your Azure Blob Storage Account Name as well as its corresponding Access Key by clicking the "Select" button to the right. If you cannot supply this information, please search our online Knowledge Base, User Manual or contact Support for additional information before proceeding.
|
|
NOTE: User Provided storage will give you access to Azure logs for a longer period of time than Microsoft provided storage. It will also allow you to perform the migration faster with less throttling. |
Create User Specific Log File - If you would like a user specific log file (.txt format) created for each migrated Google Drive, that will be saved directly to that Group's Documents library, check this option before you finish. This log file will contain all the content that was included in the migration with both source and target URLs as well as any file renaming that took place and skipped files due to lack of ownership.
NOTE: Create user Specific log file is disabled if Azure Turbo Asynchronous mode is on. Supported only for CSOM or Azure Turbo Synchronous modes.

|
|
NOTE: Content permissions are not migrated because Office 365 Group permissions are maintained and enforced by the group membership and its roles (Owners, Members and Guests). |
12. Click Finish to begin the migration.
Box - Group Mapping
This may be necessary when you have a Collaboration group assigned to a Box Folder that you want to translate into an Azure Active Directory group in your Office 365 environment.
Finding the Box Group to map:
1.In the Box application, right click on the shared folder which contains the group you want to map the Office 365 group from, and select Share>Manage Collaborators.
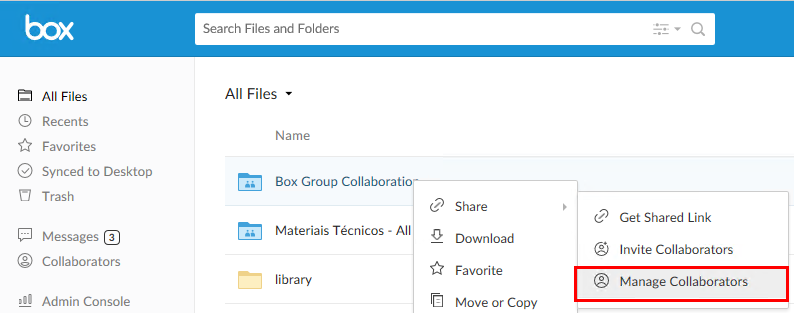
2.As is displayed in the following image, the group for this example is "Box Dev".

3.When migrating this as is (with no mapping) into OneDrive for Business, a SharePoint group will be created with the same name "Box Dev".
If you would like to translate this Box Group into an Azure AD Group, we first need to locate the "Account" name of the Azure AD group you would like to map the Box Group to. You can do this by following these steps:
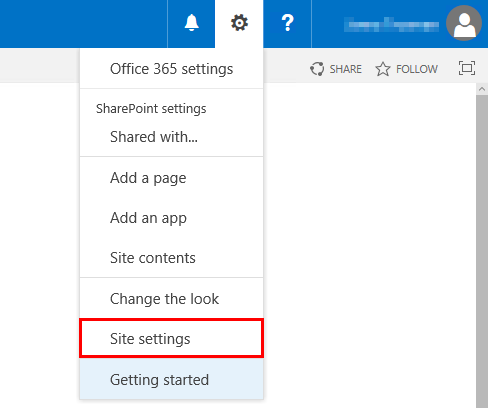
1.On your SharePoint Online site or OneDrive for Business Site, select the cogwheel settings tab, and then click Site Settings.
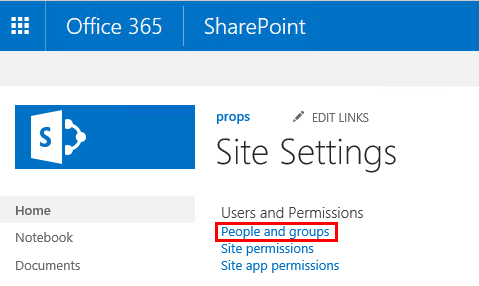
2.Select "People and Groups" under User Permissions.
3.Click on the name of the Azure Group AD for which you wish to find the Account ID for user mapping.

4.The Azure Group AD account ID will be the set of numbers and characters listed beside "Account". Copy this sequence.

Make a new entry in your User Mapping file for the Group

As you can see, use the information from the Box side on the leftmost column and use the information from your SharePoint side on the rightmost column. When you use this mapping file, your group should map from Box group to your existing group in OneDrive for Business.