
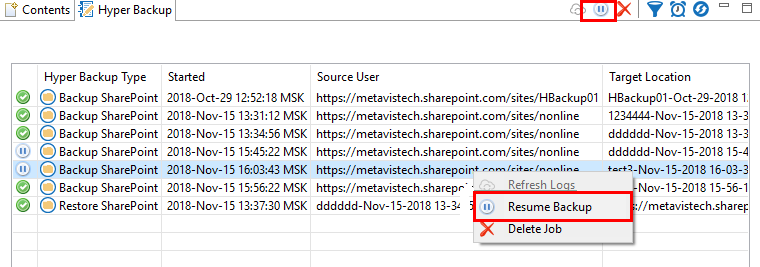
Resume Backup Job
If a backup operation does not finish in its entirety, then it is considered incomplete and will be marked in red as a failed job, or in white as a paused job.
If a backup is in this incomplete state, there are two options available.
First, you can select this backup project, right click and choose Resume, or click on the Resume button on the Hyper Backup tab toolbar. This will continue the backup process from the beginning of the mailbox or OneDrive for Business site that the previous attempt stopped on. When the resume operation is complete, the resulting snapshot will include all the objects as defined in the project configuration.
Second, you can choose not to run the Resume function for the current backup, leaving it to run as usual on the next update. This will mean that content from the previous incomplete backup will be missed and cannot be resumed at a later time.
Auto Resume
Auto Resume allows users to set automatic resume sessions in order to bypass issues caused by Office 365 throttling. This functionality works by analyzing a hyper backup or hyper migration at the medium stage, looking for errors that occurred during migration. Once a "is not responding" error is found, the next auto resume round is started, and only objects with the "is not responding" status are re-migrated.
The number of Auto Resume attempts can be specified in in the Profile Manager.
1.In the Essentials, select the Help tab, and then Profile Manager.

2.In Profile Manager, select Migration from the left hand tab.
3.On the right hand half of the Profile Manager window, find the "#Retry" setting. This setting is set to 10 by default, which means that ten migration rounds will be launched, and the auto-resume function is enabled and will retry 9 more times after the first failed attempt, until the problem is resolved, or the 9 concurrent attempts have failed.

|
|
NOTE: Auto Resume will only retry for throttling issues and will skip issues connected with permissions, authentication, lost internet connections, and non-supported objects, etc. |

|
|
NOTE: You can use Admin Pool in combination with Auto-Resume or use only one of the functions to solve the problem with connections to Office 365. |
Admin Pool
The Admin Pool functionality uses a set of global administrators for hyper migration and hyper backup operations in order to provide a solution for Office 365 throttling issues.
This functionality allows you to provide a list of admins from within wizards, instructing Essentials to use these global admin accounts when running the hyper migration or hyper backup. The more admin accounts you provide, the more users used to send requests to Office 365, thereby reducing the pressure on the target service.
In order to add more administrators you must use the +Admin button from within the Hyper Migration or Hyper Backup wizards. This button appears in place of the Connect button, after the first global administrator has been approved. You will see a list of users from within the wizard once the admin user has been authenticated.

|
|
NOTE: Admin pool is not supported for connection by Claims. |
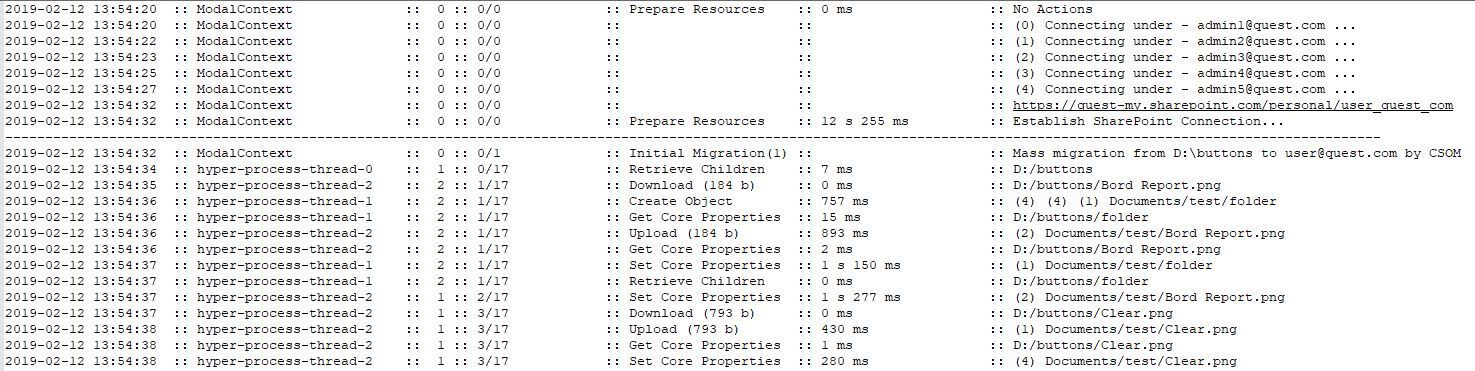
Tracking
You can track the admin pool in detail from within the migration logs. First, you will see the list of provided global administrators. Next, in each request, you can see the ID for each administrator used in the current request.
|
|
NOTE: Site Collection Administrators are required to perform a hyper migration to SharePoint site (Box to SharePoint or File Share to SharePoint options) or a hyper backup of SharePoint only site. |
The admin pool feature can be used in migration via the user interface, or via script. You can generate a script or create a scheduled task
Script:
essentials -cmd fileSharesToOneDrive -trgtsite https:// quest-admin.sharepoint.com -trgtuser admin1@quest.com -trgtepass WW4P5qweqMFmMSHasdasdvRnQP0C6EmQ == -trgtuser_1 admin2@quest.com -trgtepass_1 WW4P5MFmMSHasdasdvRnQP0C6EmQ== -usermapping 'D:\fileshare-onedrive.csv' -overwritebehavior dont_copy - log 'output.xml' -noSplash
Best Practices
The Technical Documentation portal provides various support documents, including the Performance Optimization Guide, which provides an overview for users on understanding the architecture of Essentials, and the best practices for optimizing Essentials' performance.