
Encryption
The Encryption tab allows you to manage encryption keys that are used to safeguard your archived items stored in HSM.
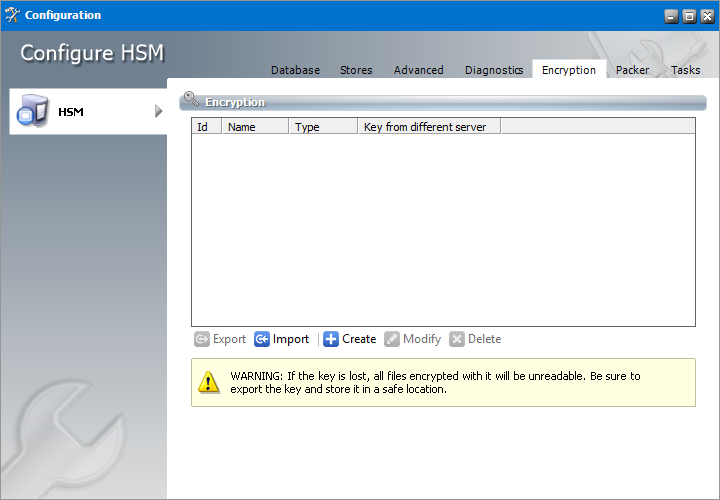
Steps to create an encryption key
1.In the Encryption tab, click Create. The Create new encryption key window opens.
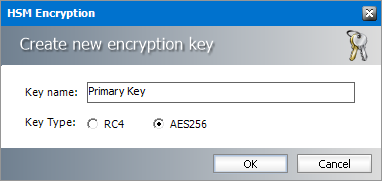
Enter the information as described below:
Key name - display name of the encryption key.
Key type - Select one of the industry standard encryption ciphers RC4 or AES256. Between the two, AES256 is a relatively new and very complex 256-bit block cipher, and RC4 is a very old and simple stream cipher.
2.Click OK to create the encryption key. The Configuration window opens.
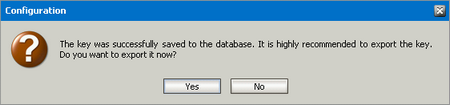
3.Click Yes to export the key or click No to export it later. If you click Yes, the Export Encryption Key window opens. See the section below for steps to export the encryption key.
|
|
NOTE: Always export and store encryption keys in a safe location. If the key is lost, it will not be possible to read the encrypted files. |

Steps to export an encryption key
1.There are two ways to export an encryption key:
a.Select an encryption key from the encryption key list and click Export.
b.Create a new encryption key and click Yes in the Configuration window that opens after you have created the key.
2.In the Export Encryption Key window, enter the information as described below.
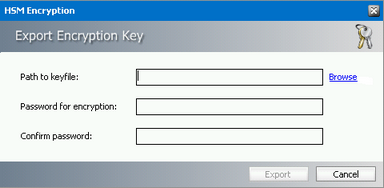
a.Path to key/file - location where the key will be exported. Click Browse to open the Save As window. The default location is C:\Program Files (x86)\Common Files\PAM\HSM\Keys. Keep the default or choose a location. Then enter a name for the encryption key file and click Save.
b.Password for encryption - enter a password for the encryption file.
c.Confirm password - enter the password again to confirm the password entry.
3.Click Export to export the encryption key.
Steps to import an encryption key
1.In the Encryption tab, click Import. The Import Encryption Key window opens.
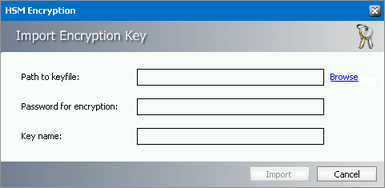
2.Enter the information as described below:
a.Path to key/file - location from where the key will be imported. Click Browse to select a location.
b.Password for encryption - enter a password for the encryption file.
c.Key name - name of the encryption key file.
3.Click Import to add the encryption key to the HSM encryption key list.
Steps to modify an encryption key
1.Select an encryption key from the encryption key list and click Modify. The Edit Encryption Key window opens.
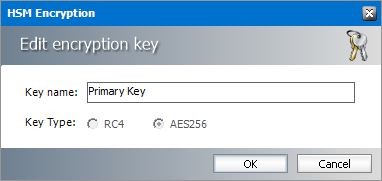
2.You can change the Key name of the encryption key but you cannot change the Key Type.
3.Click OK to save the change.
Steps to delete an encryption key
1.Select an encryption key from the encryption key list
2.Click Delete. A confirmation window opens.
3.Click Yes to confirm the deletion of the encryption key.
Packer
Packers are joining multiple files stored in HSM into large ZIP archives. It is better to have several large files than a plenty of small ones the disk space utilization is more efficient in this case, because it helps to avoid internal disk fragmentation. Packers can be created and managed on the Packer tab. Created packers can then be assigned to specific schema on the Stores tab.
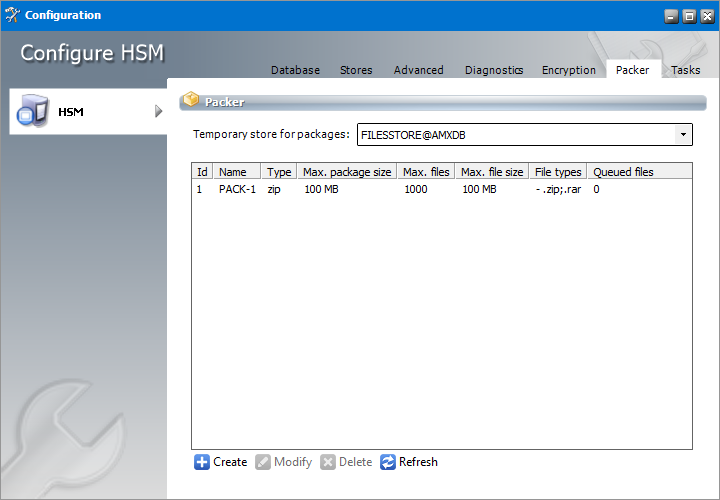
First select the store in Temporary store for packages dropdown. It will be the temporary store for archived files before they got packed. Then the packed files will be moved to the final store (it can be the same store as well).
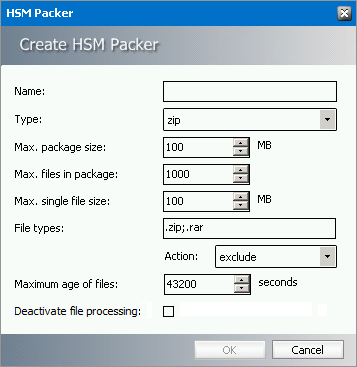
To create a packer, click Create. The HSM Packer dialog pops-up. Configure the settings:
Name enter packer name
Type the file to be used by the packer
Max. package size if the specified limit is reached, new package will be created
Max. files in package package starts to be created when the specified number of files is reached
| Max single file size | if the file size is bigger than the specified value, the file will not be included in the package (otherwise it would be much time consuming) |
File types & Action allow specifying file types to be included / excluded in/from the package
| Max age of files | is files to be packed are waiting in the packer queue longer than the specified value, a new package will be created |
Deactivate processing of files deactivate processing of files in the packer queue
Following table displays how archived files in HSM are handled during Asynchronous packer task process:
|
Temporary store for packages |
Source Store result |
Target store result |
|---|---|---|
|
Same as Source store (*) |
Original archived files are deleted after they are compressed and stored in Temporary store for packages. |
ZIP container with archived files |
|
Different as Source store (*) |
Original archived file remains at store after they are compressed and stored in Temporary store for packages. |
ZIP container with archived files |
Temporary store for packages: HSM store that is used by packer process to store compressed temporary files that are subsequently stored in ZIP container. Current version of HSM uses only GZ compression.
Source store: HSM store that is processed by Asynchronous packer task.
Target store: HSM store where ZIP containers are stored as a result of Asynchronous packer task
|
|
NOTE: Files archived into HSM with compress option activated at schema always remains at source store regardless settings of temporary store for packages. These files also do not use Temporary store for packages since they are already compressed. This behavior is by HSM design. |
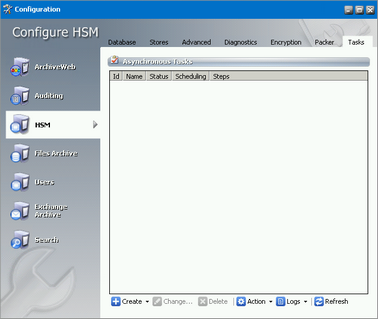
Tasks
On this tab you can create asynchronous tasks for HSM. An asynchronous task can be performed at a later time and not immediately after its creation. Basic tasks are the following:
·Copy - copies archived items from a source store to a destination store.
·Move - moves archived items from a source store to a destination store.
·Encrypt - encrypts files in the specified store with a selected encryption key.
·Advanced - define multiple tasks or sequence tasks based on specific criteria.
Creating Move / Copy task
|
|
NOTE: Before creating any asynchronous task, stores must be created under the Stores tab. |
1.Click Create > Move task (or Copy task). The Move files (or Copy files) window opens.
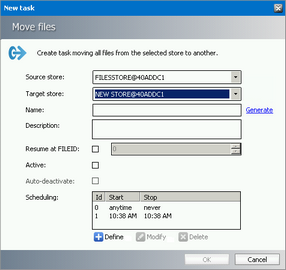
Enter the configuration details as described below:
a.Source store dropdown menu select the store from which the files will be moved (copied).
b.Target store dropdown menu select the store to which the files will be moved (copied).
c.Name text box type the task display name or click Generate to fill in the text box with generic name.
d.Description - add a description about the task.
e.Resume at FILEID - select the check box if you want the task to remember the last processed file and resume at the next one when it starts again after a pause. (The textbox displays the file ID of the latest processed file.)
f.Activate - select the check box to activate the task.
g.Auto-deactivate - select the check box to deactivate the task when it completes. The check box is available only when Resume at FILEID is checked.
h.Scheduling - Sets the task run time. Besides the default perpetual unlimited scheduling, you can add your own start time and stop time by clicking Define. There can be several schedulers defined. Then select the actual scheduling time. The task will be started every day at the defined time.
|
|
NOTE: Task scheduling can be modified when you select the task from the list and click Modify. If anytime is selected the task starts whenever the MAM HSM Asynchronous Operations service starts. |
2.Once the task is configured, click OK. The task displays in the Tasks list.
Creating Encryption Task
|
|
NOTE: Before creating any asynchronous task, stores must be created under the Stores tab. |
1.Click Create > Encrypt task. In the Encryption Task window opens.
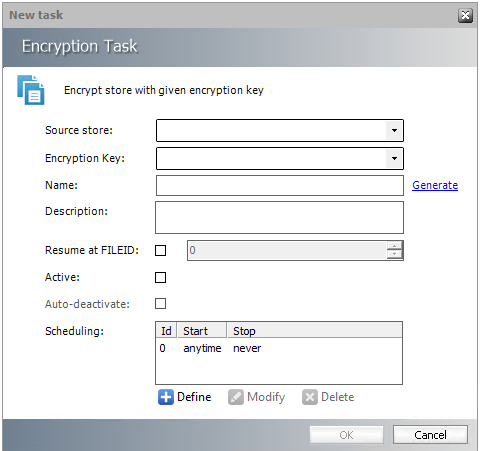
Enter the configuration details as described below:
a.Source store dropdown menu select the store to which the files will be encrypted
b.Name text box type the task display name or click Generate to fill in the text box with generic name.
c.Description - It is a good practice to add a short Description of the task.
d. Resume at FILEID - Select the check box if you want the task to remember the last processed file and resume at the next one when it starts again after a pause. (The text box displays the file ID of the latest processed file.)
e.Activate - Select the check box to activate the task.
f.Auto-deactivate - Select the check box if you wish to deactivate the task as soon as it completes. The check box is available only when Resume at FILEID is checked.
g.Scheduling - specify the task run time. Besides the default perpetual unlimited scheduling, you can add your own start time and stop time by clicking Define. There can be several schedulers defined. Then select the actual scheduling time. The task will be started every day at the defined time.
|
|
NOTE: Task scheduling can be modified when you select the task from the list and click Modify. If anytime is selected the task starts whenever the MAM HSM Asynchronous Operations service starts. |
2.Once the task is configured, click OK. The task displays in the Tasks list.
Creating Advanced Task
Advanced task allow configuration of specific task criteria. To create the Advanced task:
1.Click Create / Advanced option from the menu. Task wizard opens.
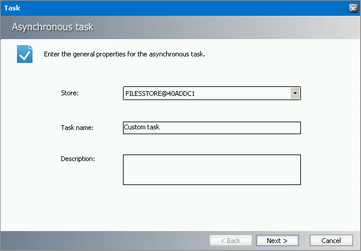
In the first dialog enter the general task configuration:
a.Store select the source store for which the task should apply
b.Task name enter tasks display name
c.Description its a good practice to add short task description
d.Click Next.
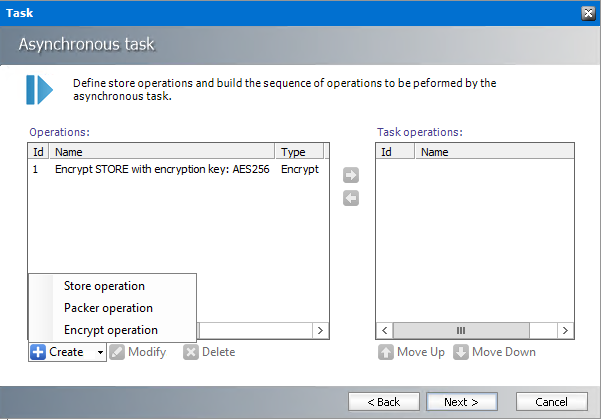
2.Advanced task can consist of several operations. This dialog allows you to define the operations and the sequence in which they should be performed. To do so, select the operation in the Operations list and click the arrow to add the operation to the Task operations list. The operation sequence can be customized easily by selecting the desired operation and moving it up or down by clicking the Move up / Move down arrows under the list.
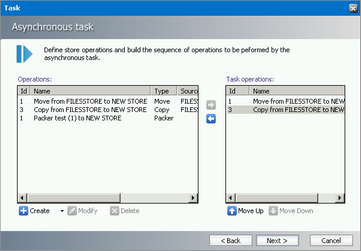
3.In case no operation is created in the Operations list or you wish to create a new one, click the Create button. You will be able to create:
a.Store operation (Copy, Move and Delete) or
b.Packer operation
c.Encrypt operation
Store operation
a.In case the Create/Store operation has been selected, the Store operation configuration dialog opens. The source store will be the store you have selected in the previous dialog. In the dialog enter the operation configuration:
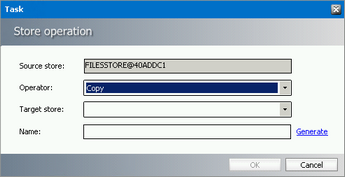
i.Operator select the type of store operation you wish to create (Copy, Delete, Move)
ii.Target store target store where ZIP archives are stored
iii.Name Name of the operation. To generate the name automatically click Generate button.
b.To confirm, click OK.
Packer operation
a.In case the Create/Packer operation has been selected, the Packer operation configuration dialog opens. In the dialog enter the operation configuration:
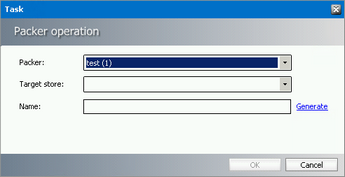
i.Packer select the packer which the task should apply. Packers are defined in Packer tab.
ii.Target store target store where ZIP archives are stored.
iii.Name Name of the operation. To generate the name automatically click Generate button.
b.To confirm, click OK.
Encrypt operation
a.In case the Create/Encrypt operation has been selected, the Encrypt operation configuration dialog opens.
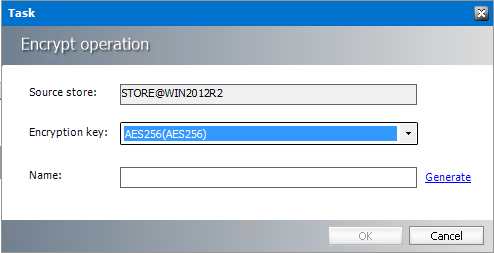
i.Source store - will be the store you have selected in the previous dialog.
ii.Encryption key select the encrypt which the task should apply. Encryption key is defined in Encryption tab.
iii.Name Name of the operation. To generate the name automatically click Generate button.
d.To confirm, click OK.
4.Click Next. Set up filters defining files to be processed from the source store. To do so, click the filter you want to use from the left pane:
a.Resume at the task will start from the specified file
b.Schema specifies the schema under which the files are store
c.Expired (yes/no) specifies whether files where retention time has expired should be processed
d.File ID specifies the ID of files
e.Date specifies the archive date
f.Size specifies the file size
5.The filter displays in the main pane where you can configure it. To remove the selected filter, click its name again.

SQl View tab displays the defined filter criteria in SQL View. When you are modifying already existing task it is not possible to edit the query using the Query Builder directly. You have to edit your query in the SQL view. Should you want to use the Query Builder, you have to create a completely new query.
6.Click Next. Set the task scheduling. Make sure to check the Active check box to activate the task.
a.To set Run interval when the task will be performed, select the desired option from the list or click Define button to set up custom interval.
b.Check Auto-deactivate should you wish the task to become inactive as soon as it carries its work out. The check box is available only when Resume at FILEID filter is defined.
7.Click Finish.
Once the task is created, it displays in the Asynchronous task list view. Menu under the Asynchronous Tasks list provides access to the following functions:
·Create create a new asynchronous task; two most common tasks can be created directly:
oMove task
oCopy task
oEncrypt task
·Advanced - specific tasks can be created via wizard that is launched.
·Change change settings of the task selected in the list view (for detailed description see the section Creating Advanced Task)
·Delete task delete the selected asynchronous task
·Action access to immediate Start, Stop or Restart of the selected task
·Logs view log of the selected task or clear the respective log or logs of all tasks
·Refresh refresh the tasks list
Addendum
In this chapter: