
How to remove a filter
On the Groups tab in Manager view you have an option to set a filter to display only groups meeting the desired criteria. Having set a filter, the Set filter button turns green (see below).
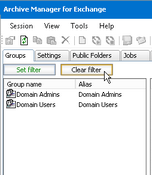
To remove a previously set filter, simply click on the Clear filter button. The list of all synchronized groups will be displayed again and the Set filter button turns black.
Setting criteria for group archiving
When deciding to archive a desired group, specify the criteria according to which emails of that groups members will be archived. You will do that through properties of the respective group.
So, first switch to Manager view, and then click on the Groups tab. In the left pane choose a group, whose members emails you plan to archive.
There are three ways of opening the Properties window:
·Double-click the desired group to open its Properties window,
·Right-click the desired group and then, in the context menu, select Properties to open its Properties window,
·Select the desired group and then click on the Properties icon on the toolbar to open its Properties window.
In the displayed Properties window of the desired group you may set your criteria on the General, Scheduler, Folders, Classes, and the Script tabs.
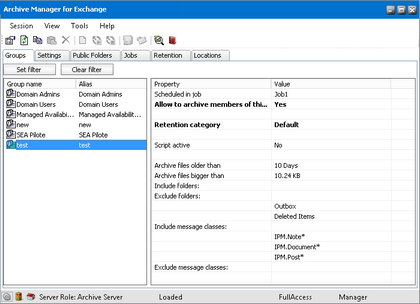
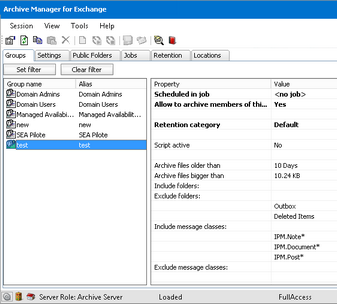
On the following figure you will see a list of groups displayed in the left pane. If you select a group, its properties will be displayed in the right pane.
|
|
NOTE: The icons of groups activated for archiving are displayed in green. |

General tab
On this tab you have an option to activate archiving for a desired group. Here you may specify a period following which messages will be archived by using a pre-defined job. You can also specify a limit-value for the files so that files exceeding that limit-value are archived.
To activate archiving for a group:
1.In Manager view click on the Groups tab. In the left pane double-click the desired group. The Properties window opens.
2.In the Properties window, click on the General tab.
3.To activate archiving for this group, select the Allow to archive check box. In the Retention category down-drop box you can select a retention category which will be used for the group archiving. This retention category can be DIFFERENT from the one assigned to a job that will be in charge of the group. (The relevant job is specified on the scheduler tab.) This allows you to have several groups archived via the same job and at the same time each group being archived with specific retention category. Should you select the Use job settings option, the retention category of the job will be used.
4.In the Archive files older than (days) text box you can enter a period following which messages will be archived.
5.In the Archive files bigger than text box you can enter the size of the messages to be archived; please do not forget to select the proper item from the dropdown list in order to specify their size either in B, KB, or MB.
EXAMPLE: On the following figure we set archiving of messages older than 10 days and exceeding 0.01 MB.
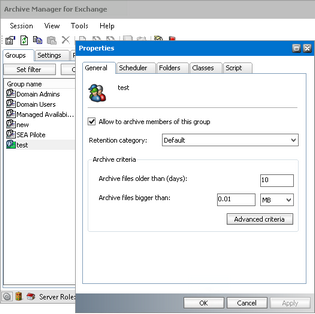
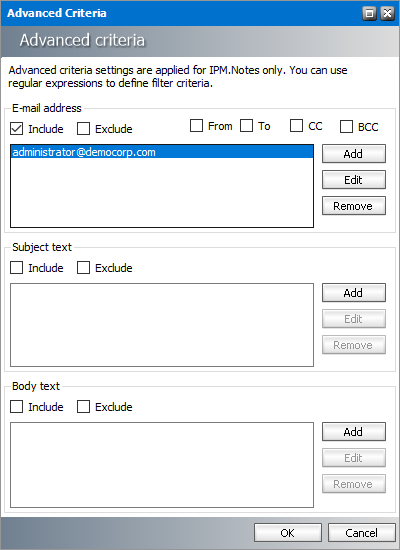
6.The Advanced criteria give user opportunity to set filter for e-mails (IPM.Note) based on the e-mail address, subject and body. E-mails satisfying the given criteria will be excluded from archiving or only the e-mails satisfying the given criteria will be archived by the job set for that group.
7.Finish by clicking Apply and then OK.
Upon activating a group you need to assign it a job that will do the archiving in the background (see the section "Jobs tab).
Scheduler tab
On this tab you need to specify the job for archiving. Automated archiving is done via jobs. Jobs, however, must be specified up-front on the Jobs tab. Therefore, if no jobs have been defined yet, do so first (see "How to create a job).
Once jobs are defined on the Jobs tab, you may select one.
To assign a job to the desired group:
1.In Manager view click on the Groups tab. In the left pane double-click a desired group. The Properties window opens.
2.In the Properties window click on the Scheduler tab.
3.In the Selected job dropdown list select a job you prefer for archiving, for instance Job1.
|
|
NOTE: If no jobs are created, the dropdown list is empty. |
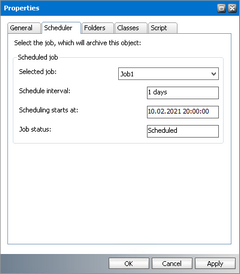
4.Upon selecting a job, the Scheduling starts at box, the Schedule interval (in days) box, as well as the Job status box are automatically filled in with the settings of that specific job.
EXAMPLE: In the following figure a job called Job1 has been selected. Groups scheduled for archiving with this job will be archived every day at 8 PM starting on October 02, 2021. The status of that job is Scheduled, which means that the job is currently active.
|
|
NOTE: When the status of a job is Stopped, the job is put on hold and needs to be "turned on (Scheduled) to run at the predefined time. A jobs status (Stopped, Scheduled) can be changed on the Jobs tab. |
5.Click Apply and then OK.
|
|
NOTE: On the figure below you may notice that one group (e.g. test) is indicated by a green icon with an exclamation mark (!). It notifies the administrator that this group is activated for archiving, although no job is assigned to it. |
Exclude tab
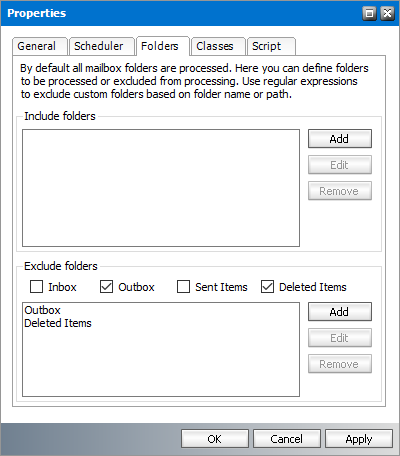
You may have activated and scheduled a group for automated archiving, yet you might want to exclude some of the folders and their content from being archived or define folders to be processed. That can be specified on the Folders tab in the Properties window of the respective group. Use regular expressions to exclude custom folders based on folder name or path.
To exclude folders from automated archiving:
1.In Manager view click on the Groups tab. In the left pane double-click the desired group. The Properties window opens.
2.Click on the Folders tab. Here you can either:
·include certain folders in automated archiving
Be aware that if some folder(s) are listed in Include folders section, NO OTHER folders will be archived. All other folders will be automatically excluded from archiving. When adding folders, wildcards can be used see further.
or
·exclude certain folders from automated archiving
It is possible to check folders in the list (Inbox, Outbox, Sent Items and Deleted Items) or define custom folders. When defining custom folders, also wildcards can be used see further.
|
|
IMPORTANT: If you exclude a folder from automated archiving, then its subfolders will NOT be archived either. |
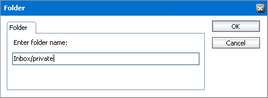
3.When adding folders either in Include or Exclude section, click on the Add button. In the Folder window that opens, enter the folder name or path.
|
|
NOTE: As a path separator use a slash "/. |
Wildcards
Asterisk (*) has a specific function in the Include section. Three basic scenarios apply:
a)<folder>
If only folder is specified (e.g. Inbox, Export/marketing...), it will be archived, but its subfolder will not be archived.
b)<folder>/*
If folder is followed by a slash with asterisk /*" (e.g. Inbox/*, Export/marketing/*...), only subfolders will be archived, NOT the given folder.
c)<folder>*
If folder is directly followed by the asterisk *" (e.g. Inbox*, Export/marketing*...), both folder and it subfolders will be archived.
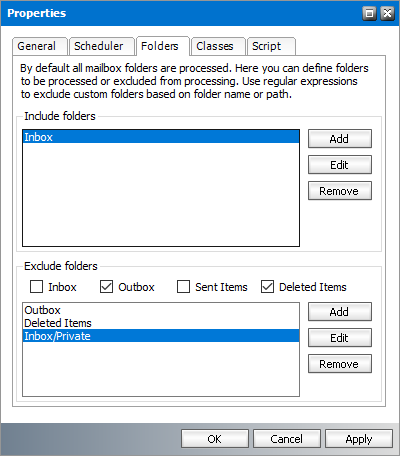
EXAMPLE: In the example on the figure below, the configuration is the following:
Include folders: Inbox*
Exclude folders: Inbox/private
This means that Inbox and all its subfolders will be archived, except the private subfolder.
4.Click Apply and finish by clicking OK. The respective folders will be excluded from automated archiving.
You may of course review your decision. In that case deselect the respective check-box, or simply select the respective folders in the Custom folders list-box and then click on the Remove button. Do not forget to click Apply and OK.
Classes tab
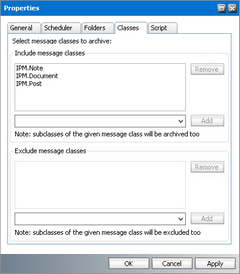
On this tab you may specify which types of email items will be automatically archived/excluded in mailboxes of a given group.
To select message classes:
1.In Manager view click on the Groups tab. In the left pane double-click the desired group. The Properties window opens.
2.Click on the Classes tab.
3.There are three items selected by default for archiving: IPM.Note (email), IPM.Post (Note in Outlook), IPM.Document (OLE-documents). To select additional ones, click on the down arrow next to the Add button to open the dropdown menu.
Similarly, you can also define message classes that will be excluded from archiving.
|
|
NOTE: If the Message classes list is empty, the IPM.Note is added automatically! In such a case, only IPM.Note will be archived. |
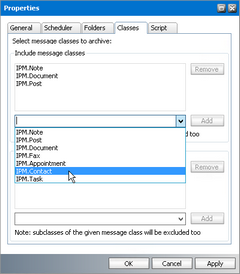
4.Select the desired item from the help-list or type in the message class you wish to include.
|
|
IMPORTANT: You can enter any message class on this tab. However, only those message classes which are allowed to be archived on the global level will be actually archived. For more information see Message Classes. |
5.Click on the Add button. The respective item will be added to the list in the Message classes box.
6.Click Apply and then OK.
Message classes specified on this tab will be archived only if they are allowed to be archived on the global level. For more information see Message Classes.
|
|
NOTE: If you want to remove any of the message classes listed under the Message classes box from archiving, simply select them and then click on the Remove button. |
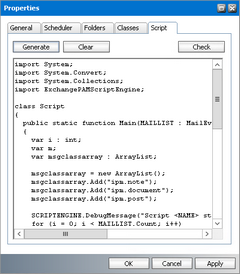
Script tab
You might want to modify the script to define additional conditions you may have wanted to apply to a desired group. This can be done on the Script tab of the respective group.
|
|
NOTE: For instance, script is used when a particular feature of Archive Manager is deployed (e.g. live email indexing feature which allows fulltext search of live/non-archived emails in the ArchiveWeb interface). |
To generate a script for the desired group:
1.In Manager view click on the Groups tab.
2.Select the desired group in the left pane. Right-click it and in the context menu select Properties.
3.In the Properties window click on the Script tab.
4.Click on the Generate button. Then in the Generate script window click Yes to generate a new script.
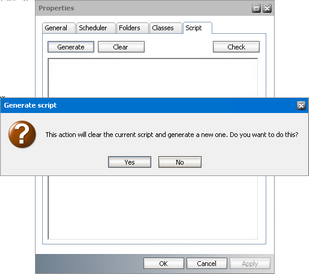
5.Upon clicking Yes, the newly generated script will be displayed in the text box, as shown below. You may now modify it to your needs. By clicking on the Check button you will verify the syntax. When you are done, click Apply and then OK to confirm.
|
|
NOTE: Please notice that by having modified the script, certain fields on the General and Classes tabs become inaccessible, meaning that they cannot be modified there. A generated script may be deleted, simply by clicking on the Clear button. Then the fields on the General and Classes tabs will become accessible again. |
How to activate the archiving option for a group
Keep in mind that automated archiving of emails via jobs is only possible for those groups that have had the archiving option activated. So, even if a job has been assigned to a group, but the group archiving option is not activated no automatic archiving will take place. Therefore, do not forget to activate it first.
To activate the archiving option for a group:
1.In Manager view click on the Groups tab.
2.In the left pane double-click the desired group. Its Properties window opens.
3.In the Properties window on the General tab select the Allow to archive members of this group check box.
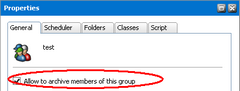
4.Click Apply and then OK. The group is now allowed to archive.
Now you are ready to assign a job that would do the archiving.
How to deactivate a group from being able to archive
1.In Manager view click on the Groups tab.
2.In the left pane double-click the desired group. Its Properties window opens.
3.In the Properties window on the General tab make sure that the Allow to archive check box is de-selected.
4.Click OK. That group can no longer be archived.
|
|
NOTE: Even if a job is assigned to it, no automated archiving of this groups items will take place. |