
Appendix
·How to create a customized HTML shortcut template
How to create a customized HTML shortcut template
On the Shortcut tab of the Archive Manager for Exchange (Tools/Options/Archive settings/Shortcut tab) you can configure Archive Manager for Exchange to create HTML shortcuts for archived emails. The appearance of the archived email in the Outlook Preview pane depends on the template which you choose on that Shortcut tab. Besides the default template for the shortcuts you can create your own templates satisfying your criteria and thus modify the design of the Outlook preview pane for archived emails.
To create your own template:
1.Go to <installdir>\ Metalogix\MAM4Exchange\Tools\Templates.
2.In the Template directory create a new folder. Its name will be the name of your new template displayed on the Tools\ Options\ Archive settings\ Shortcut tab of Archive Manager for Exchange (in our example the name of the template is Beautiful).
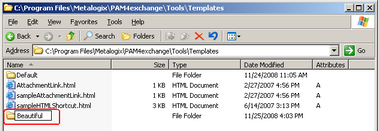
3.Copy the sampleHTMLShortcut.html file to the new template folder (in our case to Beautiful). Or copy the html file from the Default folder, if the sample is not available.
4.Rename the sampleHTMLShortcut.html to HTMLShortcut.html.
5.Now you can modify the HTMLShortcut.html file in the new folder to create your desired template. To do so, open the file in Notepad and edit the HTML code.
Important variables:
%ATTACHMENTS% - email attachments
%BUTTONS% - buttons
%BODY% - message body
%PROPERTIES% - message specific properties needed for Macintosh clients
The original HTML:
<!DOCTYPE html PUBLIC "-//W3C//DTD XHTML 1.0 Strict//EN" "http://www.w3.org/TR/xhtml1/DTD/xhtml1-strict.dtd">
<html xmlns="http://www.w3.org/1999/xhtml">
<head>
<meta http-equiv="content-type" content="text/html; charset=utf-8"/>
<title>
</title>
<style type="text/css">
<!--
body {
margin: 0;
text-align: center;
padding-top: 10px;
}
td.hlavicka {
display: block;
height: 20px;
color: white;
background-color: #6699FF;
font-family: arial;
font-size: 14px;
text-align:left;
}
td.hlavicka span {
font-weight: bold;
padding-left: 5px;
}
td.buttons {
vertical-align: bottom;
text-align: right;
padding-right: 10px;
padding-bottom: 10px;
}
td.buttons a {
color: #FFFFFF;
background-color: #6699FF;
font-family: arial;
font-size: 11px;
padding: 5px;
border: 1px solid #333366;
font-weight: bold;
text-decoration: none;
margin-left: 3px;
}
td.buttons a:hover {
font-size: 12px;
font-weight: bold;
}
td.prilohy {
background-color: white;
font-family: arial;
font-size: 12px;
padding: 5px 5px 5px 5px;
text-align:left;
}
td.prilohy a {
color: black;
margin-right: 15px;
margin-top: 15px;
font-style: normal;
}
td.prilohy a:hover {
text-align: center;
font-weight: bold;
}
td.ciara {
background-color: #333366;
width: 100%;
}
td.text {
display: float;
color: #2a2a2a;
text-align: center;
background-color: white;
font-family: arial;
font-size: 12px;
padding: 5px;
text-align:left;
}
td.stred {
border: 1px solid #333366;
}
td.pata {
display: block;
width: 99.9%;
height: 15px;
background-color: #6699CC;
padding-right: 0;
}
-->
</style>
</head>
<body>
<table width="100%" border="0" cellspacing="0" cellpadding="0">
<tr>
<td bgcolor="white" class="stred" height="100%" >
<table width="100%" border="0" height="10" cellspacing="0" cellpadding="0">
<tr>
<td height="100%" class="hlavicka"> <span>This message was archived</span></td>
</tr>
</table>
<table width="100%" border="0" height="10" cellspacing="0" cellpadding="0">
<tr>
<td height="100%" class="prilohy">%ATTACHMENTS%</td>
<td height="100%" class="buttons" nowrap>%BUTTONS%</td>
</tr>
</table>
<table width="100%" border="0" height="2" cellspacing="0" cellpadding="0">
<tr>
<td bgcolor="#a0c3c9" width="100%" height="2px"></td>
</tr>
</table>
<table width="100%" border="0" height="10" cellspacing="0" cellpadding="0">
<tr>
<td height="100%" class="text">
<pre WRAP="hard">%BODY%</pre>
</td>
</tr>
</table>
<table width="100%" border="0" height="10" cellspacing="0" cellpadding="0">
<tr>
<td height="100%" class="pata"><b></b></td>
</tr>
</table>
</td>
</tr>
</table>
</body>
</html>

Default HTML shortcut in the preview pane Example of customized HTML shortcut