
Introduction
Hierarchical Storage Manager (HSM) as a data storage system, is a complement of several Metalogix archiving products. HSM can be installed in two ways:
·manually by the HSM installer
·automtically by the Metalogix Archive Manager installation package. When installed by the Installation package as a part of the Archive Manager product installation, necessary configuration is performed by the Installation package itself as described in the Metalogix Archive Manager Quick Start Guide.
This guide describes the manual HSM installation and configuration of HSM.
HSM allows storing of data (even all company data) on one or more file-servers. It is possible to use a shared store as well. HSM includes the Single Instance Store service (SIS), which ensures that identical content is stored only once. The SIS service activates versioning, allowing the HSM system to keep track of any changes made to files or emails. With versioning activated, the administrator may retrieve older versions. Even if the original file or email was deleted, it can be restored back.
The HSM Server (i.e. the computer where the HSM system is installed), as a complement of Archive Manager products, takes care of saving and securing archived documents. Archived data reside in store. HSM works with different store types depending on administrators choice.
When archived with Archive Manager, the desired file or email with its attachments is transferred to the HSM system. It is the HSM System that takes care of storing and retrieving files/emails. The HSM system works with a database because the information contained in the shortcut is stored either in an ORACLE or MS SQL database. The HSM system passes down the file/email to a store specified by the administrator and this file/email is compressed on the fly. Only shortcut of a few kilobytes remains at the file/emails original location. This shortcut includes information about the new location of the archived file/email. The only difference a user notices is that the shortcut is displayed with a slightly modified icon.
Users may work with archived files/emails as usual which means: when an archived file/email is reopened, Archive Manager passes the information from the shortcut onto the HSM system. The HSM system restores the file/email from the store. For users it seems as if they are working in a normal environment.
The HSM system includes the Single Instance Store service (SIS), allows versioning in cooperation with Archive Manager products. Due to versioning the HSM system keeps track of any changes made to a document, for example:
·who modified the document;
·when this modification occurred;
·what was modified within the document.
With versioning activated, the administrator may retrieve older versions. Even files whose shortcuts were deleted can be retrieved as well.
Supported operating systems
·Windows Server 2012
·Windows Server 2012 R2
·Windows Server 2016
·Windows Server 2019
Software Requirements
·.Net Framework 2.0
·.Net Framework 3.5 if not available, setup can be installed but the following store types will not be functional: Amazon S3, Windows Azure, Caringo CAStore, EMC Atmos, FileNet IS, Hitachi HCAP, Hitachi HCP, Nirvanix, Rackspace, Simple Foldering Store, XAM
·.Net Framework 4.5 if not available, Google Drive store will not be functional. If .NET Framework 4.5 is installed after HSM, it is necessary to run the HSM setup in Repair mode to activate the Google Drive store.
·IIS (32-bit support) if not available, setup will continue but the HSM web client will not be installed.
·Microsoft WSE 3.0 if not available, the iTernity store cannot be created.
·Database - ORACLE Database (version 12c or higher), MS SQL Server (version 2012 or higher) or Azure SQL Database
Database requirements
·If you are using an MS SQL Database, then installation of MDAC (Microsoft Data Access Components) is necessary, as it contains the required OLEDB Data Provider for MS SQL Server. The MS SQL Data Provider for .Net is also needed for accessing MS SQL (part of the .NET Framework installation). We recommend installing the latest version of MDAC (Currently we recommend installing MDAC 2.8.)
·If you are using an ORACLE Database, and it has not been installed on the HSM server, then an ORACLE Database Client must be installed on your HSM server and a Net8 connection from the HSM server to the ORACLE Database server must be established. The ORACLE OLEDB Data Provider (part of the MDAC installation) and the Oracle Data Provider for .Net (part of the .NET Framework installation) are required for connecting the ORACLE Database. If you prefer working with an ORACLE Database, make sure to have similar data (database, database user, password, owner of the schema) available during the installation of Archive Manager for Exchange.
Databases with the database user(s) (who, in addition, should be the owner of the database) have to be available before HSM installation.
Installation
In this topic:
·Steps to download the install media
·Worksheet for this installation
Steps to download the install media
1.Login to the server with the credentials of the superuser (eg. democorp\mamadmin)
2.From your browser, navigate to the https://www.quest.com/products/metalogix-archive-manager-for-exchange page
or
navigate to the http://www.quest.com/trials page. Locate the product Metalogix Archive Manager for Exchange.
3.Click the Download Free Trial button.
4.Fill the Download Your Free Trial registration form and click Download Trial. The file download page appears.
5.Download the install media zip file.
6.The the trial license key is specified in the email that is sent to you.
7.Ensure that the files are available locally on the computer on which you are planning to install the Metalogix Archive Manager for Exchange features.
Worksheet for this installation
The following information will be required through the installation process. Sample values are provided here as a guidance.
|
Item |
Description |
Example |
|
HSM server |
The server where the HSM and Archive Manager Search will be installed. |
AMXHSM |
|
Superuser account |
Windows account that is used to install the application and run the Archive Manager for Exchange services. |
username: democorp\mamadmin password: ************** |
|
Media folder |
Full path of the folder where the media files are extracted |
C:\Metalogix |
|
Installation folder |
Full path of the folder where the application files will be installed |
C:\Program Files (x86)\Metalogix |
|
HSM Store folder |
Full path of the folder that will contain the archived files. |
C:\HSM The local hard drive folder is used as the default media store. Use of other media storage systems are described in the Media Store Administration Guide. |
|
Store name |
Name of the media store on a hard drive. With the Advanced Installation option of the installer wizard, only a local hard drive can be setup as a media store. |
FILESTORE |
|
Schema name |
Name of a schema in a hard drive media store. |
FILESCHEMA |
|
Database Authentication method |
Type of database authentication: Integrated Windows Authentication or SQL Authentication |
Integrated Windows Authentication |
|
UserLogin |
Username if SQL Authentication is selected |
dbadmin |
|
Password |
Database password if SQL Authentication is selected |
************** |
|
Database server |
The database server instance name where the databases for Archive Manager for Files will be installed. |
AMXDB |
Steps to install the application
1.Log in to the server (eg. AMXHSM) with the credentials of the superuser (eg. democorp\mamadmin)
2.Download the installation media. For more information see Steps to download the install media.
3.Run the Metalogix Archive Manager Installation Package to extract the files to a local folder.
4.Close the integrated installer wizard which starts automatically.
5.Run the HSM setup from <Media folder>\Archive Manager Installation Package\HSM\HSM Setup.exe
6.A prerequisite check occurs and missing requirements if any are displayed. Click Install to ensure all missing requirements are installed.
7.The Welcome window of the HSM installer opens.

8.Click Next. The Logon Information window opens.
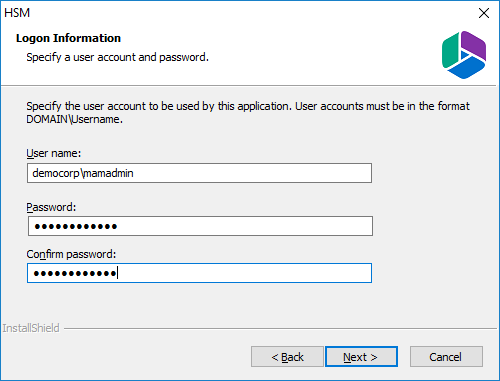
Enter the information as described below:
a.User name - logon name of the superuser (for example, democorp\mamadmin)
b.Password - logon password of the superuser
c.Confirm password - same as the Password.
9.Click Next. The Firewall Settings window opens.

Select Allow programs to communicate through Windows Firewall.
10.Click Next. The Ready to install the Program window opens.
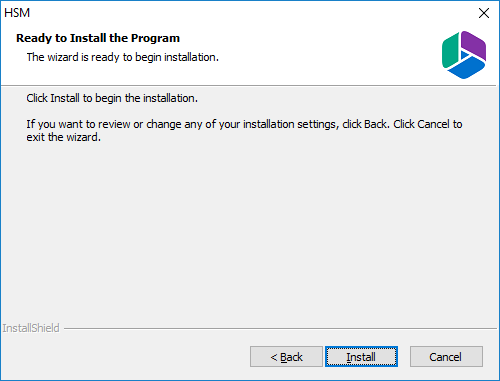
11.Click Install. The installation starts and the progress is displayed on the Setup Status window. When the installation completes, the InstallShield Wizard Complete window opens.
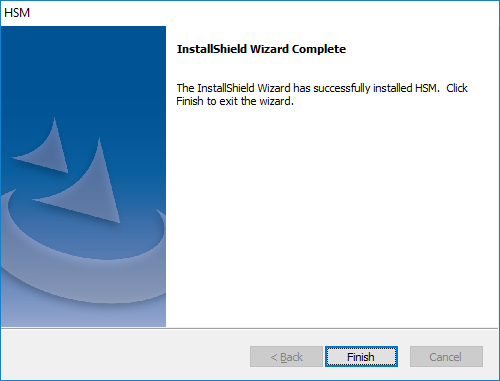
12.Click Finish to close the installer.
Configuration
In this chapter:
Database
In this topic:
·Steps to configure the HSM database
·Steps to install the HSM database
Steps to configure the HSM database
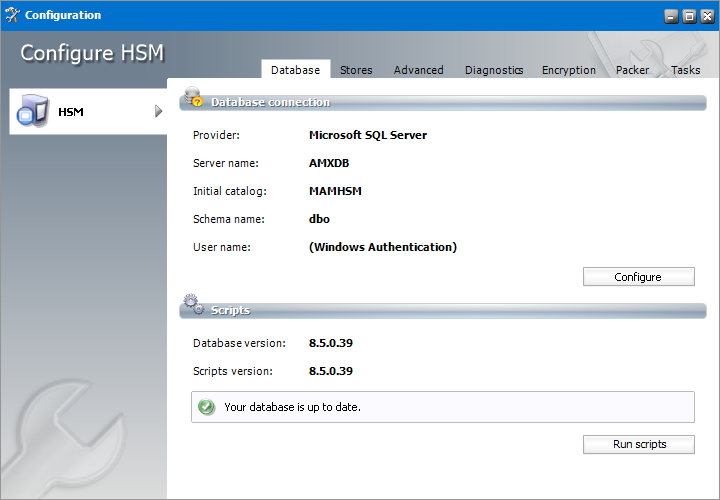
1.When the installation completes, the Configuration wizard opens. If it does not open automatically, click Start > Metalogix > Archive Manager Configuration.
2.From the feature panel on the left, click HSM and select the Database tab.
3.Click Configure. The Database Connection Wizard opens.
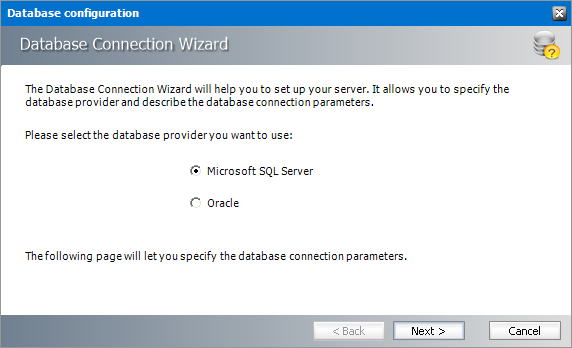
4.Select either Microsoft SQL Server or Oracle and click Next. If you choose Microsost SQL Server, the Database Connection window opens for the Microsoft SQL Server connection information.

For Microsoft SQL Server
a.Server name - name of the SQL server (eg. AMXDB)
b.Initial catalog - name of the HSM database (e.g. MAMHSM which is the default name of the HSM database)
c.Schema name - name of the SQL Schema (e.g. dbo)
d.Authentication authentication type used for the database. Choose either Windows authentication or SQL Server authentication
e.User name - database login user name if SQL Server authentication is the selected as the authentication mode.
f.Password - password of the database user if SQL Server authentication is the selected as the authentication mode.
For Oracle
a.Oracle net name - net service name that describes the network address of the database server in your tnsnames.ora file.
b.Schema - name of the Oracle schema from your tnsnames.ora file.
c.User name - database login user name.
d.Password - password of the database user.
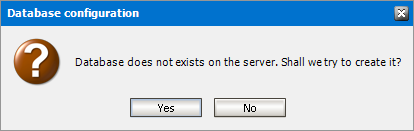
5.Click Next and then click Yes on the confirmation dialog that opens.
6.If the database connection is setup successfully, the configuration completion window opens.
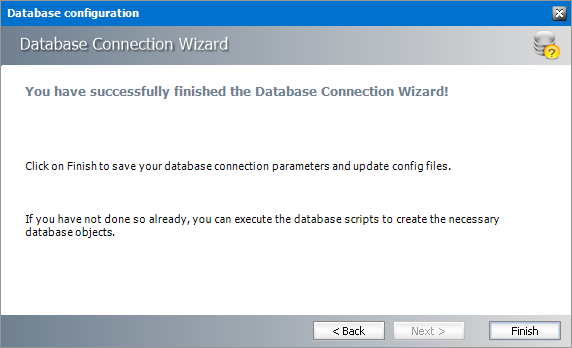
7.Click Finish to close the Database Connection wizard.
Steps to install the HSM database
1.From the feature panel on the left in the Configuration tool, click HSM and then select the Database tab.
2.Verify that the database connection information is as expected. Then click Run Scripts. The script installer wizard opens.
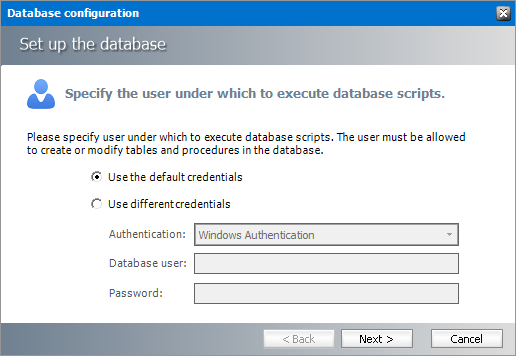
3.Select Use the default credentials to use the information displayed in the Database connections section. If you select Use different credentials, enter the following information:
a.Authentication - authentication type used for the database. Choose either Windows authentication or SQL Server authentication
a.User name - database login user name if SQL Server authentication is the selected as the authentication mode.
b.Password - password of the database user if SQL Server authentication is the selected as the authentication mode.
4.Click Next.

In the Select the method for setting up the database step, choose one of the following options:
a.Run the database scripts by this wizard - the installer will automatically run the scripts to create the tables and procedures required for the database.
b.Get the database scripts and run them manually - you get the option to either save the scripts or copy it to clipboard and paste it elsewhere.
5.Click Next. Depending on your selection, one of the following windows open:
For Run the database scripts by this wizard

Select both check boxes: Create tables and Create procedures.
For Get the database scripts and run them manually

You must run both the scripts for a successful database installation.
6.Click Next. Depending on your selection in step 4, one of the following windows open
a.If you chose Run the database scripts by this wizard, and the installation is successful, a confirmation dialog opens. Click OK to close the dialog.
b.If you chose Get the database scripts and run them manually, you must run the scripts immediately because a confirmation dialog will verify whether you ran the scripts.

Select both check boxes after you run scripts and click OK.
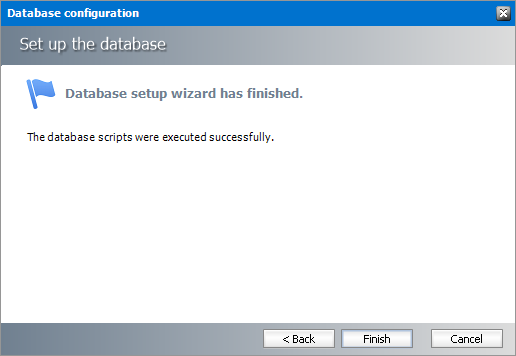
7.If the installation is successful, the confirmation dialog opens. Click OK to close the dialog. The database setup completion window opens.
8.Click Finish to close the script installer. The Scripts section of the Configuration tool displays the status and version of the scripts(the version of the scripts you install may differ from the version shown in the image below).
9.Keep the Configuration tool open for next steps.
- Ferramentas de autoatendimento
- Base de conhecimento
- Notificações e alertas
- Suporte a produtos
- Downloads de software
- Documentação técnica
- Fóruns de usuário
- Tutorial em vídeo
- Feed RSS