
Setup - Users, Groups and Contact Sync Set Up
This section provides a step-by-step guide on how to set up Users, Groups and Contacts Synchronization for Microsoft Active Directory Environments.
Setup Environments
To begin at least two (2) Active Directory environments must be configured in Power365 Directory Sync. At the end of this section there will be two (2) Active Directory environments fully configured.
An environment is an end-point connection that can control the scope of objects read. This guide will walk through how to create the source and target active directory environments.
To create a local AD environment, the following are required
-
One (1) Local Administrator Account for each Microsoft Forest and/or Domain that has permissions to create, update or delete depending on the scope of your Directory Sync workflows.
-
One (1) Windows Server to install and host the Power365 Directory Sync Agent.
Follow these steps to setup the cloud environment endpoints.
-
Login to Power365
-
Navigate to Environments
-
Click the New button
-
Click Local as the environment type, Click Next
-
Name the environment, Click Next
-
Name the local agent, Click Next
-
Note the agent registration URL and registration Key for later use, click Finish.
-
Install the agent in the Windows Server that is joined to the local AD domain.
-
Launch the Power365 Directory Sync Agent installation in the target workstation or server
-
Accept the license agreement and click on next.
-
Enter the target active directory environment information by providing the following and click next.
-
Domain Name
-
Global Catalog Server
-
Username
-
Password
-
-
Enter the Power365 Directory Sync Registration URL and Agent Registration Key information and click next.
-
In the sIDHistory Migration section, you may skip this step if sIDHistory Migration is not part of your project scope.
Note, Refer to Power365 Online Help Center for detailed information about agent installation and set-up requirements.
-
-
Once the agent is installed and the environment is discovered, click on the Setting button to access the local AD environment setting page.
-
Click on the Organization Unit tab and define the OU filter based on your project scope.
-
Click on the Filters tab and define any LDAP filter based on your project scope.
-
Click Save.
-
Repeat steps 3 – 12 for the next local environment
Setup Templates
Before we can build our workflows, it is best to set up your template(s). Templates contain common mappings and settings used to sync Users, Contacts, Devices, Groups, Office 365 Groups and Microsoft Teams. A template can then be applied to any workflow with a Stage Data step.
For the purpose of this guide, the following template will need to be configured to perform Synchronization for User, Group and Contact Objects. This guide also assume objects will be created in the target Active Directory if there is no match found. Additional templates may be created based on your project requirements. Local to Local Password Sync
-
Local to Local Sync
How to create a Local to Local template
-
Login to Power365
-
Navigate to Templates
-
Click the New button
-
Name and Describe the template
-
In our example, we will name our template “Local to Local Sync”, Click Next
-
Click Local as the source environment type, Click Next
-
Click Local as the target environment type, Click Next
-
Set CREATE NEW USERS AS = AS-IS
-
Set UPDATE CREATED USERS= ENABLE
-
Set UPDATE MATCHED USERS= ENABLE
-
Set IF TARGET ADDRESS EXISTS setting as OVERWRITE ONCE.
-
Click Next
-
Set CREATE GROUPS AS = SKIP
-
Set UPDATE CREATED GROUPS = ENABLE
-
Set UPDATE MATCHED GROUPS = ENABLE
-
Set Convert Group Options with default settings: (See Pro Tip 17)
-
DOMAIN LOCAL GROUPS = DOMAIN LOCAL
-
GLOBAL GROUPS = GLOBAL
-
UNIVERSAL GROUPS = UNIVERSAL
-
-
Click Next
-
Set CREATE NEW CONTACTS AS = AS-IS
-
Set UPDATE CREATED CONTACTS = ENABLE
-
Set UPDATE MATCHED CONTACTS = ENABLE
-
Click Next
-
Set CREATE NEW DEVICES AS = SKIP
-
Set UPDATE CREATED CONTACTS = DISABLE
-
Set UPDATE MATCHED CONTACTS = DISABLE
-
Click Next
-
Enter a default password, Click Next
-
Leave the SYNCHRONIZE SID HISTORY checkbox unchecked, Click Next
-
Under mappings, we can leave the settings as default or update them based on your project requirements. (See Pro Tip 16)
-
Click Next
-
Click Finish
Setup Workflows
Follow these steps to create two (2) new workflows for reading, matching, staging and writing data.
How to create a one-way sync workflow for Local to Local
-
Login to Power365
-
Navigate to Workflows
-
Click the New button
-
Name and Describe the template, Click Next
-
Select the all two (2) local Active Directory environments created previously, Click Next
-
Select ONE-WAY SYNC, Click Next
-
The screen presented next will be a pre-configured set of workflow steps to facilitate the flow of object and attributes between your directories.
-
Start at the top of the steps, 1. Read From. Click the Select button
-
Select all two (2) environments created previously the click OK
-
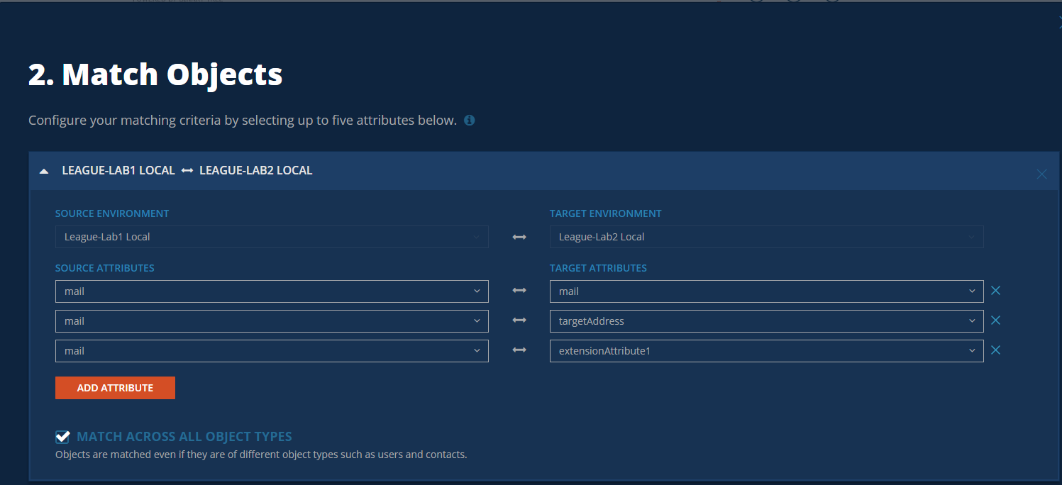
Move to Match Objects
-
This is the step where you will decide on how to match existing objects across your local Active Directories
-
Matching is conducted by pairing sets of attributes to find corresponding objects
-
Your two (2) environments may already have some attributes that can be used to find similar objects between the different directories, or you may need to set some to ensure accurate matching
-
For the purpose of Password Synchronization, it is most important that existing objects are correctly matched to perform Password Synchronization.
-
-
Click the Select button to configure the Match Objects criteria for your source Local environment and target Local environment
Figure 1: Example Match Objects Criteria
-
Select your source local environment from the drop-down menu
-
Select your target local environment from the drop-down menu
-
Choose your first attribute pairings, we will use WindowsEmailAddress for our first match criteria
-
Choose the sAMAccountName attribute for the source and target fields
-
To add more attribute pairs, click the Add Attribute button
-
Additional pairings are evaluated as “OR” conditions. After the first match is found, the additional pairings are not assessed.
-
In our case we are adding three (3) additional attribute pairings to our criteria
-
cn – This attribute was added to ensure we can match existing objects based on CN.
-
UserPrincipalName – UPN was added to ensure uniqueness of the local part of the address string. (See Pro Tip 5 & 6)
-
Mail – This attribute was added to ensure we can match existing objects based on Mail.
Note: Matching attributes should be reviewed and adjusted based on actual project scope; there isn’t a set matching rule that will fit all scenarios.
-
-
Ensure Match Across all object types is not checked in this case.
-
There is no need in this guide to Add Another Pair, click OK to close this configuration
-
-
Drag a Stage Data workflow task from the left panel to the right under the Stage Data task mentioned above. Click the Select button to configure the fourth STAGE DATA workflow task for your target local to source local synchronization rule.
-
Select the “Local to Local Sync” template, Click Next
-
Select the source local environment as your source, Click Next
-
Select the target local environment as your target, Click Next
-
Select the default target domain name, Click Next
-
Select the source Organizational Units that will be in scope of the project by click on the ADD OUS button.
-
In the new OU pop-up window, select the OU that will be in-scope, check the INCLUDE ALL SUB OUS checkbox, click OK to close the pop-up.
-
Configure any Stage Data filter you like by double click on the OU in the OUs list, it is highly recommended to setup filter to limit the scope to perform a test on the first sync as part of the validation. Click Next
Figure 2: Example Source OU setup.
-
Select the default OU for newly created objects for Users, Groups, Contacts, and Devices.
Figure 3: Example Target OU setup.
-
Click Finish
-
-
Click the Select button to configure the WRITE TO workflow task. Ensure the target environment is selected, Click OK
-
Click Next
-
Configure the workflow sync interval, select Manual for now and we can setup a sync schedule once the test sync has completed. Click Next
-
Setup any workflow alert you may wish to configure, for now, Click SKIP
-
Click Finish


Setup Environments
This section provides a step-by-step guide on how to set up Users, Groups and Contacts Synchronization for Microsoft Active Directory Environments.
To begin at least two (2) Active Directory environments must be configured in Power365 Directory Sync. At the end of this section there will be two (2) Active Directory environments fully configured.
An environment is an end-point connection that can control the scope of objects read. This guide will walk through how to create the source and target active directory environments.
To create a local AD environment, the following are required
-
One (1) Local Administrator Account for each Microsoft Forest and/or Domain that has permissions to create, update or delete depending on the scope of your Directory Sync workflows.
-
One (1) Windows Server to install and host the Power365 Directory Sync Agent.
Follow these steps to setup the cloud environment endpoints.
-
Login to Power365
-
Navigate to Environments
-
Click the New button
-
Click Local as the environment type, Click Next
-
Name the environment, Click Next
-
Name the local agent, Click Next
-
Note the agent registration URL and registration Key for later use, click Finish.
-
Install the agent in the Windows Server that is joined to the local AD domain.
-
Launch the Power365 Directory Sync Agent installation in the target workstation or server
-
Accept the license agreement and click on next.
-
Enter the target active directory environment information by providing the following and click next.
-
Domain Name
-
Global Catalog Server
-
Username
-
Password
-
-
Enter the Power365 Directory Sync Registration URL and Agent Registration Key information and click next.
-
In the sIDHistory Migration section, you may skip this step if sIDHistory Migration is not part of your project scope.
Note, Refer to Power365 Online Help Center for detailed information about agent installation and set-up requirements.
-
-
Once the agent is installed and the environment is discovered, click on the Setting button to access the local AD environment setting page.
-
Click on the Organization Unit tab and define the OU filter based on your project scope.
-
Click on the Filters tab and define any LDAP filter based on your project scope.
-
Click Save.
-
Repeat steps 3 – 12 for the next local environment
Setup Templates
Before we can build our workflows, it is best to set up your template(s). Templates contain common mappings and settings used to sync Users, Contacts, Devices, Groups, Office 365 Groups and Microsoft Teams. A template can then be applied to any workflow with a Stage Data step.
For the purpose of this guide, the following template will need to be configured to perform Synchronization for User, Group and Contact Objects. This guide also assume objects will be created in the target Active Directory if there is no match found. Additional templates may be created based on your project requirements. Local to Local Password Sync
-
Local to Local Sync
How to create a Local to Local template
-
Login to Power365
-
Navigate to Templates
-
Click the New button
-
Name and Describe the template
-
In our example, we will name our template “Local to Local Sync”, Click Next
-
Click Local as the source environment type, Click Next
-
Click Local as the target environment type, Click Next
-
Set CREATE NEW USERS AS = AS-IS
-
Set UPDATE CREATED USERS= ENABLE
-
Set UPDATE MATCHED USERS= ENABLE
-
Set IF TARGET ADDRESS EXISTS setting as OVERWRITE ONCE.
-
Click Next
-
Set CREATE GROUPS AS = SKIP
-
Set UPDATE CREATED GROUPS = ENABLE
-
Set UPDATE MATCHED GROUPS = ENABLE
-
Set Convert Group Options with default settings: (See Pro Tip 17)
-
DOMAIN LOCAL GROUPS = DOMAIN LOCAL
-
GLOBAL GROUPS = GLOBAL
-
UNIVERSAL GROUPS = UNIVERSAL
-
-
Click Next
-
Set CREATE NEW CONTACTS AS = AS-IS
-
Set UPDATE CREATED CONTACTS = ENABLE
-
Set UPDATE MATCHED CONTACTS = ENABLE
-
Click Next
-
Set CREATE NEW DEVICES AS = SKIP
-
Set UPDATE CREATED CONTACTS = DISABLE
-
Set UPDATE MATCHED CONTACTS = DISABLE
-
Click Next
-
Enter a default password, Click Next
-
Leave the SYNCHRONIZE SID HISTORY checkbox unchecked, Click Next
-
Under mappings, we can leave the settings as default or update them based on your project requirements. (See Pro Tip 16)
-
Click Next
-
Click Finish
Setup Workflows
Follow these steps to create two (2) new workflows for reading, matching, staging and writing data.
How to create a one-way sync workflow for Local to Local
-
Login to Power365
-
Navigate to Workflows
-
Click the New button
-
Name and Describe the template, Click Next
-
Select the all two (2) local Active Directory environments created previously, Click Next
-
Select ONE-WAY SYNC, Click Next
-
The screen presented next will be a pre-configured set of workflow steps to facilitate the flow of object and attributes between your directories.
-
Start at the top of the steps, 1. Read From. Click the Select button
-
Select all two (2) environments created previously the click OK
-
Move to Match Objects
-
This is the step where you will decide on how to match existing objects across your local Active Directories
-
Matching is conducted by pairing sets of attributes to find corresponding objects
-
Your two (2) environments may already have some attributes that can be used to find similar objects between the different directories, or you may need to set some to ensure accurate matching
-
For the purpose of Password Synchronization, it is most important that existing objects are correctly matched to perform Password Synchronization.
-
-
Click the Select button to configure the Match Objects criteria for your source Local environment and target Local environment
Figure 1: Example Match Objects Criteria
-
Select your source local environment from the drop-down menu
-
Select your target local environment from the drop-down menu
-
Choose your first attribute pairings, we will use WindowsEmailAddress for our first match criteria
-
Choose the sAMAccountName attribute for the source and target fields
-
To add more attribute pairs, click the Add Attribute button
-
Additional pairings are evaluated as “OR” conditions. After the first match is found, the additional pairings are not assessed.
-
In our case we are adding three (3) additional attribute pairings to our criteria
-
cn – This attribute was added to ensure we can match existing objects based on CN.
-
UserPrincipalName – UPN was added to ensure uniqueness of the local part of the address string. (See Pro Tip 5 & 6)
-
Mail – This attribute was added to ensure we can match existing objects based on Mail.
Note: Matching attributes should be reviewed and adjusted based on actual project scope; there isn’t a set matching rule that will fit all scenarios.
-
-
Ensure Match Across all object types is not checked in this case.
-
There is no need in this guide to Add Another Pair, click OK to close this configuration
-
-
Drag a Stage Data workflow task from the left panel to the right under the Stage Data task mentioned above. Click the Select button to configure the fourth STAGE DATA workflow task for your target local to source local synchronization rule.
-
Select the “Local to Local Sync” template, Click Next
-
Select the source local environment as your source, Click Next
-
Select the target local environment as your target, Click Next
-
Select the default target domain name, Click Next
-
Select the source Organizational Units that will be in scope of the project by click on the ADD OUS button.
-
In the new OU pop-up window, select the OU that will be in-scope, check the INCLUDE ALL SUB OUS checkbox, click OK to close the pop-up.
-
Configure any Stage Data filter you like by double click on the OU in the OUs list, it is highly recommended to setup filter to limit the scope to perform a test on the first sync as part of the validation. Click Next
Figure 2: Example Source OU setup.
-
Select the default OU for newly created objects for Users, Groups, Contacts, and Devices.
Figure 3: Example Target OU setup.
-
Click Finish
-
-
Click the Select button to configure the WRITE TO workflow task. Ensure the target environment is selected, Click OK
-
Click Next
-
Configure the workflow sync interval, select Manual for now and we can setup a sync schedule once the test sync has completed. Click Next
-
Setup any workflow alert you may wish to configure, for now, Click SKIP
-
Click Finish
Setup Templates
This section provides a step-by-step guide on how to set up Users, Groups and Contacts Synchronization for Microsoft Active Directory Environments.
Setup Environments
To begin at least two (2) Active Directory environments must be configured in Power365 Directory Sync. At the end of this section there will be two (2) Active Directory environments fully configured.
An environment is an end-point connection that can control the scope of objects read. This guide will walk through how to create the source and target active directory environments.
To create a local AD environment, the following are required
-
One (1) Local Administrator Account for each Microsoft Forest and/or Domain that has permissions to create, update or delete depending on the scope of your Directory Sync workflows.
-
One (1) Windows Server to install and host the Power365 Directory Sync Agent.
Follow these steps to setup the cloud environment endpoints.
-
Login to Power365
-
Navigate to Environments
-
Click the New button
-
Click Local as the environment type, Click Next
-
Name the environment, Click Next
-
Name the local agent, Click Next
-
Note the agent registration URL and registration Key for later use, click Finish.
-
Install the agent in the Windows Server that is joined to the local AD domain.
-
Launch the Power365 Directory Sync Agent installation in the target workstation or server
-
Accept the license agreement and click on next.
-
Enter the target active directory environment information by providing the following and click next.
-
Domain Name
-
Global Catalog Server
-
Username
-
Password
-
-
Enter the Power365 Directory Sync Registration URL and Agent Registration Key information and click next.
-
In the sIDHistory Migration section, you may skip this step if sIDHistory Migration is not part of your project scope.
Note, Refer to Power365 Online Help Center for detailed information about agent installation and set-up requirements.
-
-
Once the agent is installed and the environment is discovered, click on the Setting button to access the local AD environment setting page.
-
Click on the Organization Unit tab and define the OU filter based on your project scope.
-
Click on the Filters tab and define any LDAP filter based on your project scope.
-
Click Save.
-
Repeat steps 3 – 12 for the next local environment
Before we can build our workflows, it is best to set up your template(s). Templates contain common mappings and settings used to sync Users, Contacts, Devices, Groups, Office 365 Groups and Microsoft Teams. A template can then be applied to any workflow with a Stage Data step.
For the purpose of this guide, the following template will need to be configured to perform Synchronization for User, Group and Contact Objects. This guide also assume objects will be created in the target Active Directory if there is no match found. Additional templates may be created based on your project requirements. Local to Local Password Sync
-
Local to Local Sync
How to create a Local to Local template
-
Login to Power365
-
Navigate to Templates
-
Click the New button
-
Name and Describe the template
-
In our example, we will name our template “Local to Local Sync”, Click Next
-
Click Local as the source environment type, Click Next
-
Click Local as the target environment type, Click Next
-
Set CREATE NEW USERS AS = AS-IS
-
Set UPDATE CREATED USERS= ENABLE
-
Set UPDATE MATCHED USERS= ENABLE
-
Set IF TARGET ADDRESS EXISTS setting as OVERWRITE ONCE.
-
Click Next
-
Set CREATE GROUPS AS = SKIP
-
Set UPDATE CREATED GROUPS = ENABLE
-
Set UPDATE MATCHED GROUPS = ENABLE
-
Set Convert Group Options with default settings: (See Pro Tip 17)
-
DOMAIN LOCAL GROUPS = DOMAIN LOCAL
-
GLOBAL GROUPS = GLOBAL
-
UNIVERSAL GROUPS = UNIVERSAL
-
-
Click Next
-
Set CREATE NEW CONTACTS AS = AS-IS
-
Set UPDATE CREATED CONTACTS = ENABLE
-
Set UPDATE MATCHED CONTACTS = ENABLE
-
Click Next
-
Set CREATE NEW DEVICES AS = SKIP
-
Set UPDATE CREATED CONTACTS = DISABLE
-
Set UPDATE MATCHED CONTACTS = DISABLE
-
Click Next
-
Enter a default password, Click Next
-
Leave the SYNCHRONIZE SID HISTORY checkbox unchecked, Click Next
-
Under mappings, we can leave the settings as default or update them based on your project requirements. (See Pro Tip 16)
-
Click Next
-
Click Finish
Setup Workflows
Follow these steps to create two (2) new workflows for reading, matching, staging and writing data.
How to create a one-way sync workflow for Local to Local
-
Login to Power365
-
Navigate to Workflows
-
Click the New button
-
Name and Describe the template, Click Next
-
Select the all two (2) local Active Directory environments created previously, Click Next
-
Select ONE-WAY SYNC, Click Next
-
The screen presented next will be a pre-configured set of workflow steps to facilitate the flow of object and attributes between your directories.
-
Start at the top of the steps, 1. Read From. Click the Select button
-
Select all two (2) environments created previously the click OK
-
Move to Match Objects
-
This is the step where you will decide on how to match existing objects across your local Active Directories
-
Matching is conducted by pairing sets of attributes to find corresponding objects
-
Your two (2) environments may already have some attributes that can be used to find similar objects between the different directories, or you may need to set some to ensure accurate matching
-
For the purpose of Password Synchronization, it is most important that existing objects are correctly matched to perform Password Synchronization.
-
-
Click the Select button to configure the Match Objects criteria for your source Local environment and target Local environment
Figure 1: Example Match Objects Criteria
-
Select your source local environment from the drop-down menu
-
Select your target local environment from the drop-down menu
-
Choose your first attribute pairings, we will use WindowsEmailAddress for our first match criteria
-
Choose the sAMAccountName attribute for the source and target fields
-
To add more attribute pairs, click the Add Attribute button
-
Additional pairings are evaluated as “OR” conditions. After the first match is found, the additional pairings are not assessed.
-
In our case we are adding three (3) additional attribute pairings to our criteria
-
cn – This attribute was added to ensure we can match existing objects based on CN.
-
UserPrincipalName – UPN was added to ensure uniqueness of the local part of the address string. (See Pro Tip 5 & 6)
-
Mail – This attribute was added to ensure we can match existing objects based on Mail.
Note: Matching attributes should be reviewed and adjusted based on actual project scope; there isn’t a set matching rule that will fit all scenarios.
-
-
Ensure Match Across all object types is not checked in this case.
-
There is no need in this guide to Add Another Pair, click OK to close this configuration
-
-
Drag a Stage Data workflow task from the left panel to the right under the Stage Data task mentioned above. Click the Select button to configure the fourth STAGE DATA workflow task for your target local to source local synchronization rule.
-
Select the “Local to Local Sync” template, Click Next
-
Select the source local environment as your source, Click Next
-
Select the target local environment as your target, Click Next
-
Select the default target domain name, Click Next
-
Select the source Organizational Units that will be in scope of the project by click on the ADD OUS button.
-
In the new OU pop-up window, select the OU that will be in-scope, check the INCLUDE ALL SUB OUS checkbox, click OK to close the pop-up.
-
Configure any Stage Data filter you like by double click on the OU in the OUs list, it is highly recommended to setup filter to limit the scope to perform a test on the first sync as part of the validation. Click Next
Figure 2: Example Source OU setup.
-
Select the default OU for newly created objects for Users, Groups, Contacts, and Devices.
Figure 3: Example Target OU setup.
-
Click Finish
-
-
Click the Select button to configure the WRITE TO workflow task. Ensure the target environment is selected, Click OK
-
Click Next
-
Configure the workflow sync interval, select Manual for now and we can setup a sync schedule once the test sync has completed. Click Next
-
Setup any workflow alert you may wish to configure, for now, Click SKIP
-
Click Finish
How to create a Local to Local template
This section provides a step-by-step guide on how to set up Users, Groups and Contacts Synchronization for Microsoft Active Directory Environments.
Setup Environments
To begin at least two (2) Active Directory environments must be configured in Power365 Directory Sync. At the end of this section there will be two (2) Active Directory environments fully configured.
An environment is an end-point connection that can control the scope of objects read. This guide will walk through how to create the source and target active directory environments.
To create a local AD environment, the following are required
-
One (1) Local Administrator Account for each Microsoft Forest and/or Domain that has permissions to create, update or delete depending on the scope of your Directory Sync workflows.
-
One (1) Windows Server to install and host the Power365 Directory Sync Agent.
Follow these steps to setup the cloud environment endpoints.
-
Login to Power365
-
Navigate to Environments
-
Click the New button
-
Click Local as the environment type, Click Next
-
Name the environment, Click Next
-
Name the local agent, Click Next
-
Note the agent registration URL and registration Key for later use, click Finish.
-
Install the agent in the Windows Server that is joined to the local AD domain.
-
Launch the Power365 Directory Sync Agent installation in the target workstation or server
-
Accept the license agreement and click on next.
-
Enter the target active directory environment information by providing the following and click next.
-
Domain Name
-
Global Catalog Server
-
Username
-
Password
-
-
Enter the Power365 Directory Sync Registration URL and Agent Registration Key information and click next.
-
In the sIDHistory Migration section, you may skip this step if sIDHistory Migration is not part of your project scope.
Note, Refer to Power365 Online Help Center for detailed information about agent installation and set-up requirements.
-
-
Once the agent is installed and the environment is discovered, click on the Setting button to access the local AD environment setting page.
-
Click on the Organization Unit tab and define the OU filter based on your project scope.
-
Click on the Filters tab and define any LDAP filter based on your project scope.
-
Click Save.
-
Repeat steps 3 – 12 for the next local environment
Setup Templates
Before we can build our workflows, it is best to set up your template(s). Templates contain common mappings and settings used to sync Users, Contacts, Devices, Groups, Office 365 Groups and Microsoft Teams. A template can then be applied to any workflow with a Stage Data step.
For the purpose of this guide, the following template will need to be configured to perform Synchronization for User, Group and Contact Objects. This guide also assume objects will be created in the target Active Directory if there is no match found. Additional templates may be created based on your project requirements. Local to Local Password Sync
-
Local to Local Sync
-
Login to Power365
-
Navigate to Templates
-
Click the New button
-
Name and Describe the template
-
In our example, we will name our template “Local to Local Sync”, Click Next
-
Click Local as the source environment type, Click Next
-
Click Local as the target environment type, Click Next
-
Set CREATE NEW USERS AS = AS-IS
-
Set UPDATE CREATED USERS= ENABLE
-
Set UPDATE MATCHED USERS= ENABLE
-
Set IF TARGET ADDRESS EXISTS setting as OVERWRITE ONCE.
-
Click Next
-
Set CREATE GROUPS AS = SKIP
-
Set UPDATE CREATED GROUPS = ENABLE
-
Set UPDATE MATCHED GROUPS = ENABLE
-
Set Convert Group Options with default settings: (See Pro Tip 17)
-
DOMAIN LOCAL GROUPS = DOMAIN LOCAL
-
GLOBAL GROUPS = GLOBAL
-
UNIVERSAL GROUPS = UNIVERSAL
-
-
Click Next
-
Set CREATE NEW CONTACTS AS = AS-IS
-
Set UPDATE CREATED CONTACTS = ENABLE
-
Set UPDATE MATCHED CONTACTS = ENABLE
-
Click Next
-
Set CREATE NEW DEVICES AS = SKIP
-
Set UPDATE CREATED CONTACTS = DISABLE
-
Set UPDATE MATCHED CONTACTS = DISABLE
-
Click Next
-
Enter a default password, Click Next
-
Leave the SYNCHRONIZE SID HISTORY checkbox unchecked, Click Next
-
Under mappings, we can leave the settings as default or update them based on your project requirements. (See Pro Tip 16)
-
Click Next
-
Click Finish
Setup Workflows
Follow these steps to create two (2) new workflows for reading, matching, staging and writing data.
How to create a one-way sync workflow for Local to Local
-
Login to Power365
-
Navigate to Workflows
-
Click the New button
-
Name and Describe the template, Click Next
-
Select the all two (2) local Active Directory environments created previously, Click Next
-
Select ONE-WAY SYNC, Click Next
-
The screen presented next will be a pre-configured set of workflow steps to facilitate the flow of object and attributes between your directories.
-
Start at the top of the steps, 1. Read From. Click the Select button
-
Select all two (2) environments created previously the click OK
-
Move to Match Objects
-
This is the step where you will decide on how to match existing objects across your local Active Directories
-
Matching is conducted by pairing sets of attributes to find corresponding objects
-
Your two (2) environments may already have some attributes that can be used to find similar objects between the different directories, or you may need to set some to ensure accurate matching
-
For the purpose of Password Synchronization, it is most important that existing objects are correctly matched to perform Password Synchronization.
-
-
Click the Select button to configure the Match Objects criteria for your source Local environment and target Local environment
Figure 1: Example Match Objects Criteria
-
Select your source local environment from the drop-down menu
-
Select your target local environment from the drop-down menu
-
Choose your first attribute pairings, we will use WindowsEmailAddress for our first match criteria
-
Choose the sAMAccountName attribute for the source and target fields
-
To add more attribute pairs, click the Add Attribute button
-
Additional pairings are evaluated as “OR” conditions. After the first match is found, the additional pairings are not assessed.
-
In our case we are adding three (3) additional attribute pairings to our criteria
-
cn – This attribute was added to ensure we can match existing objects based on CN.
-
UserPrincipalName – UPN was added to ensure uniqueness of the local part of the address string. (See Pro Tip 5 & 6)
-
Mail – This attribute was added to ensure we can match existing objects based on Mail.
Note: Matching attributes should be reviewed and adjusted based on actual project scope; there isn’t a set matching rule that will fit all scenarios.
-
-
Ensure Match Across all object types is not checked in this case.
-
There is no need in this guide to Add Another Pair, click OK to close this configuration
-
-
Drag a Stage Data workflow task from the left panel to the right under the Stage Data task mentioned above. Click the Select button to configure the fourth STAGE DATA workflow task for your target local to source local synchronization rule.
-
Select the “Local to Local Sync” template, Click Next
-
Select the source local environment as your source, Click Next
-
Select the target local environment as your target, Click Next
-
Select the default target domain name, Click Next
-
Select the source Organizational Units that will be in scope of the project by click on the ADD OUS button.
-
In the new OU pop-up window, select the OU that will be in-scope, check the INCLUDE ALL SUB OUS checkbox, click OK to close the pop-up.
-
Configure any Stage Data filter you like by double click on the OU in the OUs list, it is highly recommended to setup filter to limit the scope to perform a test on the first sync as part of the validation. Click Next
Figure 2: Example Source OU setup.
-
Select the default OU for newly created objects for Users, Groups, Contacts, and Devices.
Figure 3: Example Target OU setup.
-
Click Finish
-
-
Click the Select button to configure the WRITE TO workflow task. Ensure the target environment is selected, Click OK
-
Click Next
-
Configure the workflow sync interval, select Manual for now and we can setup a sync schedule once the test sync has completed. Click Next
-
Setup any workflow alert you may wish to configure, for now, Click SKIP
-
Click Finish