
Blackouts
There may be times when you do not want migration to occur. You can configure blackout periods to stop the migration process during selected dates and times. You can create default blackouts that affect all users, or custom blackout profiles for a chosen subset of users. Go to the Blackout Times view, and then double-click on a day to get started. You can choose from day, week, or month views. The options are similar to those for Outlook appointments.

Migrate Mailboxes
Go to the Mailboxes view. Be sure that the forest that you want to migrate FROM is listed.

Select a user (or several, using the Ctrl key…), and right-click for the Action menu. Choose Add Selection to Queue.
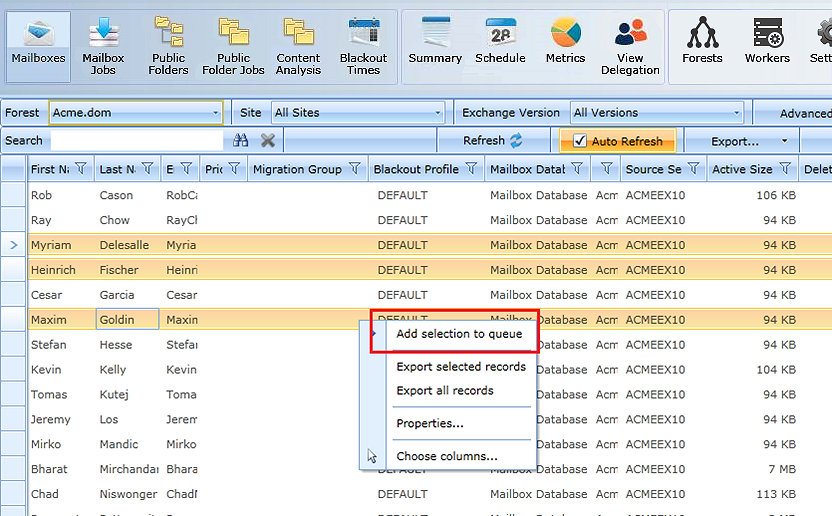
Choose the target database from the list, or let Migrator Pro for Exchange automatically choose for you by checking the boxes. The migration will begin processing as soon as you click the Add to Migration Queue button. Prior to that you can change the Do Not Start Before date to a later time if desired. That would cause clicking the Add to Migration Queue button to place the job in the queue in a suspended state until the chosen time. Then the job would start processing. You can also apply a blackout profile to this migration job, and/or specify other job options as described in the User Guide.

Click on Add to Migration Queue. Your selected mailboxes will disappear from the Mailboxes view.
Go to the Mailbox Jobs view. You will see the jobs listed. This screen will automatically refresh every 10 seconds by default, or you can hit the Refresh button. The status of the jobs will change as mailboxes are processed. Each job will disappear from the list as it completes.

Success!
Migrate Public Folders (optional)
Migrating Public Folders is an easy drag-and-drop operation. Go to the Public Folders view.

You will see the source folders on the left and the target folders on the right. Click on the small arrows to expand your selections as needed.

Use your left mouse button to click and drag your selected folder from the source. Drop it on your desired target folder. In this example, we are moving the Finance folder from the source to the BTcorp folder on the target.


A dialog box appears, with options including:
PF Mailbox: Lets you specify the target mailbox, or the Auto select setting (default) tells the program to migrate to the smallest available target PF mailbox.
Scheduled Start: Lets you choose to postpone the jobs until a selected time.
Sync Interval: Lets you choose how often (if at all) Migrator Pro for Exchange should check for changes in the source folder.
See the User Guide for all settings and options.
Click on Add to Migration Queue.
Similar to the mailbox jobs queue, a look at the Public Folder Jobs view shows that the job is scheduled. It will disappear from this Active view when complete.

If you are migrating to Office365 Groups, you would just choose Target Groups instead of Target Folders from the dropdown menu. A quick Office365 Groups wizard will take you through a few authentication steps. From then on, the migration steps would be similar to Public Folders. See the User Guide for more information.
