
Section 11. Install FreeBusy for Windows
9.2 How to update the Notes.ini file
To make changes to the Notes.ini file, follow these steps:
-
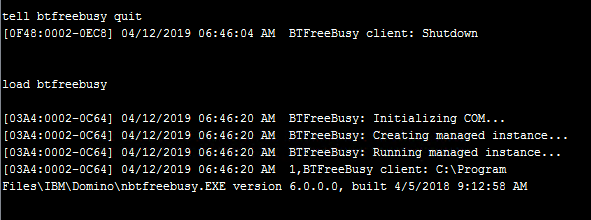
Shutdown BTFreebusy by issuing the following command at the Domino Coex server console:
|
Domino Coex Server Console |
|
tell btfreebusy quit |
-
Shut down the Domino Coex server by issuing the following command:
|
Domino Coex Server Console |
|
quit |
-
When the Domino server has completed its shutdown:
-
Open the INI file in a basic text editor (e.g. Notepad)
-
Make the modifications and save the text file
-
|
|
|

-
Restart the Domino Coex server
Section 10. Start FreeBusy on Domino Coex Server
After installing the FreeBusy software and updating the Notes.ini file, the Domino Coex server needs to be restarted.
Refer to the Ongoing Administration section for more information on FreeBusy Domino server commands.
If the Domino server was not shutdown when the Notes.ini was updated, restart FreeBusy. To do this, issue the following commands at the Domino Coex server console to start and stop the FreeBusy task:
|
Domino Coex Server Console |
|
tell btfreebusy quit load btfreebusy |
The example below, shows a quit followed by a successful BTFreeBusy load.
Section 11. Install FreeBusy for Windows
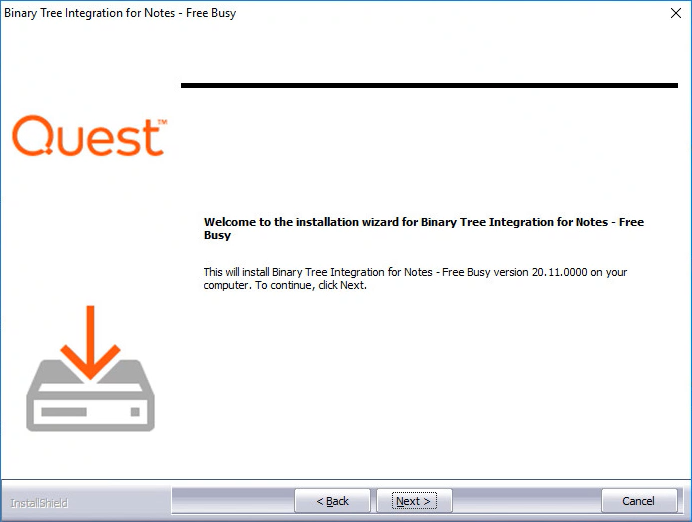
To install Integration for Notes Free/Busy on the Windows Coex server, follow the instructions below:
-
Run the Notes Integration FreeBusy.exe as Administrator
-
On the installation wizard screen, click Next:
-
Review the Software License Agreement and if you agree, click Yes to continue:
-
On the Choose Destination Location screen, accept the default destination location or browse to the desired location; click Next:


-
On the first screen, enter the Fully Qualified Domain Name (FDQN) of the Exchange CAS server hostname and click Next:
-
Enter the DNS name of the Domino Server and click Next:


-
On the third Free/Busy Install Configuration screen, enter the Domino SMTP domain name you want to expose Free/Busy information for and click Next:
-
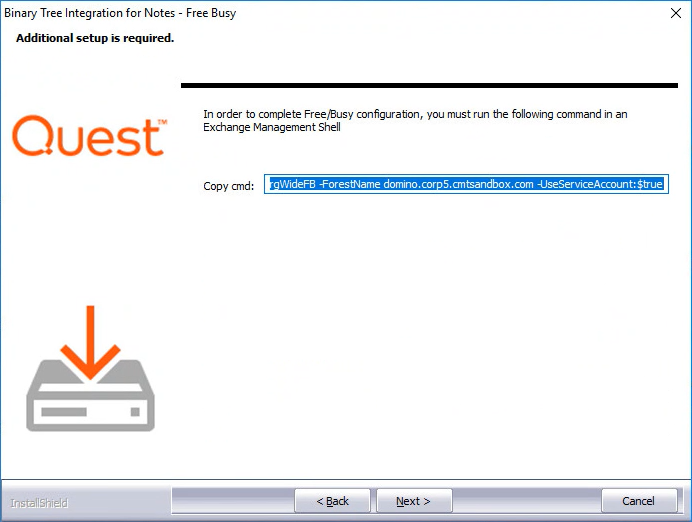
On the Additional setup is required screen, copy the command and run it in an Exchange Management Shell then click Next.
This command sets the Availability Address Space in Exchange so Free/Busy requests are sent to Domino:
-
On the Ready to Install the Program screen, click Install to begin the installation:
-
When installation is complete, the Wizard Complete screen appears; click Finish to exit the wizard:
-
Open a command prompt and run the following command: iisreset


Proper verification of the FreeBusy installation, can prevent future issues from occurring during coexistence. Verify Autodiscover, BTAvailability and BTRouter and then complete the validation matrix at the end of this section.
Section 12. Verification
9.2 How to update the Notes.ini file
To make changes to the Notes.ini file, follow these steps:
-
Shutdown BTFreebusy by issuing the following command at the Domino Coex server console:
|
Domino Coex Server Console |
|
tell btfreebusy quit |
-
Shut down the Domino Coex server by issuing the following command:
|
Domino Coex Server Console |
|
quit |
-
When the Domino server has completed its shutdown:
-
Open the INI file in a basic text editor (e.g. Notepad)
-
Make the modifications and save the text file
-
|
|
|
-
Restart the Domino Coex server
Section 10. Start FreeBusy on Domino Coex Server
After installing the FreeBusy software and updating the Notes.ini file, the Domino Coex server needs to be restarted.
Refer to the Ongoing Administration section for more information on FreeBusy Domino server commands.
If the Domino server was not shutdown when the Notes.ini was updated, restart FreeBusy. To do this, issue the following commands at the Domino Coex server console to start and stop the FreeBusy task:
|
Domino Coex Server Console |
|
tell btfreebusy quit load btfreebusy |
The example below, shows a quit followed by a successful BTFreeBusy load.
Section 11. Install FreeBusy for Windows
To install Integration for Notes Free/Busy on the Windows Coex server, follow the instructions below:
-
Run the Notes Integration FreeBusy.exe as Administrator
-
On the installation wizard screen, click Next:
-
Review the Software License Agreement and if you agree, click Yes to continue:
-
On the Choose Destination Location screen, accept the default destination location or browse to the desired location; click Next:
-
On the first screen, enter the Fully Qualified Domain Name (FDQN) of the Exchange CAS server hostname and click Next:
-
Enter the DNS name of the Domino Server and click Next:
-
On the third Free/Busy Install Configuration screen, enter the Domino SMTP domain name you want to expose Free/Busy information for and click Next:
-
On the Additional setup is required screen, copy the command and run it in an Exchange Management Shell then click Next.
This command sets the Availability Address Space in Exchange so Free/Busy requests are sent to Domino:
-
On the Ready to Install the Program screen, click Install to begin the installation:
-
When installation is complete, the Wizard Complete screen appears; click Finish to exit the wizard:
-
Open a command prompt and run the following command: iisreset
Proper verification of the FreeBusy installation, can prevent future issues from occurring during coexistence. Verify Autodiscover, BTAvailability and BTRouter and then complete the validation matrix at the end of this section.
12.1 Verify Autodiscover, BTAvailability and BTRouter on the Windows Coex Server
All verification sequences in section 12.1 are run on the Windows Coex server.
12.1.1 Autodiscover
-
Open a command prompt and navigate to the following path: %Program Files%\BinaryTree\CMT for Coexistence\Autodiscover
If web.2010.config exists, rename it to web.config.-
Verify that web.config and connections.config are not set to Read-Only
-
-
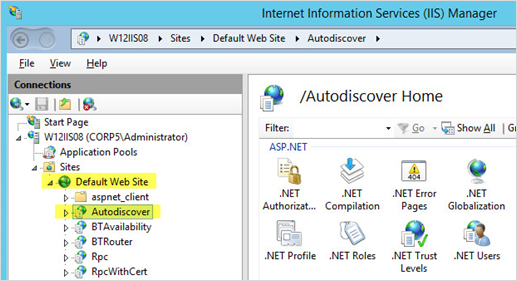
Open the IIS Administrator application
-
Navigate to the Default Web Site
-
Refresh IIS (press <F5>) and be sure that the Autodiscover virtual application has been added:
-
-
In the left pane, select the Autodiscover application
-
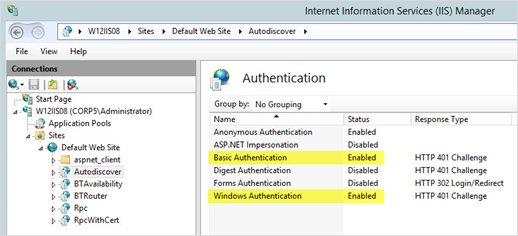
In the right pane, in the IIS section, double-click Authentication
-
Be sure that Basic Authentication and Windows Authentication are enabled; if they are not, enable them:
-
Click the Back button
-
-
-
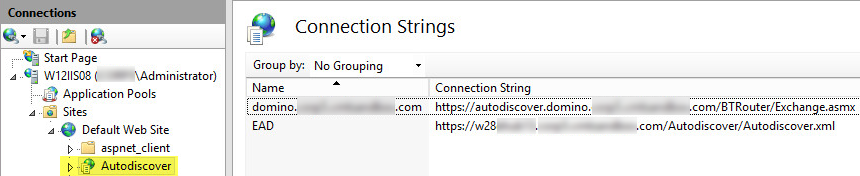
In the right pane, in the ASP.net section, double-click Connection Strings
-
Verify that the EAD is: https://<Your Exchange CAS Server FQDN>/Autodiscover/Autodiscover.xml
-
If the EAD (Exchange CAS Server) value is incorrect, modify it with the correct name:
-
Click the Back button
-
-
-
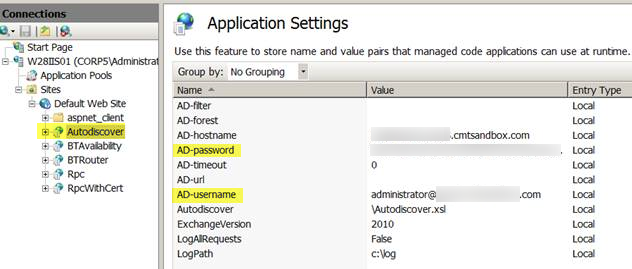
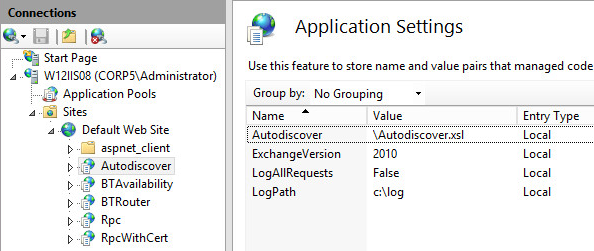
In the right pane, in the ASP.net section, double-click Application Settings
-
Verify that ExchangeVersion is set to 2010 for all supported versions of Exchange
-
If you require credentials to access the Active Directory environment and you do not see the following fields:
AD-Username and AD-Password
use the SetFBCred Utility to set the AD-Username and AD-Password (see Appendix B: SetFBCred Utility)
-
Be sure that Autodiscover is set to .\Autodiscover.xsl
-
The following log settings are optional:
-
LogAllRequests = False
-
Log path = c:\log\autodiscover (must be an existing directory, create if needed)
-
-

-
Close the IIS Manager
-
If any changes were made in steps 1-5, open a command prompt and run iisreset
-
Open Internet Explorer and navigate to the following virtual directory: https://autodiscover.domino.<contoso.com>/Autodiscover/Autodiscover.asmx
|
|
|
-
The BT Autodiscovery Service for Exchange 2010 page should appear:
-
Click BT_GetConfiguration
-
On the page that loads, Click Invoke; an XML response with the correct endpoint for this machine should display in the browser:
-
Return to the original AutoDiscovery screen
-
Click BT_TestAutoDiscovery
-
Enter the e-mail address of a valid Domino user; for example, user1@domino.contoso.com and click Invoke:
-
A properly formatted Autodiscover XML document should appear showing the correct URL to the BTRouter application
To successfully install the FreeBusy web services, the web server must accept connections via HTTP (Port 80) and can be later switched to HTTPS (Port 443).


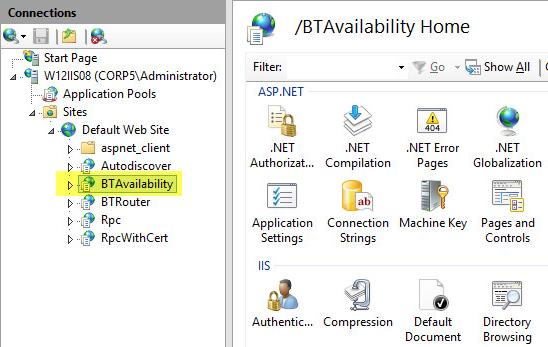
12.1.2 BTAvailability
-
Open a command prompt and navigate to the following path: %Program Files%\BinaryTree\CMT for Coexistence\AvailabilityService
If web.2010.config exists, rename it to web.config.-
Verify that web.config and connections.config are not set to Read-Only
-
-
Open the IIS Administrator application
-
Navigate to the Default Web Site
-
Refresh IIS (press <F5>) and be sure that the BTAvailability virtual application has been added:
-
-
In the left pane, select the BTAvailability application in the left pane
-
In the right pane, in the IIS section, double-click Authentication
-
Be sure that Basic Authentication and Windows Authentication are enabled; if they are not, enable them:
-
Click the Back button
-
-
-
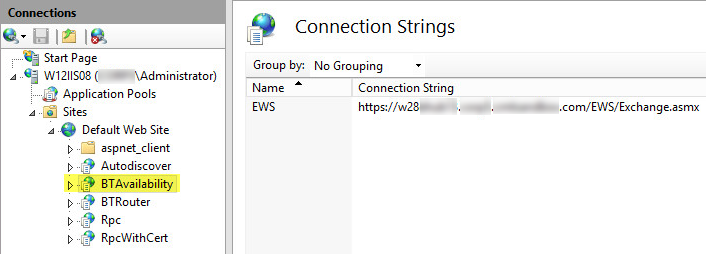
In the right pane, double-click Connection Strings
-
Verify that the EWS is: https://<Exchange CAS Server FQDN>/EWS/Exchange.asmx
-
If the EWS value is incorrect, modify it with the correct name:
-
Click the Back button
-
-
-
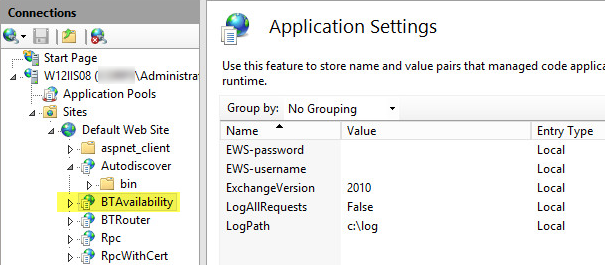
In the right pane, in the ASP.net section, double-click Application Settings
-
Verify that ExchangeVersion is set to 2010 for all supported versions of Exchange
-
If you require credentials to access the Active Directory environment and you do not see the following fields…-
EWS-username
-
EWS-password
…use the SetFBCred Utility to set the EWS AD-username and EWS AD-password (see Appendix B: SetFBCred Utility)
-
-
If using these optional log settings, verify the following:
-
LogAllRequests = False
-
LogPath = c:\log\availability (must be an existing directory, create if needed)
-
-
-
Close the IIS Manager
-
If any changes were made in steps 1-5, open a command prompt and run iisreset
-
Verify that the application is up and running
-
Open Internet Explorer and navigate to the following virtual directory:
https:// autodiscover.domino.contoso.com/BTAvailability/Availability.asmx


|
|
|
-
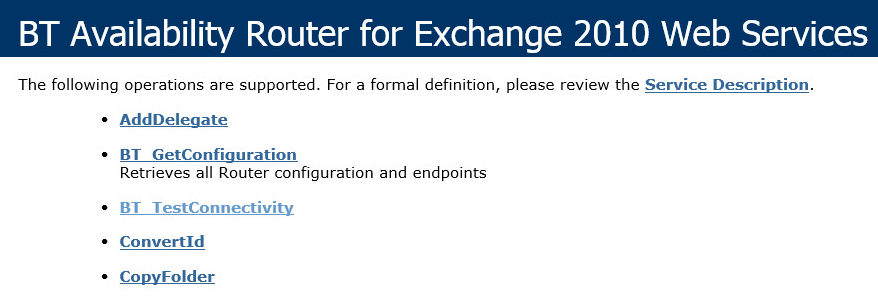
The BT Availability Router for Exchange 2010 Web Services page should appear:
-
Click BT_GetConfiguration
-
On the page that loads, click Invoke; an XML response with the correct endpoint for this machine should display in the browser:
-
Return to the original BT Availability Router screen
-
Click BT_TestConnectivity
-
Add two e-mail addresses of valid Exchange mailbox users (e.g. michael@contoso.com and david@contoso.com)
-
Click Invoke:
-
Two string representations of the Free/Busy stream should appear for each user for the current date

12.1.3 BTRouter
-
Open a command prompt and navigate to the following path:
%Program Files%\BinaryTree\CMT for Coexistence\AvailabilityRouter
|
|
|
|
-
If Exchange.2010.asmx exists, rename it to Exchange.asmx
-
Verify that web.config and connections.config are not set to Read-Only
-
Open the IIS Administrator application
-
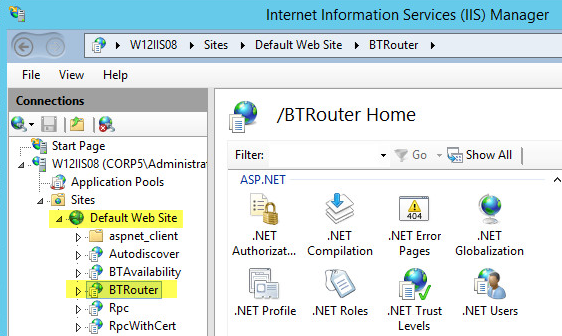
Navigate to the Default Web Site
-
Refresh IIS (press <F5>) and verify that the BTRouter virtual application has been added:
-
-
In the left pane, select the BTRouter application
-
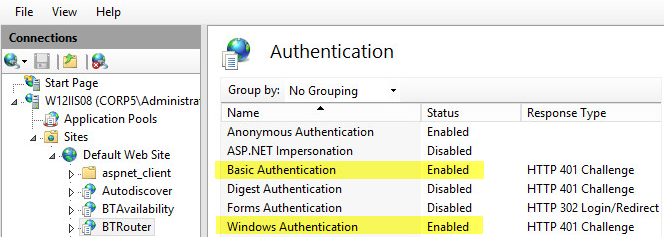
In the right pane, in the IIS section, double-click Authentication
-
Be sure that Basic Authentication and Windows Authentication are enabled; if they are not, enable them:
-
Click the Back button
-
-
-
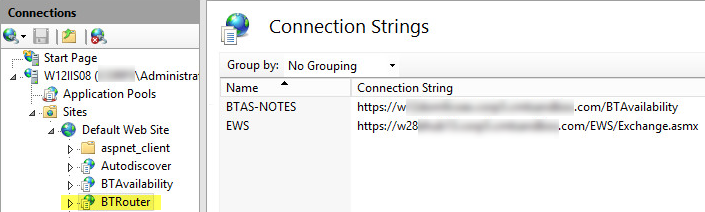
In the right pane, in the ASP.net section, double-click Connection Strings
-
Verify that the BTAS-NOTES URL is pointing to the BT Domino Availability Service URL (e.g. https://<FQDN of the Domino Web service>/BTAvailability)
-
Verify that the EWS URL is: https://<Your Exchange CAS Server FQDN>/EWS/Exchange.asmx
-
If the URLs in Connection Strings are incorrect, modify them with the correct values:
-
Click the Back button
-
-
In the right pane, in the ASP.net section, double-click Application Settings
-
Verify that ExchangeVersion is set to 2010 for all supported versions of Exchange
-
If you require credentials to access the Active Directory environment and you do not see the following fields…
-
-
BTAS-password
-
BTAS-username
…use the SetFBCred Utility to set the BTAS-username and BTAS-password (see the SetFBCred Utility appendix for more information).
-
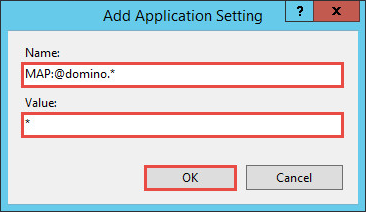
To ensure all requests that route through Domino, use the SMTP domain contoso.com rather than domino.contoso.com, map each of your Domino domains to the SMTP domain by creating one “map” entry per Domino domain as listed below:
-
In the right-hand Actions pane, click Add
-
In the Name field, enter:
-
MAP:@domino.<contoso.com>
-
-
In the Value field, enter:
-
<contoso.com>
-
-
Multiple FQDN’s can be supported by a single map entry using a wildcard (*) in the Name and Value fields as follows:
-
MAP:@domino.*
-
-
A less common map entry is illustrated below and is not recommended to be installed without Binary Tree assistance; these settings are used in environments that wish to use Free/Busy lookups based on Domino shortname only:
-
-


|
|
|
-
If using these optional log settings, verify the following:
-
LogAllRequests = False
-
Log path = c:\log\btrouter (must be an existing directory, create if needed)
-

-
Close the IIS Manager
-
If any changes were made in steps 1-5, open a command prompt and run iisreset
-
Open Internet Explorer and navigate to the following virtual directory:
https:// autodiscover.domino.contoso.com/BTRouter/Exchange.asmx
|
|
|
-
The BT Availability Router for Exchange 2010 Web Services page should appear:
-
Click BT_GetConfiguration
-
On the page that loads, click Invoke; an XML response with the correct endpoint for this machine should display in the browser:
-
If UNREACHABLE appears under the Domino endpoint URL, verify the Domino Availability Service endpoint. You should be able to reach the Domino service endpoint using the browser.
-
Return to Application Settings in IIS and update the endpoint with the proper URL
-
-
Return to the original BT Availability Router screen
-
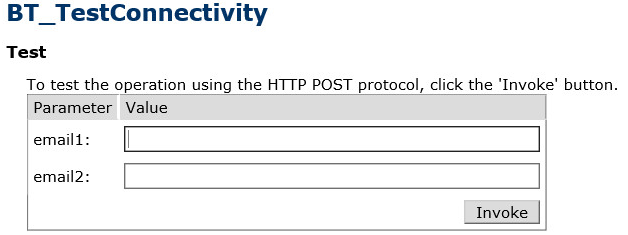
Click BT_TestConnectivity
-
Enter email addresses for two valid Domino users (e.g. james@domino.contoso.com and daniel@contoso.com)
-
Click Invoke; you should see a string representation the Free/Busy stream for each user for the current day
12.2 FreeBusy Client Validation Matrix
12.2 FreeBusy Client Validation Matrix
12.2.1 Create Test Accounts
Prior to performing the validation in the attached Excel spreadsheet, first create two Notes and two Outlook test accounts (or use existing accounts):
-
The Notes users should reflect a typical end user with a similar client, mail template and mail server
-
The Outlook client should match that of a typical end user