
Appendix C: Enable Modern Authentication
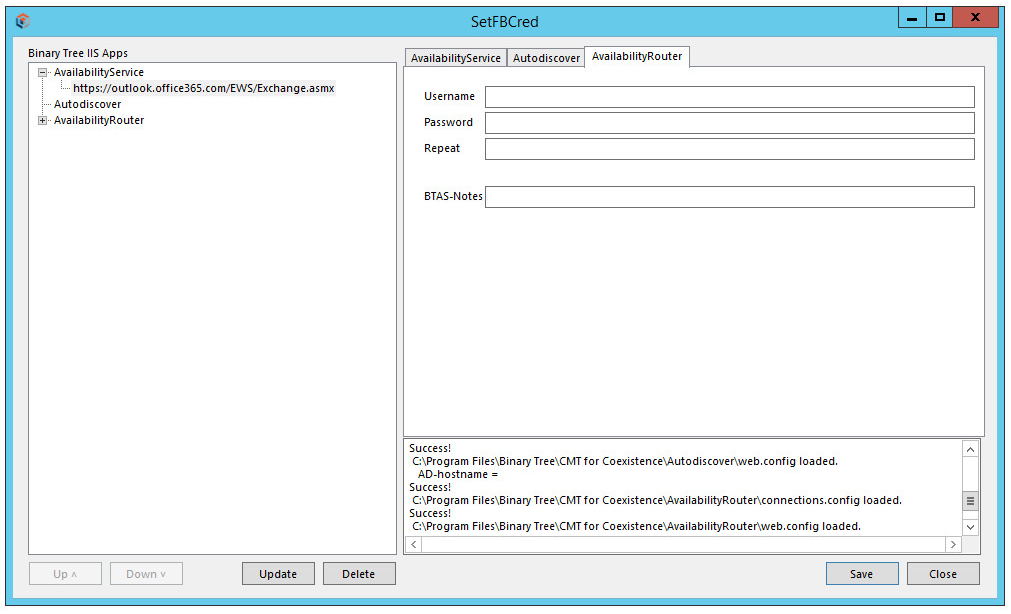
AvailabilityRouter

If the Domino requires a username/password for FreeBusy queries, the AvailabilityRouter must supply those credentials on each request. Select the entry under AvailabilityRouter in the tree on the left to populate the BTRouter tab.
The Username must belong to a Notes user who is listed in the ACLs of the btws.nsf.
Appendix C: Enable Modern Authentication
Hybrid Modern Authentication is distinct from Basic Authentication (username and password in Section 6.1.3)
Enabling the use of Modern authentication will replace the configuration in Section 6.1.3 for Basic Authentication. If the Hybrid Modern Authentication tab is populated this will override the Basic Authentication and FreeBusy will always use the Hybrid Modern Authentication details.
Basic Authentication is typically used on-premises, and Hybrid Modern Authentication is typically used with Office 365/Microsoft 365.
Both authentication schemes require the Exchange Web Services URL.
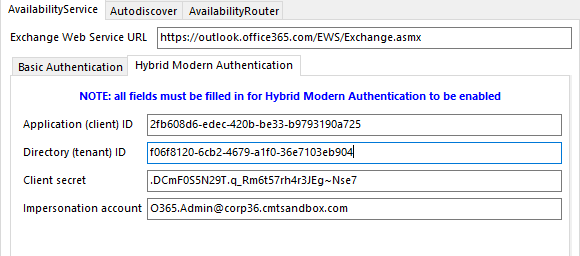
Configuring Availability Service:
Hybrid Modern Authentication requires an App registration to connect to Exchange Web Services.
Four items are required for configuration and can be taken from the App registration process which is explained below.
These four items are:
-
Application (client) ID – this is the App registration that will be created
-
Directory (tenant) ID – this is the tenant ID that FreeBusy will access for migrated accounts
-
Client secret – this is the secure access secret created for the App registration
-
Impersonation account – this is the tenant account that will be used for accessing scheduling information (eg BtFreeBusy@tenant.onmicrosoft.com). This account will require a mailbox.

Configuring an Azure AD App Registration:
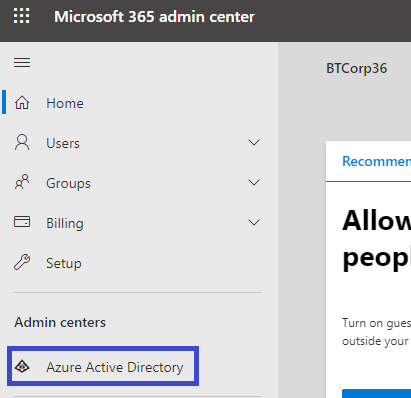
First, navigate to the Office administration portal at https://portal.office.com and sign in with an admin account:

After signing in, click on the Admin button:

This takes you to the admin center for your Office 365 instance (already rebranded for Microsoft 365):
Click on the Azure Active Directory button to go to yet another admin page, this time for Azure AD for the instance:
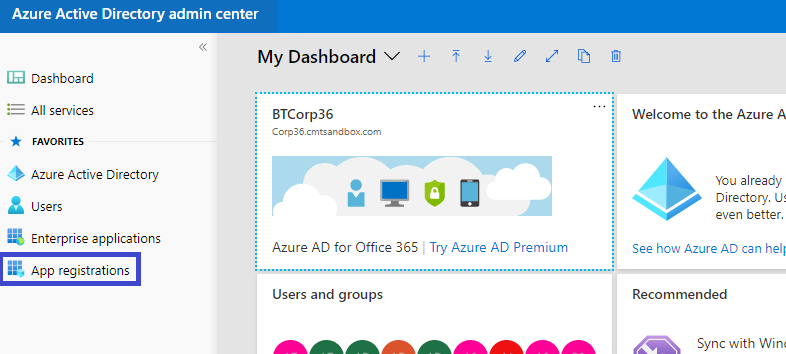
Click on the All services button to list the services, one of which is App registrations:
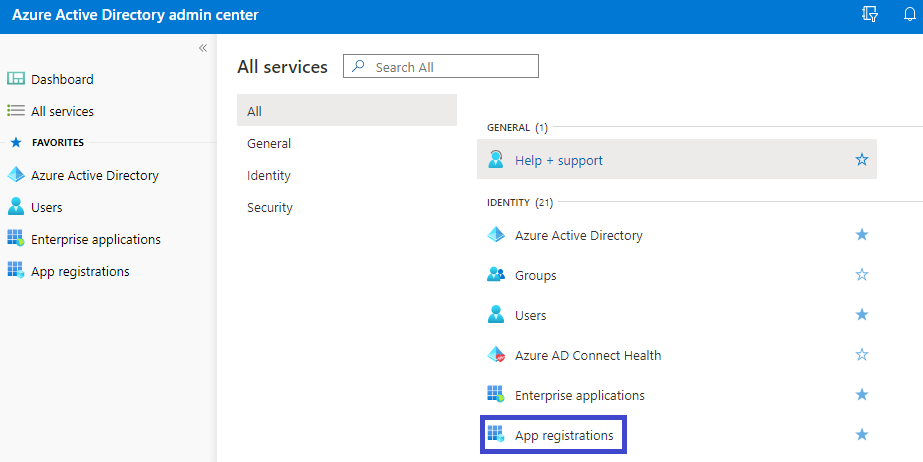
Click on the App registrations button and you get here:
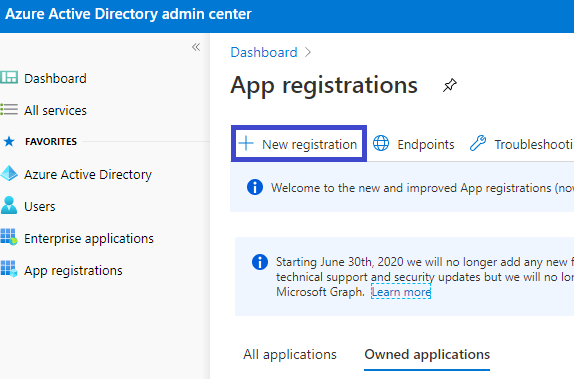
Click on the New registration button to load the following interface:

Set an appropriate Name (e.g. BTIntegration) and Supported account types. In the Redirect URI section, select Public client/native (mobile & desktop) and set the URI to:
urn:ietf:wg:oauth:2.0:oob
Next, click the Register button. Notice two of the four items needed for configuration, the Application (client) ID and the Directory (tenant) ID:
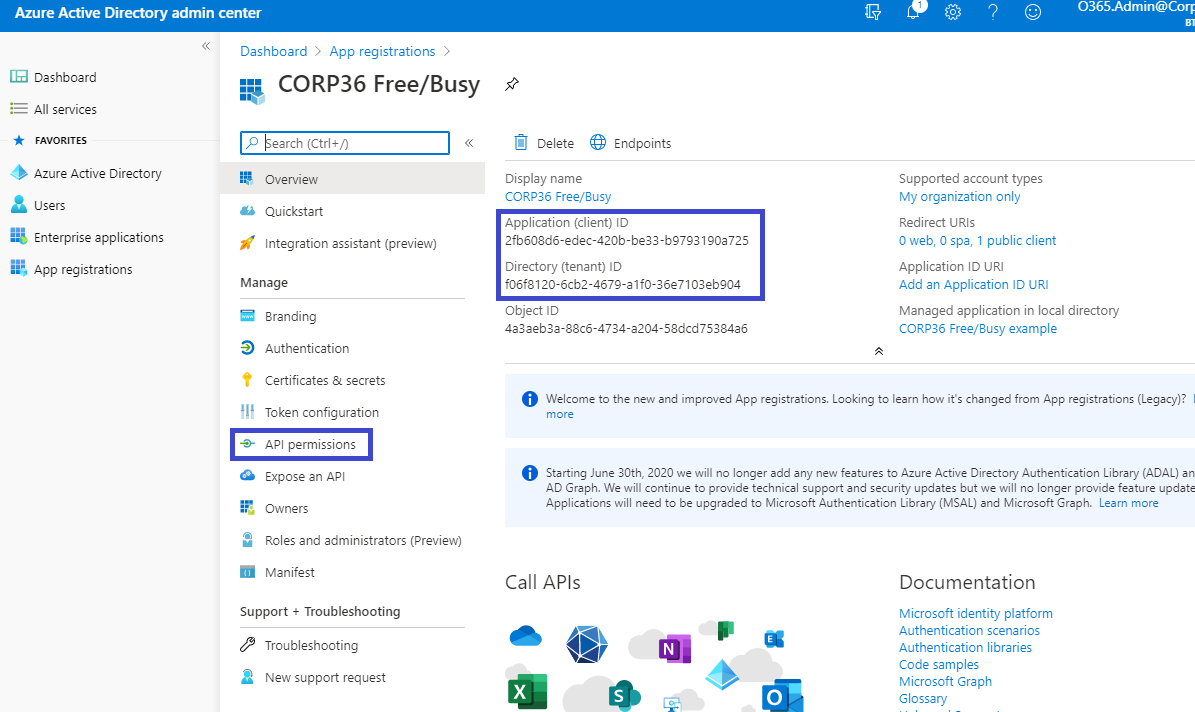
Notice when hovering over these two values, a copy icon will appear to copy the values with a single click:

Click this icon to copy the values before continuing.
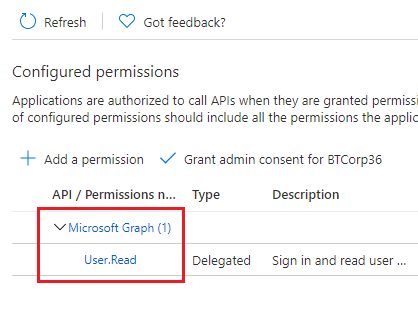
Click on the API permissions button and click on Add a permission. Microsoft’s default permission for the Microsoft Graph API will appear.
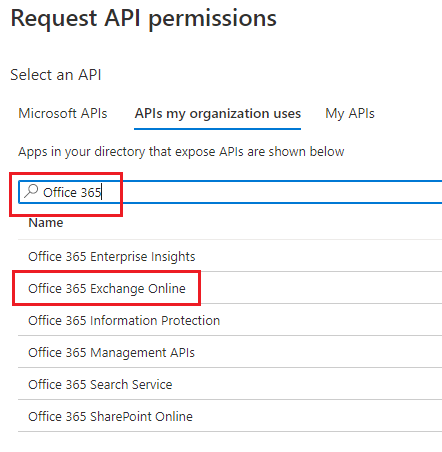
After adding an API permission, click APIs my organization uses, type in Office 365, and select Office 365 Exchange Online:
In the next screen, select Application permissions; check the full_access_as_app box, and click Add Permissions:
Back in the API permissions screen, click the Grant admin consent for BTCorp36 checkmark button:

When the admin consent is granted, a green checkmark for the API permissions will appear. Now, click on Certificates & secrets in the Manage menu on the left:
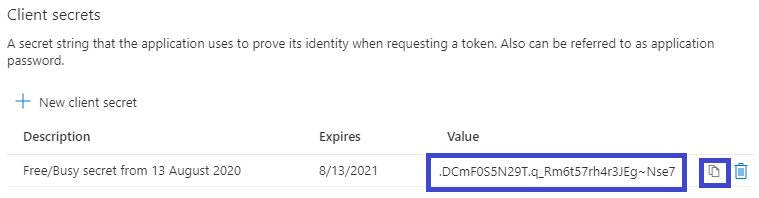
In the Certificates & secrets screen, click on the New client secret button:
Give the secret a description and an expiration and click the Add button:
|
|
|

Now you have the third item, the client secret. Click the copy icon and save the client secret wherever you saved the application ID and directory ID:
|
|
|
Now you should be able to plug all these values into SetFBCred for the AvailabilityService, save the configuration, restart Free/Busy, and you should be using modern authentication:
Enable TLS 1.2 Connectivity
The Integration for Notes Free Busy process does support TLS 1.2. This requires the Windows Operating System to have recent patch updates and TLS 1.2 enabled on the Windows Server that hosts IIS along with Windows Server that hosts the Domino server for the FreeBusy deployment.
Valid Internet Certificates are required for the target system, self-signed certificates are not supported.
The target system should also support TLS 1.2 connections. If TLS 1.2 is enabled for FreeBusy but the target system does not have this enabled then the FreeBusy processing will fail. For support to configure TLS for IIS or Exchange a case should be raised with Microsoft, for Domino a case should be raised with HCL.
|
|
|
Windows Operating System Registry Updates:
[HKEY_LOCAL_MACHINE\SOFTWARE\Wow6432Node\Microsoft\Windows\CurrentVersion\Internet Settings\WinHttp]
“DefaultSecureProtocols”=Set the DWORD value to 800 for TLS 1.2.
[HKEY_LOCAL_MACHINE\SOFTWARE\Microsoft\.NETFramework\v4.0.30319]
"SchUseStrongCrypto"=dword:00000001
[HKEY_LOCAL_MACHINE\SOFTWARE\Microsoft\.NETFramework\v4.0.30319]
"SystemDefaultTlsVersions"=dword:00000001
[HKEY_LOCAL_MACHINE\SOFTWARE\Wow6432Node\Microsoft\.NETFramework\v4.0.30319]
"SchUseStrongCrypto"=dword:00000001
[HKEY_LOCAL_MACHINE\SOFTWARE\Wow6432Node\Microsoft\.NETFramework\v4.0.30319]
"SystemDefaultTlsVersions"=dword:00000001
Appendix D. Notes.ini File Parameters
The Notes.ini parameters required to configure FreeBusy are listed in blue, below:
BTCOEX_BYPASS_REQUESTOR
Accepted value = 0/1
Default = 0
This setting must be set to 1.
When set to 1, Exchange requests will use the credentials supplied by the BTCOEX_DEFAULT_FB_ACCESS_ACCOUNT parameter (described below). This is useful when Exchange is not supplying the user ID because it is set to OrgWideFB.
BTCOEX_DEFAULT_FB_ACCESS_ACCOUNT=<SMTP address>
The account specified will provide the access used by the entire Exchange organization for querying the Domino Availability Service. This account must be a Domino user with the Domain value set to the Foreign Domain in the Administrator Pre-install Checklist. This account must be allowed to see FreeBusy information for all users in the Domino environment.
BTCOEX_APPROVED_CALLERS=<IP addresses>

This comma separated list of IP addresses restricts the source of Free/Busy requests that will be processed by Domino FreeBusy. Legitimate requests would only come from servers known to the BT Coexistence install and trusted to have performed all necessary authentications prior to allowing OrgWideFB requests (e.g., 127.0.0.1,192.168.0.1).
Not providing a list of IP addresses for this setting is a potential security risk as the server would allow requests to come from any source.
BTCOEX_CACHE_EXCH_RESPONSE
Accepted value = <number of seconds to cache the response>
Default = 60
This command should be set in the Notes.ini; you can, however, manually set the FreeBusy caching, on-the-fly, using the following Domino console command:
tell btfreebusy cache n
n is the number of seconds to cache the response; 0 is also a valid value.
To turn the Exchange FreeBusy caching feature off, set the BTCOEX_CACHE_EXCH_RESPONSE parameter to a value of zero.
In addition, you may use the BTCOEX_DONT_CACHE_EXCH_RESPONSE parameter to turn the Exchange FreeBusy caching feature off. Specify 1 to indicate that the default value of 60 seconds should not be used.
BTCOEX_EXCHANGE_DOMAINS and BTCOEX_DOMINO _DOMAINS
Invitees in a Free/Busy request going to Exchange must be in a domain listed in the Notes.ini BTCOEX_EXCHANGE_DOMAINS variable.
Invitees in a Free/Busy request going to Domino must be in a domain listed in the Notes.ini BTCOEX_DOMINO_DOMAINS variable.
The following two Notes.ini variables are required (the below values are examples only):
-
BTCOEX_DOMINO_DOMAINS=BinaryTree,BTCMT,Domino
-
BTCOEX_EXCHANGE_DOMAINS=BinTreeEX,BTExchange,Exchange
FreeBusy checks requests coming from Exchange to make sure they are asking about users in the BTCOEX_DOMINO_DOMAINS.
FreeBusy checks requests going to Exchange to make sure they are asking about users in the BTCOEX_EXCHANGE_DOMAINS.
This is done to prevent an infinite loop of Free/Busy requests between the Exchange and Domino servers, which can happen when Exchange assumes that a particular SMTP address belongs to a Domino user, while Domino assumes that SMTP address belongs to an Exchange user.
If a list of domains is longer than 255 characters, the Notes.ini variables are contained in a series by appending a sequence number to the end of the variable name.
For example, if the original variable BTCOEX_DOMINO_DOMAINS contains more than 255 characters, the variables BTCOEX_DOMINO_DOMAINS1, BTCOEX_DOMINO_DOMAINS2, and so on, where each one provides up to a 255 character portion of the list of domains, will be used.
BTCOEX_SERVICE_TYPE
Accepted Value: COEX
Default Value: COEX
The BTCOEX_SERVICE_TYPE parameter specifies the Web Service format used by the FreeBusy IIS apps on the Windows Coex server to translate to the correct version of the EWS format.
The BTCOEX_SERVICE_TYPE parameter is set to COEX by default and should not be changed.
BTCOEX_LOG
Accepted Values: 0 or 8 (0=no logging to 8=all areas logging)
Default Value: 0
This controls which areas of FreeBusy should log information.
BTCOEX_SERVER_LOG
Accepted Values: 0-6 (0=no logging to 6=debug logging)
Default Value: 0
This logs incoming message processing done by the Domino Listener DSAPI filter to the <Domino Coex server>\logs\btserver.log file.
BTCOEX_CLIENT _LOG
Accepted Values: 0-6 (0=no logging to 6=debug logging)
Default Value: 0
This logs outgoing processing messages from the Domino Coex FreeBusy task to the <Domino Coex server>\logs\btclient.log file.
BTCOEX_STOP_AFTER_EXCEPTION
Accepted Values: 0, 1
Default Value: 0
This parameter controls whether FreeBusy will automatically restart if it encounters a fatal exception (error) that causes it to terminate.
If BTCOEX_STOP_AFTER_EXCEPTION is set to 1, FreeBusy will not restart after an error causes it to exit and it would need to be manually restarted.
If BTCOEX_STOP_AFTER_EXCEPTION = 0 (default), FreeBusy will restart after exiting due to an error.
BTCOEX_LOGDATA=15
This is a bit mask which controls both which data is log and where the data is logged. The value is the sum of the information you want to log and its location from the list below. Any combination of the values below can be used; the lowest value of this parameter can be “1”, the highest “15”.
1 = request
2 = response
4 = to console
8 = to file
BTCOEX_FB_TEST_POLLING
Accepted value = <number of minutes between heartbeat messages>
Default = 5
BTCOEX_FB_TEST_ACCOUNT
Accepted value = <SMTP address>
This is a recommended setting.
The SMTP address should be a valid Exchange account. It is passed from the Domino Coex server to IIS BTAvailability on the Windows Coex server.
If it is a valid Exchange account, IIS will send the request to Exchange, ensuring all servers are checked.
BTEXCHANGESERVER
Accepted value = <ExchangeSMTPDomain>
If a value for BTCOEX_FB_TEST_ACCOUNT is not provided, "fbtestaccount@” is prepended to this Exchange server name to create an SMTP address.
BTCOEX_NUM_POLLING_FAILS_BEFORE_MSG
Accepted value = <number of successive failures before sending a failure notification>
Default = 3
This parameter determines the number of successive FreeBusy failures before a notification is sent to the email account specified in BTMULTISCHEDREPORTADDRESS.
BTCOEX_MINUTES_BETWEEN_FAIL_MSGS
Accepted value = <number of minutes between failure notifications>
Default = 30
FreeBusy will send alerts to the account previously specified account until a successful test occurs. This parameter determines the interval between failure notifications, i.e. 30 minutes.
BTMULTISCHEDREPORTADDRESS
Accepted Value = <SMTP address>
Default = None
FreeBusy sends alerts to the address specified in this parameter.
The SMTP address should be a valid email address for a user or a group.
BTMULTISCHEDREPORTADDRESSTYPE
Accepted Value = 0/1/2
Default = 0
This parameter allows the user to specify whether the configured BTMULTISCHEDREPORTADDRESS should be placed in the To, CC, or BCC field when sending a mail notification. Acceptable values are as follows:
0 = To
1 = CC
2 = BCC
If the parameter is not included in the Notes.ini file or contains an unacceptable value then the address will appear in the To field as that is the default behavior.
Appendix D. Notes.ini File Parameters
AvailabilityRouter
If the Domino requires a username/password for FreeBusy queries, the AvailabilityRouter must supply those credentials on each request. Select the entry under AvailabilityRouter in the tree on the left to populate the BTRouter tab.
The Username must belong to a Notes user who is listed in the ACLs of the btws.nsf.
Appendix C: Enable Modern Authentication
Hybrid Modern Authentication is distinct from Basic Authentication (username and password in Section 6.1.3)
Enabling the use of Modern authentication will replace the configuration in Section 6.1.3 for Basic Authentication. If the Hybrid Modern Authentication tab is populated this will override the Basic Authentication and FreeBusy will always use the Hybrid Modern Authentication details.
Basic Authentication is typically used on-premises, and Hybrid Modern Authentication is typically used with Office 365/Microsoft 365.
Both authentication schemes require the Exchange Web Services URL.
Configuring Availability Service:
Hybrid Modern Authentication requires an App registration to connect to Exchange Web Services.
Four items are required for configuration and can be taken from the App registration process which is explained below.
These four items are:
-
Application (client) ID – this is the App registration that will be created
-
Directory (tenant) ID – this is the tenant ID that FreeBusy will access for migrated accounts
-
Client secret – this is the secure access secret created for the App registration
-
Impersonation account – this is the tenant account that will be used for accessing scheduling information (eg BtFreeBusy@tenant.onmicrosoft.com). This account will require a mailbox.
Configuring an Azure AD App Registration:
First, navigate to the Office administration portal at https://portal.office.com and sign in with an admin account:
After signing in, click on the Admin button:
This takes you to the admin center for your Office 365 instance (already rebranded for Microsoft 365):
Click on the Azure Active Directory button to go to yet another admin page, this time for Azure AD for the instance:
Click on the All services button to list the services, one of which is App registrations:
Click on the App registrations button and you get here:
Click on the New registration button to load the following interface:
Set an appropriate Name (e.g. BTIntegration) and Supported account types. In the Redirect URI section, select Public client/native (mobile & desktop) and set the URI to:
urn:ietf:wg:oauth:2.0:oob
Next, click the Register button. Notice two of the four items needed for configuration, the Application (client) ID and the Directory (tenant) ID:
Notice when hovering over these two values, a copy icon will appear to copy the values with a single click:
Click this icon to copy the values before continuing.
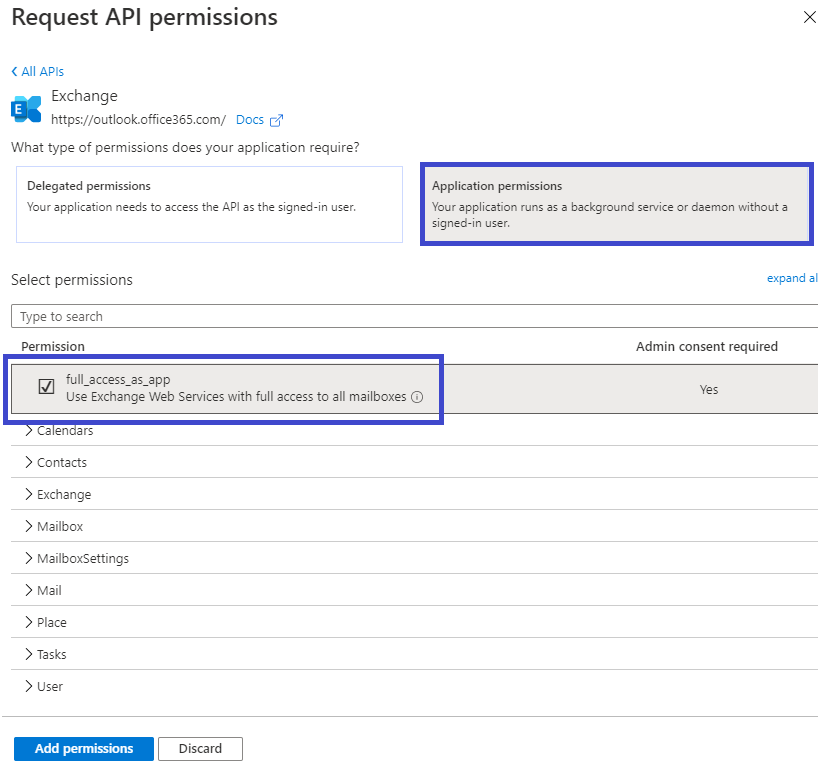
Click on the API permissions button and click on Add a permission. Microsoft’s default permission for the Microsoft Graph API will appear.
After adding an API permission, click APIs my organization uses, type in Office 365, and select Office 365 Exchange Online:
In the next screen, select Application permissions; check the full_access_as_app box, and click Add Permissions:
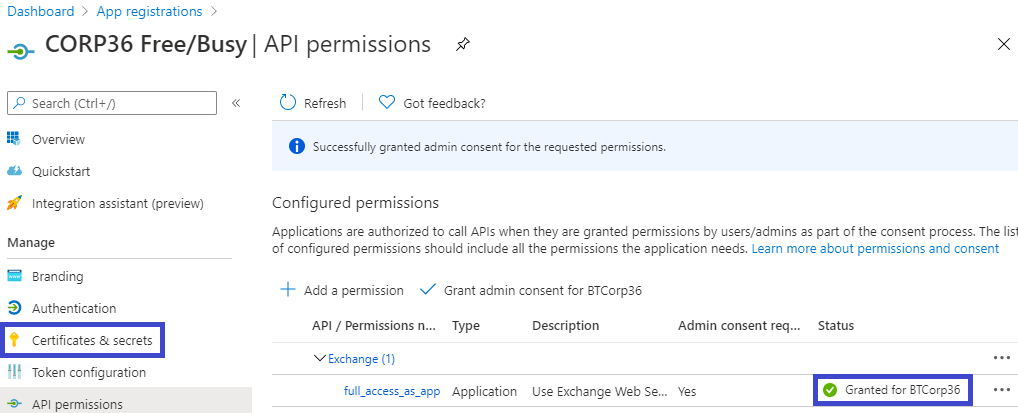
Back in the API permissions screen, click the Grant admin consent for BTCorp36 checkmark button:
When the admin consent is granted, a green checkmark for the API permissions will appear. Now, click on Certificates & secrets in the Manage menu on the left:
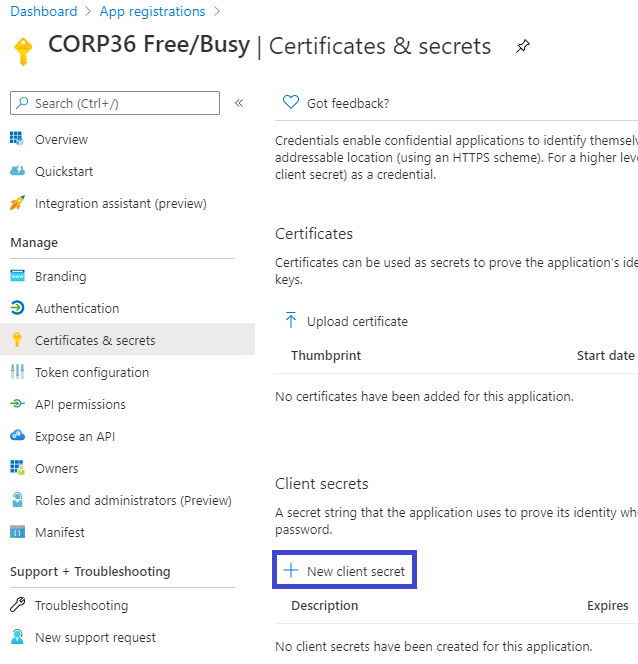
In the Certificates & secrets screen, click on the New client secret button:
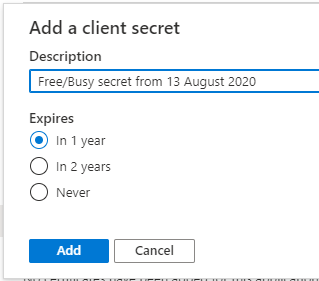
Give the secret a description and an expiration and click the Add button:
|
|
|
Now you have the third item, the client secret. Click the copy icon and save the client secret wherever you saved the application ID and directory ID:
|
|
|
Now you should be able to plug all these values into SetFBCred for the AvailabilityService, save the configuration, restart Free/Busy, and you should be using modern authentication:
Enable TLS 1.2 Connectivity
The Integration for Notes Free Busy process does support TLS 1.2. This requires the Windows Operating System to have recent patch updates and TLS 1.2 enabled on the Windows Server that hosts IIS along with Windows Server that hosts the Domino server for the FreeBusy deployment.
Valid Internet Certificates are required for the target system, self-signed certificates are not supported.
The target system should also support TLS 1.2 connections. If TLS 1.2 is enabled for FreeBusy but the target system does not have this enabled then the FreeBusy processing will fail. For support to configure TLS for IIS or Exchange a case should be raised with Microsoft, for Domino a case should be raised with HCL.
|
|
|
Windows Operating System Registry Updates:
[HKEY_LOCAL_MACHINE\SOFTWARE\Wow6432Node\Microsoft\Windows\CurrentVersion\Internet Settings\WinHttp]
“DefaultSecureProtocols”=Set the DWORD value to 800 for TLS 1.2.
[HKEY_LOCAL_MACHINE\SOFTWARE\Microsoft\.NETFramework\v4.0.30319]
"SchUseStrongCrypto"=dword:00000001
[HKEY_LOCAL_MACHINE\SOFTWARE\Microsoft\.NETFramework\v4.0.30319]
"SystemDefaultTlsVersions"=dword:00000001
[HKEY_LOCAL_MACHINE\SOFTWARE\Wow6432Node\Microsoft\.NETFramework\v4.0.30319]
"SchUseStrongCrypto"=dword:00000001
[HKEY_LOCAL_MACHINE\SOFTWARE\Wow6432Node\Microsoft\.NETFramework\v4.0.30319]
"SystemDefaultTlsVersions"=dword:00000001
Appendix D. Notes.ini File Parameters
The Notes.ini parameters required to configure FreeBusy are listed in blue, below:
BTCOEX_BYPASS_REQUESTOR
Accepted value = 0/1
Default = 0
This setting must be set to 1.
When set to 1, Exchange requests will use the credentials supplied by the BTCOEX_DEFAULT_FB_ACCESS_ACCOUNT parameter (described below). This is useful when Exchange is not supplying the user ID because it is set to OrgWideFB.
BTCOEX_DEFAULT_FB_ACCESS_ACCOUNT=<SMTP address>
The account specified will provide the access used by the entire Exchange organization for querying the Domino Availability Service. This account must be a Domino user with the Domain value set to the Foreign Domain in the Administrator Pre-install Checklist. This account must be allowed to see FreeBusy information for all users in the Domino environment.
BTCOEX_APPROVED_CALLERS=<IP addresses>
This comma separated list of IP addresses restricts the source of Free/Busy requests that will be processed by Domino FreeBusy. Legitimate requests would only come from servers known to the BT Coexistence install and trusted to have performed all necessary authentications prior to allowing OrgWideFB requests (e.g., 127.0.0.1,192.168.0.1).
Not providing a list of IP addresses for this setting is a potential security risk as the server would allow requests to come from any source.
BTCOEX_CACHE_EXCH_RESPONSE
Accepted value = <number of seconds to cache the response>
Default = 60
This command should be set in the Notes.ini; you can, however, manually set the FreeBusy caching, on-the-fly, using the following Domino console command:
tell btfreebusy cache n
n is the number of seconds to cache the response; 0 is also a valid value.
To turn the Exchange FreeBusy caching feature off, set the BTCOEX_CACHE_EXCH_RESPONSE parameter to a value of zero.
In addition, you may use the BTCOEX_DONT_CACHE_EXCH_RESPONSE parameter to turn the Exchange FreeBusy caching feature off. Specify 1 to indicate that the default value of 60 seconds should not be used.
BTCOEX_EXCHANGE_DOMAINS and BTCOEX_DOMINO _DOMAINS
Invitees in a Free/Busy request going to Exchange must be in a domain listed in the Notes.ini BTCOEX_EXCHANGE_DOMAINS variable.
Invitees in a Free/Busy request going to Domino must be in a domain listed in the Notes.ini BTCOEX_DOMINO_DOMAINS variable.
The following two Notes.ini variables are required (the below values are examples only):
-
BTCOEX_DOMINO_DOMAINS=BinaryTree,BTCMT,Domino
-
BTCOEX_EXCHANGE_DOMAINS=BinTreeEX,BTExchange,Exchange
FreeBusy checks requests coming from Exchange to make sure they are asking about users in the BTCOEX_DOMINO_DOMAINS.
FreeBusy checks requests going to Exchange to make sure they are asking about users in the BTCOEX_EXCHANGE_DOMAINS.
This is done to prevent an infinite loop of Free/Busy requests between the Exchange and Domino servers, which can happen when Exchange assumes that a particular SMTP address belongs to a Domino user, while Domino assumes that SMTP address belongs to an Exchange user.
If a list of domains is longer than 255 characters, the Notes.ini variables are contained in a series by appending a sequence number to the end of the variable name.
For example, if the original variable BTCOEX_DOMINO_DOMAINS contains more than 255 characters, the variables BTCOEX_DOMINO_DOMAINS1, BTCOEX_DOMINO_DOMAINS2, and so on, where each one provides up to a 255 character portion of the list of domains, will be used.
BTCOEX_SERVICE_TYPE
Accepted Value: COEX
Default Value: COEX
The BTCOEX_SERVICE_TYPE parameter specifies the Web Service format used by the FreeBusy IIS apps on the Windows Coex server to translate to the correct version of the EWS format.
The BTCOEX_SERVICE_TYPE parameter is set to COEX by default and should not be changed.
BTCOEX_LOG
Accepted Values: 0 or 8 (0=no logging to 8=all areas logging)
Default Value: 0
This controls which areas of FreeBusy should log information.
BTCOEX_SERVER_LOG
Accepted Values: 0-6 (0=no logging to 6=debug logging)
Default Value: 0
This logs incoming message processing done by the Domino Listener DSAPI filter to the <Domino Coex server>\logs\btserver.log file.
BTCOEX_CLIENT _LOG
Accepted Values: 0-6 (0=no logging to 6=debug logging)
Default Value: 0
This logs outgoing processing messages from the Domino Coex FreeBusy task to the <Domino Coex server>\logs\btclient.log file.
BTCOEX_STOP_AFTER_EXCEPTION
Accepted Values: 0, 1
Default Value: 0
This parameter controls whether FreeBusy will automatically restart if it encounters a fatal exception (error) that causes it to terminate.
If BTCOEX_STOP_AFTER_EXCEPTION is set to 1, FreeBusy will not restart after an error causes it to exit and it would need to be manually restarted.
If BTCOEX_STOP_AFTER_EXCEPTION = 0 (default), FreeBusy will restart after exiting due to an error.
BTCOEX_LOGDATA=15
This is a bit mask which controls both which data is log and where the data is logged. The value is the sum of the information you want to log and its location from the list below. Any combination of the values below can be used; the lowest value of this parameter can be “1”, the highest “15”.
1 = request
2 = response
4 = to console
8 = to file
BTCOEX_FB_TEST_POLLING
Accepted value = <number of minutes between heartbeat messages>
Default = 5
BTCOEX_FB_TEST_ACCOUNT
Accepted value = <SMTP address>
This is a recommended setting.
The SMTP address should be a valid Exchange account. It is passed from the Domino Coex server to IIS BTAvailability on the Windows Coex server.
If it is a valid Exchange account, IIS will send the request to Exchange, ensuring all servers are checked.
BTEXCHANGESERVER
Accepted value = <ExchangeSMTPDomain>
If a value for BTCOEX_FB_TEST_ACCOUNT is not provided, "fbtestaccount@” is prepended to this Exchange server name to create an SMTP address.
BTCOEX_NUM_POLLING_FAILS_BEFORE_MSG
Accepted value = <number of successive failures before sending a failure notification>
Default = 3
This parameter determines the number of successive FreeBusy failures before a notification is sent to the email account specified in BTMULTISCHEDREPORTADDRESS.
BTCOEX_MINUTES_BETWEEN_FAIL_MSGS
Accepted value = <number of minutes between failure notifications>
Default = 30
FreeBusy will send alerts to the account previously specified account until a successful test occurs. This parameter determines the interval between failure notifications, i.e. 30 minutes.
BTMULTISCHEDREPORTADDRESS
Accepted Value = <SMTP address>
Default = None
FreeBusy sends alerts to the address specified in this parameter.
The SMTP address should be a valid email address for a user or a group.
BTMULTISCHEDREPORTADDRESSTYPE
Accepted Value = 0/1/2
Default = 0
This parameter allows the user to specify whether the configured BTMULTISCHEDREPORTADDRESS should be placed in the To, CC, or BCC field when sending a mail notification. Acceptable values are as follows:
0 = To
1 = CC
2 = BCC
If the parameter is not included in the Notes.ini file or contains an unacceptable value then the address will appear in the To field as that is the default behavior.