Acting on Compliance Analysis Results
From the Compliance Summary page, you can take a number of compliance actions on returned SCM scans. Use the information in the following table to determine the appropriate action to take.
NOTE: Any option that is not valid for the result set is not available for selection. For example, if you are viewing Compliance Action jobs, the option to Apply Compliance Actions will be disabled.
|
If you want to ... |
Then ... |
|---|---|
|
view more detailed information about scan results for individual items (and, optionally, export results for closer analysis) |
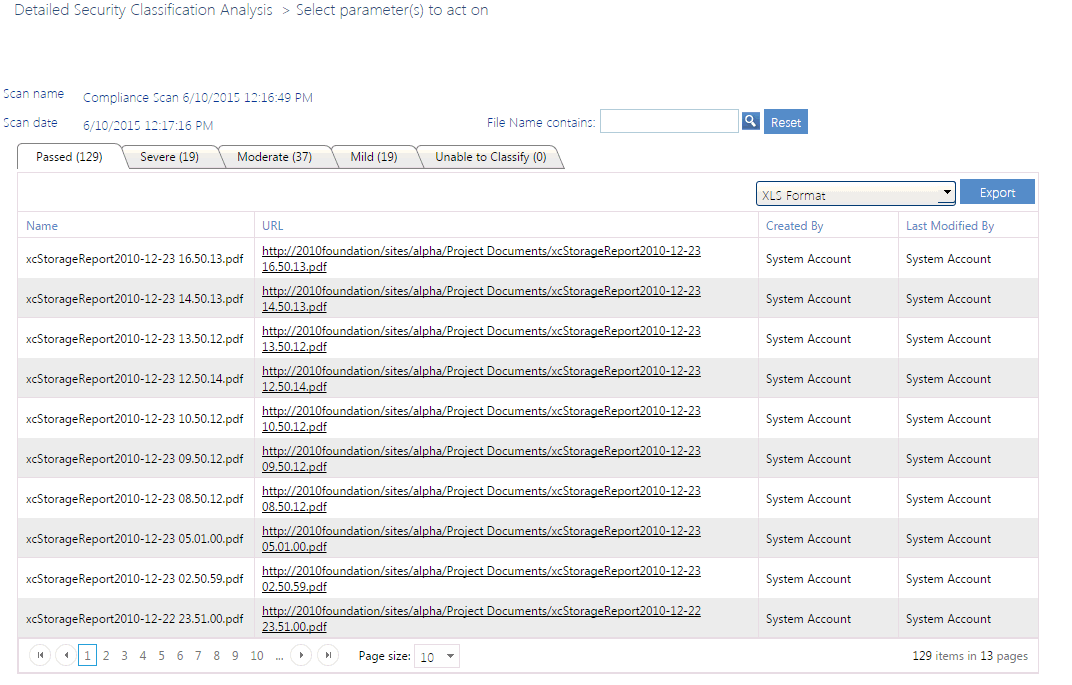
·from the Sensitive Content Submission Maintenance page,select the applicable Detailed Analysis View link. OR ·from the Compliance Summary page, click [View Detailed Classification Analysis]. Note that there is a separate tab for each classification, with detail about each item for which scan results were returned. If you want to download a tabs-worth of results: a)Choose one of the following export formats: §XLS format (for opening in a pre-2007 version of Excel) §Excel XML format (for opening in Excel 2007 or later) §PDF format b)Click [Export]. |
|
re-classify an item that returned "Unable to Classify" |
see Reclassifying Items Returned as Unable to Classify. If you want an action to be taken on any items that were returned by Metalogix Sensitive Content Manager as 'Unable to Classify,' you must reclassify them before applying Compliance Actions to the scan job. |
|
manage scanned files |
|
|
apply Compliance Actions to the selected job |
a)From the Compliance Summary page, click [Apply Compliance Actions]. NOTE: This option is not available if you filtered results by Compliance Action Jobs. b)Either: §select a previously-defined Compliance Action from the drop-down OR §define a new Compliance Action. WARNING: If you choose to Update Existing Compliance Actions, the changes will be applied to all scan jobs that use it going forward.
c)When finished, click [Apply actions to current scan]. |
|
view items for which Compliance Actions have been taken |
from the Compliance Summary page, click [View Items Affected by Compliance Actions]. Note that there is a separate tab for each action taken, with a list of items and the associated classifications returned by Metalogix Sensitive Content Manager. If you want to download a tabs-worth of results: a)Choose one of the following export formats: §XLS format (for opening in a pre-2007 version of Excel) §Excel XML format (for opening in Excel 2007 or later) §PDF formal b)Click [Export]. |
|
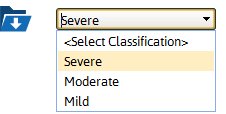
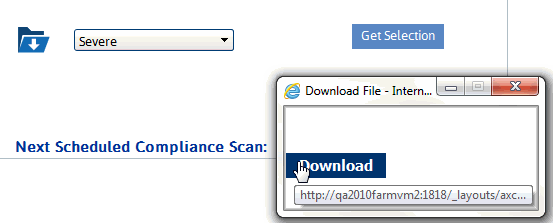
download items of a particular severity level (Mild, Moderate. or Severe) as a reusable selection on which you can perform ControlPoint operations |
a)from the Compliance Summary page drop-down to the right of the b)Click [Get Selection]. You can now download and save the file, then upload it as a selection when performing a ControlPoint operation that involves list items. See Saving and Re-Using a SharePoint Object Selection. |


NOTE: If you want to review compliance actions for a selected scope and date range, you can generate a Compliance Actions Audit.
Reclassifying Items Returned as Unable to Classify
If an item is returned from Metalogix Sensitive Content Manager with a Classification of 'Unable to Classify,' it means that the service detected "probable" sensitive content but was unable to classify it definitively as sensitive content. You can, however, review the file and apply a classification manually before applying a Compliance Action to the scan job.
If you want an action to be taken on any items that were returned by Metalogix Sensitive Content Manager as 'Unable to Classify,' you must reclassify them before applying Compliance Actions to the scan job.
To reclassify items returned as 'Unable to Classify':
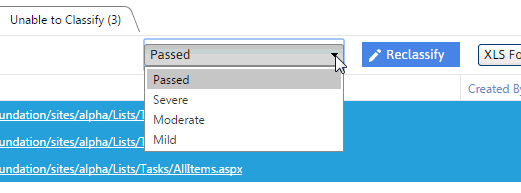
1From the Detailed Security Classification Analysis page, select the Unable to Classify tab.
2Select the item(s) to which you want to apply a particular classification.

NOTE: If you want to review the contents of an item before assigning a classification, click the URL link to open the item.
3Select a classification from the drop-down, then click [Reclassify].
You will be prompted to confirm the action before continuing.
CAUTION: Once you reclassify an item, the drop-down becomes disabled and the item cannot be reclassified again. If Compliance Actions have already been applied to the scan job containing the item(s), the Reclassify option will no longer appear on the page.
Once an item has been reclassified:
·it will be moved to the appropriate tab for the classification
AND
·the classification change(s) will be reflected on the Compliance Summary page.
Managing Scanned Files
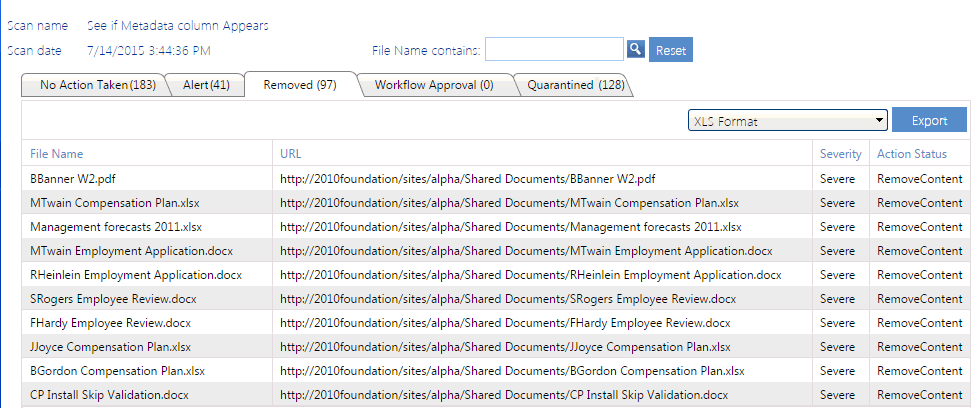
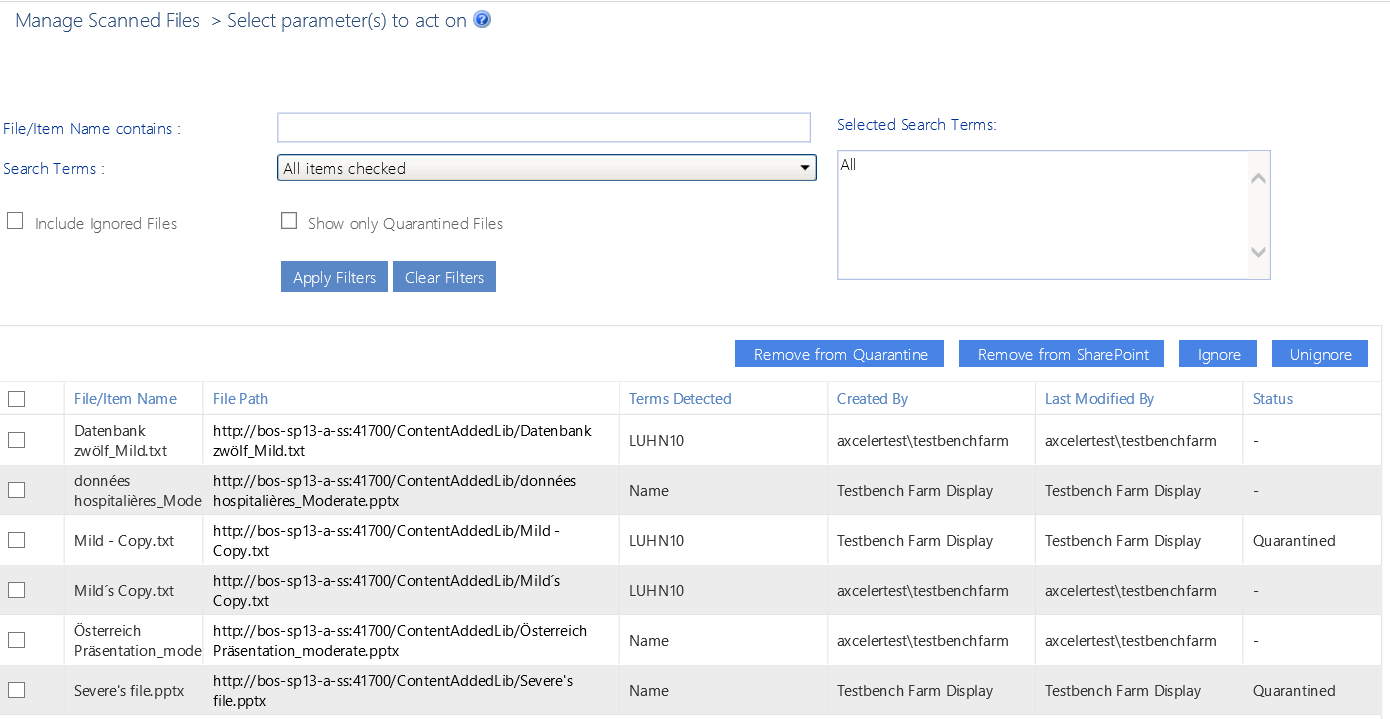
Use the Manage Scanned Files operation to review and act on files that have been scanned for compliance. You can:
·apply filters to further refine the results that display in the grid
·choose to "ignore" (that is, hide from the grid) files that do not require review or action
EXCEPTION: Quarantined files cannot be ignored.
·link to individual files to review their content
·remove files from quarantine
·remove files from SharePoint.
To manage scanned files:
1Use the information in the following table to determine the appropriate action to take.
|
If you are starting from ... |
Then ... |
|---|---|
|
the SharePoint Hierarchy |
a)Select the object(s) containing the scanned files you want to manage. b)Choose Compliance > Manage Scanned Files. |
|
a)Make sure the Compliance Action jobs radio button is selected. b)Select the Scan job containing the files you want to manage. c)Click [Manage Scanned Files]. |

3.To filter items that display in the grid:
·Enter a full or partial file name in the File Name Contains field, and/or select specific Search Terms from the drop-down.
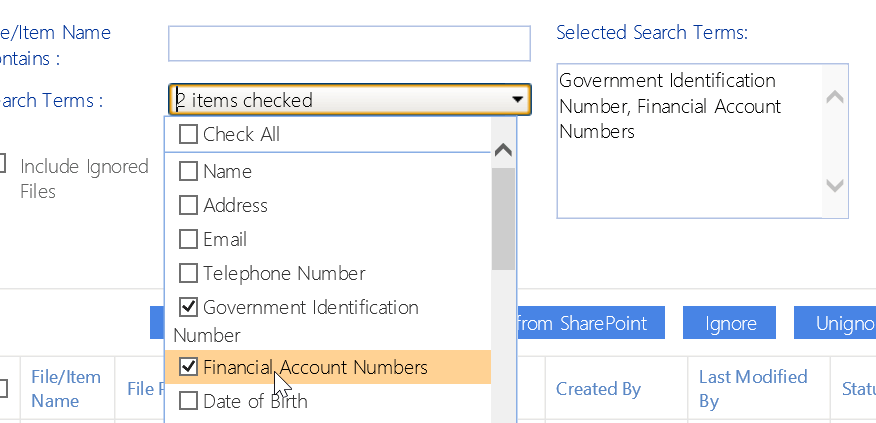
·If you want to Include Ignored Files (which are hidden by default), check the applicable box(es).
REMINDER: "Ignore" is a status that you can apply to files that you do not want to display in the grid by default (because, for example, they do not require further review or action).
NOTE: Because quarantined files cannot be ignored, if you select Show Only Quarantined Files, the Include Ignored Files option becomes disabled. If you upgraded from version 8.5, all quarantined files will always display, even those that show a status of Ignored.
·Click [Apply Filters].
Note that if you chose to include Ignored or Quarantined files, they will be labeled as such in the Status field.
TIP: If you want to review quarantined or Ignored files specifically, sort on the Status column to group these files together.
Now you can:
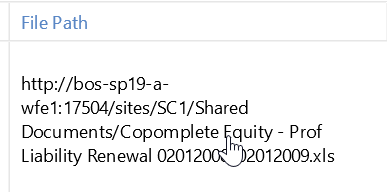
·open a file whose contents you want to review (by clicking the File Path link)
AND/OR
·select files on which you want to perform an action, then click the appropriate action button: [Remove from Quarantine], [Remove from SharePoint], [Ignore], or [Unignore].
Note that when a file is removed from SharePoint it no longer displays in the grid.
NOTE: When you remove a file from quarantine, it is restored in its original location with the same permissions it had before it was quarantined, and you cannot remove an attachment from quarantine without also removing its parent item.
Removing Scanned Files from SharePoint
If you attempt to remove one or more files from SharePoint, you will be prompted to confirm your selection. Unlike the Sensitive Content Submission Maintenance feature, you can remove individual files which has been quarantined.
If you delete an item that has attachments, the attachments will automatically be deleted along with the item.
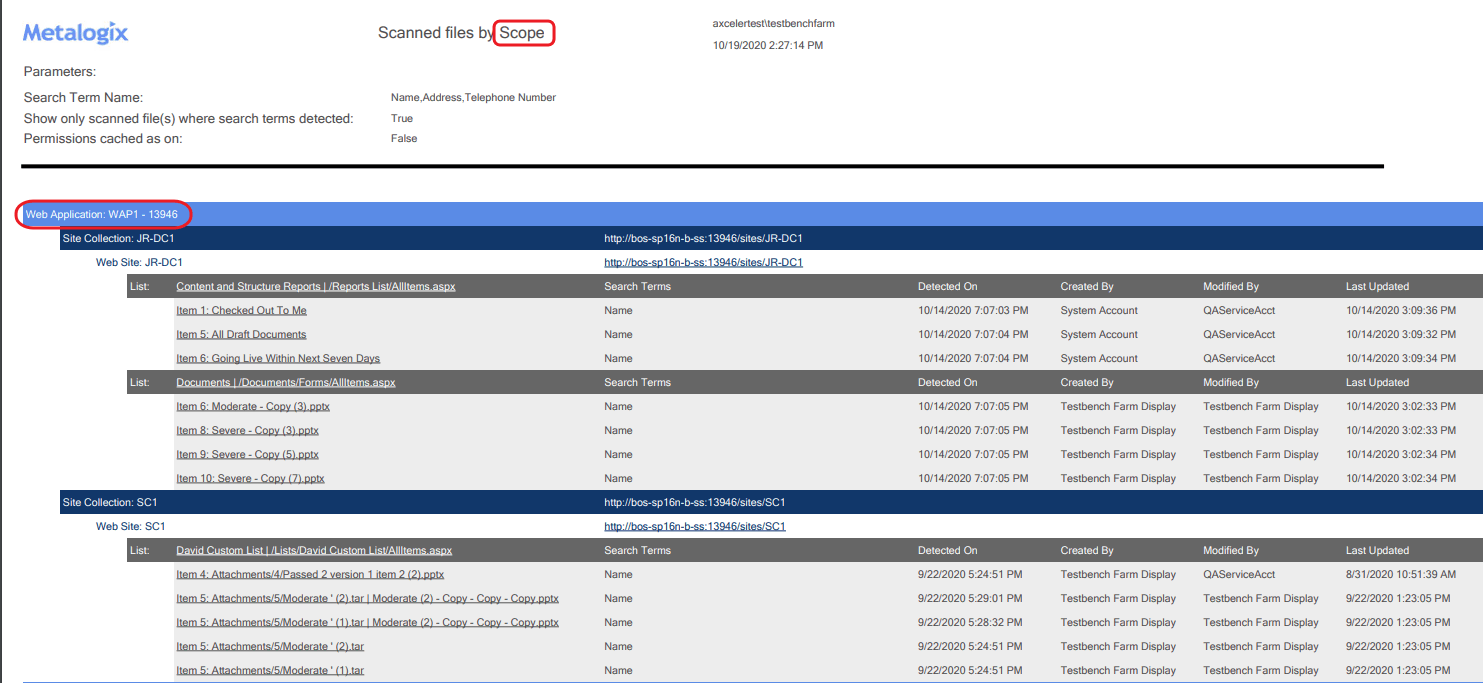
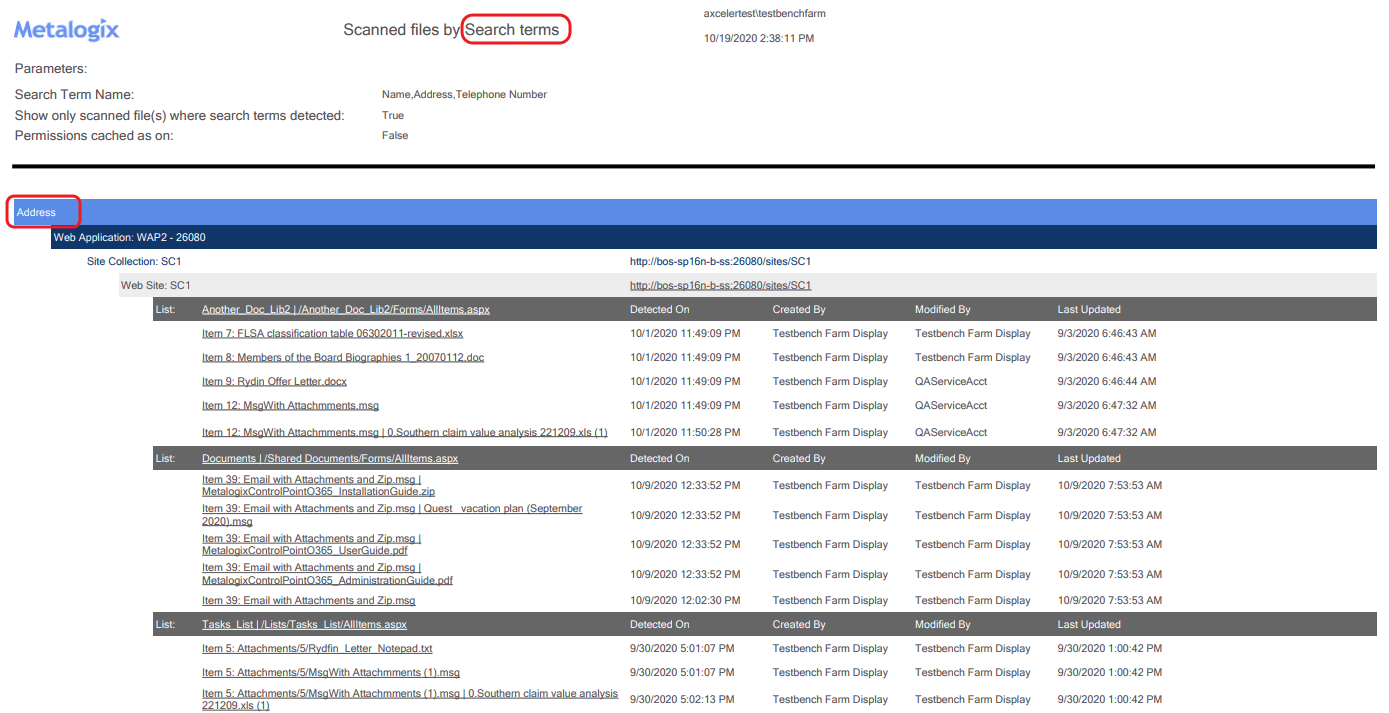
Analyzing Scanned Files
The Scanned Files by Search Term and Scanned Files by Scope analyses let you view all of the files that have been scanned for sensitive content, along with the search term(s) found. By default, results display the most recent scan performed on each file within the selected scope, but you can also enter a date range.
To generate a Scanned Files analysis:
1Select the object(s) you want to include in your analysis.
2RightChoose the appropriate option, based on how you would like to have results grouped:
§Compliance > Scanned Files by Scope
OR
§Compliance > Scanned Files by Search Terms.
3Specify the parameters for your analysis.
IMPORTANT:
§Currently, you can only Filter by Search Terms if you enter one complete search term (that is, you cannot filter by multiple or partial search terms).

If you leave the Filter by Search Terms field blank, all search terms within the scope of your analysis will be included.
4Under Advanced Parameters:
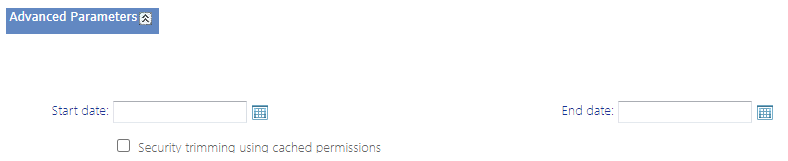
·If you leave the Start Date and End Date blank (the default), the most recent scan performed on each scanned file will be included in analysis results. If you enter a Start Date and End Date, results will include all scans performed within the date range.
·If you want to run the analysis on scans for which the permissions of users who performed the scans were collected since the last run of Discovery, check the Security trimming using cached permissions box. If you leave this box unchecked, the analysis will be run using real-time permissions, but processing time my increase significantly.
Now you can:
·run the operation immediately (by clicking the [Run Now] button)
OR
·schedule the operation to run at a later time or on a recurring basis.
OR
·save the operation as XML Instructions that can be run at a later time.
Results are grouped either by scope or search term (depending on the analysis selected).