
Setting Metadata Values
ContolPoint lets you populate or change Managed Metadata, a single line of text, or numeric values within a list column for a selected Content Type.
You can also run a simulation of how the operation will be carried out before committing to the action. This can be valuable, for example, to identify exactly which items would be changed.
EXAMPLE:
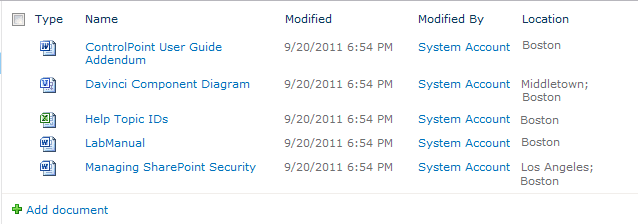
The Shared Documents library on the company website has a Managed Metadata column called Location.
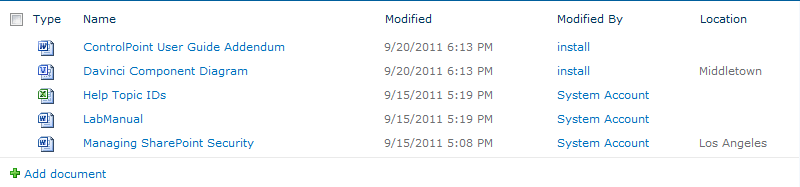
I want to make sure that the value Woburn is added to the Location column for all documents in that library.
To set a metatdata value:
1Select the object(s) whose column data you want to set.
2Choose Automation > Set Metadata Value.
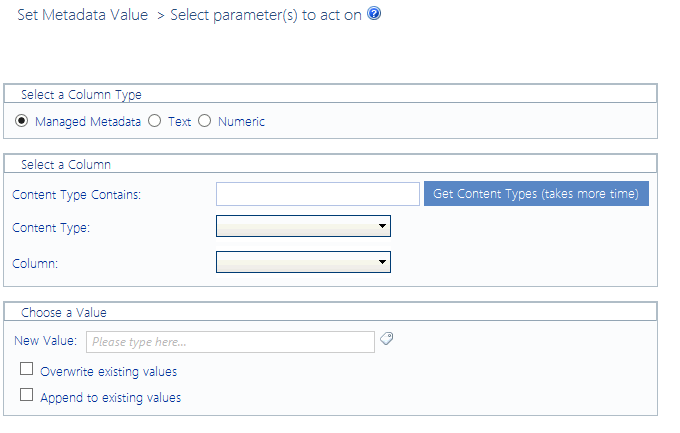
3Select the type of metadata you want to set:
§Managed Metadata
§Single Line Text, or
§Numeric
4Use the information in the following table to determine the appropriate action to take.
|
If the scope of your selection ... |
Then ... |
|
·is at the site level or above and/or ·includes more than one list |
go to the next step. NOTE: Before you can select a list column, you must first choose from available Content Types. |
|
consists of only one list |
you may want to go to Step 8. NOTE: It is not necessary to choose a Content Type for a single list. The Column drop-down will automatically populate with all of the columns used by that list. |
5If you want to filter content types by a specific text string, complete the Content Type Contains field.

6To populate the Content Type drop-down with relevant Content Types, click [Get Content Types].
7Select a Content Type from the drop-down.
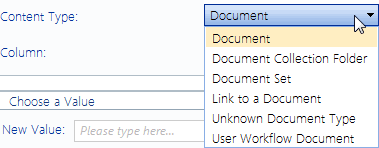
NOTE: If you have selected objects above the list level (for example, Web applications, site collections, and/or sites), the drop-down will be populated with all Content Types that are available for use by lists and libraries within the scope of your selection. If you have selected multiple lists, only Content Types that are currently in use by those lists will be available for selection.
8Select the Column whose value you want to set. (This drop-down is populated with all of the columns used by lists within the scope of your selection that match the selected data type and content type.)
NOTE: If your selection includes more than one list, custom columns will only appear in the drop-down if they have been added to the Content Type at the site level. If a column was added directly to a particular list (or to a Content Type on the list), it will appear in the drop-down if your selection consists of only that list.
9For Choose a Value:
a)Enter the new value for the column (For Managed Metadata, you can also click the 
b)If you want to Overwrite existing values, check this box.
NOTE: If you leave this box unchecked and a value already exists in that column for an item, it will be skipped. If you selected a Managed Metadata column that allows multiple values, you also have the option to Append to existing values.

Now you can:
·run a simulation of the action (by clicking [Run Simulation])
·run the action immediately (by clicking [Run Now]),
OR
·schedule the action to run at a later time .
OR
·create an xml file with instructions for the analysis that can be run at a later time (by clicking [Save Instructions]).
If you click [Run Simulation], ControlPoint runs through the process without actually making changes. A Task Audit will be generated with a description of what ControlPoint would have done if the action had been carried out. Text in the task description identifies it as a simulation.
If you chose the Run Now, option, after the action has been processed:
·a confirmation message displays at the top of the page, and
·a ControlPoint Task Audit is generated for the action and displays in the Results section.
If you schedule the action, a link to the Task Audit is included in the scheduled action notification email.
See also The ControlPoint TaskAudit.
Creating a Managed Metadata Column from a Text Column (SharePoint Server)
The Create Managed Metadata action lets you map an existing text column in a SharePoint list or library to a Managed Metadata term. You can:
·map the text column to a Managed Metadata column that is already used by the list/library
OR
·create a new Managed Metadata column using a term set that has been defined either within the current site collection or in the Managed Metadata Service Application.
NOTE: If ControlPoint creates the Managed Metadata column, it will do so on the list-level Content Type. If you have defined a Content type at a higher level (such as the site collection or site) you may want to manually update the shared definition, and then use this action to populated the values of that column.
You can also run a simulation of how the operation will be carried out before committing to the action. This can be valuable, for example, to identify exactly which items would be changed.
EXAMPLE:
A SharePoint document library has a text field called Office, which identifies the Metalogix regional office that has ownership of a document.
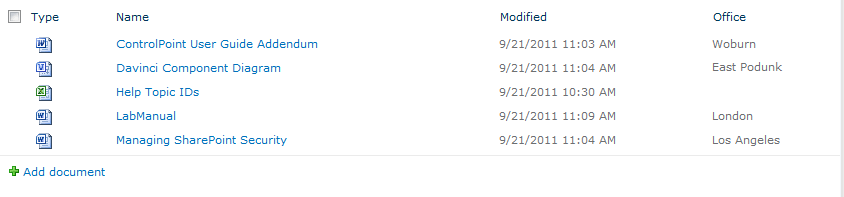
The SharePoint administrator wants to map that column to a new Managed Metadata column entitled Metalogix Office, populate the new column with only valid Managed Metadata, and rename the original column, which is retained for reference or cleanup.

To create Managed Metadata from a text column:
1Select the object(s) for which you want to create Managed Metadata.
2Choose Automation > Create Managed Metadata.
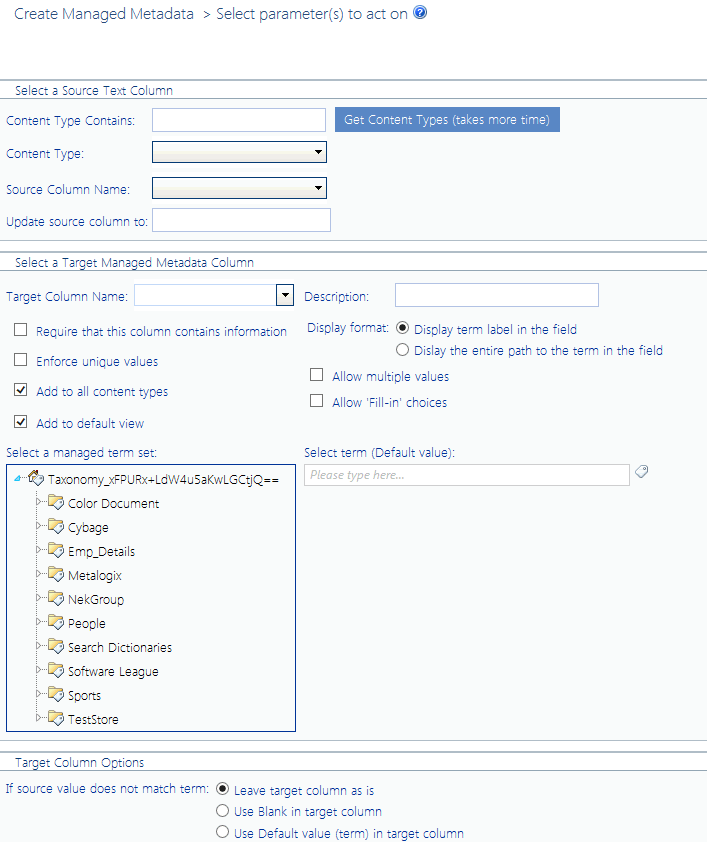
3Use the information in the following table to determine the appropriate action to take.
|
If the scope of your selection ... |
Then ... |
|
·is at the site level or above and/or ·includes more than one list |
go to the next step. NOTE: Before you can select a list column, you must first choose from available Content Types. |
|
consists of only one list |
you may go to Step 7. NOTE: It is not necessary to choose a Content Type for a single list. The Column drop-down will automatically populate with all of the columns used by that list. |
4If you want to filter source column content types by a specific text string, complete the Content Type Contains field.
5To populate the Content Type drop-down with relevant content types, click [Get Content Types].
6Select a source column Content Type from the drop-down.
NOTE: If you have selected objects above the list level (for example, Web applications, site collections, and/or sites), the drop-down will be populated with all Content Types that are available for use by lists and libraries within the scope of your selection. If you have selected multiple lists, only Content Types that are currently in use by those lists will be available for selection.
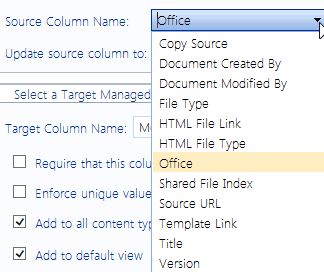
7Select the Source Column Name of the column whose value you want to use in setting the Managed Metadata field. (This drop-down is populated with all of the text columns within the scope of your selection that match the selected Content Type.)
NOTE: If your selection includes more than one list, custom columns will only appear in the drop-down if they have been added to the Content Type at the site level. If a column was added directly to a particular list (or to a Content Type on the list), it will appear in the drop-down if your selection consists of only that list.
8If you want to give the source column a new name, complete the Rename source column to field. ( If you want to use the same name for the target column, then you must rename the source column.)

9Complete the Select a Target Managed Metadata section as follows:
a)For Target Column Name and Description:
§If the Managed Metadata column already exists for the Content Type, select it from the drop-down.
NOTE: When you select an existing Managed Metadata column, the remaining fields will be grayed-out, and the existing column definition will be used.
OR
§If you want to create a Managed Metadata column for the Content Type, enter a name for the new column in the drop-down then enter a Description.
NOTE: If you are creating a new Managed Metadata column, complete the remaining fields as you would if you were creating it in SharePoint.
10Check the options that you want to apply to the target column.

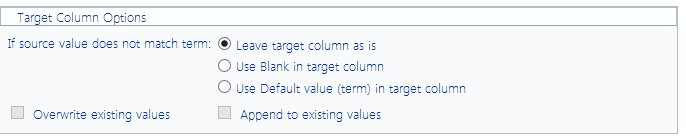
11Complete the Target Column Options section as follows:
a)For If source value does not match term, specify how to proceed if a source value does not match a valid term within the selected term set. Use the information in the following table for guidance.
|
If the source value does not match a valid term within the selected term set and ... |
Then ... |
|---|---|
|
you want to retain the existing value in the target Managed Metadata column |
select Leave target column as is. NOTE: If you are creating a new target Managed Metadata column and select this option, when a non-matching value is encountered the target column value will be left blank. |
|
you want the value in the target column to be blank (and blank is a valid value per the column definition) |
select Use Blank in target column. |
|
you want the default value that has been specified for the target Managed Metadata column to be used |
select Use Default value (term) in target column. |
b)If the target Managed Metadata column already exists and you want to Overwrite existing values, check this box.
NOTE: If you leave this box unchecked and a value already exists in that column for an item, the existing value will be retained. If you selected a Managed Metadata column that allows multiple values, you also have the option to Append to existing values.
Now you can:
·run a simulation of the action (by clicking [Run Simulation])
OR
·run the action immediately (by clicking [Run Now]),
OR
·schedule the action to run at a later time
OR
·create an xml file with instructions for the analysis that can be run at a later time (by clicking [Save Instructions]).
If you click [Run Simulation], ControlPoint runs through the process without actually making changes. A Task Audit will be generated with a description of what ControlPoint would have done if the action had been carried out. Text in the task description identifies it as a simulation.
If you chose the Run Now, option, after the action has been processed:
·a confirmation message displays at the top of the page, and
·a ControlPoint Task Audit is generated for the action and displays in the Results section.
If you schedule the action, a link to the Task Audit is included in the scheduled action notification email.
See also The ControlPoint Task Audit.
Managing SharePoint User Permissions
ControlPoint includes a variety of value-added actions that facilitate the management of SharePoint users, groups, and permissions:
These actions are accessible from various levels of the hierarchy, enabling you to act on a single site collection or site, multiple site collections, sites, and/or lists within a Web application, or across the entire farm.
EXCEPTION: You cannot use these actions to manage user permissions for the SharePoint Central Administration site.
From the ControlPoint left navigation pane, you can also link directly to SharePoint pages for managing users and permissions.
Accessing SharePoint Pages for Managing User Permissions
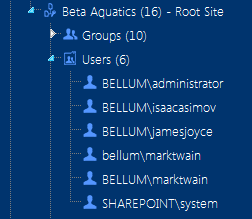
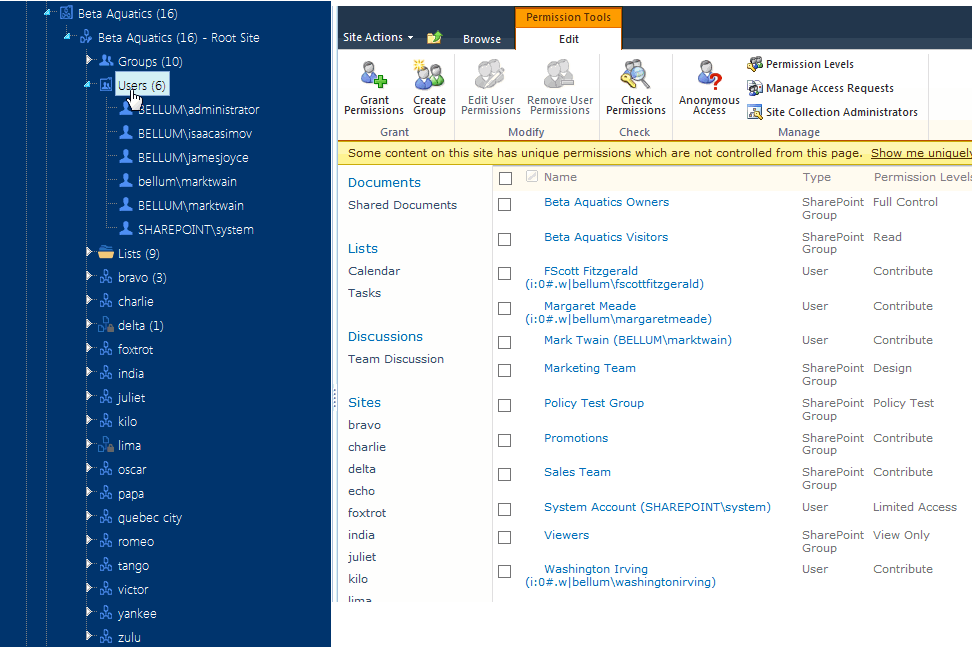
The Users folder displays all of the users with direct or explicit permissions for a selected site collection or site. You can link directly to the SharePoint pages for managing direct permissions of an existing user or create a new user.
NOTE: Users do not display for sites whose permissions are inherited (as indicated by a 
If a user has permissions to the site collection/site via a group, permissions are managed at the group level. See Accessing SharePoint Pages for Managing Groups.
To view user permissions for the site collection/site in SharePoint
Click on the Users folder to access the SharePoint Permissions page for the site collection/site
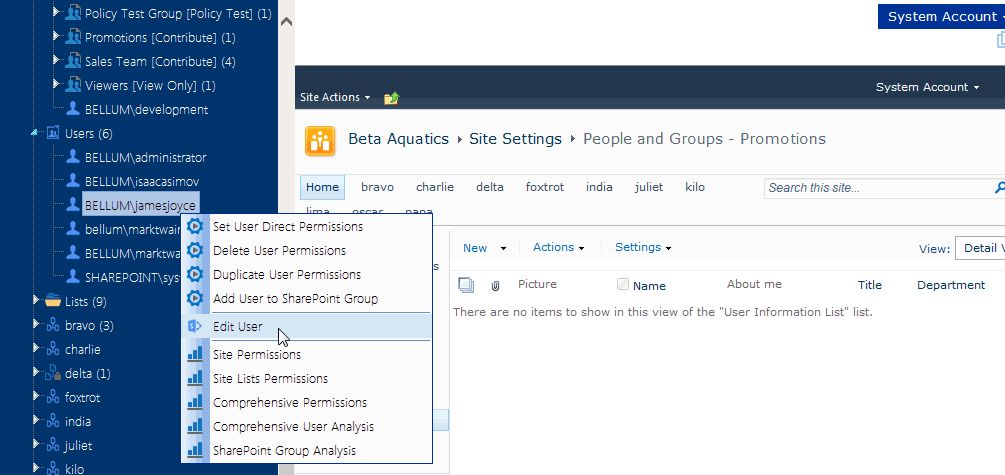
To view/edit information about a user in SharePoint:
Select a user name and choose Edit to access the SharePoint Edit Personal Settings page for that user.
As an alternative to managing permissions through SharePoint, you can use ControlPoint value-added features for managing user permissions. These features are especially useful if you want act on multiple users and/or across multiple sites in a single operation.