
Client-side UI Customization
Privilege Manager supports the text customization of all user-facing dialogs on client computers. In addition to the ability to change the default English dialog text, admins can also create client-side UI customization files for any non-English client language locale.
Language Translation Files
To customize the language used in the client-side UI, one or more translation files must be located in the same folder where the client files are installed, by default: C:\Program Files (x86)\Common Files\Quest\Privilege Manager\Client.
A language-specific translation file must be named as follows: (two_letter_language_code)-pmlang.ini
Example:
- Spanish translation language filename: es-pmlang.ini
- English translation language filename: en-pmlang.ini (used to customize client computers with English locale)
- French translation language filename: fr-pmlang.ini
|
|
NOTE: The en-pmlang.ini file is present in the client folder by default. If no language translation file exists, default English UI text is used. Please see Privilege Manager for Windows KB 266054 for information on language translation files currently available for download, as well as configuration and troubleshooting tips. |

Privilege Manager will automatically search for the language translation file corresponding to the language locale setting on a client computer. If no translation file is found, default English client-side text strings are used.
A specific language translation file can be used regardless of the Window's local setting. with the use of a registry setting.
- Hive: HKCU\Software\Scriptlogic Corporation\Privilege Authority
- Key: Preferred Language
- Type: REG_SZ
- Value: name of language file; for example: es-pmlang.ini
Of course, the corresponding translation file must exist as described above.
In addition to checking locally on the client computer for language translation files, the Privilege Manager client will atomically copy down (and overwrite existing, if older) language files found on the NETLOGON share.
|
|
NOTE: NETLOGON is checked for updated language files every time a user logs on to a computer. Additionally, Admins can configure the Privilege Manager client to check an alternate location for updated language translation files. This can be done by updating the TranslationFilesFolder value in HKLM\Software\Scriptlogic Corporation\Privilege Authority. |
Using Microsoft tools
You can use Microsoft tools with Privilege Manager for Windows to:
- Install the client using the Group Policy Management Console. For more information, see Using the Group Policy Management Console.
- Create and manage rules using the Group Policy Management Editor in the Group Policy Management Console. For more information, see Using the Group Policy Management Editor.
-
Remove local administrator rights using the Active Directory Users and Computers Utility. For more information, see Using the Active Directory Users and Computers utility.
- Report on policies you have applied using the Resultant Set of Policy Wizard. For more information, see Using the Resultant Set of Policy Wizard.
Maintaining a least privileged use environment
Maintain a least privileged use environment by processing self-service elevation requests, using the Console Email Configuration screen, and using group policy settings.
Processing Self-Service Elevation Requests
Using the Console Email Configuration screen
Using Group Policy Settings
Database Planning
The goal of this topic is to proactively manage disk capacity as it relates to Privilege Manager. The capacity planning information provided here contains steps to help understand, install, and configure the Privilege Manager database environment.
Eighty percent of database issues deal with disk capacity problems and in many cases, they are caused by failure to adhere to best practices. Failure to adhere to best practices should never happen as these issues are very predictable and could have been prevented with a comprehensive database plan.
This section gives you a breakdown of the Privilege Manager database structure to better understand the database environment and walks through capacity planning best practices to minimize the risk of disk over-utilization.
Privilege Manager Database Diagram

Privilege Manager Tables
| Table Name | Description |
| Activity | Contains rule and instant elevation activity; includes elevation type and item. |
| Computer | Contains client computer information such as its name, domain, class, OU, operating system and the version of Privilege Manager installed. |
| DatabaseVersion | Contains the database version of the Privilege Manager database. |
| DataError | Contains database exceptions and includes exception messages, host address, host name and the xml data document that caused the exception. |
| DeployedRules | Every time a new rule is deployed, a record is created for every user associated with this rule. This keeps track of all deployed rules giving them a status of active or inactive and tracks date added or removed. |
| Discovery | Contains information on any process that starts or fails to start on a client computer. Data stored here includes the product name and requested execution level. It is used by the Privileged Application Discovery component. |
| Domain | Contains records of the network domains. |
| ElevationRequest | Contains elevation requests made on the client, including information about the name of products the request is being made for and the reason for the request. |
| Reports_Scheduled | Contains records of the scheduled reports to be generated. |
| SharedFilters | All shared filters created. |
| Rules | Rules created and saved in the Privilege Manager console. |
| Users | Users who have logged into a Privilege Manager client machine. |
Data Storage Estimates
| Table Name | # Rows | Byte Size per Row | Total Size (bytes) |
|---|---|---|---|
| Activity | 1,000 | 4,222.68 | 422,268.00 |
| Computer | 1 | 84.38 | 84.38 |
| DatabaseVersion | 1 | 72.09 | 72.09 |
| DataError | 20 | 8,834.25 | 176,685.00 |
| DeployedRules | 20 | 49.15 | 983 |
| Discovery | 30 | 3,8049.23 | 1,141,476.9 |
| Domain | 1 | 84.38 | 84.38 |
| ElevationRequest | 20 | 54,540.61 | 1,090,812.2 |
| Reports_Scheduled | 10 | 4,575.25 | 45,752.50 |
| Reports_SharedFiles | 10 | 9,436.70 | 94,367.0 |
| Rule | 20 | 304.99 | 6,099.8 |
| User | 1 | 4,443.48 | 4,443.48 |
| Total Size | 4,683,128.73 Bytes |
As the number of users grow, some tables will increase in size more rapidly than others. For this reason, the database size will not grow proportionately.
Database size calculation uses the following rules:
- The Activity table generates one thousand records per user.
- The number of Computer records are equal to the number of user records.
- 20 reports represent one user.
- The DatabaseVersion table should be one record irrespective of the number of user in the environment.
- The DataError table is estimated to be twenty records to one user.
- The DeployedRules table should generate twenty records per one user.
- The Discovery table should generate roughly thirty records per user.
- The number of Domain table records are set to one per user.
- Twenty ElevationRequest records are generated per user.
- There are ten Schedule_report records per user.
- There are ten Reports_SharedFilters per user.
- Twenty Rule records are generated per user.
- One user record exists in the User table per user.
| Privilege Manager Users | Privilege Manager Database |
|---|---|
| 1 | 4.7 MB |
| 10 | 10.5 MB |
| 100 | 73.0 MB |
| 1,000 | 692.6 MB |
| 2,000 | 1,378.6 MB |
| 5,000 | 3,439.9 MB |
| 10,000 | 6,876.4 MB |
| 15,000 | 10,313.0 MB |
| 20,000 | 13,749.5 MB |
| 50,000 | 34,368.8 MB |
| 100,000 | 68,734.2 MB |
Database Hardware and Software Requirements
It is recommended that databases above 6876.4MB or 10,000 users (Table 2 displays the database size as it relates to the number of users in the database environment) install the full SQL Server version. Any database size below 6000MB should be adequate to run SQL Server Express with room to grow before an upgrade to the full version of SQL Server is required.
NOTE: SQL Server Express databases have a size capacity limit of 10,000MB.
When it comes to computing capacity and maximum memory there is also a bottleneck where different SQL Server installs would not be able to take advantage of processing power and large memory storage.
| Enterprise | Standard | Web | Express | |
|---|---|---|---|---|
| Maximum database size | 524 PB | 524 PB | 524 PB | 10 GB |
| Compute Capacity | OS Max | 4 sockets or 24 cores | 4 sockets or 16 cores | 1 socket or 4 cores |
| Maximum Memory | OS Max | 128 GB | 64 GB |
1 GB |
| Privilege Manager Users | Privilege Manager Database | Recommended SQL Server Install |
|---|---|---|
| 1 | 4.7 MB | SQL Server Express |
| 10 | 10.5 MB | SQL Server Express |
| 100 | 73.0 MB | SQL Server Express |
| 1,000 | 692.6 MB | SQL Server Express |
| 2,000 | 1,378.6 MB | SQL Server Express |
| 5,000 | 3,439.9 MB | SQL Server Express |
| 10,000 | 6,876.4 MB | SQL Server Express |
| 15,000 | 10,313.0 MB | SQL Server |
| 20,000 | 13,749.5 MB | SQL Server |
| 50,000 | 34,368.8 MB | SQL Server |
| 100,000 | 68,734.2 MB | SQL Server |
Auto-Growth
Privilege Manager uses the default auto-growth configuration settings that comes installed on SQL Server. This setting sets the initial database size of SQL Server to 3MB, then grows it by 1MB every time the data limit is exceeded. The log file starts at 2MB and is set to grow by 10% increments until the disk is full.
Even though the default auto-growth configuration settings will work for Privilege Manager, it may not be the most appropriate configuration for all environments (especially for customers exceeding 10,000 users).
Every time the database grows it takes a performance hit. In SQL Server storage terms, 1024K is 128 pages; pages are stored in 8K blocks. For Privilege Manager, which is going to potentially load millions of records, growing the data file of a database every 128 pages incurs a large performance hit, especially since SQL Server’s I/O requests are a major bottleneck.
Additionally, since auto-growth allocates chunks of data at a time it is easier for the database to become fragmented. With that in mind it is recommended to update the auto-growth settings.
The table below displays the recommended settings based on the size of the network environment. These values are not set in stone but are based on database growth rates of your specific environment. The rule of thumb is to set this value to one eight the estimated database size. Ideally you should use auto-grow as a failsafe and use alerts or monitoring programs to monitor file sizes and grow files proactively. This helps you avoid fragmentation and permits you to shift these maintenance activities to non-peak hours.
| Privilege Manager Users | Privilege Manager Database | Auto-growth |
|---|---|---|
| 1 | 4.7 MB | 1 MB |
| 10 | 10.5 MB | 1.3 MB |
| 100 | 73.0 MB | 9.1 MB |
| 1,000 | 692.6 MB | 86.5 MB |
| 2,000 | 1,378.6 MB | 172.3 MB |
| 5,000 | 3,439.9 MB | 429.9 MB |
| 10,000 | 6,876.4 MB | 859.5 MB |
| 15,000 | 10,313.0 MB | 1289.1 MB |
| 20,000 | 13,749.5 MB | 1718.7 MB |
| 50,000 | 34,368.8 MB | 4296.1 MB |
| 100,000 | 68,734.2 MB | 8591.8 MB |
How to change auto-growth on SQL Server 2014
|
|
NOTE: Steps may be slightly different for other supported versions of SQL Server. |
To change the auto-growth settings:
- Start SQL Server Management Studio.
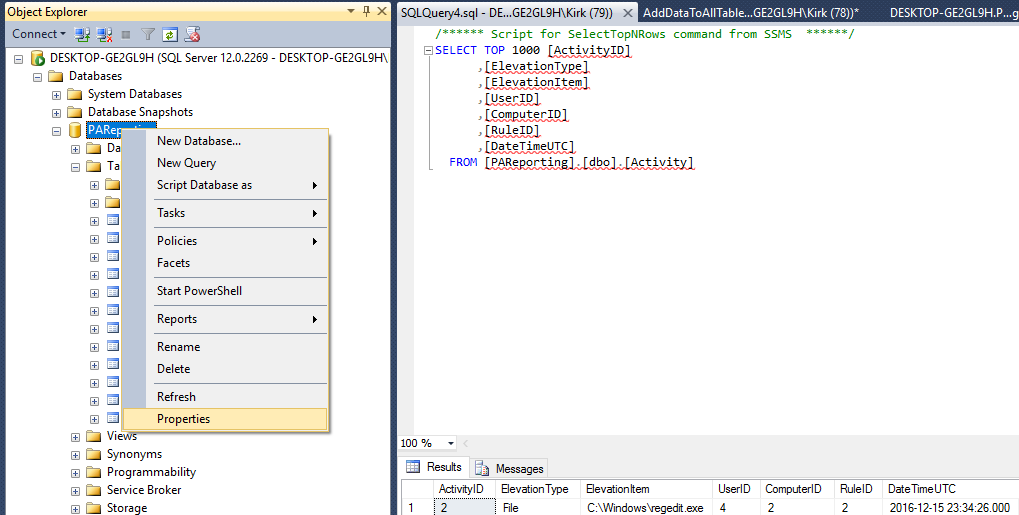
- Highlight, then right click the PAReporting database and navigate to Properties.
- In the left Panel, select Files from the Database Properties dialog. The Properties window will be used to change Auto-growth.
- Identify the PAReporting name under Logical Name and change the Auto-growth based on table 5 above. In this example, we have set the auto-growth to 430MB and a max size of unlimited and left the log file to grow my 10% to a limit of 20971252MB. 430 is roughly one eighth of the 3,439.9MB database size for the 5000-user environment.

Initial database size
When Privilege Manager is installed it uses the default file and log size specified by SQL Server. The specified file size is 3MB for the database and 2MB for the database logs. As these files fill up and exceed the initial file size there are performance implications from growing this file and fragmentation of the data on the disk.
To prevent these performance issues, it is recommended that if the database is expected to grow to a specific size in a month double that value and use it for the initial size. For example, if the database is expected to grow to 2000Mb in a month, set the initial database size to 4000Mb. This will reduce the number of auto-growths and lessen fragmentation because a larger allocation means more database related information can be accessed from the same disk location. Table 6 below breaks down the recommended initial size for the database based on a range of 1 to 100,000 users for the different database size estimates.
| Privilege Manager Users | Privilege Manager Database | Initial Size |
|---|---|---|
| 1 | 4.7 MB | 9.4 MB |
| 10 | 10.5 MB | 21.0 MB |
| 100 | 73.0 MB | 146.0 MB |
| 1,000 | 692.6 MB | 1385.2 MB |
| 2,000 | 1,378.6 MB | 2,757.2 MB |
| 5,000 | 3,439.9 MB | 6,879.8 MB |
| 10,000 | 6,876.4 MB | 13,752.8 MB |
| 15,000 | 10,313.0 MB | 21,626.0 MB |
| 20,000 | 13,749.5 MB | 27,498.0 MB |
| 50,000 | 34,368.8 MB | 68,736.0 MB |
| 100,000 | 68,734.2 MB | 137,468.4 MB |
How to change the Initial Size on SQL Server 2014
|
|
NOTE: Steps may be slightly different for other supported versions of SQL Server. |
To change the Initial Size settings:
- Start SQL Server Management Studio.
- Highlight, then right click the PAReporting database and navigate to Properties.
- In the left Panel, select Files from the Database Properties dialog. The Properties window will be used to change the Initial Size.
- Identify the PAReporting name under Logical Name and change the Initial Size based on table 5 above.
In this image, we have set the Initial Size (MB) to 13,752.8MB. This value is 2 times the size of the database.
