
-
Title
Active Administrator - How to upgrade from Active Administrator 5.5 to version 5.6 -
Description
Active Administrator - How to upgrade from Active Administrator 5.5 to version 5.6 -
Cause
N/A -
Resolution
Note: During the upgrade you may be prompted to reboot the Active Administrator server.
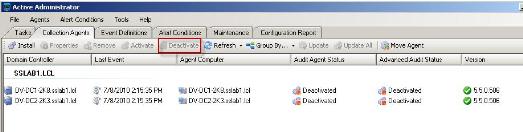
Open the Active Administrator Server Manager console and deactivate all existing Active Administrator (AA) agents:
Back up the Active Administrator database (default name in version 5 is ActiveAdministrator). This can be done via SQL by right clicking on the AA database and selecting Tasks | Back Up, as shown below:
![[image]](https://support.quest.com/KBArticleImages/SL3430/2ca5858d.jpg)
Close both Active Administrator consoles.
Active Administrator 5.6 Server Upgrade
Run the Active Administrator 5.5 Server.exe which can be downloaded from: http://www.quest.com/active-administrator/
Click “Next” to begin the installation:
![[image]](https://support.quest.com/KBArticleImages/SL3430/8834bf31.jpg)
Accept the terms of the License Agreement:
![[image]](https://support.quest.com/KBArticleImages/SL3430/0a58b02f.jpg)
Click “Next” several times to allow the installation to continue. You may be prompted to reboot, which is required to complete the setup. Click “OK”.
![[image]](https://support.quest.com/KBArticleImages/SL3430/6ebf6efd.jpg)
If you are prompted to reboot, and select “OK” above, but the server doesn’t reboot; it’s recommended to reboot after the screen below.
Allow the default behavior of launching the Configuration Wizard.
![[image]](https://support.quest.com/KBArticleImages/SL3430/93ccca6c.jpg)
After the reboot continue with the installation via Start > All Programs > ScriptLogic Corporation > Active Administrator 5 > Server Configuration Wizard:
![[image]](https://support.quest.com/KBArticleImages/SL3430/b3569ef7.jpg)
Click “Next”:
![[image]](https://support.quest.com/KBArticleImages/SL3430/6f474f50.jpg)
Click “OK” on the message below if the database has already been backed up:
![[image]](https://support.quest.com/KBArticleImages/SL3430/dcd90bce.jpg)
Most of the settings inside the Configuration Wizard will have been preserved from the previous installation. Verify these settings and click “Next” through the next several screens until the “Active Administrator Trustees” screen.
This is new in version 5.6. For more information on this function please review the documentation on page 7 of the Active Administrator 5.6 Server Management Guide. Please add the necessary Users/Groups, and click “Next”.
![[image]](https://support.quest.com/KBArticleImages/SL3430/6f1151cf.jpg)
Enter an account for all 5 services (or customize each service account) and click “Next”.
![[image]](https://support.quest.com/KBArticleImages/SL3430/7a895426.jpg)
Review all the selected settings and click “Finish”:
![[image]](https://support.quest.com/KBArticleImages/SL3430/2733d8d2.jpg)
If you receive the message below, click “Yes”:
![[image]](https://support.quest.com/KBArticleImages/SL3430/0ddeec63.jpg)
Click “Finish”.
When the installation of the Server Manager Console has completed, you will get the message below. Click “OK”.
![[image]](https://support.quest.com/KBArticleImages/SL3430/ae255734.jpg)
Select the “Collection Agents” tab.
The existing agents that were deactivated are now visible. Highlight all of them and select “Update All” from the buttons above the domain controller list. You may also right click on any agent in the list and select “Update” from the context menu.

In some installations, the existing agents might not be visible and this screen may be blank. If that is the case, click “Install” and finish the standard installation process for the Active Administrator agents.
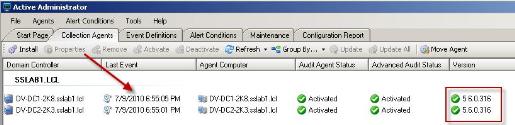
Verify that agents on all Domain Controllers are now running at the 5.6.x version and are reporting currently collected events.
Active Administrator 5.6 Console Upgrade
Run the Active Administrator 5.5 Console.exe from the same location where the Server.msi was downloaded to. Click “Next” to begin the installation:
![[image]](https://support.quest.com/KBArticleImages/SL3430/a1046c96.jpg)
Accept the terms of the License Agreement:
![[image]](https://support.quest.com/KBArticleImages/SL3430/60db96f0.jpg)
Change the path to the installation folder if desired:
![[image]](https://support.quest.com/KBArticleImages/SL3430/98e04052.jpg)
Click “Install” to continue the installation, then “Finish”:
![[image]](https://support.quest.com/KBArticleImages/SL3430/9124da3e.jpg)
Browse to the location of the server where Active Administrator was installed, and click “OK”:
![[image]](https://support.quest.com/KBArticleImages/SL3430/b565823e.jpg)
Click “OK”:
![[image]](https://support.quest.com/KBArticleImages/SL3430/2ed5188c.jpg)
Click on the Auditing tab and verify that events are being seen in the Live View preview window.
![[image]](https://support.quest.com/KBArticleImages/SL3430/6e83e951.jpg)