Tchater maintenant avec le support
Tchattez avec un ingénieur du support

NetVault 12.3 - Administration Guide

Introduction Getting started Configuring clients Managing catalog search Configuring storage devices Backing up data Managing policies Restoring data Managing NetVault Backup dashboard Managing jobs Monitoring logs Managing storage devices
Monitoring device activity Managing disk-based storage devices in list view Managing disk-based storage devices in tree view Managing the Snapshot Array Manager Managing tape libraries in list view Managing tape libraries in tree view Managing tape drives in list view Managing tape drives in tree view Adding shared devices
Managing storage media Managing user and group accounts
About user accounts About user and group privileges and presets Creating a user account Modifying a user account Deleting a user account Setting a user policy Using Secure Mode Using Presets User privileges Predefined Presets Integrating Active Directory with NetVault Backup Using Azure Active Directory as an identity provider
Monitoring events and configuring notifications Reporting in NetVault Backup Working with client clusters Configuring default settings for NetVault Backup
About configuring default settings Configuring encryption settings Configuring plug-in options Configuring default settings for post-scripts Configuring default settings for Verify Plug-in Configuring Deployment Manager Settings Configuring Job Manager settings Configuring Logging Daemon settings Configuring Media Manager settings Configuring Network Manager settings Configuring Process Manager settings Configuring RAS device settings Configuring Schedule Manager settings Configuring Web Service settings Configuring Auditor Daemon settings Configuring firewall settings Configuring general settings Configuring security settings Synchronizing NetVault Time Configuring default settings for global notification methods Configuring the reporting utility Configuring NetVault Backup WebUI default settings Configuring NetVault Backup to use a specific VSS provider Configuring default settings using Txtconfig
Diagnostic tracing Managing diagnostic data Using the deviceconfig utility NetVault Backup processes Environment variables Network ports used by NetVault Backup Troubleshooting
Common errors
NetVault Backup Service fails to start on Windows NetVault Backup Service fails to start after the machine is restarted NetVault Backup Service starts, but stops immediately on Linux Login fails after any change in the server IP address Unexpected behavior of NetVault Backup WebUI WebUI does not run in Compatibility View in Internet Explorer NetVault Backup installer fails during push installation VSS-based backup fails Modifying TCP/IP socket buffer size on Windows Restores using Data Copy savesets fail on clients running NetVault Backup 10.0.1 Restore fails on Itanium platforms if the index is larger than 2GB After upgrade, Data Copy and Consolidated backup job on Linux fails After upgrade, console error is displayed on WebUI pages Deployment task hangs on target Linux machine during push installation. Unable to add package store with hostname. Deployment task fails due to network configuration issues. Domain user is unable to login NetVault Backup Server if the workstation attribute is set. Domain user is unable to login NetVault Backup Server on Debian 9. Adding the target machine as a client fails, after successful push installation. Unable to install, uninstall or navigate catalog search page after manually uninstalling NetVault Backup Client Host. Unable to install, uninstall catalog search on client after NetVault Backup Server migration with the same or different server name External Azure AD user cannot add an external Azure AD user to NetVault Backup Server Failed to verify target Windows machine from a Linux-based NetVault Backup server
Safe Mode in NetVault Backup

About NetVault Backup Sets

NetVault Backup Sets are used to create backup and restore jobs.

You can use sets to store data selections, backup and restore options, scheduling options, device and media options, and other advanced backup and restore options. Sets eliminate the need to manually select the data items or configure backup and restore options for each job, and allow you to quickly and easily apply the same data selections and options to multiple jobs.

For example, you can save the data selections in a Backup Selection Set, and use this set to create Full, Incremental, and Differential Backup jobs to ensure that the same data set is used for all jobs. Similarly, you can change the day, date, or time in a Schedule Set to automatically change the job schedule for multiple jobs, or specify a new device for backups by changing the Target Set.

The following table describes the set types that are available in NetVault Backup.

Table 33. Set types

Backup Selection Set

This set is used to specify data selections for backup jobs. The data items that are available for selection depend on the plug-in in use.

For more information about these sets, see the relevant plug-in user's guide.

Plugin Options Set

This set is used to specify the backup method, backup type, and other backup options.

The backup options that are available to a job depend on the plug-in in use. For more information about these sets, see the relevant plug-in user's guide.

Schedule Set

This set is used to specify scheduling options for backup and restore jobs. These options define when and at what intervals a job runs.

NetVault Backup includes the following predefined Schedule Sets:

Source Set

This set is used to specify source device options.

A Source Set is required for the following jobs:

Plug-in for Consolidation jobs
Plug-in for Data Copy jobs

NetVault Backup includes the following predefined Source Set:

Target Set

This set is used to specify target device and media options for backup jobs.

NetVault Backup includes the following predefined Target Sets:

Backup Advanced Options Set

This set is used to specify backup retirement settings, Secondary Copy job definitions, user-defined events, and other advanced options.

NetVault Backup includes the following predefined Backup Advanced Options Sets:

Restore Selection Set

This set is used to specify data selections for restore jobs.

The data items that are available for selection depend on the plug-in in use. For more information, see the relevant plug-in user's guide.

Restore Advanced Options Set

This set is used to specify restore type, user-defined events, and other advanced restore options.

NetVault Backup provides the following predefined Restore Advanced Options Set:

Backup and recovery strategy

The primary objective of backing up data is to recover from the damages caused by a data loss event and resume normal operations quickly. This objective requires a good backup strategy, which maximizes data availability and minimizes data loss and downtime, while balancing your business requirements with costs, resources, and other factors.

To create a good backup plan, consider the possible failure modes, like hardware failure, data corruption, human error, or loss of a data center, and select the suitable backup methods and features to recover from these scenarios.

Typically, your backup plan should define what backup methods are used, when and at what intervals the backups are performed, how the backups are stored, how long the backups are retained, and how the backup media are re-used.

Creating backup jobs

You can use the backup job wizard to create and submit backup jobs. The wizard can be accessed from the Guided Configuration or Create Backup Job link in the Navigation pane.

1
In the Navigation pane, click Guided Configuration, and then on the NetVault Configuration Wizard page, click Create Backup Jobs.
2
In Job Name, type a name for the job. Assign a descriptive name that allows you to easily identify the job for monitoring its progress or restoring data.

Hover to view information about the corresponding detail.

To create a new set for the corresponding detail, click this icon. The corresponding drawer opens. Enter the required information, and then click Save.

Optionally, click Clone Existing Set, select a set and click Load, and then enter a name for the cloned set at the bottom of the page.

To edit the information for the selected set, click this icon. The corresponding drawer opens. Update the required information, and then click Save.

Optionally, click Clone Existing Set, select a set and click Load, and then enter a name for the cloned set at the bottom of the page.

Click to delete the selected set. Click OK to confirm.

Selections

Select an existing Backup Selection Set, or create a new set and select the items that you want to back up.

Plugin Options

Select an existing Backup Options Set, or create a new set and configure the options that you want to use.

Schedule

Select an existing Schedule Set, or create a new set and configure the schedule type and method. For more information, see Creating Schedule Sets.

NOTE: The predefined set “Immediate” is selected by default. To run the job as soon as it is submitted, use this set.

Source Storage

This option appears only when creating a Plug-in for Consolidation and Plug-in for Data Copy job.

Select an existing Source Set, or create a new set and configure the source device options for the job. For more information, see Creating Source Sets for backup jobs.

NOTE: The predefined set “Any Device” is selected by default.

Target Storage

Select an existing target set, or create a new set and configure the target device and media options for the job. For more information, see Creating Target Sets.

NOTE: The predefined set “Default Backup Target Options” is selected by default.

Advanced Options

Select an existing Backup Advanced Options set, or create a new set and configure the options that you want to use. For more information, see Creating Backup Advanced Options Sets.

NOTE: The predefined set “Default Advanced Backup Options” is selected by default.
You can view, edit, or run this job from the Manage Job Definitions page. For more information, see Managing job definitions. This job is not displayed on the Job Status page until you submit it.
You can monitor the job progress from the Job Status page and view the logs from the View Logs page. For more information, see Viewing job activity and Viewing log messages.

Creating Schedule Sets

A Schedule Set is used to specify scheduling options for backup and restore jobs. These options define when and at what intervals a job runs. You can create Schedule Sets from the Create Backup Job and Create Restore Job pages.

1
Start the job configuration wizard, and click Create New next to the Schedule list.
2
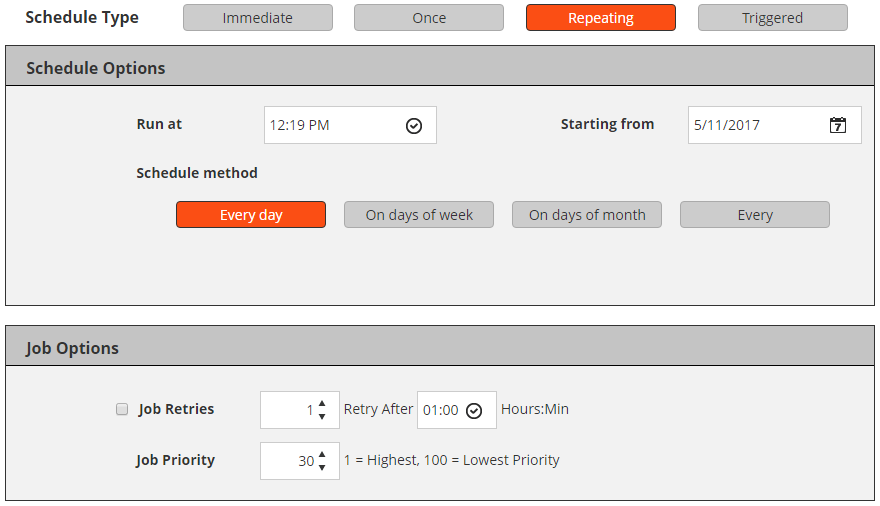
On the Create Schedule Set page, configure the following options.
Table 34. Schedule type

Immediate

To run a job as soon as it is submitted, select this option.

Once

To run a job once on the specified days, select this option, and configure the following options:

Run at: Type or select the start time for the job.
Starting from: Type or select the date on which the schedule takes effect.
Schedule method: Select a scheduling method and configure the required options. The available methods are: Any day, On days of week, On days of month, and On specified date. For more information, see Scheduling methods and options for non-repeating jobs.

Repeating

To create a recurring schedule for jobs that are performed regularly, select this option, and configure the following options:

Run at: Type or select the start time for the job.
Starting from: Type or select the date on which the schedule takes effect.
Schedule method: Select a scheduling method and configure the required options. The available methods are: Every day, On days of week, On days of month, and Every. For more information, see Scheduling methods and options for repeating jobs.

You cannot use the Repeating schedule type to run Secondary Copy jobs.

Triggered

To schedule a job from an external script, select this option.

The most common use of this option is to run a job independently of the NetVault Backup Scheduler such as from a 3rd-party scheduler or an automation interface.

To schedule a triggered job, do the following:

The nvtrigger utility is stored in the bin directory under the NetVault Backup installation directory. If this path is not configured in the path variable, provide the complete file path. Alternatively, include commands to change to the appropriate directory in the script.


When creating the Schedule Set, select the Triggered option. In the Trigger Name box, provide the same trigger name that was specified with the nvtrigger command in the external script file.
NOTE: You cannot use the Triggered schedule type to run Secondary Copy jobs.
3
Under Job Options, configure the following settings.

Job Retries

This setting is used to automatically reschedule a job after a failed attempt.

To schedule retry attempts for a job, do the following:

Select the Job Retries check box, and in the value box type or select a value from 1 through 10. You can set a maximum of 10 retries for a job.
In the Retry After box, type or select the interval between two attempts. By default, the job is scheduled to run immediately after a failed attempt.

Job Priority

The Schedule Manager assigns a default priority level to each job type (backup, restore, and report). These default settings are applied globally to all backup, restore, and report jobs. The priority settings are used to prioritize resource allocation when two or more jobs are scheduled to run at the same time.

By default, the Schedule Manager assigns the following priority levels:

You can override the global priority setting for an individual job by configuring the Job Priority option in the Schedule Set.

In the Job Priority box, type or select a value from 1 through 100. 1 denotes highest priority, while 100 denotes lowest priority. A job with a priority level of zero (0) runs as a background task.

To change the priority level settings globally for all jobs, see Configuring default job priority settings.

4
Click Save, and in the Create New Set dialog box, type a name for the set.
Click Save to save the Schedule Set.
Documents connexes

The document was helpful.

Sélectionner une évaluation

I easily found the information I needed.

Sélectionner une évaluation