
Components
Metalogix Backup for SharePoint has a light, unobtrusive architecture that easily runs in your environment with minimal configuration. Metalogix Backup for SharePoint does not add to or modify any of your native SharePoint files or services when you install it. When needed, Metalogix Backup for SharePoint does make changes to permissions. For more information about permissions and requirements, see Learning about the requirements.
About the Metalogix Backup for SharePoint Management Console
The Metalogix Backup for SharePoint Management Console (abbreviated to Management Console) allows you to configure Metalogix Backup for SharePoint, view operation status and history, schedule automated backup activities, and perform other related functions. Comprehensive Summary pages for specified farms include a view of the backup status and recent backup and restore operations. You also use the Management Console to configure Metalogix Backup for SharePoint and to perform backup and restore tasks.
Multiple copies of the Management Console can all contact a single Management Service. You can let each of the SharePoint administrators in your environment collaborate to perform backup and restore operations. In addition, if your environment includes multiple SharePoint farms, each Management Console can connect to one or more of the farms simultaneously.
You can use the Metalogix Backup for SharePoint installer to install the Management Console and Management Service on a computer, or you can install the Management Console only. If you install only the Management Console, you must install the Management Service on another computer. The Management Console must be installed on a Web Front End (WFE).
About the Metalogix Backup for SharePoint Management Service
The Metalogix Backup for SharePoint Management Service (abbreviated to Management Service)receives requests from the Management Console and from the Self-Service Recovery feature. Based on those requests, the Management Service connects to one or more Metalogix Backup for SharePoint Service installations hosted on a SharePoint Web front End (WFE) or on a SharePoint database server and starts the requested operation.
You can install the Management Service on any computer in your network. The Management Service host does not need to be a part of the SharePoint farm, and can manage multiple farms at once. The host that you select should always be running so that it can contact and manage the Metalogix Backup for SharePoint Service when needed. Both the Management Service and the Management Console are installed when you perform a full install of Metalogix Backup for SharePoint. You cannot install only the Management Service.
The Management Service uses the Metalogix Backup for SharePoint repository database to store historical data. Each Management Service uses a separate repository database.
If you schedule an activity, the Management Service initiates the scheduled activity and records its progress and status.
About the Metalogix Backup for SharePoint Service
The Metalogix Backup for SharePoint Service (abbreviated to Backup Service) performs any backup and restore operations you request. When an on-demand or scheduled operation begins, the Management Service contacts the Metalogix Backup for SharePoint Service and initiates the operation. The Metalogix Backup for SharePoint Service uses the Microsoft Volume Shadow Copy Service (VSS) to back up SharePoint 2010, 2013, 2016 or 2019 farm components. The Metalogix Backup for SharePoint Service uses the SharePoint object model to backup and restore granular SharePoint content on any SharePoint 2010, 2013, 2016 or 2019 farm.
To perform Farm Backups for SharePoint 2010, 2013, 2016 or 2019 farms, install the Metalogix Backup for SharePoint Service on every WFE and every Database Server in the farm.
The Metalogix Backup for SharePoint Service stores the objects that it backs up in backup sets. Specify a location where the Metalogix Backup for SharePoint Service stores the sets. You can specify a UNC location or a Tivoli Storage Manager (TSM) virtual client node.
Use the Management Console to discover your WFE hosts and standalone database server hosts and install the Metalogix Backup for SharePoint Service. You can also use the Metalogix Backup for SharePoint installer to manually install the service on a WFE host or database server host. You can only install one Metalogix Backup for SharePoint Service on each server, but the Metalogix Backup for SharePoint Service can be shared by multiple Management Service copies. You can back up content databases from a SQL Server host that is shared between farms as part of the relevant farms.
When it starts, the Metalogix Backup for SharePoint Service verifies connectivity to the farm and to the Web applications in the farm. To perform backups, the Metalogix Backup for SharePoint Service account must be assigned a full control policy for every Web application in the farm. When it starts, the Metalogix Backup for SharePoint Service assigns the required policies to the Metalogix Backup for SharePoint Service account. If you add a Web application to the farm, you should restart all of the Metalogix Backup for SharePoint Service copies so that the Metalogix Backup for SharePoint Service can grant privileges for the new Web application.
About the Repository Database
The Metalogix Backup for SharePoint repository database stores configuration information, backup and restore operation data, and statistical and other data that the Management Service collects. Each Management Service uses a separate repository database. A single SQL Server host can host multiple uniquely-named repository databases. The SQL Server that hosts the repository database does not need to be part of the SharePoint farm. The repository database does not store backed-up SharePoint content.
About the Self-Service Recovery Solutions
The Self-Service Recovery feature saves backup administrators time and effort while also giving site collection administrators fast, convenient access to their backed-up library items. You install the Self-Service Recovery feature when you configure Metalogix Backup for SharePoint for your farm.
Communications and Security
Depending on the configuration of your SharePoint farm and your enterprise network, many of the computers in your network can host the Metalogix Backup for SharePoint components. The components use encrypted TCP/IP communications to communicate with one another. Metalogix Backup for SharePoint encrypts all internal communications between components. If a component is not able to negotiate an encrypted communications channel, the communication fails. This helps to ensure the security of your SharePoint data.
Metalogix Backup for SharePoint uses the Microsoft .NET Windows Communications Foundation (WCF) services to secure communications. All communications channels use transport encryption and signing, and do not use non-FIPS encryption methods. All communications within Metalogix Backup for SharePoint are therefore FIPS-compliant.
You can customize the communications ports for each component if you choose. For assistance in changing the port, please visit the Metalogix Technical Support Web page at https://support.quest.com.
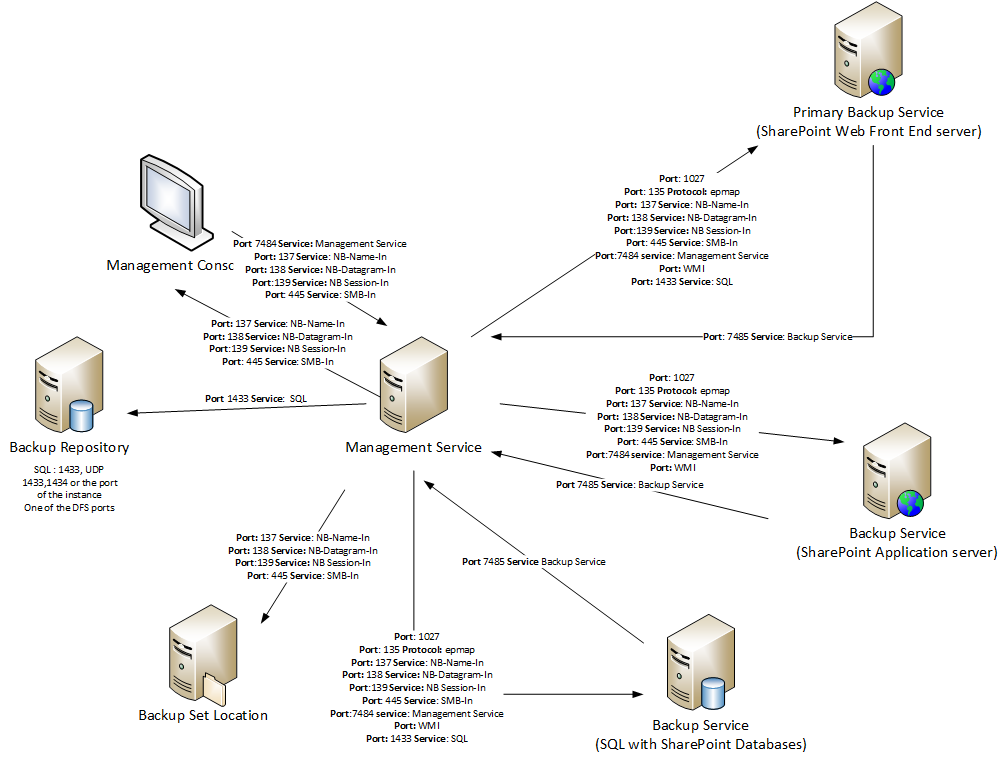
Ports Used During Metalogix Backup for SharePoint Setup
The following ports must be open during the installation and setup of Metalogix Backup for SharePoint:
|
Port |
Destination |
Details |
|
TCP 1433, UDP 1434, or custom |
Management Service > Backup Repository |
This port can be replaced if an instance or a non-default port is used for SQL server. |
|
TCP 7484 |
Management Console > Management Service |
This port should be open where the Management Service will be installed. |
|
TCP 7485 |
Management Service > Backup Service |
This port should be open where the Management Service and Backup Services will be installed. |
|
TCP 137,138,139 or TCP/UDP 445 |
Management service > Backup Service Management Console > Management Service Management Service > SharePoint SQL Server Management Service > Backup Set location |
This port should be open where the Management Service and Backup Services will be installed. |
|
TCP 1027 |
Management Service> WFE Management Service> APP Management Service> SQL |
This port should be opened before the Configuration Wizard runs. |
|
TCP 135 or epmap |
Management Service> WFE Management Service> APP Management Service> SQL |
This port should be opened before the Configuration Wizard runs. |
|
WMI (port 135 and a second, random port) |
Management Service> WFE Management Service> APP Management Service> SQL |
These ports should be opened before the Configuration Wizard runs in order for farm configuration retrieval to take place. To set up a fixed port for WMI instead of using a random one, refer to the related article on MSDN: |
Additionally, you should enable the Remote Administration option in the Windows Firewall for each server in the farm to let the Management Console contact the server. Some ports like 1027, epmap, WMI can be closed after the Configuration Wizard finishes installing and/or updating all components on the farm.
All of the Metalogix Backup for SharePoint components should be hosted by computers that are members of the same farm or by farms that have mutual trust relationships defined. Metalogix Backup for SharePoint encrypts Farm Backups with the AES-128 algorithm. AES-128 is FIPS-compliant.
The following image illustrates the ports, protocols and services used by Metalogix Backup for SharePoint during installation and setup:
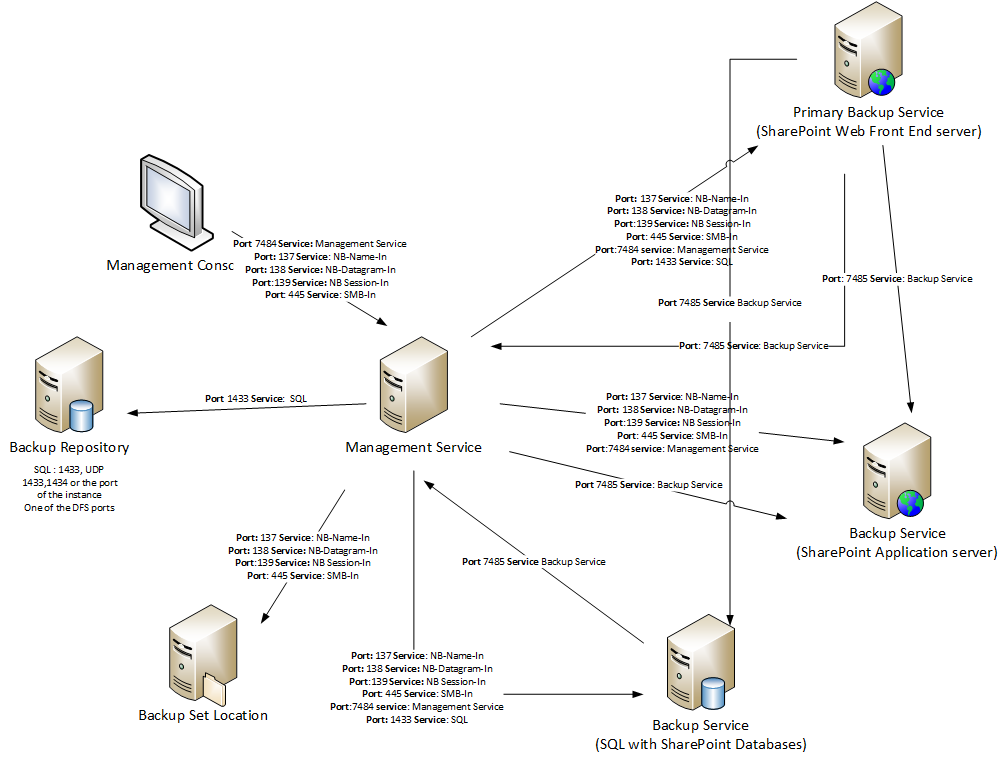
Ports Used for Backup Services
In order to use Metalogix Backup for SharePoint components for daily operations, the following ports need to be open:
|
Port |
Destination |
Details |
|
TCP 7484 |
Management Console > Management Service |
|
|
TCP 7485 |
Management Service > Backup Service Primary Backup Service >Backup Service |
|
|
TCP 1433, UDP 1434, or custom |
Management Service > Backup Repository |
This port can be replaced if an instance or a non-default port is used for SQL server. |
|
TCP 137,138,139 or TCP/UDP 445 |
Management service > Backup Service Management Console > Management Service Management Service > SharePoint SQL Server Management Service > Backup Set location |
This port should be open where the Management Service and Backup Services will be installed. |
The following image illustrates the ports that need to be open to perform Metalogix Backup for SharePoint operations:
Tivoli Storage Manager
Tivoli Storage Manager (TSM) is a product from IBM that helps you to manage storage and backup on your enterprise network. If your enterprise network includes a TSM deployment, you can configure Metalogix Backup for SharePoint to store backup sets in TSM. Before you can use TSM as a backup location, you must configure it.
|
|
NOTE: Metalogix Backup for SharePoint supports the 32-bit versions 6.x and 7.x of the Tivoli Storage Manager (TSM), as well as 64-bit versions for 7.x and 8.x of TSM. |

The steps to configure TSM in your environment depend on the version of TSM you have installed, and the way that your environment is configured. In general, though, you must do the following:
·Install and configure the TSM client software on every server in your SharePoint farm where the Backup Service is installed.
·On the TSM server, create a single virtual client node that the clients share.
·Grant access to the virtual client node to every server that hosts a Backup Service.
·In TSM, configure the options for the virtual client node. In addition to whatever options are appropriate for your deployment, you must set the option backdel=yes.
·In the Management Console, when you create a TSM backup location, you enter the name of the virtual client node where Metalogix Backup for SharePoint stores the backup data.
The default TSM filespace that Metalogix Backup for SharePoint uses is IderaSPbackup. For information about installing configuring TSM and configuring the TSM client options, see your TSM documentation set. For more information about creating a Backup Location, see Defining the Backup Service preferences.
|
|
NOTE: If you enable data grooming for a backup set that Metalogix Backup for SharePoint stores in TSM or if you manually delete the reference to a backup set that is stored in TSM from the Management Console, Metalogix Backup for SharePoint removes references to the data in Metalogix Backup for SharePoint. In addition, Metalogix Backup for SharePoint sets the data objects to Inactive in TSM. Metalogix Backup for SharePoint does not automatically delete the data itself. If you need to delete the data from TSM, you should use the TSM management tools to do so. |
Here are a few considerations for users using Tivoli Storage Manager:
·If you use a Tivoli Storage Manager (TSM) virtual client node as a backup location and the TSM storage pool runs out of free space, Metalogix Backup for SharePoint encounters errors. You should ensure that the TSM storage pool that hosts a backup location does not run out of free space.
·If you import a backup stored in a TSM virtual client node, you can only perform in place restores from that set.
Managing licenses
Metalogix Backup for SharePoint activates your license key during its installation by contacting a Metalogix server. Metalogix Backup for SharePoint will periodically refresh the activation as it runs. For customers without an Internet connection or who want to review the information that is being sent to Metalogix, offline activation is available. Installations using offline activation must be manually refreshed every 365 days. Your license is based on the number of servers that you want to back up within your farms. If the server does not have a valid license, Metalogix Backup for SharePoint does not collect data from that server.
|
|
NOTE: Trial licenses can be activated and reused after they have expired. You can add another trial license as well. Contact your Quest sales representative for more information. |
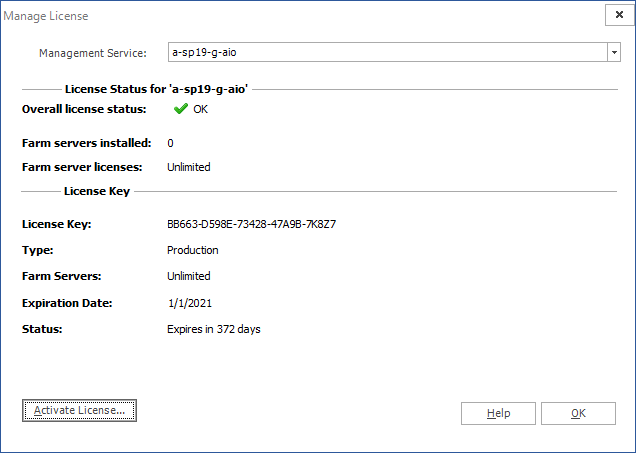
Steps to view the licensed servers
1.From the Management Console toolbar, click Help > Manage License.
or
From the Management Console workspace selector click Configuration > Configuration tab > Manage License.
2.From the Management Service drop down, select the server that hosts the management service to view the license status.
Steps to activate a License Key
The first time that you open the Management Console, you will be prompted to activate a license key. Follow these steps to activate your license key:
Online activation
1.In the Activate License window, enter the license key.
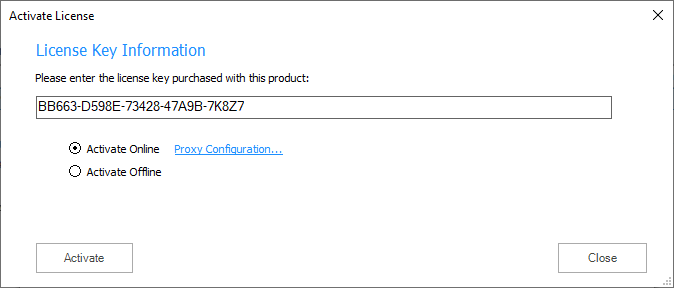
2.If you want to activate the license online, select Activate Online, and then click Activate. If your computer is behind a firewall, click the Proxy Configuration link. The Proxy Setup dialog appears.
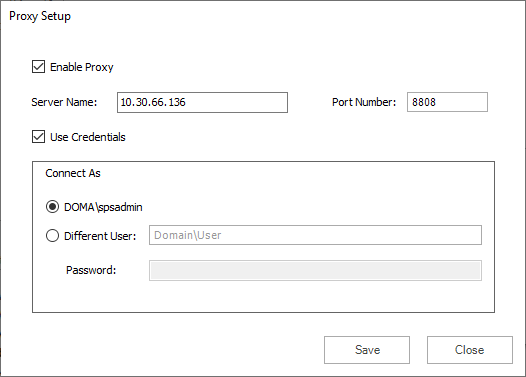
a.Select Enable Proxy.
b.In the Server Name field, enter the name of your proxy server.
c.In the Port Number field, enter the port number of the proxy server.
d.If your proxy server requires explicit login credentials, select Use Credentials.
e.Choose the credentials of the logged in user or provide credentials of another user.
f.Click Save to preserve the information, or click Close to return to the License Key Information dialog.
3.If the license key is validated successfully, the Management Console appears and the Configuration Wizard is displayed.
Offline activation is available for customers without an Internet connection or who want to review the information sent to Metalogix.
|
|
NOTE: Installations using offline activation must be manually refreshed every 365 days. |
1.In the License Key field, enter your license key.
2.Choose Activate Offline. The License Information page expands to display additional steps that are required.
3.Step 1: Collect the activation data to the clipboard or to a file
a.Select from the two options described below:
Option 1: Click Copy Activation Data to Clipboard. The activation data is saved to memory. Use this option if you plan to follow through with the subsequent steps immediately.
Option 2: Click Save Activation Data to File. The Windows File dialog appears. Use this option if you plan to activate the license at a later date.
b.Specify a file name for the activation data file.
c.Click Save to save the file to a location of your choice.
4.Step 2: Submit collected data
a.Click the URL provided. The Offline Activation web page appears.
b.Follow the instructions to get the Activation Key file (with the file extension DAT) is made available for download. Save this file to a location of your choice.
5.Step 3: Paste Activation Response
a.Click Browse. The Windows file dialog appears.
b.Locate the activation key file and click Open. The file appears in the Activation Key File field.
6.Step 4: Activate offline
a.Click the Activate button to complete the activation process.
7.Log out and log in again to access all licensed features.
Steps to update or add a license
You may need to update a license when you increase the number of servers you want to monitor and you receive another license from Quest.
1.From the Management Console toolbar, click Help > Manage License.
or
From the Management Console workspace selector click Configuration > Configuration tab > Manage License.
2.In the Manage Licenses window, click Activate License.
3.In the Activate License window, enter the license key.
4.If you want to activate the license online, select Activate Online, and then click Activate. If your computer is behind a firewall, click the Proxy Configuration link. The Proxy Setup window appears.
a.Select Enable Proxy.
b.In the Server Name field, enter the name of your proxy server.
c.In the Port Number field, enter the port number of the proxy server.
d.If your proxy server requires explicit login credentials, select Use Credentials.
e.Choose the credentials of the logged in user or provide credentials of another user.
f.Click Save to preserve the information, or click Close to return to the Activate License window.
5.If you want to activate the license offline, select Activate Offline and follow the steps outlined in the Offline Activation section.
|
|
NOTE: Offline activation is available for customers without an Internet connection or who want to review the information sent to Metalogix. Installations using offline activation must be manually refreshed every 365 days. |
6.Metalogix Backup for SharePoint displays a message with the status of your activation. Click OK to close the confirmation dialog.