
Clients Permissions
Archive Manager Client AddIn for MS Outlook has been designed for complete usage of Archive Manager for Exchange archiving solutions. Its extra features are directly incorporated in MS Outlook.
Global add-in settings are applied automatically onto every client machine with the Archive Manager Client AddIn installed. They apply also for OWA, if Archive Manager OWA Extensions are installed. It is therefore good to decide beforehand on some company strategy. In some cases you may want to modify the settings for some mailboxes/groups, and let them either gain additional rights, or withdraw some rights from them.
Permissions can be specified on the Clients Permissions tab in the Archive Manager for Exchange. At the same time, by adding users onto this tab you have an option to modify the permissions for them.
|
|
NOTE: Regarding the retention categories, individual groups or users can have their own default retention categories at Addin archiving. It may be set on the Settings/Group level retention tab (see the following section "Group level retention tab). Otherwise the global default retention category is applied. |

How to set Clients Permissions
To define Clients Permissions:
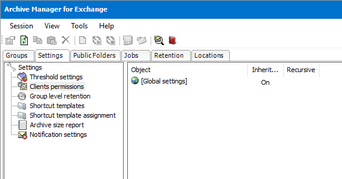
1.In Manager view, click on the Settings tab.
2.Click the Clients Permissions node in the left pane. Then double-click the [Global settings] icon.
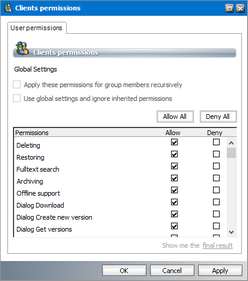
3.The Properties window opens. For every option (Deleting, Restoring, Fulltext search, etc.) you may choose individually whether you want to activate or deny. When you are finished, click Apply and then OK.
4.Options selected in the previous step will be applied globally to all users with the Archive Manager Client AddIn installed.
Let us describe what the activating of individual options mean for the user who has the Archive Manager Client AddIn installed:
|
Deleting |
User will be able to mark items in the archive for deletion. This means that items marked for deletion will be DELETED from the archive upon the expiration of their retention period by using the Delete Files job, if specified (see the section "Delete Files job). |
|
Restoring |
User will be able to restore items from the archive himself. |
|
Fulltext search |
User will be able to conduct full-text search within his archived items. |
|
Archiving |
User will be able to archive items himself. |
|
Offline support |
User will be able to work offline with archived items. |
|
Dialog Download |
User will see a message box displayed when downloading. |
|
Dialog Create new version |
User will see a message box displayed when creating a new version. |
|
Dialog Get versions |
User will see a message box displayed when retrieving one of the archived versions. |
|
Versions view |
User will be able to view different versions of archived items. |
|
Dialog Get fulltext results |
User will see a message box displayed when getting full-text search results. |
|
Dialog Identifying user |
User will see a message box displayed when identifying the user at the beginning (when opening MS Outlook). |
|
AddIn Options |
User will be able to set some options, such as whether to auto-synchronize when Outlook starts/exits; what format to save archived messages in. |
|
Create version |
User will be able to create versions. |
|
Select retention |
User will be able to choose which retention category should be used at archiving |
|
|
NOTE: If all the global ones are activated, then users with the Archive Manager Client AddIn installed will have add-in features activated. Similarly, if all the global ones are deactivated, then users with the Archive Manager Client AddIn installed will have add-in features deactivated. You may however want to assign different rights to some users, i.e. to override the global ones. In that case add those users onto this tab and specify the desired rights for them individually. See the section How to override global Clients Permissions settings. |
|
|
IMPORTANT: Be aware that after installation of Archive Manager Client AddIn no rights are allowed, yet no rights are denied. It is up to the administrator to choose the best approach regarding setting up the global rights. |
Keep in mind that if for Global Settings you:
1.allow all of the options, then all users with the Archive Manager Client AddIn or Archive Manager OWA Extension installed will be allowed to do archiving, restoring, etc.
2.deactivate all of the options, then all users with the Archive Manager Client AddIn or Archive Manager OWA Extension installed will not be allowed to do archiving, restoring, etc.
In both cases you will have to add all those users for whom you want to change the settings onto this Clients Permissions tab and specify the desired options for them.
How to override global Clients Permission settings
To override Clients Permissions settings and assign different rights to a group/mailbox:
1.In Manager view, click on the Settings tab.
2.Click on the Clients Permissions permissions tab in the right pane.
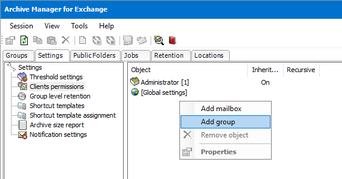
3.Click with your right mouse button inside the right pane and, in the context menu, select Add group/Add mailbox.
4.In the Select group or mailbox window enter the name of desired group/mailbox in the text box or select the desired one in the list below. Then click OK.

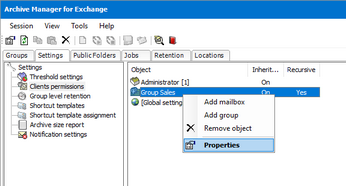
5.The respective group/mailbox will be added onto the Clients Permissions tab. Right-click it and, in the context menu, click Properties to open its Properties window.
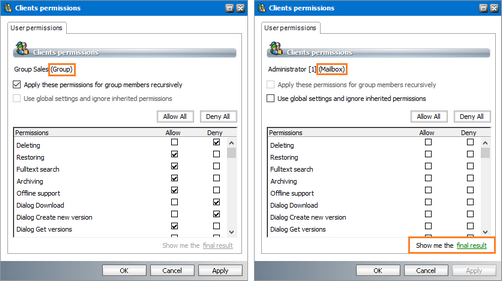
6.In its Properties window you may either allow or deny individual options simply by clicking on appropriate Allow or Deny check boxes.
These attributes will override the global ones.
For group: You may wish to apply those settings for subgroups as well. In that case select the Apply these permissions for group members recursively check-box.
When you have finished, click Apply and then OK.
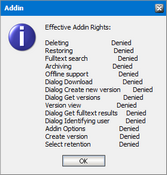
For mailbox: If you select the Use global settings and ignore inherited permissions check box, the global rights will be inherited again and the ones specified in the Properties window, will be overridden. In those cases you may check the effective Addin rights by clicking on the final result link.
|
Group properties window |
Mailbox properties window |
If we assume in our example that all rights in the global settings for the mailbox are allowed, then after clicking on the final result link you would get the following:
Group level retention
As a part of AMAC preferences, the default retention category was specified on the Tools /Options/Archive settings/Retention tab. For more information see Archive settings. The default retention category is used if no specific retention category is chosen at archiving. It usually applies for manual archiving using Archive Manager Client Addin.
However, this tab gives you the opportunity to set different default retention categories for different groups or users. It is especially useful in case of Archive Manager Client Addin. Company needs or user preferences can be taken into account. For each group/user you can specify the default retention category used when archiving in Outlook via Addin.
|
|
NOTE: Addin rights for individual users or groups can be set on the Settings > Clients Permissions tab. |
How to specify global default retention category
Global default retention category can be set on the Tools /Options/Archive settings/Retention tab.
How to set default retention category for individual groups or mailboxes
To override global default retention category and assign specific default retention category to individual group/mailbox:
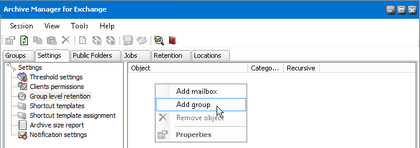
1.In Manager view, click on the Settings tab.
2.Click on the Group level Retention tab in the right pane.
3.Click with your right mouse button inside the right pane and in the context menu select Add group/Add mailbox.
4.In the Select mailbox or group window enter the name of the desired group/mailbox in the text box or select the desired one in the list below. The click OK.
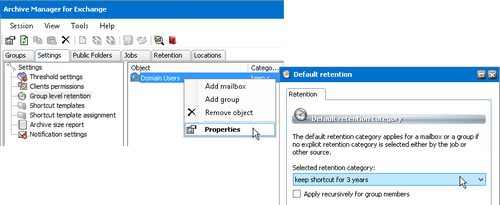
5.The respective group/mailbox will be added onto the Retention tab. Right-click it and, in the context menu, click Properties.
6.In its Default retention window select the desired retention category in the down-drop box.
For group: You may want to assign that retention category to subgroups as well. In that case select the Apply recursively for group members check box.
Click Apply, then OK.
|
|
NOTE: The default retention category assigned to the mailbox has higher priority than the default retention category assigned to the group. |