Tchater maintenant avec le support
Tchattez avec un ingénieur du support

On Demand Migration Current - User Guide

About On Demand Migration Working with On Demand Migration Account Migration Mailbox Migration OneDrive Migration Microsoft Teams Migration Microsoft 365 Groups Migration SharePoint Migration Public Folders Migration Troubleshooting Finalizing the Migration Appendix A: Using PowerShell

Discovering Public Folders

Before proceeding with the migration, retrieve the list of public folders from the source tenant. Explicit credentials must be provided using Configure Connections. For more information, see Prerequisites.

TIP: If you want to rediscover public folders, rerun the existing discovery task.

Discovering all Public Folders

To create a new discovery task

  1. Log in to Quest On Demand and choose an organization if you have set up multiple organizations.
  2. From the navigation pane, click Migration to open the My Projects list.
  3. Create a new project or open an existing project.
  4. Click Public Folders from the project tiles, or click Open from the Public Folders tile to open the Public Folders Migration Workspace.
  5. Go to the Public Folders tab. Then click Discovery > Discover Public Folders. The New Public Folder Discovery Task wizard starts.
  6. Step 1: Schedule
    1. Choose from one of three options to schedule the task. The scheduler will be activated only after you complete the task wizard.
      • Run now - task runs immediately.
      • Run later - task must be started manually.
      • Schedule - task will be started at a future date and time entered in the corresponding calendar field.
    2. Click Next.
  7. Step 4: Summary
    1. Verify the task specifications as described below:
      1. Name - name of the task. You can specify a custom name. The default name is Public Folder Discovery Task.
      2. Source tenant - name of the tenant where the statistics will be collected.
      3. Scheduled start - date and time when the task will start. Now indicates that the task will start immediately.
    2. Click Back to revise or review a previous step or click Finish to complete the task wizard and start the task as scheduled.

When the discovery task is complete, you will see the source tenant’s public folder summary on the Dashboard.

Discovering Public Folders from a file

When you have a large set of public folders but you want to migrate a subset of those public folders, you can start the discovery process by using a CSV file. The CSV file lets you specify the public folders that you want to discover and ignore the rest. This is a two-step process:

Step 1: Preparing the CSV file

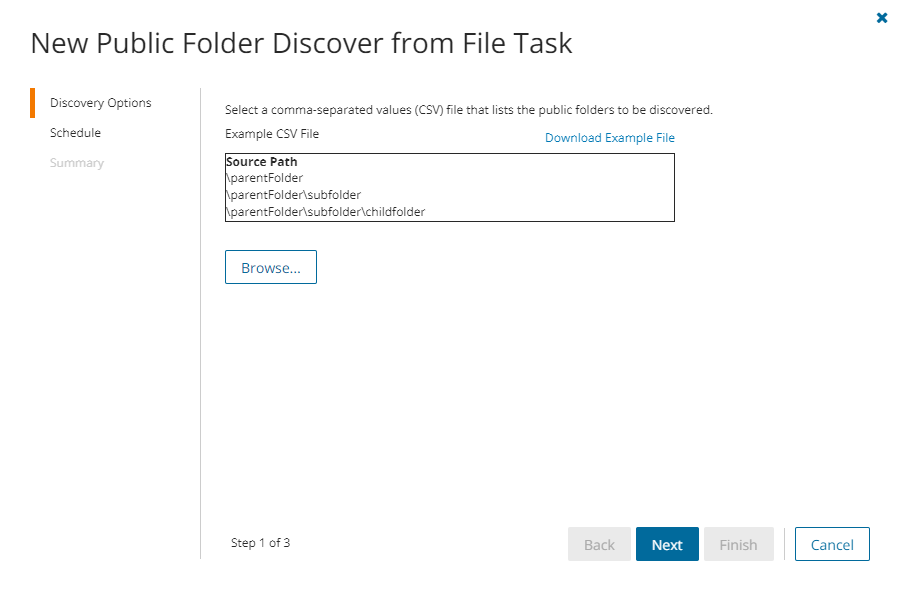
  1. Create a CSV file with the column title Source Path. Then enter the relative path of the folders that you want to search. Some examples are shown below:

    NOTE:

    • You can download a CSV template when you start the New Public Folder Discover from File Task wizard and click Download Example File from the Discovery Options step.
    • CSV file names with non-ASCII characters are not supported.

  2. Save the CSV file. You may rename the file if needed.

Step 2: Starting the Discovery Task

  1. Log in to Quest On Demand and choose an organization if you have multiple organizations.
  2. From the navigation pane, click Migration to open the My Projects list.
  3. Create a new project or open an existing project.
  4. Click the Public Folders tile, or click Open from the Public Folders tile to open the Public Folders Migration Workspace.
  5. Go to the Public Folders tab. Then click Discovery > Discover Public Folders from File. The New Public Folder Discover from File Task wizard opens.

  6. Step 1: Discovery Options
    1. Click Browse and select the CSV that contains the folder paths that you want to search.
    2. Click Next.
  7. Step 2: Schedule
    1. Choose from one of three options to schedule the task. The scheduler will be activated only after you complete the task wizard.
      • Run now - task runs immediately.
      • Run later - task must be started manually.
      • Schedule - task will be started at a future date and time entered in the corresponding calendar field.
    2. Click Next.
  8. Step 4: Summary
    1. Verify the task specifications as described below:
      1. Name - name of the task. You can specify a custom name. The default name is Public Folder Discover from File Task.
      2. Source tenant - name of the tenant where the statistics will be collected.
      3. Scheduled start - date and time when the task will start. Now indicates that the task will start immediately.
    2. Click Back to revise or review a previous step or click Finish to complete the task wizard and start the task as scheduled.

Reviewing the Discovery Task

  1. Open the Tasks tab.
  2. Select the task that you want to review. The default name is Public Folder Discovery Task or Public Folder Discover from File Task.
  3. In the task details pane that opens, the information presented is as described below:
    1. Type - Type of the task. The type is Discover.
    2. Created - Date and time when the task was created.
    3. Modified - Date and time when the task was last updated.
    4. Status - State of the task.
    5. Last Operation - The action that was most recently performed in this task.
    6. Schedule - Date and time when the task started. Now indicates that the task started immediately after the task was created.
    7. Events (number) - Number indicates the count of events that the task encountered. The values indicate the type of the events and the event count for each type.

Reviewing the Discovery Task Events

  1. Open the Tasks tab.
  2. Select the task that you want to review.
  3. In the task details pane that opens, click Events (number). The Events tab opens with a filtered list of events for the selected task.
  4. Select an event that you want to review. In the event details pane that opens, the information presented is as described below:
    1. Object - Name of the team or group discovered.
    2. Task - Name of the task.
    3. Time - Date and time when the event occurred.
    4. Category - Type of task. the value is Application.
    5. Source - Name of the On Demand Migration service

Removing Public Folders from the Migration Project

You can temporarily remove any source public folders from the migration project, if necessary. Consider, public folders cannot be removed permanently from the migration project, all existing source public folders will be added in after next discovery.

To temporarily remove public folders from the migration project:

  1. Go to the migration project Dashboard in case you use new migration UI. In case you are using classic experience or you are already on the Public Folders migration Dashboard, go to step 3.
  2. Click Public Folders widget.
  3. Open Public Folders and select the items you want to remove from the migration project.
  4. Click Delete
  5. Click Delete to confirm the action.

Mapping Public Folders

Use this method to map specific public folders from the source to existing public folders in the tenant that do not have any matching attributes. The CSV file lets you specify the public folders that you want to map and ignore the rest. You can then use this file in the New Mapping from File Task wizard to map the public folders from the source to the target tenant. This is a two-step process:

Step 1: Prepare the CSV file

  1. Create a new CSV file and specify the column header in the first row and then enter the relative path in the subsequent rows manually. Since paths in a mapping file are case sensitive, this method must be used with caution.

    NOTE:

    • You need to map only the public folder paths that will change in the target Tenant.
    • You can download a CSV template when you start the New Public Folder Mapping from File Task wizard and click Download Example File from the Mapping File step.
    • CSV file names with non-ASCII characters are not supported.
    1. In the first column, specify the header as either Source Path.
    2. In the second column, specify the header as either Target Path.
    3. Enter the source and target paths manually in the subsequent rows . Ensure that only relative paths are used.
  2. Save the CSV file. You may rename the file if needed.

Step 2: Start the Mapping from File Task

  1. Log in to Quest On Demand and choose an organization if you have set up multiple organizations.
  2. From the navigation pane, click Migration to open the My Projects list.
  3. Create a new project or open an existing project.
  4. Click the Public Folders tile, or click Open from the Public Folders tile to open the Public Folders Migration Workspace.
  5. Go to the Public Folders tab. Then click Map from File. The New Public Folder Mapping from File Task wizard opens.

  6. Step 1: Mapping File
    1. Click Browse and locate the CSV mapping file.
    2. Click Open in the File Explorer window to load the file into the wizard.
    3. Click Next.
  7. Step 2: Schedule
    1. Choose from one of three options to schedule the task. The scheduler will be activated after you complete the task wizard.
      • Run now - task runs immediately.
      • Run later - task must be started manually.
      • Schedule - task will be started at a future date and time entered in the corresponding calendar field.
    2. Click Next.
  8. Step 3: Summary
    1. Verify the task specifications as described below:
      • Name - name of the task. The default name is Public Folder Mapping from File Task. You can specify a custom name.
      • Source tenant - name of the tenant where the source URLs exist.
      • Target tenant - name of the tenant where the target URLs may or may not exist.
      • Scheduled start - date and time when the task will start. Now indicates that the task will start immediately.
    2. Click Back to revise or review a previous step or click Finish to complete the task wizard and start the task as scheduled.

You can track the progress in the Tasks tab, monitor alerts and notifications in the Events tab and view the summary on the Dashboard.

When the task completes, the Public Folders list is updated. Compare the Source Pathcolumn with the Target Path column for the selected public folders. The Status is set to Mapped.

Migrating Public Folders

Make sure that all associated accounts in this project are matched or migrated:

  1. Log in to Quest On Demand and choose an organization if you have set up multiple organizations.
  2. From the navigation pane, click Migration to open the My Projects list.
  3. Create a new project or open an existing project.
  4. Click the Public Folders tile, or click Open from the Public Folders tile to open the Public Folders Migration Workspace.
  5. Go to the Public Folders tab and select the public folders that you want to migrate.

    TIP: Use search and filtering to quickly navigate through the list of public folders.

  6. Click Migrate. The New Public Folder Migration Task wizard starts.
  7. Step 1: Options
    • Include subfolders in migration scope - select this option to migrate all sub-folders.
    • Migrate public folder content - select this option to migrate folder and sub-folder contents. You can clear this option for a test migration to create an empty public folder structure and transfer folder permissions.
  8. Step 2: Schedule
    1. Choose from one of three options to schedule the task. The scheduler will be activated after you complete the task wizard.
      • Run now - task runs immediately.
      • Run later - task must be started manually.
      • Schedule - task will be started at a future date and time entered in the corresponding calendar field.
    2. Click Next.
  9. Step 3: Summary
    1. Verify the task specifications as described below:
      • Name - name of the task. The default name is Public Folder Migration Task. You can specify a custom name.
      • Source tenant - name of the tenant where the source URLs exist.
      • Target tenant - name of the tenant where the target URLs may or may not exist.
      • Scheduled start - date and time when the task will start. Now indicates that the task will start immediately.
    2. Click Back to revise or review a previous step or click Finish to complete the task wizard and start the task as scheduled.

The migration task is created. You can track its progress in the Tasks, view the summary on the Dashboard or monitor alerts and notifications in the Events.

Documents connexes

The document was helpful.

Sélectionner une évaluation

I easily found the information I needed.

Sélectionner une évaluation