Assessment
The On Demand Migration account service analyzes your domain structure and tracks potential problems, misconfiguration, and risks that might adversely affect the migration. Switch to Assessment view to see the summary reports about the discovered data.

The following reports are available for Accounts:
- Clean Up
- Disabled accounts
- Users with non expiring passwords
- Adjustments
- Duplicate group names
- Duplicate user names
- Users without first name
- Users without last name
- Inventory
- Number of users
- Number of groups
- User by Type
- External Accounts
- Tenant members
- Licenses
- Available ODM licenses
- Used ODM licenses
- Available Teams only licenses
- Used Teams only licenses
Migrating Accounts
|

|
Caution: Don’t start a migration before the discovery task is finished. Running a matching task is recommended. |
In this topic:
Considerations for Guest User Migration
|

|
TIP: Guest user accounts have a specific icon  to distinguish them from other domain members. to distinguish them from other domain members. |
On Demand migration can process all guest user types supported by Microsoft. Before adding a guest user account to the migration task, consider the following:
- Guest user account cannot be migrated if an original account for this guest user is already in the target tenant. The guest user account should be matched but not migrated.
- Guest user account cannot be migrated in case a guest user account of the same original account is already in the target tenant. To update the target guest user account properties create a matching task to pair these guest user accounts and then migrate the source guest user account again
- Guest user account cannot be migrated in case the invitation procedure in source domain is not finished yet. In case acceptance procedure was skipped (this case is deprecated now, but such guest users still exist), and the acceptance status is empty, guest user can be migrated successfully.
- A regular source user mapped to a target guest user during migration, will be converted to a regular user. If the target guest user was created in an on-premise environment, you must manually convert the target guest user to a regular user.
Preferred Data Location
For multi-geo enabled tenants, each account could be assigned a Preferred Data Location (PDL) property in Azure Active Directory. During account migration the property is migrated from source to target tenant. If the preferred data location is set in the source account then the same setting can be migrated to the target. If the preferred data location is absent in the source tenant then it will either not be set on the target or it will use the default location of the target tenant. This applies only for general tenant to multi-geo tenant and multi-geo tenant to multi-geo tenant migrations.
Starting an Account Migration Task
- Log in to Quest On Demand and choose an organization if you have multiple organizations.
- From the navigation pane, click Migration to open the My Projects list.
- Create a new project or open an existing project.
- Click the Accounts tile, or click Open from the Accounts tile to open the Accounts and User Data migration workspace.
- Click the Accounts tab and select List View if not already selected.
- Select the accounts you want to migrate. If you are planning to migrate Microsoft 365 Groups including content, see Microsoft 365 Groups Migration.
- Click Migrate from the Actions menu. The New Account Migration Task opens
- Step 1: Custom Target Domain
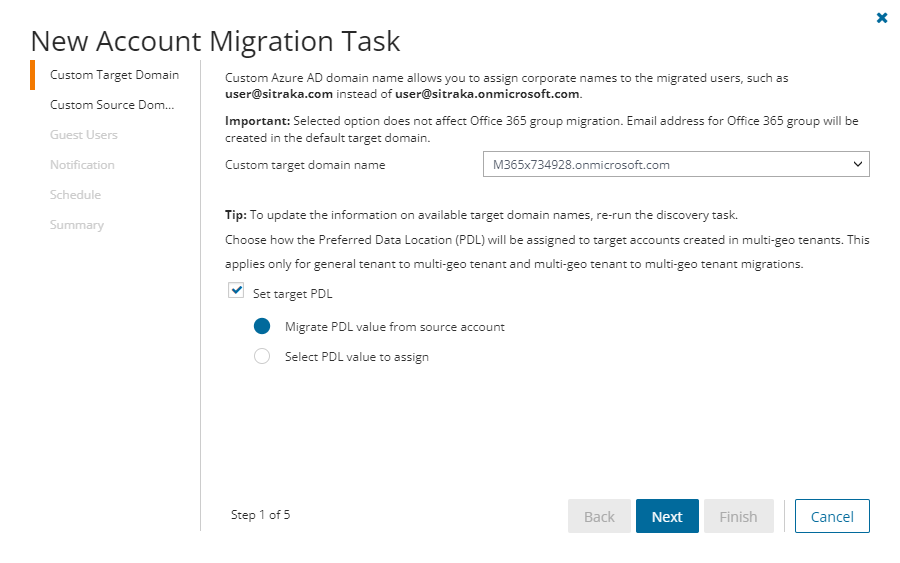
- Configure the options as described below:
- Custom target domain name - select the domain you want to use for the UPN and primary SMTP address of accounts created during the migration process.
|
|
NOTE: Accounts that already exist in the target tenant will not have their current UPN or primary SMTP email address modified. |
- Set target PDL - choose how the Preferred Data Location (PDL) will be assigned to target accounts created in multi-geo tenants. This applies only for general tenant to multi-geo tenant and multi-geo tenant to multi-geo tenant migrations. The Microsoft 365 multi-geo feature must be available and enabled in the target tenant, otherwise this option is ignored.
- Migrate PDL value from source account - assign the same PDL value as the corresponding source account, or use the default location specified in the target tenant.
- Select PDL value to assign - assign a specific PDL value to target accounts. Choose a PDL from the Location dropdown. See Microsoft 365 Multi-Geo availability for location codes.
- Click Next.
- Step 2: Custom Source Domain
- Configure the setting as described below:
- Custom source domain for routing - select the custom source domain name for forwarding mail from the target account. If the domain is omitted, the primary SMTP address of the source tenant will be used as the forwarding address for the mail enabled user created by this task. Optionally, you can select the custom SMTP domain here that will be used as the forwarding address.
- Click Next.
- Step 3: Guest Users
This option is used when guest users are migrated. For all other account types, this option is ignored.
Send invitation email - select this option to send an invitation email to migrated guest users. Guest users can either accept the invitation or authenticate with Microsoft to access secured applications. If this option is not selected, guest users must authenticate with Microsoft to access secured applications.
- Step 4: Notification
- Send notification email once the task is completed - select this option to send a notification email when a discovery task completes.
- Only in a case of failure - select this option to send the email if the discovery task fails to complete successfully.
- Recipients - enter the email address of the recipients of this email. You can specify multiple recipient email addresses separated by semicolon.
- Step 5: Schedule
- Choose from one of three options to schedule the task. The scheduler will be activated only after you complete the task wizard.
- Run now - task runs immediately.
- Run later - task must be started manually.
- Schedule - task will be started at a future date and time entered in the corresponding calendar field.
- Click Next.
- Step 6: Summary
- Verify the task specifications as described below:
- Name - name of the task. You can specify a custom name. Default name is Account Migration Task.
- Source tenant - name of the source tenant in this project.
- Target tenant - name of the target tenant in this project.
- Custom target domain name - domain name of your target tenant.
- Custom domain for forwarding - custom source domain or primary SMTP address of the source tenant used as the forwarding address for the mail enabled user created by this task.
- Scheduled start - date and time when the task will start. Now indicates that the task will start immediately.
- Click Back to revise or review a previous step or click Finish to complete the task wizard and start the task as scheduled.
You can track its progress in the Tasks tab, view the summary on the Dashboard or monitor alerts and notifications in the Events tab. When accounts are matched successfully, the Status changes from New to Completed.
|
|
IMPORTANT: The account migration service does not synchronize end-user passwords as part of the data migration process. The migration administrator will need to reset or synchronize end-user passwords from the source tenant to the target tenant using native Microsoft 365 tools or third-party Single Sign On tools. |
Reviewing the Account Migration Task
- Open the Tasks tab.
- Select the account discovery task that you want to review.
- In the task details pane that opens, the information presented is as described below:
- Type - Type of the task. The type is Migration.
- Created - Date and time when the task was created.
- Modified - Date and time when the task was last updated.
- State - State of the task.
- Last Operation - The action that was most recently performed in this task.
- Schedule - Date and time when the task started. Now indicates that the task started immediately after the task was created.
- Accounts (number) - The number of accounts that were selected for matching and the number of accounts passing through the various states from Migrating to Migrated.
- Events (number) - Number indicates the count of events that the task encountered. The values indicate the type of the events and the event count for each type.
Reviewing the Account Migration Task Events
- Open the Tasks tab.
- Select the account discovery task for which you want to review the events.
- In the task details pane that opens, click Events (number). The Events tab opens with a filtered list of events for the selected task.
- Select an event that you want to review. In the event details pane that opens, the information presented is as described below:
- Object - name of the account object if applicable.
- Task - name of the task.
- Time - date and time when the event occurred.
- Category - type of task. For account migration tasks, the category is Migrate.
- Summary - a descriptive statement about the event.
Domain Coexistence
Mergers and acquisitions are often accompanied by the unification of brands and corporate identities, including the consolidation of email addresses. However, the transition from source to target tenant might take considerable time. On Demand Migration offers domain coexistence services to close this gap, allowing your employees to send mail from new addresses and access cross-tenant data before the migration is finished. The following services are currently available on the account migration dashboard:
- Address Rewrite Service seamlessly changes the source users' email flow as if they're already fully migrated to the target tenant. Outgoing email addresses are replaced with the recipient's email address in the target tenant, while all incoming mail is automatically redirected to the source mailbox. Address rewriting can be started once the account is matched or migrated, giving you time to prepare and migrate mailboxes. The Address Rewrite Service requires additional licensing.
- Calendar Sharing allows users from the source and target tenants to see each other's free or busy information.
Address Rewrite Service
The Address Rewrite Service substitutes the From, To, and Cc addresses in the outgoing emails with the addresses from the target or source tenant depending on the selected address rewriting scenario. Emails are automatically redirected to the source or target mailbox. You can specify the users processed by the service. For example, you can turn on the service for only Sales and Marketing team members.
|
|
IMPORTANT: Address Rewrite Service requires additional licensing. The service only works with accounts that have been matched in the target tenant. See matching accounts for more information. Mailbox provisioning is not required. |
Address Rewrite Service Message Flow
Address Rewrite Service is intended for creating a coexistence space for domains in which all the email messages coming from the source or target mail domain will look like they were sent from the unified mail domain according to the selected settings. The Address Rewrite Service will take all the necessary steps to create this coexistence space in the Exchange online environment, including creating and managing all the required connectors, mail flow rules, mail-enabled users, and groups in source and target environments. The administrator should add or remove source mail users to this coexistence space and activate or deactivate the Address Rewrite Service.
The mail message flow in a unified domain with an activated Address Rewrite Service is as described below:
Unified mail domain in the source tenant
- When a user sends an email as user@target.domain mail user, it is redirected to the Address Rewrite Service server if it is addressed to external recipients.
- When the Address Rewrite Service receives an email from user@target.domain, it checks user eligibility to for the address rewriting service and then processes the email by rewriting @target.domain to @source.domain for every user address that is found in the coexistence space. The addresses in "From", "To" and "Cc" fields of the email message are rewritten for all external recipients. Then Address Rewrite Service passes the processed email message to the source Exchange Online. Internal recipients that reside in the source receive this email message with unchanged addresses.
- Exchange Online at the source sends a message to external recipients as if it was sent by a user from @source.domain, and all addresses of users added to coexistence scope in From, To and Cc are rewritten for external recipients.
- The External recipient is not aware about @target.domain and replies (or create a new email) to the user@source.domain
- When the reply or a new mail arrives to the source mail domain it will be forwarded to the target. Target recipient gets the message as if it was forwarded from the Exchange online at the source from user@source.domain
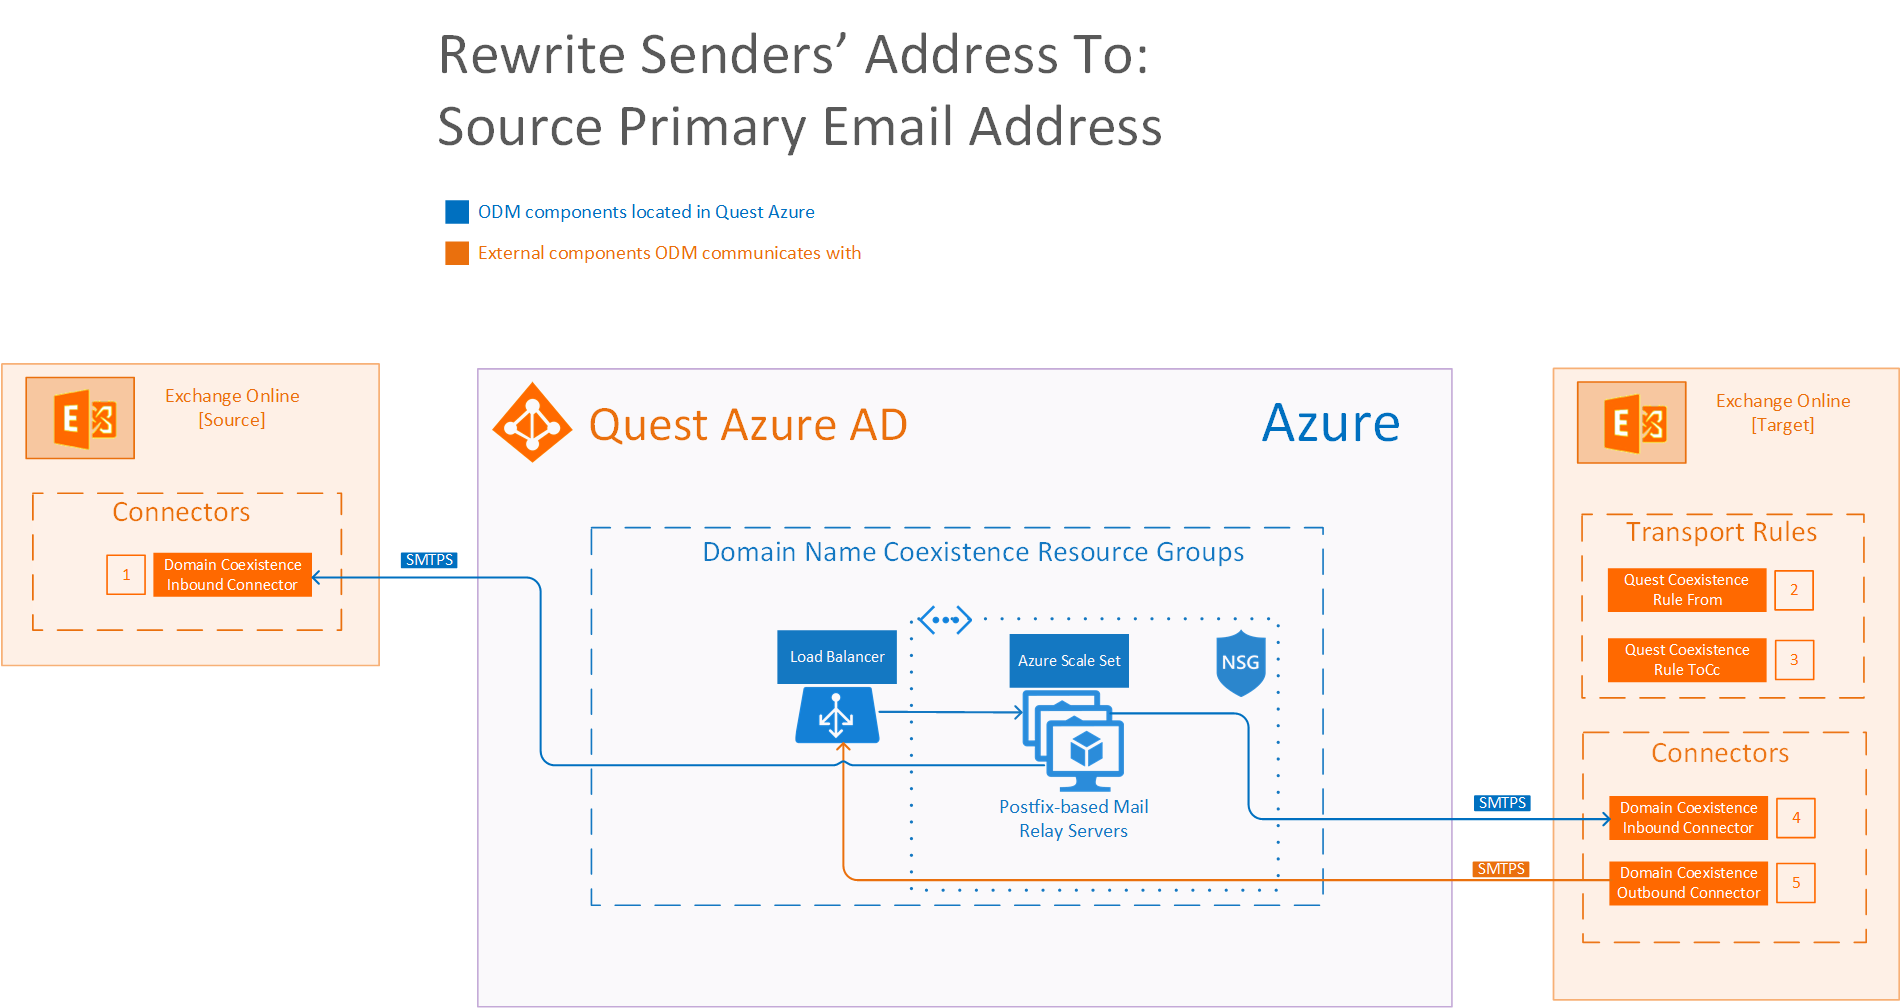
 |
If the message...
Is sent outside the organization from a member of the coexistence group
Do the following...
Route the message using the connector Quest Coexistence Connector Outbound.
Except if...
Sender IP address belongs to one of Mail Relay IP addresses. |
 |
If the message...
Is sent outside the organization and is received by a member of the coexistence group specified in the To or CC field
Do the following...
Route the message using the connector Quest Coexistence Connector Outbound.
Except if...
Sender IP address belongs to one of Mail Relay IP addresses. |
 |
Mail flow scenario
From: Mail Relay Servers
To: Microsoft 365
How to identify email sent from Mail Relay Servers
Identify incoming messages from Mail Relay Servers by verifying that the sending server's IP address is within Mail Relay IP address ranges and the sender's email address is an accepted domain in your organization. |
 |
Mail flow scenario
From: Microsoft 365
To: Mail Relay Servers
When to use the connector
Use only when there is a transport rule (Quest Coexistence Rule From and Quest Coexistence Rule ToCc) is set up that redirects messages to this connector. Routing method Route email messages through Mail Relay Servers. |
 |
Mail flow scenario
From: Mail Relay Servers
To: Microsoft 365
How to identify email sent from Mail Relay Servers
Identify incoming messages from Mail Relay Servers by verifying that the sending server's IP address is within Mail Relay IP address ranges and the sender's email address is an accepted domain in your organization. |
Unified mail domain in the target tenant
- When a user sends an email as user@source.domain it is redirected to Address Rewrite Service server if it is addressed to external recipients.
- When the Address Rewrite Service receives email from user@source.domain, its checks user eligibility for the address rewriting service and then processes it by rewriting @source.domain to @target.domain for every user found in the coexistence space. The addresses in "From", "To" and "Cc" of the email message are rewritten for all external recipients. Then Address Rewrite Service passes the processed email message to the target Exchange Online. Internal recipients that reside in the source receive this email message with unchanged addresses.
- Exchange Online at the target sends the message to external recipients as if it was sent by user@target.domain, and all addresses of the users added to the coexistence scope in "From", "To" and "Cc" are rewritten for external recipients.
- External recipient is not aware about @sourcedomain and replies (or create a new email) to user@target.domain.
- When the reply or a new mail arrives to the target mail domain it will be forwarded to the source. Source recipient gets the message as if it was forwarded from the target Exchange online from user@target.domain
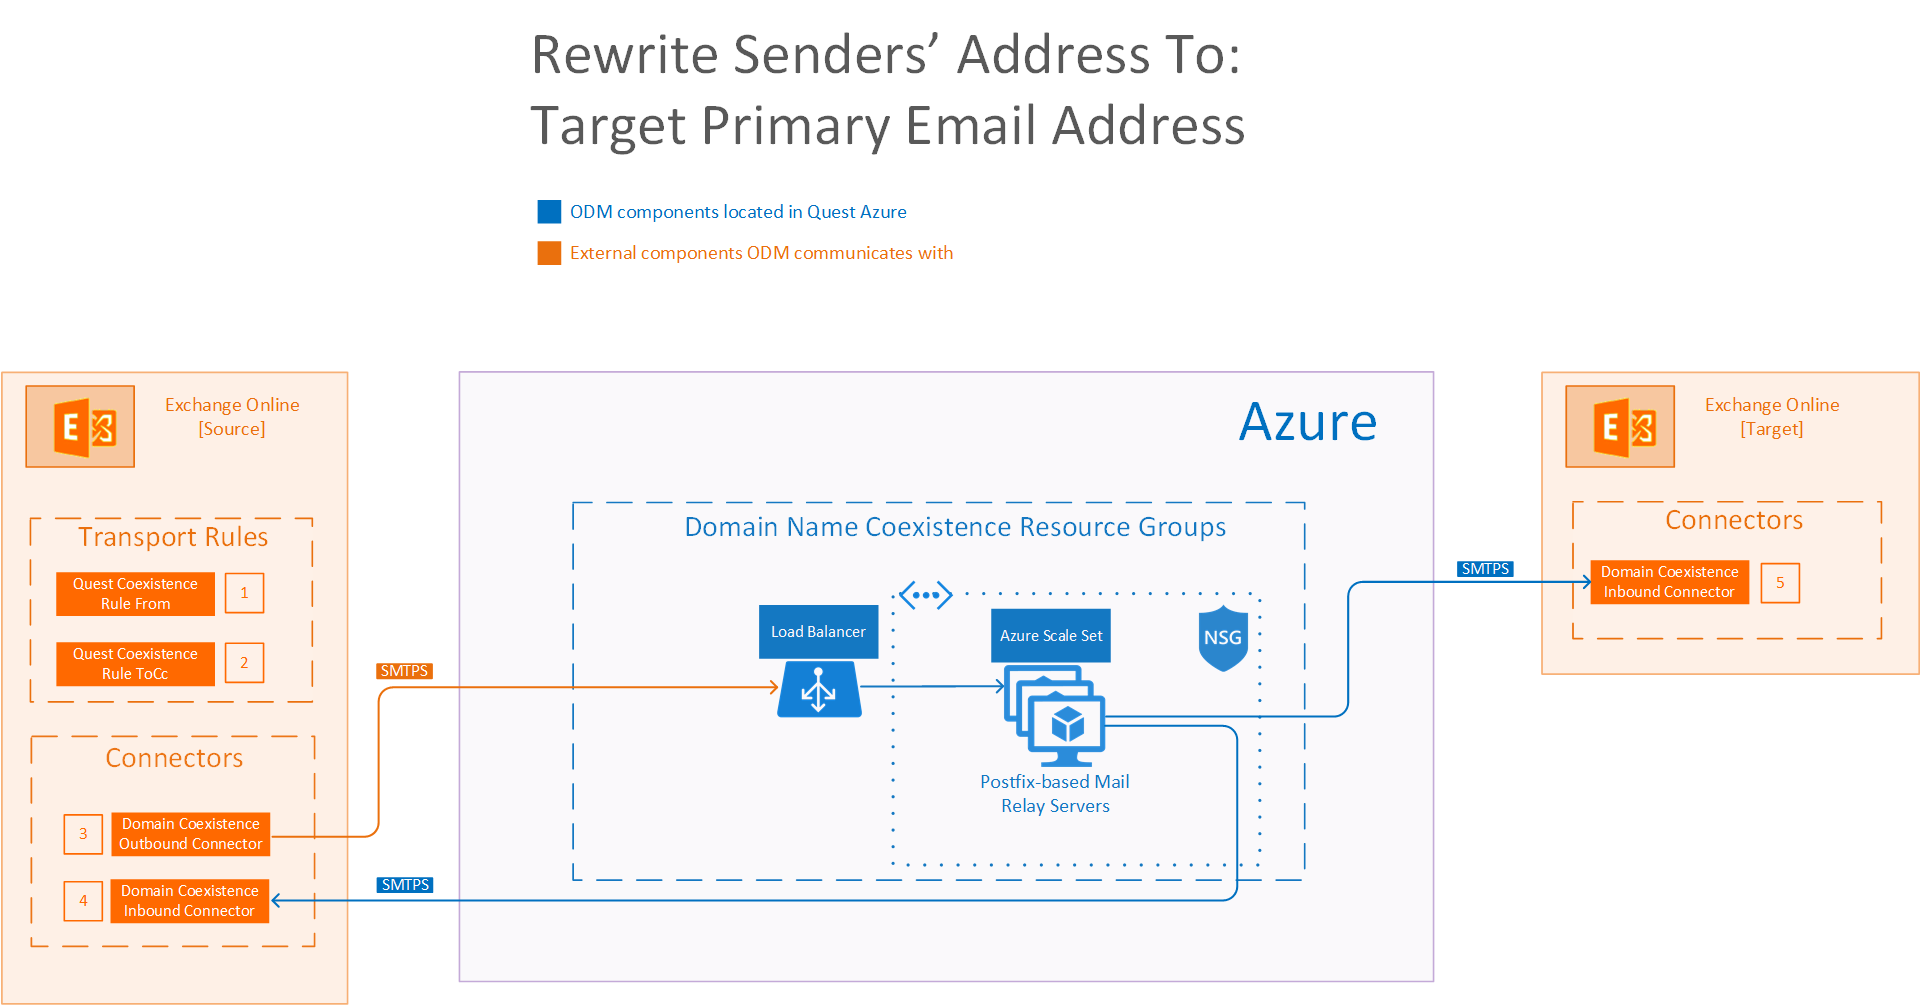
| |
If the message...
Is sent outside the organization from a member of the coexistence group
Do the following...
Route the message using the connector Quest Coexistence Connector Outbound.
Except if...
Sender IP address belongs to one of Mail Relay IP addresses. |
| |
If the message...
Is sent outside the organization and is received by a member of the coexistence group specified in the To or CC field
Do the following...
Route the message using the connector Quest Coexistence Connector Outbound.
Except if...
Sender IP address belongs to one of Mail Relay IP addresses. |
| |
Mail flow scenario
From: Microsoft 365
To: Mail Relay Servers
When to use the connector
Use only when there is a transport rule (Quest Coexistence Rule From and Quest Coexistence Rule ToCc) is set up that redirects messages to this connector. Routing method Route email messages through Mail Relay Servers. |
| |
Mail flow scenario
From: Mail Relay Servers
To: Microsoft 365
How to identify email sent from Mail Relay Servers
Identify incoming messages from Mail Relay Servers by verifying that the sending server's IP address is within Mail Relay IP address ranges and the sender's email address is an accepted domain in your organization. |
|
|
TIP: If Exchange Server Integration fails, click Try to fix and Quest will try to help you resolve the issue. |
Using the Address Rewrite Service requires following steps:
