
Installation
You can install and deploy Metalogix Backup for SharePoint in any network environment. You must have at least one Microsoft SharePoint farm deployed to use Metalogix Backup for SharePoint.
·Learn about the architecture and components.
·Review the requirements.
·Read the installation instructions.
Installing on a dedicated server
Metalogix Backup for SharePoint helps you to back up and restore the content of SharePoint 2010, 2013, 2016 and 2019 farms and the farm components that make up your SharePoint 2010, 2013, 2016 and 2019 farms. Before you can use Metalogix Backup for SharePoint, you must select one or more computers to host the product components and install it on those computers. The computers that host the components must meet minimum requirements for the components that you install. For more information about the requirements, see Product requirements.
For more information about installing Metalogix Backup for SharePoint on a "standalone" SharePoint server that hosts a basic install of SharePoint 2010, 2013, 2016 or 2019, see Installing on a standalone SharePoint server.
|
|
TIP: The account that you use to install Metalogix Backup for SharePoint must not have Windows User Account Control (UAC) enabled when you install. If UAC is enabled, the installation cannot finish successfully. |

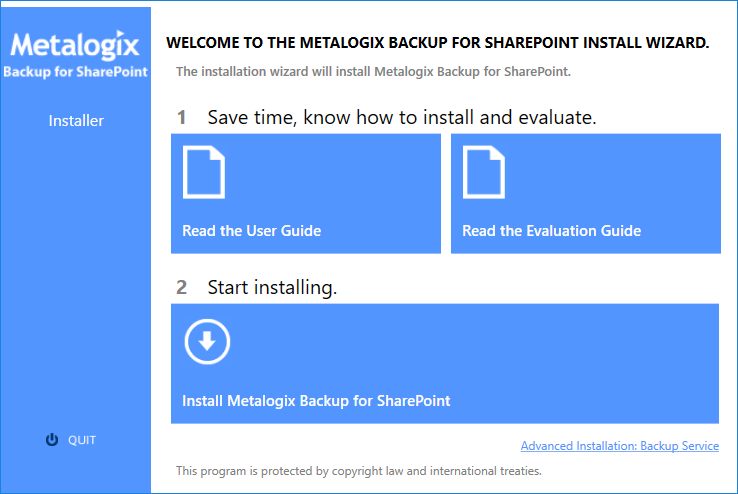
How do I install Metalogix Backup for SharePoint?
Use the Metalogix Backup for SharePoint Installation files to install the product. You can install Metalogix Backup for SharePoint on any computer that meets or exceeds the product requirements.
To install all of the Metalogix Backup for SharePoint components on a dedicated server
1.Log on to the computer where you want to install Metalogix Backup for SharePoint. You should use a user account that is a member of the local administrators group on the computer. In addition, the account that you use must have the sysadmin role assigned for the SQL Server instance that hosts the Metalogix Backup for SharePoint repository database.
2.Unzip the installation files to a folder.
3.Locate and double click the Metalogix Backup for SharePoint.exe file.
4.Read the guides and then click the Install Metalogix Backup for SharePoint button.
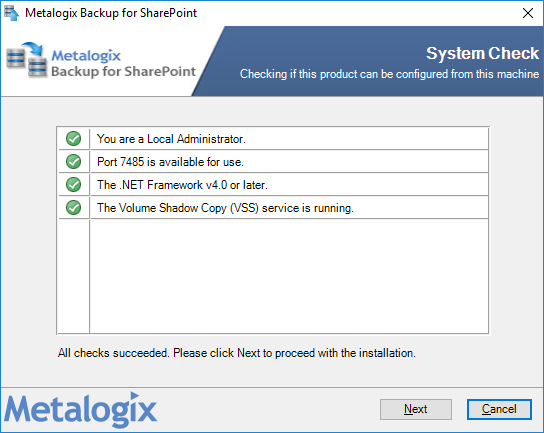
5.The System Check step appears. The Metalogix Backup for SharePoint installer bootstrap automatically runs a system check. Once the check has completed, you will either have to address the checks that did not pass.

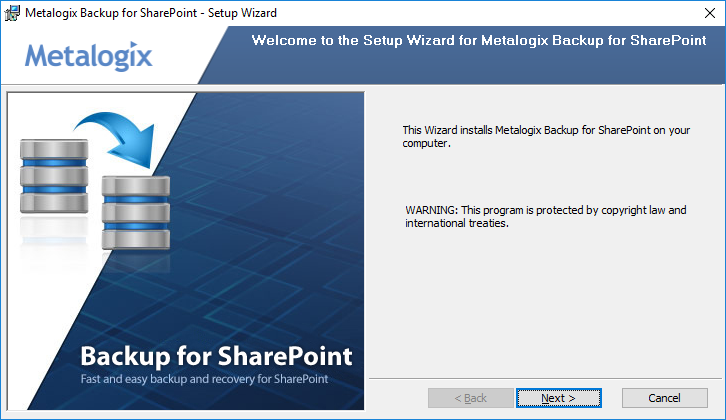
6.Click Next. The Metalogix Backup for SharePoint - Setup Wizard starts and the Welcome step appears.
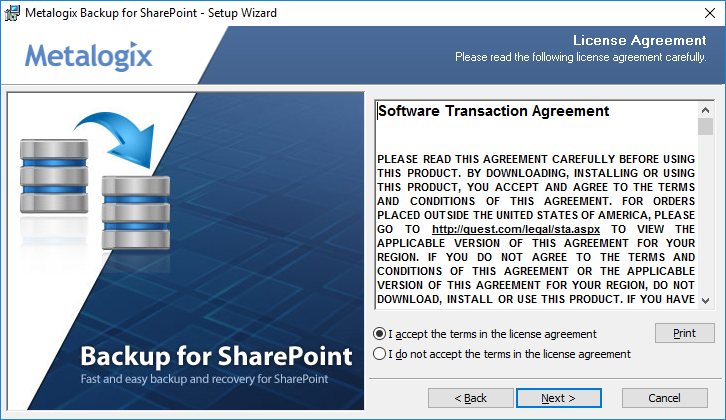
7.Click Next. The License Agreement step appears. Review the terms of the license agreement, and then click I accept the terms in the license agreement.
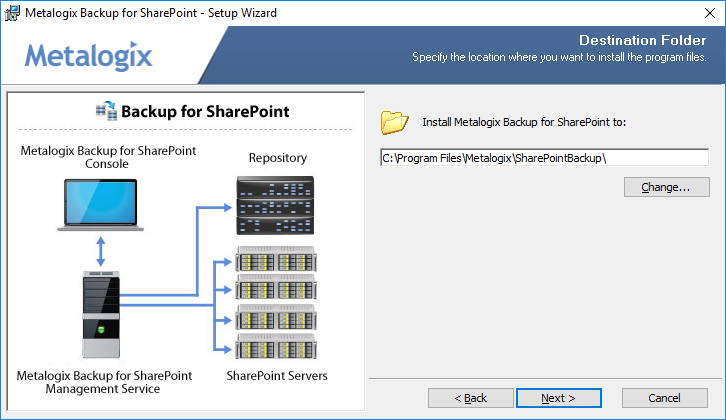
8.Click Next. The Destination Folder step appears. Accept the default location or click Change to select another local folder to install the components.
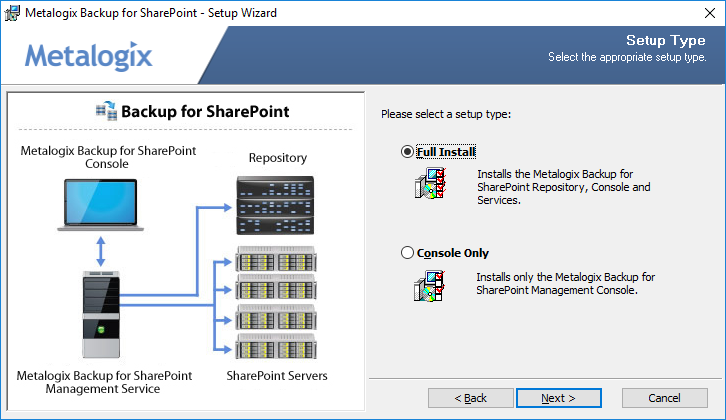
9.Click Next. The Setup Type step appears. Click Full Install to install all Metalogix Backup for SharePoint components on a single computer or click Console Only to install only the Metalogix Backup for SharePoint Management Console.
10.Click Next. If you selected Full Install and the Microsoft firewall is enabled on the host computer, the Microsoft Firewall Enabled page reminds you to open the required ports for the Management Service.
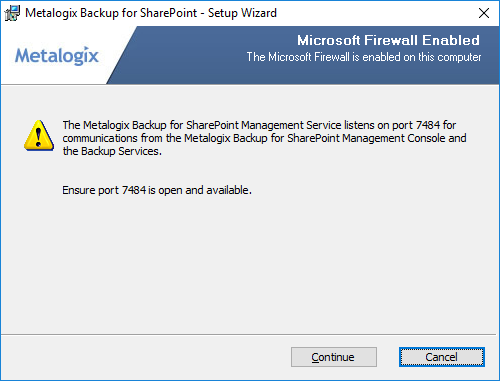
11.Click Continue. The Install the Metalogix Backup for SharePoint Repository step appears.
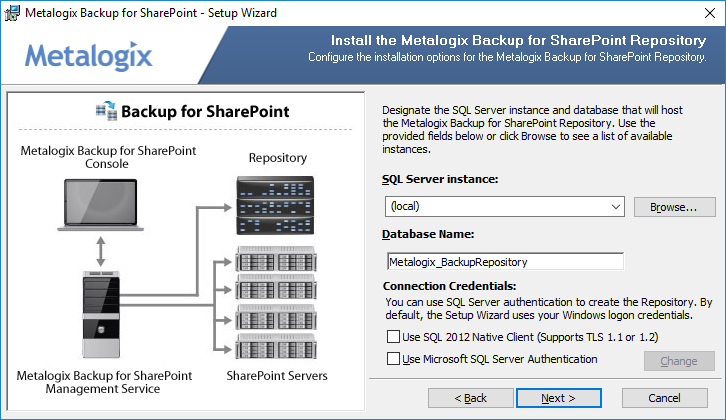
Enter the information as described below:
a.SQL Server instance - locate a SQL Server instance that will host the repository. If the SQL server is co-located on the same computer, select (local) for SQL Server Instance.
b.Database Name - accept the default name or enter a custom database name for the repository database.
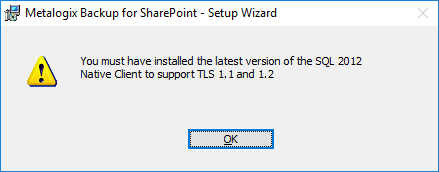
c.Use SQL 2012 Native Client (Supports TLS 1.1 or 1.2) - Select the check box if you want to use a TLS connection. When you select the check box, an information appears if you have not installed the SQL 2012 Native Client.
d.Use Microsoft SQL Server Authentication - select this check box to specify the credentials that the Setup Wizard uses to connect to the SQL Server. Otherwise leave this check box unchecked to use the default Windows Authentication.
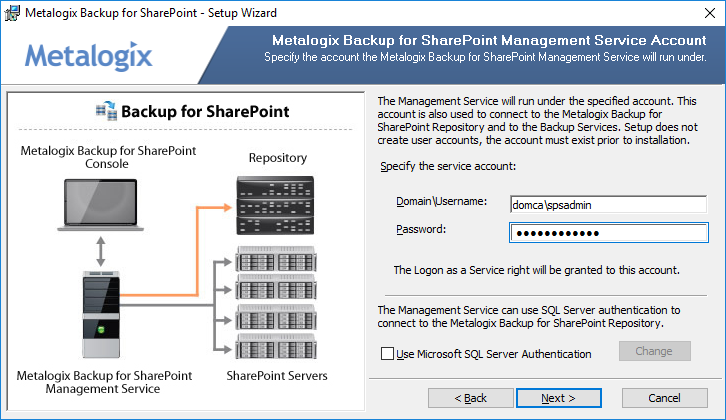
11.Click Next. The Metalogix Backup for SharePoint Management Service Account page appears. Specify the windows service account that will be used by the Management Service. If the SQL server requires SQL Server Authentication credentials then select Use Microsoft SQL Server Authentication and provide the credentials that the management service will use to connect to the repository database.
12.Click Next. The Ready to Install the Program step appears.
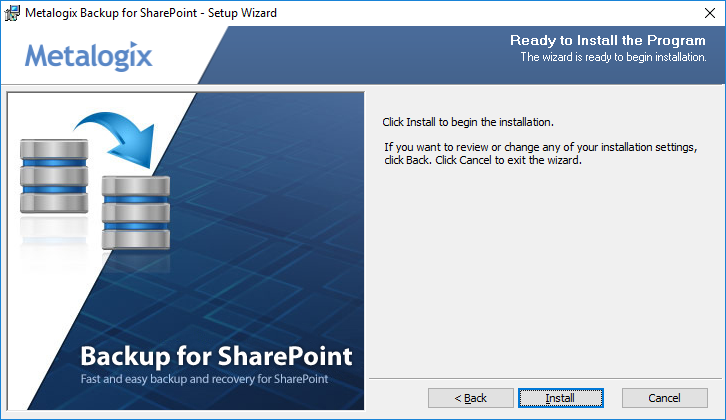
13.Click Install. When the installation completes, the On Setup Wizard Completed step appears. If you leave Launch Management Console selected, the Metalogix Backup for SharePoint Management Console starts.
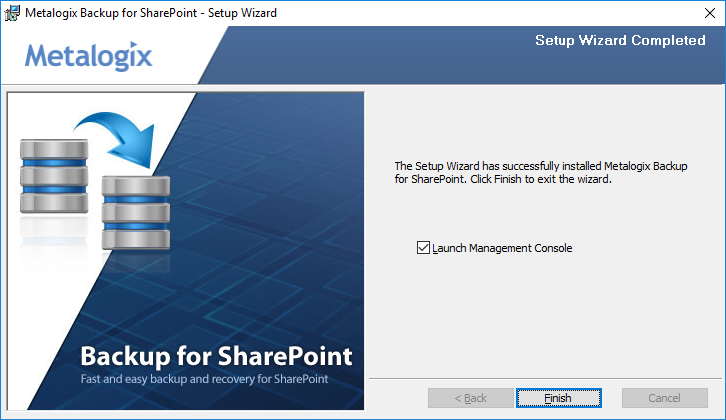
14.Click Finish to close the Metalogix Backup for SharePoint - Setup Wizard.
Installing on a standalone SharePoint server
When you install Microsoft SharePoint, you can choose to perform a "standalone" or basic install on a single server that hosts all of the SharePoint components. The installer optimizes the component settings on a standalone SharePoint farm for the standalone environment. If you install Metalogix Backup for SharePoint on a standalone farm, you must make certain changes to these settings to give Metalogix Backup for SharePoint access to both the farm components and its own components.
|
|
TIP: When you install on a multi-server farm, you do not need to make these changes. The changes are required only for standalone or basic installations of SharePoint 2010, 2013, 2016 or 2019. |
You must make these changes to your standalone SharePoint server before you install Metalogix Backup for SharePoint. Until you make the changes, Metalogix Backup for SharePoint cannot complete the Configuration wizard and install the Backup Service.
·Enable TCP/IP for the SQL Server instance. The instance name is <server name>\SHAREPOINT.
·Enable Named Pipes for the SQL Server instance.
In the Services Control Panel, do the following:
·Set the startup type of the SQL Server Agent to Automatic.
·Set the startup type of the SQL Server Browser to Automatic.
·Start or restart the SQL Server Agent.
You can then install Metalogix Backup for SharePoint as described in the topic Installing on a dedicated server and run the Configuration wizard.
When you have completed the Configuration wizard, immediately quit the Management Console. In the Services Control Panel, change the login account for the SharePoint VSS Writer service to LocalSystem then restart the service. Before you install Metalogix Backup for SharePoint, the SharePoint VSS Writer service runs as Local Service. As part of the Configuration wizard, Metalogix Backup for SharePoint issues the command stsadm registervsswriter, which changes the account. When you set the service to run as LocalSystem, you are returning the service to its original settings.
After making the changes, you can use Metalogix Backup for SharePoint normally.
Installing the Backup Service
When you add additional components like a WFE server or a database server, you must install the Backup service on these components manually. If your disaster recovery planning includes farm backups of SharePoint 2010 farms, you must install the Backup Service on every WFE and every database server in your SharePoint farm.
There are two ways to install the Backup service manually:
·Use the Metalogix Backup for SharePoint Management Console
·Use the Metalogix Backup for SharePoint installer
|
|
NOTE: The first Backup Service that you install must always be on a WFE server. When you install a Backup Service you must specify the user name and password of the windows user account that is used by the Backup Service uses. The user account that you specify must have specific permissions for the farm. |
Backup Service account Permissions
The account you use as the service account for the Backup Service must have the following permissions:
·Member of the local Administrators group on the WFE server.
·Member of the farm administrators group in the SharePoint farm.
·Must have at least db_owner permissions for all SharePoint content databases, including the admin content and SharePoint config databases.
|
|
NOTE: If the account that you use is not a SQL Server system administrator, you should use the SQL Server Management Studio to grant the account access to the repository database that you specified when you installed Metalogix Backup for SharePoint. The default database name is Metalogix_BackupRepository. |
Steps to install the Backup Service with the Metalogix Backup for SharePoint installer
To use the Metalogix Backup for SharePoint installer to install the Backup Service on a WFE or a database server, you must first log into the server with an account that is a member of the local Administrators group.
To use the Metalogix Backup for SharePoint installer to install the Backup Service
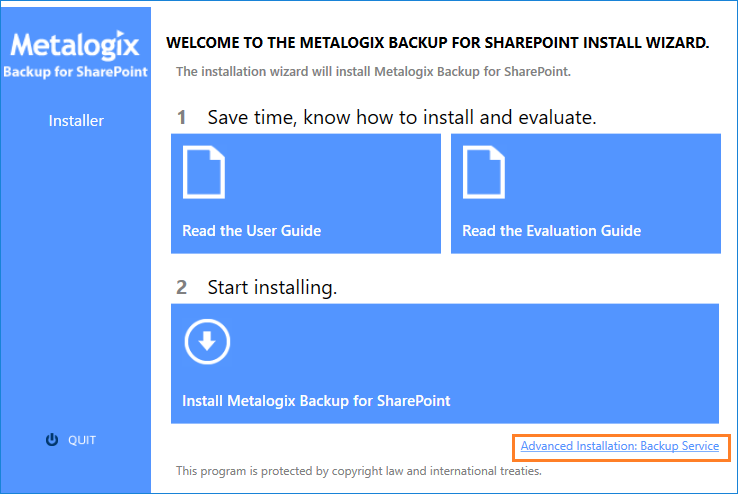
1.Use Windows Explorer to locate and double click the Metalogix Backup for SharePoint.exe file.
2.In the Install page, click Advanced Installation: Backup Service.
3.The System Check step appears. Metalogix Backup for SharePoint installation wizard automatically runs a system check. Once the system check has completed, you will either have to address the checks that did not pass and rerun the wizard, or if all checks have passed click Next.
4.The Metalogix Backup for SharePoint Service - Setup wizard starts and the Welcome step appears.
5.Click Next. The License Agreement step appears. Read the license agreement and if you agree with the terms of the license, click I accept the terms in the license agreement.
6.Click Next. The Destination Folder step appears. You can accept the default settings or click Change to specify a custom folder.
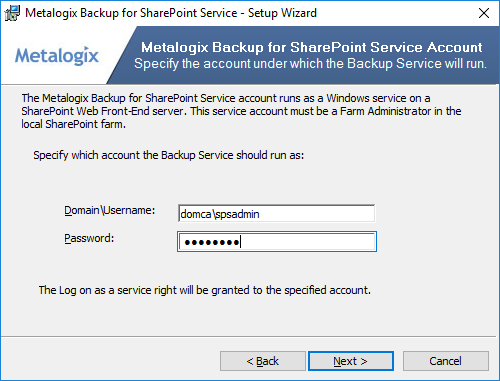
7.Click Next. The Service Account step appears. Enter the credentials of the account that the Backup Service should use. Specify the user name in <domain name>\<user name> format.
8.Click Next. The Service Location step appears. Enter the FQDN, NetBIOS name or IP address of the server that hosts the Management service.

9.Click Next. The Ready to Install the Program step appears. Click Install to begin the installation.
10.In the Setup Wizard Completed step, click Finish.
Steps to install the Backup Service from the Management Console
1.From the Management Console workspace selector click Configuration.
2.In the Configuration pane, select the name of the WFE or another server where you want to install the Backup Service.
3.From the Configuration tab ribbon click Install Backup Service. The Install Backup Service wizard opens.
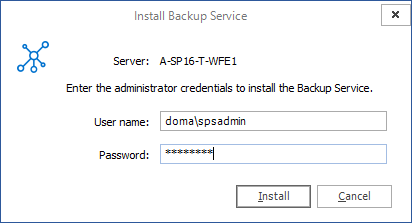
4.Enter the administrator credentials of the account that the Backup Service should use. Specify the user name in <domain name>\<user name> format.
5.Click Install. When the installation completes, the confirmation window opens.
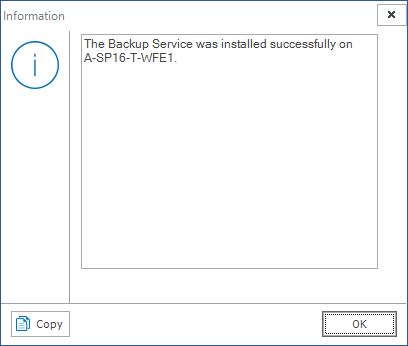
6.In the confirmation window, click OK.
Configuring the Backup Service staging location
The Backup Service uses a staging location to backup SharePoint data. During installation, the default location is configured as C:\Users\<username>\AppData\Local\Temp\ which is insufficient for a successful backup operation. You must specify a UNC path for the staging location.
If you specify an invalid UNC path during and upgrade or install you will get an error as shown below when you attempt a backup operation.
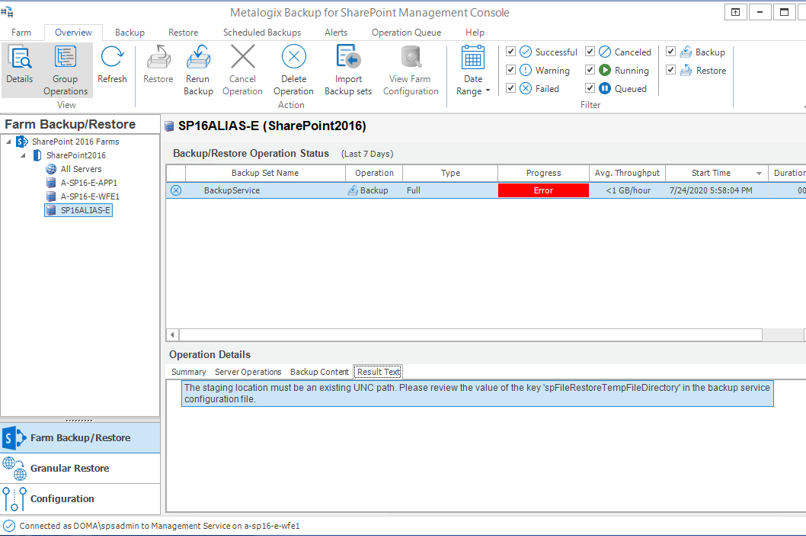
The error message appears in the Result Text tab of the Operations Detail pane: The staging location must be an existing UNC path. Please review the value of the key spFileRestoreTempFileDirectory in the Backup service configuration file.
Steps to review and change the staging location
1.Log in to the computer where Metalogix Backup for SharePoint has been installed.
2.Navigate to the Backup Service installation directory C:\Program Files\Metalogix\SharePointBackupService
3.Open the PBBackupService.exe.config file with Administrator privileges.
4.Inspect the value of the row key=spFileRestoreTempFileDirectory
5.If the value indicates a local path, you must change the path to a UNC path.
6.Save the changes to the configuration file and restart the Backup Services. If there are more instances of the backup Service on other computers, you must restart them as well.