
-
Titre
Configuring SAML Authentication with Azure as IdP (Enterprise Application) -
Description
Azure SAML Authentication claims are not customizable when are set up through a regular App Registration. -
Cause
SAML authentication with Azure (App Registration) as Identity Provider (IdP) is an easy and fast solution for the SMA.
However, the regular APP registration in Azure does not allow the creation of custom mapping/renaming of claims, which may be necessary depending on the authentication structure of an organization.
If this is not a problem or it is the only option, please check How to use SAML authentication on the Kace SMA with Azure as the IdP.
If your Office license allows it, an Enterprise Application for SAML authentication can be set up, so more options in terms of claim customization are within reach.
-
Résolution
The steps listed below will allow you to enable SAML on the Kace SMA and configure it to work with Azure as the IdP through an Enterprise Application registration.
Steps on the Kace SMA
- Enable SSL
SSL configuration guide for KACE SMA - Enable SAML
- Go to Settings | SAML Settings.
- Select “Enable SAML Service Provider”.
- (Optional, version 11.1.263) Check the "Require SAML Login" box (If set, users will only be allowed to use SAML to access the SMA. Local logins will be denied for all users except for the primary Admin user and the KACE Support account (only when a Support Tether is active).
- Select "IdP Does Not Support Passive Authentication".
- (Version 11.1.263) Check the "Select Automatically Refresh IdP Metadata (monthly)" box.
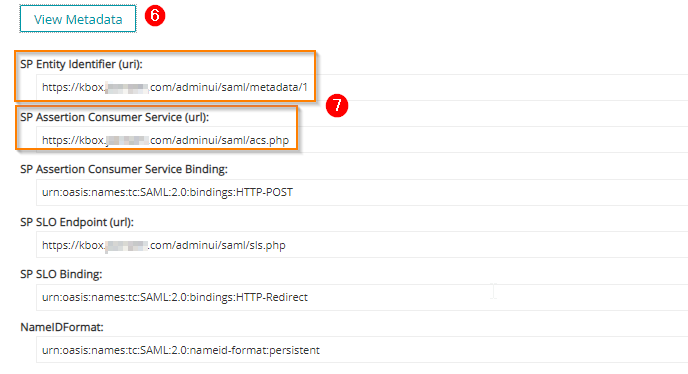
- Scroll Down to “Local Service (SP) Settings” and click on “View Metadata”.
- Copy the link below “SP Assertion Consumer Service (url)” and “SP Entity Identifier (uri)” you will need these links on the Next steps on Azure. Make sure that all the links are "secure" shown as “https”. Add the “s” manually if the link is shown as “http”.
- Stand by in Kace SMA and let's move to the steps in Azure.

Steps In Azure
- Create the Enterprise Application.
- Go to Microsoft Azure Portal and log in with your account.
- On the Azure portal, open "Azure Active Directory".
- Select “Enterprise Applications” on the left panel.
- Select “New application".
- Select "Create your own application"
- In the right expanded panel select "Integrate any other application you don't find in the gallery (Non-gallery)"
- Set the name of the application.
- Click "Create".
- Assign Users and Groups access to the Application
- In the Application overview click on "Assign users and groups".
- Click "Add user/group" and add the required user's group(s) that will be logging in to KACE SMA.
- Click "Assign".
- Set up Single sign-on
- Back on the Application Overview page click on "Set up single sign-on".
- Select SAML.
- On the "Basic SAML Configuration" section click on the "Edit" button.
- On the “Identifier (Entity ID)” field, paste the “SP Entity Identifier (uri):” obtained from the SMA.
- On the "Reply URL (Assertion Consumer Service URL)" field, paste the "SP Assertion Consumer Service (url)" obtained from the SMA.
- Click Save.
- Click "Edit" on the "User Attributes & Claims" section.
- The default claims are:
Claim Name Value
http://schemas.xmlsoap.org/ws/2005/05/identity/claims/emailaddress user.mail
http://schemas.xmlsoap.org/ws/2005/05/identity/claims/givenname user.givenname
http://schemas.xmlsoap.org/ws/2005/05/identity/claims/name user.userprincipalname
http://schemas.xmlsoap.org/ws/2005/05/identity/claims/surname user.surname - IF a new claim is needed to be set up click on "Add new claim".
- Select from the "Source attribute" drop-down menu the required attribute.
- Example: user.displayname
- Set the source to Attribute.
- In the "Namespace" field paste
- Set the "Name" field same as the source attribute "user.displayname".
- Click "Save".
- Let's add a group claim. This is useful to establish the role mapping in KACE SMA.
- Click "Add a group claim"
- Select "Which groups associated with the user should be returned in the claim?" in this case "Security groups" will be selected.
- Select the source attribute. In this case, "Group ID" will be selected.
- Click "Save".
- The default claims are:
- Back to the "Set up single sign-on" main menu copy the App Federation Metadata Url. This value will be used back in the KACE SMA SAML configuration.
Back on the KACE SMA | SAML Settings
- Import the IdP metadata into KACE SMA
- Paste the App Federation Metadata URL obtained in the previous step.
- Click on "Import IdP Metadata".
- This will generate all the info from the IdP by itself below.
- Click "View Metadata" to check the IdP metadata.

- Setting IdP Attribute Mappings
Note: Be careful in selecting the Primary Key (PK) attribute. The PK value should match the respective claim value from Azure in order to merge an existing user on the SMA, otherwise, a new user will be created. In this case, "Login" will be selected as PK.
IF the intention is to map the user's manager information, it is required that the claim format value is the same as the PK selected in KACE SMA. For example, if the PK is Login (Samaccountname) then the attribute to be sent should be the "ManagerSamaccountname". Also, the Manager value should match an existing user in KACE SMA.
For more info check Mapping SAML Manager Assertion with user's Manager field.- Go to “IdP Attribute Mappings” Select “Use SAML”.
- Paste the Azure claims in the respective attribute fields in KACE SMA as shown below.
Login = http://schemas.xmlsoap.org/ws/2005/05/identity/claims/emailaddress
Name = http://schemas.xmlsoap.org/ws/2005/05/identity/claims/displayname
Primary Email = http://schemas.xmlsoap.org/ws/2005/05/identity/claims/emailaddress

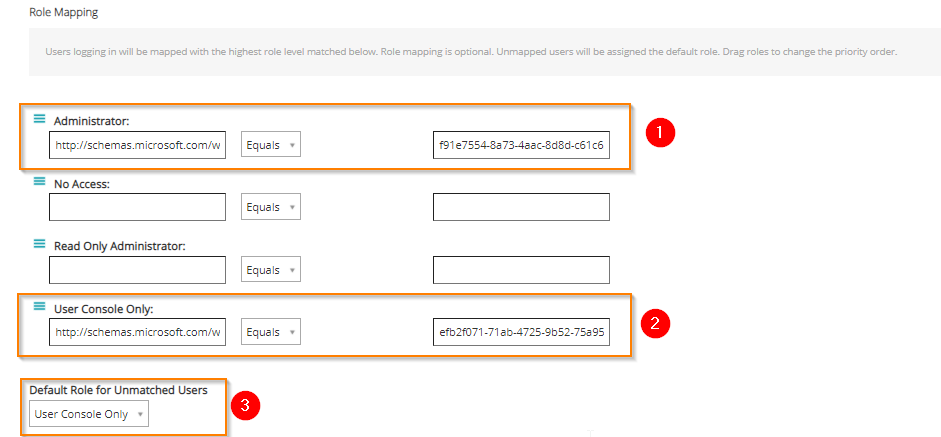
- Setting the SAML user's Role Mapping
Setting the role mapping is about creating a filter that will determine based on the results, the resulting role added to the user that authenticates. This filter can be based on a Claim value or based on a user attribute, e.g mail "contains" "@specifcdomain.com.
In this case, the role mapping filter will be set up based on the Group claim previously created in Azure, and the group names used are examples.- For the "Administrator" role set:
http://schemas.microsoft.com/ws/2008/06/identity/claims/groups = Required Group Object ID (OID)>. - For the "User Console Only" role set:
http://schemas.microsoft.com/ws/2008/06/identity/claims/groups = Required Group OID>. - Set the Default role for unmatched Users as desired. This will be based on the security policies. Keep in mind that this is the scenario in which the logging-in user attribute PK does not match the existing user in KACE SMA.
Now is time to Save the SAML configuration.
The claims and their values can always be checked either to troubleshoot problems or to verify what claim should be used for each attribute based on the claim assertion that is being sent from the IdP.
For this purpose, the SAML Chrome Panel extension can be used. This allows access to a new section called "SAML" on developer tools. Hit (F12) to access Google Chrome developer tools.

- Enable SSL