
-
Title
DCOM Prerequisites for the Exchange Server, Windows Server 2008 R2 and Server 2012 Prerequisites. -
Description
Improper configuration of this can lead to disconnection of AD Agents and no collection of data. -
Cause
The account specified in the agent properties must have Full Control permissions on the registry keys for the following:
- HKEY_CLASSES_ROOT\CLSID 72C24DD5-D70A-438B-8A42-98424B88AFB8 (Windows Script Host Shell Object)
- HKEY_CLASSES_ROOT\CLSID 76A64158-CB41-11d1-8B02-00600806D9B6 (WBEM Scripting Locator)
- HKEY_CLASSES_ROOT\CLSID 0D43FE01-F093-11CF-8940-00A0C9054228 (Windows Script FileSystem Object)
For a 64-bit OS, also grant the permissions for below registry keys:
- HKEY_CLASSES_ROOT\Wow6432Node\CLSID 72C24DD5-D70A-438B-8A42-98424B88AFB8
- HKEY_CLASSES_ROOT\Wow6432Node\CLSID 76A64158-CB41-11D1-8B02-00600806D9B6
- HKEY_CLASSES_ROOT\Wow6432Node\CLSID 0D43FE01-F093-11CF-8940-00A0C9054228
-
Resolution
Create of a backup copy of the Windows Registry before making any changes is recommended, so, the changes can be revert if necessary.
To grant permissions on these keys:
1. Login to the Windows Host with an Administrator account that you are comfortable having ownership over these keys.
2. Start the Windows Registry Editor as Administrator (run regedit.exe).
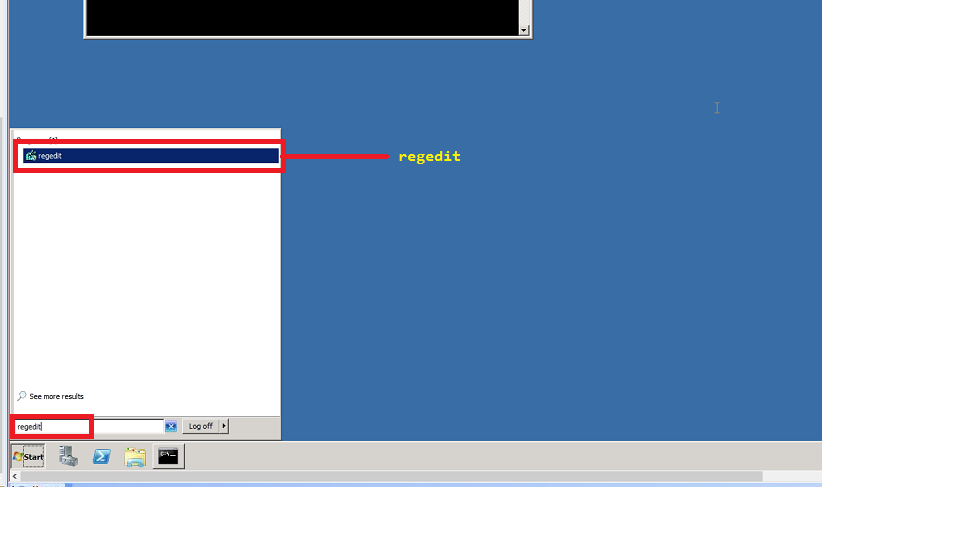
3. If asked to allow the Regedit program to make changes to the computer, click Yes.
4. 64 bit OS. Navigate to the registry item:
- HKEY_CLASSES_ROOT\Wow6432Node\CLSID 72C24DD5-D70A-438B-8A42-98424B88AFB8
- HKEY_CLASSES_ROOT\Wow6432Node\CLSID 76A64158-CB41-11D1-8B02-00600806D9B6
- HKEY_CLASSES_ROOT\Wow6432Node\CLSID 0D43FE01-F093-11CF-8940-00A0C9054228
5. Right-click the registry key and select "Permissions". Click "Advanced" and open the "Owner" tab.
6. In the "Change Owner" to box, select one of the following entries:
- The user account that is used by the Active Directory agent
- The administrative group for the account the currently user belong to Select the "Replace the owner on subcontainers and objects" check box.
If the account is not listed, click "Other user or groups" to add the account.
7. Click "OK".
8. Under "Group or user names", select the account that will be specified in the agent properties. If the account is not listed, click "Add2 to add the account.
9. Under "Permission for account", select the "Allow Full Control" check box and click "OK".
10. "Close" the Registry Editor.
Once the KEY changes ha been made. Check the AD Agent configuration over the FMS
To edit the properties of the AD Agent:
Active Directory Environment | Agent Management
If ERROR on Server 2012 extra step to set FULL CONTROL
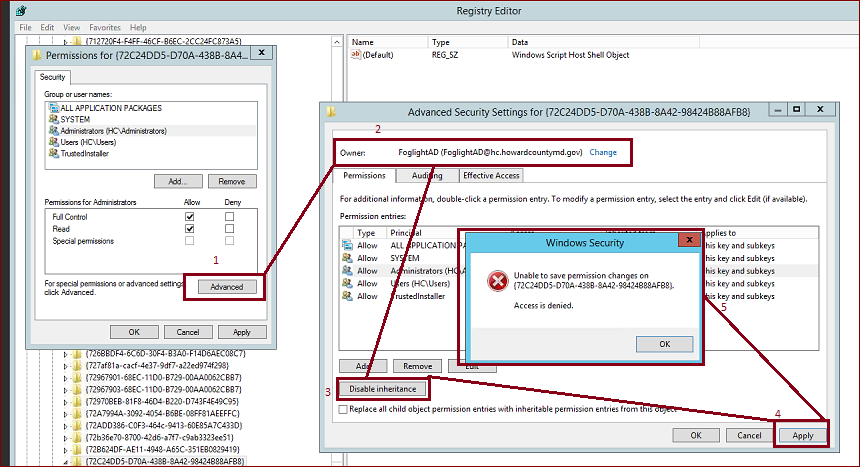
Select the options:
Replace owner on sub-containers and objects
Replace all child object permission entries with inheritable permission entries from this object

Allow Full Control permissions

=====================================================================================
DCOM Prerequisites for the Exchange ServerEnable the Distributed COM (DCOM) on the Exchange server:1. Click "Start | Run".2. In the Run dialog, enter "dcomcnfg" and click "OK".3. Expand Component Services and then Computers.4. Right-click the My Computer object and select "Properties".5. On the Default Properties tab, check the "Enable Distributed COM" on this computer option.6. Select "Default Authentication Level" as "Connect.7. Select "Default Impersonation Level" as "Identify".8. The Remote Registry Service must be running on each Exchange server being monitored by Foglight for Exchange, to allow agents remote access to the registry.9. The account which monitors the Exchange server must have the "Log on as a service" user right. This is required to enable a remote service to run PowerShell commands. For more information about how to log on as a service and the "to add the Log on as a service Right to an account section".10. The Exchange account specified in the agent properties must have Full Control permissions on following registry keys:- HKEY_CLASSES_ROOT\CLSID 72C24DD5-D70A-438B-8A42-98424B88AFB8 (Windows Script Host Shell Object)
- HKEY_CLASSES_ROOT\CLSID 76A64158-CB41-11d1-8B02-00600806D9B6 (WBEM Scripting Locator)
- HKEY_CLASSES_ROOT\CLSID 0D43FE01-F093-11CF-8940-00A0C9054228 (Windows Script FileSystem Object)
For a 64-bit OS, also grant the permissions for these two additional registry keys- HKEY_CLASSES_ROOT\Wow6432Node\CLSID 72C24DD5-D70A-438B-8A42-98424B88AFB8
- HKEY_CLASSES_ROOT\Wow6432Node\CLSID 76A64158-CB41-11D1-8B02-00600806D9B6
- HKEY_CLASSES_ROOT\Wow6432Node\CLSID 0D43FE01-F093-11CF-8940-00A0C9054228
To add the Log on as a service Right to an account:1. Go to "Control Panel | Administrative Tools" and open "Group Policy Management".2. Go to "Group Policy Management | Forest:[Domain Name] | Domains > [Domain Name] | Default Domain Policy".3. Right click the Default Domain Policy and select "Edit".4. Go to "Computer Configuration | Policies | Windows Settings | Security Settings | Local Policies | User Rights Assignment | Log on as a service".5. Double click "Log on as a service" and select "Security Policy Setting tab".6. Click "Add User or Group" and add the account which monitors the exchange server into the list.For more details see Release Notes -
Attachments
-
Additional Information
Please see images attached