
Mapping retention categories from Enterprise Vault to Office 365 retention tags
You can collect retention tags from Office 365 and map/apply them in a migration where Enterprise Vault is used as the source, and Office 365 is used as a target.
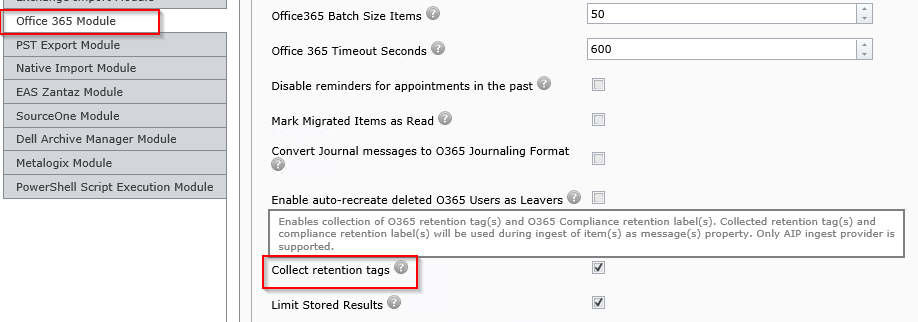
By default the collection of retention tags is disabled. If you want to make use of this new feature, then the option in System Settings needs to be enabled:
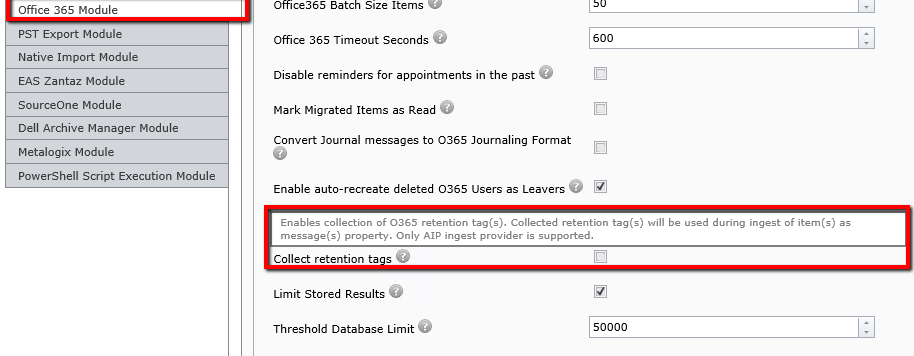
When this is enabled, retention tags will be collected by the Office 365 module.
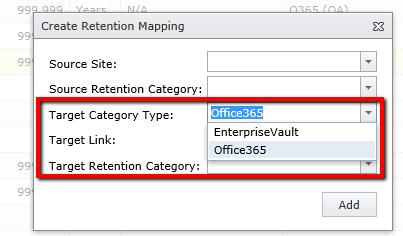
Retention category mapping can then be performed. The user interface has been extended to allow the mapping between Enterprise Vault retention category and Office 365 retention tag.
During a migration, items will be ingested into Office and two additional attributes will be set/populated:
·PR_POLICY_TAG (GUID of the retention tag)
·PR_RETENTION_PERIOD (Age limit for retention)
PowerShell commands have also been extended to allow for this mapping to process to be performed.
|
|
NOTE: If an item is exported, and there is no retention mapping for it, the item will not ingest. |

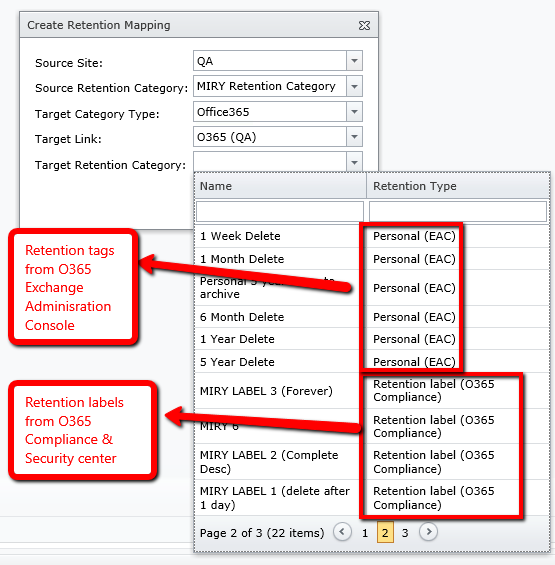
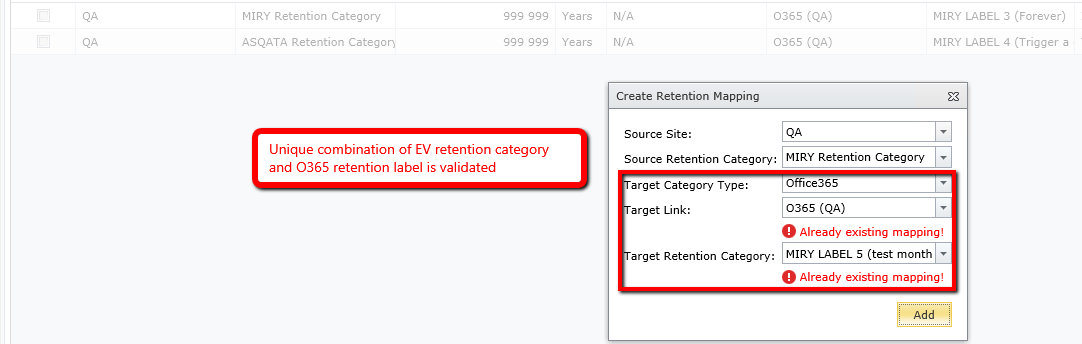
There is also the ability to bind Enterprise Vault retention categories with the Office 365 Compliance Retention labels. When the feature is active, PR_POLICY_TAG and PR_RETENTION_PERIOD properties are put into messages properties. This works only with AIP as an ingest protocol. The validation on the existing retention mapping is processed; if this doesnt exist, the ingest is not processed (items are exported only). In the case when Enterprise Vault archive contains items with more retention categories (in case when PST file was imported into archive under another RC as is origin of the EV archive) and only one 1 RC mapping exists, then these items will ingested and stamped with the Office 365 Compliance Retention label.
This is reflected in the UI below:
EV Retention Mappings screen:
Mapping health page has been updated to handle with this missing retention mapping for Office 365.

Archive Shuttle collects ALL retention labels, published or unpublished.
·Published labels are visible via Outlook > Assign Policy.
·Unpublished are hidden for users via Outlook.
Convert journal messages to Office 365 journaling format
Occasionally, before migrating Journal messages from Enterprise Vault to Office 365, it is important to consider if want to have migrated the entire envelope, or just the P2.
Archive Shuttle has a Convert Journal messages to Office 365 Journaling Format setting on Office 365 module tab in System Configuration, and this setting works as follows:
a) If unchecked (default), it will migrate the whole envelope (P1 and P2) to Office 365. In the Compliance Center, then you can do a search, because envelopes were implemented in the search functionality.
Journal message migrated with P1 and P2 item to Office 365:
b) If checked, it will migrate only the P2 message and will remove the P1 header. The metadata of the P1 message (DL Expansion, BCC etc.) is then put into special properties of the P2. Because of this, Office 365 Compliance Search can find them.
Journal message migrated with P2 item to Office 365:
In the background, once Archive Shuttle collected information from the P1 message, it will create new properties and store the P1 info into them.
|
|
NOTE: Archive Shuttle does not currently support only ingesting P1 and stripping P2. |
Enterprise Vault to Proofpoint
Introduction
This section explains what the requirements are for an Enterprise Vault (EV) to Proofpoint migration, and then covers the basic steps that should be followed to start such a migration. When doing a migration to Proofpoint, Archive Shutte make use of PST files as intermediate step in getting the data into Proofpoint.
Requirements
The following is a list of requirements.
|
Requirement |
Description |
|---|---|
|
Modules installed on source |
The EV-type modules should be installed on each appropriate source Enterprise Vault server involved in the migration. The EV import module is not required on these machines. |
|
Modules installed on appropriate bridgehead |
The Native Format Import module, and if needed, the post processing module should be installed on a bridgehead server. |
|
AD Collector module installed |
An AD Collector module should be installed so that it can collect user-level information for the migration project. |
|
Staging Area created |
One or more staging areas should be setup, of an appropriate size and should be excluded from virus scanners. |
|
PST Output Area created |
One or more PST Output areas should be setup, of an appropriate size and should be excluded from virus scanners. It is this location where finalized PSTs will be place. |
|
PST Temporary Path created |
A PST Temporary Path should be setup, of an appropriate size and should be excluded from virus scanners. It is this location where temporary PSTs will be placed. |
|
Workflows reviewed |
The Stage 2 workflows should be reviewed, and if necessary, customized to meet the needs of the project. |
|
Apply appropriate failed item threshold |
It is best practice to find an appropriate failed item threshold for the project/customer and apply that at the links level. This way all mappings which are created will inherit this value. |
Basic steps
The following are the basic steps to start this type of migration.
|
Step |
Screen |
Description |
|---|---|---|
|
Enable Modules |
Modules |
All Archive Shuttle modules must be enabled, and optionally a schedule for them defined. It is important to verify that none of the modules have a red background (this indicates that Archive Shuttle Core has not had contact with the module) and that the module versions are as expected. |
|
Enable Domains |
Active Directory |
Select and enable one or more domains for synchronization. |
|
Add EV Environment |
EV Environment |
Add the Enterprise Vault source environment. |
|
Create PST Link |
Links |
Create a PST link, and ensure that the Target modules are associated with it. Configure the PST Output Path and the PST Temporary Path. |
|
Set Watermarks for Output Path & Temporary Path |
Links |
With the PST link selected, go to the PST tab, and set the watermarks for the PST Output location. |
|
Update System Configuration |
Native Format Import, System Configuration |
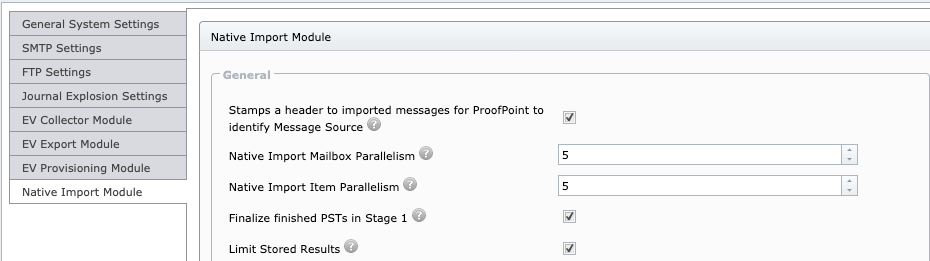
Ensure that the option Stamps a header to imported messages for Proofpoint to identify message source is selected in the System Configuration for the Native Format Import module. |
|
Add Source Links |
Links |
Configure all appropriate source links. Select the links, and then click on Map Modules, create the item database(s) and enable archive gathering. Ensure there is no import module specified on the links (this will only confuse things later). |
|
Add Staging Area |
Links |
Ensure that the Default Staging Area is configured correctly. Depending on the migration, the free space, and the number of vault stores being used as the source for the migration, the high water mark can be adjusted upwards. |
|
Map one or more containers |
Manual Mapping/Bulk Mapping |
One or more containers can now be mapped and migration can begin. It is often easiest to use a filter on the bulk mapping screen to show only DAM as a source. |
Determining Enterprise Vault archive owner(s)
Archive Shuttle must determine the owner of a mailbox archive. This section explains how this takes place..
Archive Shuttle takes the owner information of a mailbox archive from the Auto Security Descriptor field within the Enterprise Vault Directory database. The first entry for an archive will be the owner. Take the following three examples:
Simple 1
·Bill usage to: somedomain\simple1
·Permissions tab: somedomain\simple with inherited read, write and delete permissions
Archive Shuttle will see the owner of this archive as simple1.
Simple 2
·Bill usage to: somedomain\simple2
·Manually grant an additional user read, and delete permissions on the archive
·Permissions tab: somedomain\simple2 with inherited read, write and delete permissions. somedomain\someotheruser with manually set read, and delete permissions
Archive Shuttle will see the owner of this archive as simple2.
Simple 3
·Bill usage to: somedomain\simple3
·Grant full mailbox access via Exchange Management Console or Exchange Management Shell
·Permissions tab: somedomain\simple3 with inherited read, write and delete permissions. somedomain\someotheruser also with inherited read, write and delete permissions
Archive Shuttle will see the owner of this archive as simple3.
|
|
NOTE: The order which the archives are listed in the permissions tab in Enterprise Vault does not reflect the order that the accounts are described in the Auto Security Descriptor field. The permissions tab shows the archive permissions in alphabetical order. |
More detail
1.Archive Shuttle resolves the 'Owner' of an Archive as follows:
In the EnterpriseVaultDirectory database, the following SQL is used:
select ADMbxDN, LegacyMbxDN from ExchangeMailboxEntry where DefaultVaultId=@VAULTID
2.Archive Shuttle then does a lookup for the ADMbxDN in Active Directory to get the SID:
LDAP Query: (ADMbxDN=)
If Archive Shuttle does not find the AD object, the archive will be marked as Ownerless and move to the next option.
3.Archive Shuttle then does a lookup for the LegacyMbxDN in Active Directory to get the SID:
LDAP Query: (LegacyMbxDN=)
If Archive Shuttle does not find the AD object, the archive will be marked as Ownerless and move to the next option.
4.We then compare the SIDs we got from ADMbxDN and from LegacyMbxDN, and if both of them match, we have an Owner. If they do not match, they will be marked as 'Ownerless' and move to the next option.
5.If we do not find an entry in ExchangeMailboxEntry, we resolve using the BillingOwner or the AutoSecurityDesc:
select SID from Root inner join trustee on OwningTrusteeIdentity = TrusteeIdentity where VaultEntryId=@ARCHIVEID
|
|
NOTE: Regarding OwnerUserSid versus SID fields in the EVArchive Table on in the Archive Shuttle Directory Database: ·SID is always filled out with the SID which is retrieved from the above steps ·OwnerUserSid has a foreign key constraint on the [User] Table. So Archive Shuttle only fill this out if the SID obtained from EV is actually contained in the Archive Shuttle Directory Database (i.e. has been synced from AD) |
5.The UserSidHistory table is stored Sid history for each user when they were migrated from AD1 to AD2. This SidHistory attribute is part of Active Directory, and Archive Shuttle collects this data from Active Directory directly.
General considerations
The following general considerations should be taken into account for this type of migration:
·When migrating from a pre EV10.0.3 system extraction of data may be slower than expected if Enterprise Vault Collections have been used. Access to the data inside the CAB file is single threaded. This issue does not exist in Enterprise Vault 10.0.3 and later.
·When choosing a PST filename policy for Mailbox Archives ensure that SAMAccountName is used in the definition.
·Set the PST Rollover Threshold to no more than 4 Gb.
·When migrating Journal Archives, it is recommended to use data-based filters to allow greater control over the mappings.
Enterprise Vault Discovery Accelerator to Office 365
This section explains what the requirements are for an Enterprise Vault Discovery Accelerator (EV DA) to Office 365 migration, and then covers the basic steps that should be followed to start such a migration.
Requirements
The following is a list of requirements.
|
Requirement |
Description |
|---|---|
|
Modules installed on source |
The EV-type modules should be installed on each appropriate source Enterprise Vault server involved in the migration. The EV import module is not required on these machines. |
|
Modules installed on appropriate bridgehead to reach target |
Office 365 and Post Processing modules are the two which are primarily needed to work with this type of migration. |
|
AD Collector module installed |
An AD Collector module should be installed so that it can collect user-level information for the migration project. |
|
Staging Area created |
One or more staging areas should be setup, of an appropriate size and should be excluded from virus scanners. |
|
OAuth configuration |
For modern authentication (OAuth) only: If OAuth is being used for authentication, click here for more information. |
|
Workflows reviewed |
The Stage 2 workflows should be reviewed, and if necessary, customized to meet the needs of the project. |
|
Apply appropriate failed item threshold |
It is best practice to find an appropriate failed item threshold for the project/customer and apply that at the links level. This way all mappings which are created will inherit this value. |
Basic steps
The following are the basic steps to start this type of migration.
|
Step |
Screen |
Description |
|---|---|---|
|
Check Modules |
Modules |
All Archive Shuttle modules must be enabled, and optionally a schedule for them defined. It is important to verify that none of the modules have a red background (this indicates that Archive Shuttle Core has not had contact with the module) and that the module versions are as expected. |
|
Enable Domains |
Active Directory |
Select and enable one or more domains for synchronization. |
|
Add Enterprise Vault Discovery Accelerator Environment |
EV DA Environment |
Add the Enterprise Vault Discovery Accelerator source environment. |
|
Add Source Links |
Links |
Ensure that the default staging area is configured correctly. Depending on the migration, the free space, and the number of vault stores being used as the source for the migration, the high water mark can be adjusted upwards. |
|
Add Staging Area |
Links |
Select the newly created link, and map a Shortcut Process Module to it. |
|
Configure Folder-less Item Handling |
System Configuration > Folder > Folder name for folder-less items |
All migrations allow archiving of items in a folder-less area called the Top Of Information Store. On the System Configuration page, enter a folder name to be used for placing the items in the target archive. |
|
Set Office 365 Credentials |
There are two options: Option 1: Service account user name/password Screen: External Application installed by the Office 365 module Run the Archive Shuttle Office 365 Module Credential Editor and supply multiple service account credentials. When running the credential editor, it is important to make sure the account that is logged in is the account used to run the Office 365 service. Archive Shuttle recommends that you add at least as many service accounts as the number of mailboxes that will be handled in parallel (configured on the System Configuration > Office 365 Module > Threading/Parallelism screen). Option 2: OAuth authentication Screen: Office 365 module Run the Archive Shuttle Office 365 Module Credential Editor and add OAuth credentials. Then test the connection. Then, from the Office 365 Module, select the Use modern authentication (OAuth) option. | |
|
Update Shortcut Processing Module Configuration |
System Configuration > Shortcut Process Module |
Update the settings so that Use EWS for Processing is enabled. |
|
Consider disabling reminders for appointments in the past |
System Configuration > Office 365 Module |
Consider enabling the option to Disable reminders for appointments in the past. |
|
Map one or more containers |
Manual Mapping/Bulk Mapping |
One or more containers can now be mapped and migration started. |