
Configuration Settings for Migrations Using the Import Pipeline
Metalogix Content Matrix has various XML properties that can be modified to fine-tune or help troubleshoot your Import Pipeline migrations. These properties can be found in the EnvironmentSettings.xml file. Refer to Content Matrix SharePoint Edition documentation for descriptions of Import Pipeline Configuration Settings.
The following XML properties can optionally be modified. However, it is generally recommended to not modify these values unless you are encountering issues when migrating using the Import Pipeline.
UploadManagerBatchSizeItemThreshold
This key controls the maximum batch size in item count, including all folders and documents, to be used if Content Matrix will be submitting batches according to number of items. The default value is 200 and the value must be a positive integer.
<XmlableEntry>
<Key>UploadManagerBatchSizeItemThreshold</Key>
<Value>200</Value>
</XmlableEntry>
UploadManagerBatchSizeMBSizeThreshold
This key controls the maximum batch size to be used if Content Matrix will be submitting batches according to size. The default value is 1000 megabytes and the value must be a positive integer. The value should be set carefully, taking into consideration factors such as total upload bandwidth, speed of data retrieval from the source system, and so on.
<XmlableEntry>
<Key>UploadManagerBatchSizeMBSizeThreshold</Key>
<Value>1000</Value>
</XmlableEntry>
MaxAzureBatchRetryCount
This key controls the maximum number of times Content Matrix will resubmit the batch until it is successfully migrated. (The default value is 5.)
<XmlableEntry>
<Key>MaxAzureBatchRetryCount</Key>
<Value>5</Value>
</XmlableEntry>
ErrorMessagesForRetryAzureBatch
This key specifies error conditions for which you want Content Matrix to resubmit a batch, when it normally would not.
NOTE: Separate multiple error messages with a pipe character (|), as shown in the example below.
<XmlableEntry>
<Key>ErrorMessagesForRetryAzureBatch</Key>
<Value>Item does not exist|Object Reference Not Set</Value>
</XmlableEntry>
Performance Settings
BufferSizeForPipelineMigrationInMb
This key controls the buffer size while uploading files to Azure Storage Account Containers using the Import Pipeline. The default value is 64, which means, for example a 128 MB file will be uploaded in two parts, 64 MBs at a time. The lower buffer size, the more quickly the computer processor handles the information. Keep in mind that the higher the value, the more system resources will be consumed.
<XmlableEntry>
<Key>BufferSizeForPipelineMigrationInMb</Key>
<Value>64</Value>
</XmlableEntry>
MaxParallelUploadFilesInPipeline
This key controls the number of files uploaded in parallel to Azure Storage Account Containers when using the Import Pipeline. The default value is 2, which means a maximum of two files can be uploaded in parallel. Keep in mind that the higher the value, the more system resources will be consumed.
<XmlableEntry>
<Key>MaxParallelUploadFilesInPipeline</Key>
<Value>2</Value>
</XmlableEntry>
UploadManagerMaxRetryCountThresholdForJobResubmission
WARNING: This value should not be changed unless absolutely necessary.
This key controls the amount of time to wait for a response from the reporting queue before re-requesting a migration job. This value is specified in multiples of 15 seconds, meaning that the default value of 960 corresponds to 4 hours and the minimum value of 120 corresponds to 30 minutes. This value must be a positive integer greater than or equal to 120.
<XmlableEntry>
<Key>UploadManagerMaxRetryCountThresholdForJobResubmission</Key>
<Value>960</Value>
</XmlableEntry>
Temporary Storage Location
UploadManagerLocalTemporaryStorageLocation
This key indicates the directory in which the temporary binary files and manifest XML files for each batch are saved. If no filepath is specified, the default file path is used.
<XmlableEntry>
<Key>UploadManagerLocalTemporaryStorageLocation</Key>
<Value>C:\ProgramData\Metalogix\Temp folder sample</Value>
</XmlableEntry>
Performance Expectations
There are a significant number of factors that will impact the performance of migrations using the Import Pipeline. Many of those are beyond any migration vendors control. For example, the SPO tenancy has a service that runs to pull data from Azure Blob Storage accounts. If that service is being called on by many clients at the same time, it could significantly slow down migrations.
Another example is the workflow. While the Import Pipeline is significantly faster for list items/documents, it is not faster for complex site collection/sub site structures with very complex and large Managed Metadata trees, workflows, content types, etc. With that in mind, weve seen migration speeds vary between 2GB/hour and 40GB/hour depending on workload when using reasonable hardware for the migration machines involved.
As compared to speeds of between 200MB and 550MB/hour on a single on premises machine, and 400MB/hour to 10GB/hour on Azure VMs, this is a very significant increase. When trying to determine how long a project will take, we still recommend a conservative approach. Test several workload types using the migration API, and preferable using Azure VMs, and see what you get. Run multiple jobs in parallel, and if you see no difference, and can afford the additional RAM/CPU, increase that, and then see what you get. Once you have those speeds, factor in that you will not maintain those speeds 24 hours/day due to variability in SPO. You will also have more remediation work to do post migration due to the differences between SP on premises and SPO.
Using Azure Based Virtual Machines
As mentioned above, we have found that migrations from Azure Virtual Machines (VM) in the same region as the SPO instance being migrated to, increase performance of the migration. The process that we recommend for any migration to SPO is:
1.If you do not know the region your SPO tenancy is in, please contact your MS Technical Account Manager (TAM) if your company has one, or contact MS Support. If MS Support does not give you this information, please contact Quest and we will get you the information.
2.Create an Azure VM in the same region as your O365 tenancy with a Microsoft-supported SQL Server (please note that if you have the bits and rights to use SQL Server, it is less expensive to create a Windows only VM, and then install SQL Server on it).
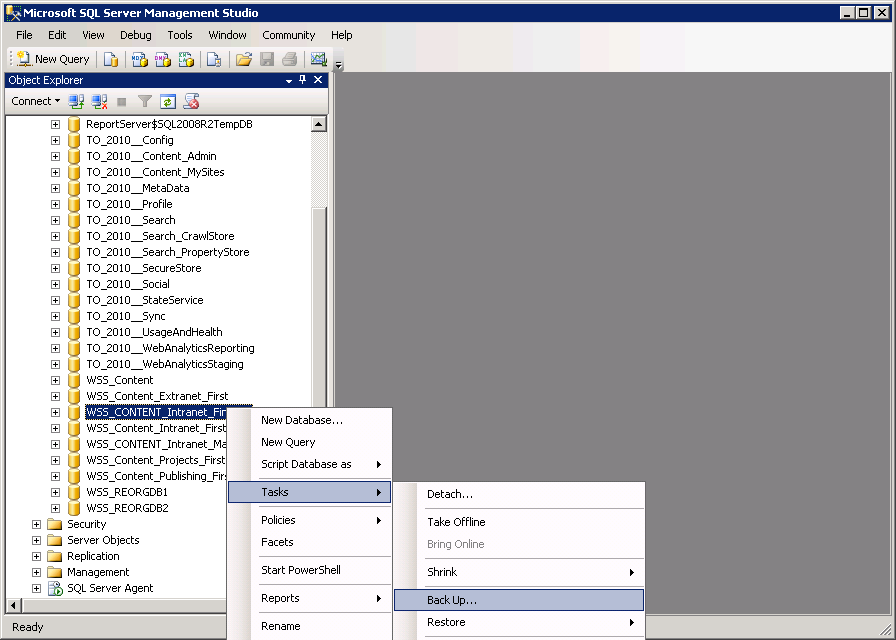
3.Using SQL Server Management Studio, back up your source Content DBs to .bak files.
4.Use ftp, or other mechanism to copy the .bak file to your Azure VM. You can ship a physical hard disk to the Azure team if needed. For more information how to ship a physical hard disk, please see Microsofts guidance here.
5.In your Azure VM, restore the databases from the .bak files.

6.Once these databases have been restored, give your Azure VM admin dbo access to each of these databases
7.Install Metalogix Content Matrix SharePoint Edition Console on the Azure VM (you can install the console on multiple other Azure VMs that do not have SQL Server on them, but they must be in the same internal network in order to enable parallel, multi username actions).
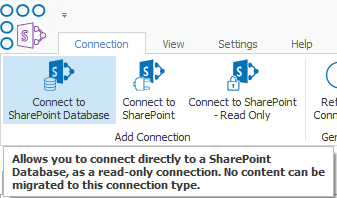
8.In Metalogix Content Matrix, use the Connect to SharePoint Database option:
9.Enter the name of the database server (at this point most likely (local)).
10.Choose the Content DB you just restored, and the site collection within that Content DB that you would like to connect to.
11.Migrate content as you normally would with Metalogix Content Matrix.
12.For any operations that require farm level connections (such as copying the Managed Metadata Services Term Store), migrate that from the source farm instead of Azure.
13.On the List Content Options tab, make sure that Preserve IDs on items/folders in Lists option is selected.
NOTE: There is no need to re-back up your Content DBs and restore them in Azure as long as you select this option.
Additional Best Practices Unique to Content Matrix that Can Further Improve SPO Migration Performance
In addition to the above mentioned migration improvements, Metalogix Content Matrix has a number of unique capabilities that make migrations to SPO potentially much faster than they are with Azure/SPO Containers, and we encourage clients who are doing large migrations (1TB or more) to take advantage of these capabilities:
I.Metalogix Content Matrix has the unique ability to connect directly to SharePoint Content Databases for 99% of the migration from SharePoint on-prem to SPO. This allows our clients to:
a.Backup their Content DBs on premises
b.Copy their Content DB .bak files to an Azure VM running SQL Server in the same geographical region as their SPO tenancy (if the content DBs involved are very large, you can also choose to ship physical disks to the Azure team, and that team will load them into your Azure VM).
c.Restore the Content DBs to SQL Server in Azure VM.
d.Use Metalogix Content Matrix Connect to SharePoint Database functionality to migrate directly from the Content DBs in the Azure VM to SPO:

II.As shown in the above diagram, by moving the Content DBs to an Azure VM in the same geographical region as your SPO tenancy, you have now moved the bulk of the objects involved in the migration to what is effectively a LAN in the SPO geographical region. The Azure VMs are frequently in the same data center as the SPO infrastructure.
III.In addition to migrating directly from the Content DBs, Metalogix Content Matrix allows you to:
a.Migrate many items in parallel without a steep reduction in performance. Metalogix Content Matrix has significant parallelism and multi-threading capabilities that allow you for example to migrate three or four site collections at the same time from a single Azure VM, and then deploy additional Azure VMs in which you can migrate additional site collections in parallel.
b.Use the unique Distributed Migration capabilities of Metalogix Content Matrix to distribute the load of migration across a multitude of different agents, thereby increasing the level of parallelism.
c.Use PowerShell to control any operation available in the Metalogix Content Matrix UI programmatically. This opens up many possibilities including the ability to create a list or CSV file that contains source site collections, target site collections, site collection job configuration files, and status, and then have the migrating machine start the next available migration in this list. This is a recommended configuration in tandem with Distributed Migration to automate migration actions across a multitude of different servers.
For example:
