
Directory Integration
What is Directory Integration?
Directory Integration refers to the Power365 Directory Sync components that are automatically deployed and configured when you set up a Premium Integration project.
Where do I manage Directory Integration?
Directory Integration will display under Settings when a Premium Integration project is created and is part of Power365 coexistence services. To manage the Directory Sync components of your Integration project, click Directory Integration from the left navigation menu, see figure 1.

Figure 1: Settings Menu for Premium Integration Pro Project
What can be managed from Directory Integration?
After project configuration, Client Administrator’s may use the Directory Integration tab to check on the status of their workflows and local agents, download history logs and manage the Organizational Units (OU) for creating new objects during Prepare and Cutover activities.
How do I create additional workflows?
If you wish to create new workflows to manage additional directory object synchronizations and services, then follow these steps.
- Login to Power365
- From the top banner, select the right application menu

Click Power365 Directory Sync
Figure 3: Application Menu
Figure 3: Application Menu
For detailed steps on how to create a workflow, click here. And for even more about Directory Sync, check out our Quick-Start Guides.
How do I create a new agent?
From Directory Integration management, see figure 2, click the New button to begin creating a new agent for your existing environments.
For more information on how to create and manage agents, click here.
Are agents automatically upgraded when a new version is available?
Yes, if the Auto Upgrade feature is checked (see figure 2), then agents will automatically be upgraded when new versions are available.
What workflows are created automatically?
A workflow is automatically created for the Prepare, Provision, and Cutover activities for each environment.
What other components are automatically configured in Directory Sync?
During the Tenant-to-Tenant Project setup, the local and cloud Environments will be automatically deployed and configured. The related workflows, templates, and advanced mappings are also auto generated.
Can I edit the workflows or template mappings?
Yes, Client Administrators have access to edit some areas of the workflows that are automatically created during project set up. To edit, locate the workflow in question and click Settings. If a section is not editable that area is disabled and cannot be modified.
Where do I setup GAL Sync?
All directory integration functionality will be configured and managed from Power365 Directory Sync.
Where do I migrate or sync Distribution & Security Groups?
Although Distribution and Security Groups are still discovered and displayed in Tenant-to-Tenant, it no longer migrates groups or members. They are discovered and displayed for matching, domain migration & reporting purposes. In the past, DS Lite provided limited solutions for Bi-Directional GAL Sync therefore all directory integration functionality will now be managed from Power365 Directory Sync.
How do I sync a user’s personal contact properties?
All directory integration functionality is managed from Power365 Directory Sync.
How do I sync SID History?
All directory integration functionality is managed from Power365 Directory Sync.
How do I sync OUs?
All directory integration functionality is managed from Power365 Directory Sync.
How do I sync passwords?
All directory integration requirements is managed from Power365 Directory Sync.
How do I migrate servers and workstations?
Power365 Migration for Active Directory should be utilized to prepare and migrate Active Directory domain joined workstations and servers to a new domain.
How do I re-prepare a user that was deleted?
Unlike Power365 DS Lite, re-preparing a user that was deleted in the tenant requires the following to be done:
- After the target user was removed from On-Prem AD, AADC sync must take place to sync up the changes.
- Reconcile should be performed for target on-prem environment.
- Discovery should be performed in T2T to pick up the object deletion and the User Migration record should then reflect the changes.
Additional Information
Power365 Directory Sync Lite (Deprecated)
Calendar Sharing
What is Calendaring Sharing?
Power365 Integration Projects provide the option to automatically configure calendar sharing between Microsoft 365 tenants. This will allow end-users to see each other’s calendaring free/busy or availability information when scheduling meetings.
How do I enable Calendar Sharing?
During the configuration of a Power365 Project you will be asked if this feature should be enabled. Answer “Yes” to allow Power365 to automatically configure your calendar sharing options. Additional questions will follow to complete the setup.
How does it work?
Once enabled Power365 will automatically create the Organization Relationships between the Microsoft Microsoft 365 tenants. Once these configurations are in place, calendar sharing is enabled.
The following is an example of the PowerShell command run against each tenant to establish calendar sharing.
New-OrganizationRelationship -DomainNames $domains -Name $name -Enabled -FreeBusyAccessEnabled -FreeBusyAccessLevel AvailabilityOnly -FreeBusyAccessScope $groupName -TargetApplicationUri "outlook.com" -TargetAutodiscoverEpr https://autodiscover-s.outlook.com/autodiscover/autodiscover.svc/WSSecurity
The “$Domains” parameter in the example below includes all accepted domains from the destination tenant, including the onmicorosoft.com domains. See figure 1 below for an example.
The “$Name” parameter is automatically calculated by Power365.
The Free Busy Access Level is always set to the lowest setting of, Availability Only.
The Free Busy Scope is set to all users for the target and can be filtered by group from the source is desired. The Power365 Project wizard will walk you through these questions.
None of the other available organization relationship parameters are setup by Power365.
What if I already have an Organization Relationship setup with the destination domains?
If you already have an organization relationship setup in your tenant pointing to the destination tenant accepted domains, then you must; A) Remove it before enabling it in your Power365 Project or B) Do not allow Power365 to manage this component and keep it disabled in your Power365 Project.
How do I know when calendar sharing is ready?
There are several ways to confirm if the Organization Relationships were deployed in each tenant.
- Use Remote PowerShell authenticate to each tenant. Run the Get-OrganizationRelationship command to get a list of items. The Power365 configured items will include the name Binary Tree.
- Open the Exchange Admin Center within the Microsoft 365 Admin Center. Navigate to the Organization tab in the left menu. Review the items listed under the Organization Sharing section.
- Check on the status of “Calendar Availability” from the Power365 Dashboard.
How do I control which users are sharing and how much they share?
During Project setup, Power365 provides the option to expose all source users or just a subset of users. This is achieved through membership in a Group. It is recommended this be a local AD group that is synchronized to Microsoft 365. A cloud only distribution list group will also work but must be managed in the cloud.
Furthermore, the Organization Relationship can be modified by an Exchange Online administrator at any time. Follow these steps to modify the existing Organization Relationship in a tenant.
- From the Microsoft 365 admin center dashboard, go to Admin > Exchange.
- Go to organization > sharing.
- Under Organization Sharing, Select the proper record then click Edit.
To set the free/busy access level, select one of the following:
a. Calendar free/busy information with time only
b. Calendar free/busy with time, subject, and location
To set which users will share calendar free/busy information, select one of the following:
c. Everyone in your organization
d. A specified security group
Click browse to pick the security group from a list, then click ok.
- Click save to create the organization relationship.
Figure 1 and 2 below provide examples of successfully completed configurations within your Microsoft 365 Exchange Online Portal.

Figure 1: Example Organization Relationship General Settings

Figure 2: Example Organization Relationship Sharing Settings
How do I Disable Calendar Sharing?
To disable and remove the previous configurations, edit the Power365 Project. Follow these steps to complete this process.
- Login to Power365.
- Open the Power365 Project Dashboard.
- Click the “EDIT” action to start the Project Wizard.
- Click “NEXT” until asked about sharing calendar availability between tenants.
- Click “NO” to disable calendar sharing.
- Click “NEXT” until you reach the end of the Wizard.
- Within 30 mins, the Organization Relationships configurations will be automatically removed from each tenant.
Additional Information
Create an organization relationship in Exchange Online
Remove-OrganizationRelationship
Certificates
What are certificates?
Certificates will display, under Settings within any Premium Integration Pro projects created. Certificates are part of the Domain Sharing, (also referred to as Email Rewrite Services) requirements. Certificates are used both for DKIM and TLS configurations within the environments to ensure secure message transit with TLS and proof of identity using DKIM.
Figure 1: Settings Menu for Premium Integration Pro Project
What is required to ensure secure transit of re-written emails?
For full details about TLS certificate requirements see the SSL requirements.
What is required to ensure a re-written email’s authenticity?
For full details about DKIM email certificate requirements see the DKIM (Email Signatures) requirements.
Where can I verify the status of my certificates?
Existing certificates can be viewed and exported by selecting Certificates from the left navigation menu, see figure 1. The Certificates Management page will open,figure 2.
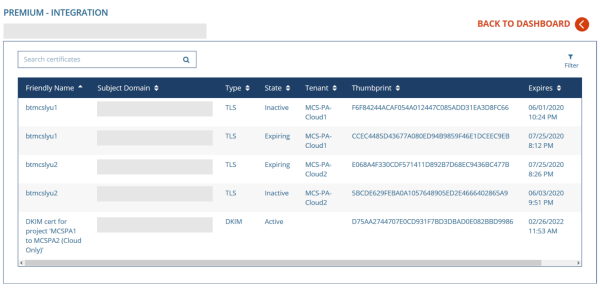
Figure 2: Certificates Management
Can I export a copy of my existing certificates?
Yes, simply click the EXPORT action located after the Expires column, see figure 2. After clicking export you must enter the valid password for the existing certificate before exporting. Enter the password, then click Export.
Where do I manage certificates?
Certificates are managed within your project. They are uploaded during project setup and can be removed or newly uploaded by editing your project. Follow these steps to add a new certificate or remove an existing certificate from your project setup.
- Login to Power365.
- Open the desired project.
From the project dashboard click Setup.

Figure 3: Project Dashboard Quick Menu
From the project summary, click Security.
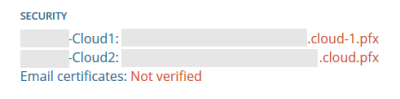
Figure 4: Example of Project Summary Security Section
The project certificate page will open.

Figure 5: Project Wizard Certificate Management
- If a certificate has expired and you need to upload a new version, then simply click the X to remove the existing certificate.
- After removing the old certificate, click Upload to provide a valid certificate. Be sure it meets requirements. It must be in the PFX format with a valid password.
- After uploading the new certificate, click Next to navigate to project summary.
- Click Next again.
- Now click Skip Discovery to return to the project dashboard.
Additional Information
Domain Sharing (ERS)
What is ERS or Domain Sharing?
Integration Pro adds the email rewriting feature to the already rich feature set of Integration. For mergers and acquisitions, email rewriting allows a company to present a unified email address to the outside world before and after the user’s mailbox has been migrated. Domain Sharing is a key requirement for any organization utilizing more than one Microsoft 365 tenant to service their end-users.
How do I enable my users for ERS?
Day 1 - ERS
To enable a user for Day 1 ERS, simply add them to the “BT-IntegrationPro-DayOne” group located in the source tenant. This is a cloud only group. The members of this group will be automatically replicated to their counterpart group in the target tenant.
If a user from a source domain has been added to the Email Rewriting Eligibility Group called BT-IntegrationPro-DayOne, their outbound email messages will be intercepted by the Power365 Address Rewrite Service (ERS). ERS will rewrite the message header with the target tenant’s SMTP Accepted Domain information. To the outside world, it looks as if the sender was already using a mailbox in the target tenant.
Day 2 - ERS
To enable a user for Day 2 ERS, simply add them to the “BT-IntegrationPro-DayTwo” group located in the source tenant. This is a cloud only group. The members of this group will be automatically replicated to their counterpart group in the target tenant.
If a Cutover (migrated) user is added to the “BT-IntegrationPro-DayTwo” group, any email sent from that user will appear as if they are still coming from the source mailbox’s primary SMTP address. During a merger or acquisition project, this allows a company to hide the migration process from the outside world, until all users have been migrated and the Accepted Domains can be migrated themselves.
How often does Power365 check the ERS groups for new members?
After adding a new member to ERS, it may take up to 15 mins to be fully enabled and ready.
After User Cutover do I need to update the Day 1 Group?
No. When a Mailbox User has been cutover and has been a member of the “BT-IntegrationPro-DayOne” group, do not remove that user from the Day 1 group after mailbox cutover. In a Premium Integration project, when an external or internal source user replies to an old message with the original source email address, it will route into the source tenant for ultimate delivery over to the target tenant mailbox (before Domain Cutover). The membership of the “Day 1” group should remain populated with the cutover user even after mailbox cutover because it will need to be rewritten before routing to the target tenant mailbox. Otherwise, if not rewritten, any reply to that delivered message would contain the source address, rather than the new target address. This, in turn, could cause end-user frustration and confusion.
Does Power365 Email Rewrite Services (ERS) rewrite the address when a “Send-on-Behalf” delegate sends a message for an enabled ERS user’s mailbox?
Yes. Power365 ERS, sometimes called Domain Sharing supports rewriting the address of the mailbox owner and/or delegate. If ERS is enabled for both, both addresses are rewritten. If ERS is enabled for the mailbox owner, then only their address will be rewritten.
Does Power365 Email Rewrite Services (ERS) rewrite the address of Day 2 Group outbound mail when sending to a cross-tenant recipient on the source tenant with the original address?
No. The Email Rewrite Services (ERS) rewrites the email address for external recipients only.