
1. Introduction to Migrator Pro for Exchange
About this Document
This document provides information about how to use Binary Tree Migrator Pro for Exchange to perform migrations from supported source versions of Microsoft Exchange to supported target versions of Exchange or to Microsoft Office 365 Exchange Online. See Supported Mailbox Migration Paths and Supported Public Folders Migration Paths below for checklists of supported scenarios.
A separate Migrator Pro for Exchange Installation and Configuration Guide describes how to install and configure the Migrator Pro for Exchange product.
This document assumes the reader brings some basic admin-level experience with Microsoft Exchange and Microsoft Outlook. If you are unfamiliar with some Outlook and Exchange terms or concepts that appear in this document, please refer to the Microsoft documentation.
Online Help
Migrator Pro for Exchange also offers context-sensitive browser-based help from the data-entry screens and tabs of the Admin Portal.
Getting more information
The Migrator Pro for Exchange Fast Start Guide and Installation and Configuration Guide provide an orientation to the product’s intended uses and features, including the Migrator Pro for Exchange Admin Portal, with detailed instructions for installing and configuring the product for your environment.
For additional resources, refer to Support: https://support.quest.com
About Migrator Pro for Exchange
Migrator Pro for Exchange facilitates migration from one version of Microsoft Exchange to another. It combines a back-end policy engine with front-end management components, to provide project managers and administrators more control over Exchange upgrades.
Key features and functions include:
-
Workflow engine lets administrators create migration tasks, select objects, schedule jobs, and provide user self-service.
-
Unified console enables flexible filtering and selection of mailbox objects.
-
Content included in the mailbox is moved in one transaction, so mailbox security and permissions (delegates) are retained.
-
Reports on object and migration status feed into the console, reducing effort required to create tasks.
-
Does not require server-hosted agents for any of its functionality.
-
Public folder migration for Exchange and Microsoft Office 365.
-
Migration to Microsoft Office 365 and resource forest migrations.
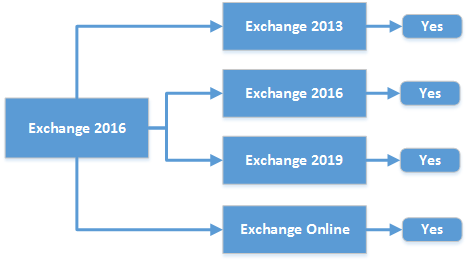
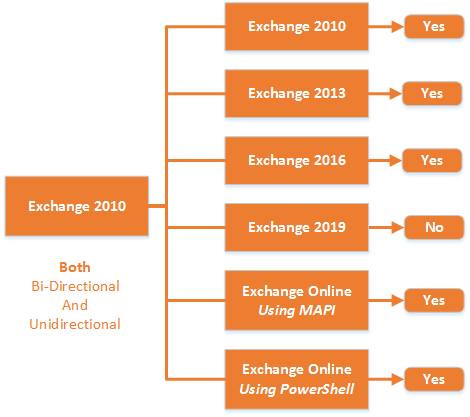
Supported Mailbox Migration Paths
The current release of Migrator Pro for Exchange supports mailbox migration for these source/target scenarios:


Supported Public Folders Migration Paths
Migrator Pro for Exchange supports inter-org (only) public folders migration for these source/target scenarios:


Components of Migrator Pro for Exchange
The main components of Migrator Pro for Exchange are: the MCP Windows Service, the Admin Portal and the User Portal.
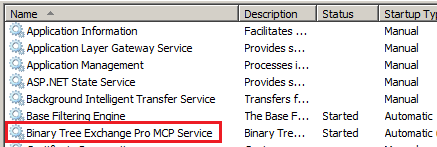
MCP Windows Service
The MCP Windows Service (BinaryTree Migrator Pro for Exchange MCP Service) is the controlling service for all Migrator Pro for Exchange functions. This service should automatically start. Make sure that BinaryTree Migrator Pro for Exchange MCP Service is started in Windows Services.
Admin Portal
Migrator Pro for Exchange's Admin Portal is a friendly user interface that lets you configure and execute most administrative tasks associated with a migration. The Admin Portal is a Microsoft Silverlight application that runs in a web browser.
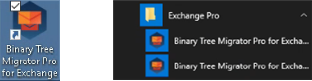
To launch the Admin Portal, double-click the Migrator Pro for Exchange shortcut on your Windows desktop, or select Migrator Pro for Exchange from the Windows Start menu:
The Admin Portal opens in a browser window. Migrator Pro for Exchange supports Internet Explorer 8 or later, Firefox and Google Chrome.

For best results, maximize the browser window.
The Admin Portal launches with http://localhost/exchangepro/admin/default.aspx. You can use localhost, <machinename>, or the IP address to access the Admin Portal.
User Portal
The User Portal is available for users to postpone and schedule blackouts for their migrations and to provide alternative notification capabilities.
-
The User Portal is located at: http://<MachineName>/exchangepro/user/default.aspx
-
Windows Authentication is enabled for this virtual application. When performing cross-forest migrations, if the users in the source forest attempt to connect to the Migrator Pro for Exchange server in the target forest and a trust has not been established between the two forests, the users will be prompted for their target credentials.
About the Migrator Pro for Exchange Admin Portal
Migrator Pro for Exchange's Admin Portal is a friendly user interface that lets you control various administrative tasks related to Exchange mailbox migration.
The first time you run the Admin Portal after installing Migrator Pro for Exchange, the program leads you through a series of screens for you to enter your Migrator Pro for Exchange license key and configure Migrator Pro for Exchange communications with other programs and hardware. This process is documented in the Migrator Pro for Exchange Installation and Configuration Guide. After that initial configuration, the Admin Portal lets you update configuration data, define new forests, designate mailboxes and public folders for migration, schedule and execute migrations, pause and resume migrations, review migration statistics, and so forth.
To access the Admin Portal, double-click the Migrator Pro for Exchange shortcut on your Windows desktop, or select Migrator Pro for Exchange from the Windows Start menu:
The Admin Portal opens as a new tab in your browser called Migrator Pro for Exchange:
|
|
We recommend the browser hosting Migrator Pro for Exchange be set to clear temporary files and history upon exit. |

Main Toolbar
Migrator Pro for Exchange's Admin Portal Main Toolbar appears across the top of the browser tab:

The toolbar buttons let you change the view of the Admin Portal, to show different types of information and different groups of available features below the Main Toolbar:
-
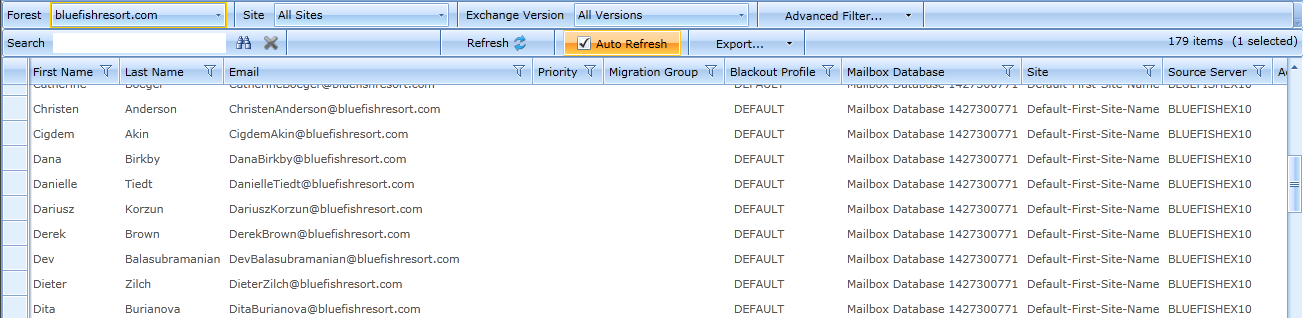
Mailboxes: Lists mailboxes from all the sites in the specified forest. In addition, it allows you to sort, group, search, and select mailboxes to add to the migration queue.
-
Mailbox Jobs: Manages the sequence of migration requests for the selected migration destination site.
-
Public Folders: Displays the public folder tree from the selected Source and Target forest. In addition, it allows you to sort, group, search, and select public folders to add to the migration queue. Public folder migration is only enabled during on-premises cross forest migration projects.
-
Public Folder Jobs: Manages the sequence of migration requests for the selected migration destination. Public folder migration is only enabled during on-premises cross forest migration projects.
-
Content Analysis: Allows public folder content information collection and analysis in SQL for data remediation.
-
Blackout Times: Allows the configuration of time periods when mailboxes cannot be migrated for the selected migration site.
-
Summary: Displays high-level accounting of mailbox migrations, which allows you to view all status levels.
-
Schedule: Displays estimated migration sequence for the selected migration site. It is a read-only view.
-
Metrics: Provides historical data and throughput measurements of migrations in a graphical format.
-
View Delegation: Lists mailboxes with one or more delegates, and their delegate mailboxes, so you can select delegation-linked pairs to add to a migration queue (to migrate them together, which preserves delegation rights after migration).
-
Forests: Configure global forest settings, add new forest, etc.
-
Workers: Administer public folder migration workers.
-
Settings: Configure general settings, activities, mailboxes, public folders, workers, scripts, notification templates, and licenses.
-
Help: Opens a browser window of context-sensitive Help: field notes and application notes for the currently open screen or tab. From the context-sensitive Help window, you can navigate to other Migrator Pro for Exchange topics using the navigation links and tools that appear across the top of the Help display.
-
About: Displays version information about the Migrator Pro for Exchange product.
Data Panel
In addition to the Main Toolbar, the Admin Portal also contains a Data Panel that displays data depending on the button that is currently selected.
Version Information
To view version information: Click
2. Creating and Managing Forests
Migrator Pro for Exchange migrates data from a source forest to a target forest. The source forest can be any forest in your local domain. The target forest can be another local forest, or can be a tenant forest in Office 365. Within Migrator Pro for Exchange we classify forests by three types:
-
Source Forest: A forest in your local domain from which you will migrate.
-
Target Forest: A forest in your local domain to which you will migrate. Generically speaking, a "target forest" can reside either in your local domain or in Office 365, but within Migrator Pro for Exchange we define and configure Office 365 forests separately (see below). Within Migrator Pro for Exchange you can designate only one forest of this Target Forest type. A local Exchange target forest is defined when migrating Intra-org (no other forests would be needed), or when migrating Inter-org (a source forest would be defined).
-
Office 365 Forest: A forest in Microsoft's Office 365 to which you will migrate. Within Migrator Pro for Exchange you can designate only one forest of this target forest type.
The first time you run the Admin Portal after installing Migrator Pro for Exchange, the program leads you through a series of screens for you to enter your Migrator Pro for Exchange license key and configure Migrator Pro for Exchange communications with other programs and hardware. (This process is documented in the Migrator Pro for Exchange Installation and Configuration Guide.) These screens also prompt you to identify and characterize your Target Forest—to register it with Migrator Pro for Exchange so the program will know where the forest resides and how to connect to it. After this initial configuration, you can register and configure one or more Source Forests.
The subtopics below explain how the Forests view lets you define (register with Migrator Pro for Exchange) forests for cross-forest migrations, and how to update configuration settings for previously defined forests.
Adding a New Source Forest
To add a new Migrator Pro for Exchange source forest: Click Forests in the main Migrator Pro for Exchange toolbar, and then click Add Forest:

Migrator Pro for Exchange then opens the first of a series of screens to define and configure the new forest. The first in the series is the Source Forest screen.
Work your way through the screens, as described in the subtopics below. Migrator Pro for Exchange will register the new forest when you click the Finish button from the Summary screen (the last screen in the series).
Add Source Forest: Source Forest Screen
Enter the name of the Source Forest (top-level domain) you want to add to Migrator Pro for Exchange, and be sure to leave the Office 365 Forest checkbox unmarked.
|
|
Or, if you are migrating to Office 365 and configured the local/on-premises forest during your initial Migrator Pro for Exchange Forest configuration, you can configure the O365 forest now, and Migrator Pro for Exchange will automatically switch the two. That is, Migrator Pro for Exchange will correctly configure the on-premises forest as the source and the O365 forest as the target. In that case, mark the Office 365 Forest checkbox and see Adding a New Office 365 Forest below. |

The Source Forest must be a fully qualified domain name (FQDN), and must be resolvable in DNS to a domain controller and global catalog server in the source forest.
When you have entered the Source Forest name:
-
Click Next to advance to the next screen; or
-
Click Finish (if enabled) to save all your configuration settings (in all screens in this sequence) and return to the Forests view, with the newly defined forest opened into the multi-tabbed Forest Configuration Settings screen.
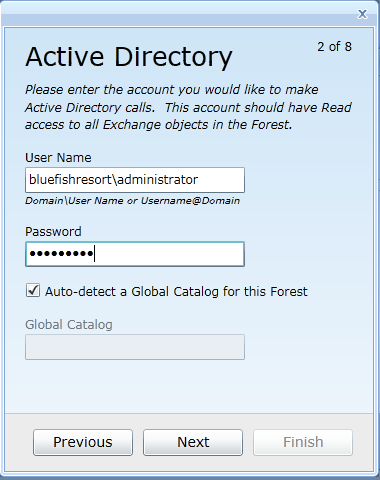
Add Source Forest: Active Directory Screen
Enter the User Name and Password for the account Migrator Pro for Exchange should use for Active Directory calls, and specify the Global Catalog for this forest. You can mark the Auto-detect a Global Catalog checkbox to have Migrator Pro for Exchange scan your environment and determine the Global Catalog for you, or manually enter the Global Catalog into the text box.
When these settings appear as you want them:
-
Click Next to advance to the next screen; or
-
Click Previous to return to the previous screen in the sequence; or
-
Click Finish (if enabled) to save all your configuration settings (in all screens in this sequence) and return to the Forests view, with the newly defined forest opened into the multi-tabbed Forest Configuration Settings screen.
Add Source Forest: PowerShell Screen
Enter the User Name and Password for the account Migrator Pro for Exchange should use for PowerShell calls. This account should have PowerShell Remoting access with the Exchange organization.
Leave the Auto-detect PowerShell Hosts checkbox marked if you want Migrator Pro for Exchange to automatically find and specify the PowerShell hosts, or unmark the checkbox if you want to manually specify the hosts in the respective text boxes: Exchange 2010 Host, Exchange 2013 Host and Exchange 2016 Host.
|
|
A PowerShell host must be specified here as a Fully Qualified Domain Name (FQDN). An IP address will generate an SSL certificate error. |
If you specify the hosts manually, be sure to click the Verify PowerShell Host(s) button to verify connectivity to the PowerShell host servers.

When these settings appear as you want them:
-
Click Next to advance to the next screen; or
-
Click Previous to return to the previous screen in the sequence; or
-
Click Finish (if enabled) to save all your configuration settings (in all screens in this sequence) and return to the Forests view, with the newly defined forest opened into the multi-tabbed Forest Configuration Settings screen.
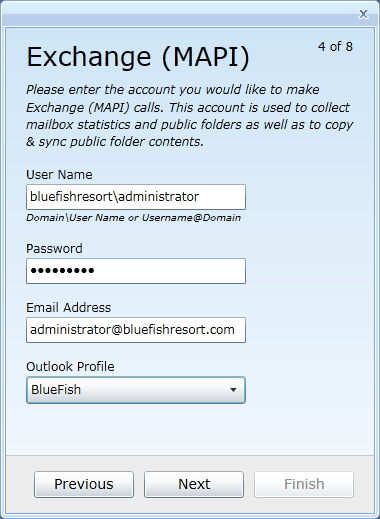
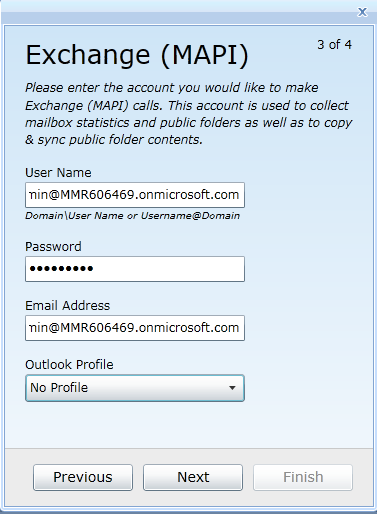
Add Source Forest: Exchange (MAPI) Screen
These settings are required only when migrating public folders in cross-forest migrations where no trusts exist.
Enter the User Name, Password and Email Address for the account Migrator Pro for Exchange should use for Exchange (MAPI) calls, and select the Outlook Profile.
|
|
|
When these settings appear as you want them:
-
Click Next to advance to the next screen; or
-
Click Previous to return to the previous screen in the sequence; or
-
Click Finish (if enabled) to save all your configuration settings (in all screens in this sequence) and return to the Forests view, with the newly defined forest opened into the multi-tabbed Forest Configuration Settings screen.
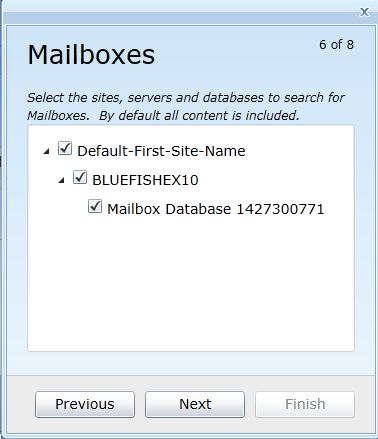
Add Source Forest: Mailboxes Screen
Select the sites, servers and databases you want Migrator Pro for Exchange to search for mailboxes to migrate. All content is selected by default.
You can right-click in the list area to select options to expand/collapse levels of the tree.
When the selections appear as you want them:
-
Click Next to advance to the next screen; or
-
Click Previous to return to the previous screen in the sequence; or
-
Click Finish (if enabled) to save all your configuration settings (in all screens in this sequence) and return to the Forests view, with the newly defined forest opened into the multi-tabbed Forest Configuration Settings screen.
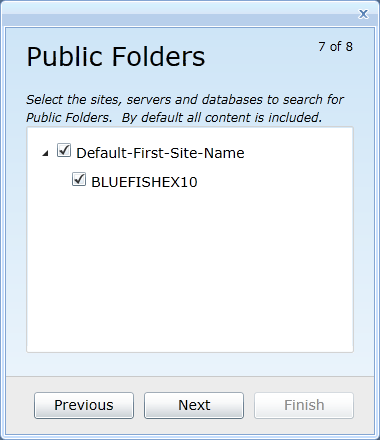
Add Source Forest: Public Folders Screen
Select the sites, servers, and databases you want Migrator Pro for Exchange to search for public folders to migrate. All content is selected by default.
You can right-click in the list area to select options to expand/collapse levels of the tree.
When the selections appear as you want them:
-
Click Next to advance to the next screen; or
-
Click Previous to return to the previous screen in the sequence; or
-
Click Finish to save all your configuration settings (in all screens in this sequence) and return to the Forests view, with the newly defined forest opened into the multi-tabbed Forest Configuration Settings screen.
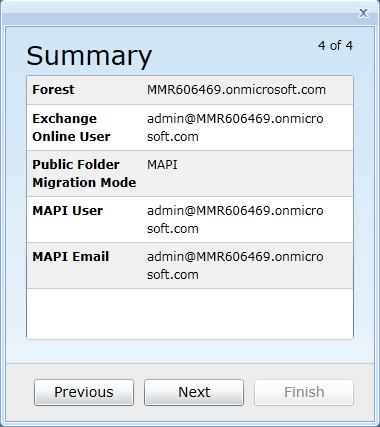
Add Source Forest: Summary Screen
Review the displayed summary of the new forest's configuration settings, and determine whether you want to change any settings before you save them into a new forest record.
If necessary, you can click Previous to return to any previous screen in the sequence to change the settings there.
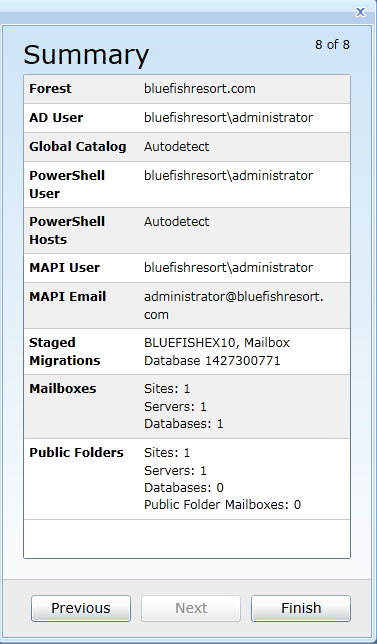
When this Summary shows all the configuration settings as you want them, click Finish to save all the settings (in all screens in this sequence) and return to the Forests view, with the newly defined forest opened into the multi-tabbed Forest Configuration Settings screen.
Adding a New Office 365 Forest
To add a new Migrator Pro for Exchange Office 365 tenant forest: Click Forests in the main Migrator Pro for Exchange toolbar, and then click Add Forest:
Migrator Pro for Exchange then opens its Source Forest screen. This is actually the first screen in a series to define a new source forest, but a checkbox on this screen lets you shift the feature to the series for an Office 365 tenant forest:

To shift the feature to define a new Office 365 tenant forest, mark the checkbox for Office 365 Forest. The screen title then changes to Office 365 Forest, and the text-box field name also changes to Office 365 Forest (as shown below).
Work your way through the screens, as described in the subtopics below. Migrator Pro for Exchange will register the new forest when you click the Finish button from the Summary screen (the last screen in the series).
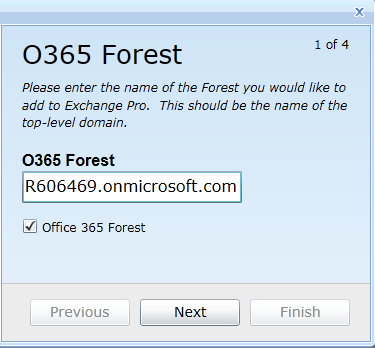
Add Office 365 Forest: Office 365 Forest Screen
Enter the name of the Office 365 Forest (top-level domain) you want to add to Migrator Pro for Exchange, and be sure to leave the Office 365 Forest checkbox marked. (If you unmark the checkbox, the screen will shift back to its Source Forest mode and the entire screen sequence will change to the Source Forest configuration mode.)
When these settings appear as you want them:
-
Click Next to advance to the next screen; or
-
Click Finish (if enabled) to save all your configuration settings (in all screens in this sequence) and return to the Forests view, with the newly defined forest opened into the multi-tabbed Forest Configuration Settings screen.
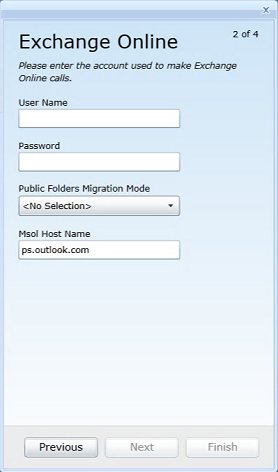
Add Office 365 Forest: Exchange Online Screen
Enter the User Name and Password for the account Migrator Pro for Exchange should use for program calls to Exchange Online.
Then, if you will migrate public folders to Exchange Online, specify a Public Folders Migration Mode from the drop-down list. PowerShell and MAPI are the two available methods.
For Msol Host Name, enter the Office 365 endpoint URL. The default Msol Host Name value is ps.outlook.com.
When these settings appear as you want them:
-
Click Next to advance to the next screen; or
-
Click Previous to return to the previous screen in the sequence; or
-
Click Finish (if enabled) to save all your configuration settings (in all screens in this sequence) and return to the Forests view, with the newly defined forest opened into the multi-tabbed Forest Configuration Settings screen.
Add Office 365 Forest: Exchange (MAPI) Screen
These settings are required only when migrating public folders in cross-forest migrations where no trusts exist.
Enter the User Name, Password and Email Address for the account Migrator Pro for Exchange should use for program calls to Exchange (MAPI), and select the Outlook Profile.
|
|
|
When these settings appear as you want them:
-
Click Next to advance to the next screen; or
-
Click Previous to return to the previous screen in the sequence; or
-
Click Finish (if enabled) to save all your configuration settings (in all screens in this sequence) and return to the Forests view, with the newly defined forest opened into the multi-tabbed Forest Configuration Settings screen.
Add Office 365 Forest: Summary Screen
Review the displayed summary of the new forest's configuration, and determine whether you want to change any settings before you save them into a new forest record.
If necessary, you can click Previous to return to any previous screen in the sequence to change the settings there.
When this Summary shows all the configuration settings as you want them, click Finish to save all the settings (in all screens in this sequence) and return to the Forests view, with the newly defined forest opened into the multi-tabbed Forest Configuration Settings screen.
|
|
Before you can begin migrating to Office 365, you must select Office 365 license packs and related service plans for Migrator Pro for Exchange to use when auto-licensing Exchange Online mailbox migrations, adding mailboxes to the migration queue and scheduling mailbox migration to Office 365. Licensing information is specified in the Licenses tab in the Forest Configuration Settings screen. |
Forest Configuration
Forests that have already been defined in Migrator Pro for Exchange can be configured and reconfigured in the multi-tabbed Forest Configuration Settings screen, which appears in the Forests view below the Forests toolbar. The three different Migrator Pro for Exchange forest types (Source, Target, and Office 365 Tenant forests) are configured differently, on different sets of tabs. This illustration shows the screen with the tabs to configure a source forest:
Configuration Tabs for a Source Forest

These tabs are documented under separate topic headings:
Mailboxes & Public Folders Tab
Configuration Tabs for the Target Forest

These tabs are documented under separate topic headings:
Mailboxes & Public Folders Tab
Configuration Tabs for an Office 365 Tenant Forest

These tabs are documented under separate topic headings:
Mailboxes & Public Folders Tab
Forest Alerts
The forest selection bar on the Forests view includes a Forest Alert indicator to show the accessibility status of required components for successful migration. A green checkmark indicates that no issues are detected. A red exclamation mark indicates that there may be issues that need to be resolved.

|
|
The Forest Alerts may not appear during the initial setup of the forest. It may take an hour or more for the first Alert indicators to display accurately. Also note that the Forest Alert indicator is not available for Tenant (Office365) Forests. |
Clicking on the icon will bring up dialog boxes to help in troubleshooting. You can click the Details button for more information. This information also displays the relevant PowerShell script that is used to troubleshoot the issue.
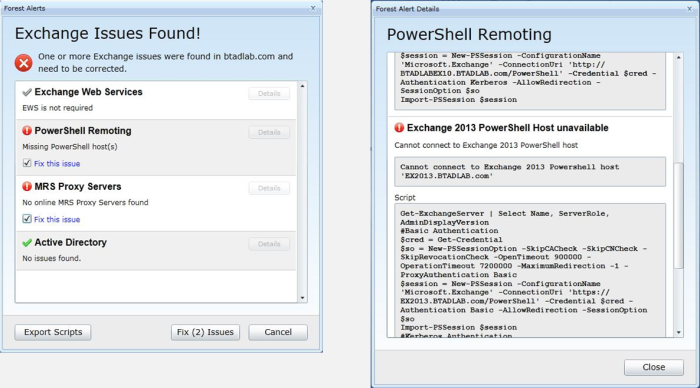
Check the [ü] Fix This Issue checkbox to select the issues that you would like Migrator Pro for Exchange to attempt to repair for you. Then click the Fix Issues button at the bottom.
The Export Scripts button allows you to optionally export and save the scripts. You can then use them as a baseline to create custom scripts that meet your unique environmental needs.

Deleting a Forest
The Forests Configuration Settings screen lets you delete additional (secondary or source) forests. When you delete a secondary forest, Migrator Pro for Exchange removes all its entries for the users and forest information, including any past migration history. Home (or target) forests cannot be deleted on the Forests Configuration Settings screen. A Home (or target) forest can be deleted only by a SQL query. Contact Support for assistance.
To delete a secondary forest: Click Forests in the main toolbar. Then select the secondary forest you want to delete (in the Forest drop-down list), and click Delete Forest.
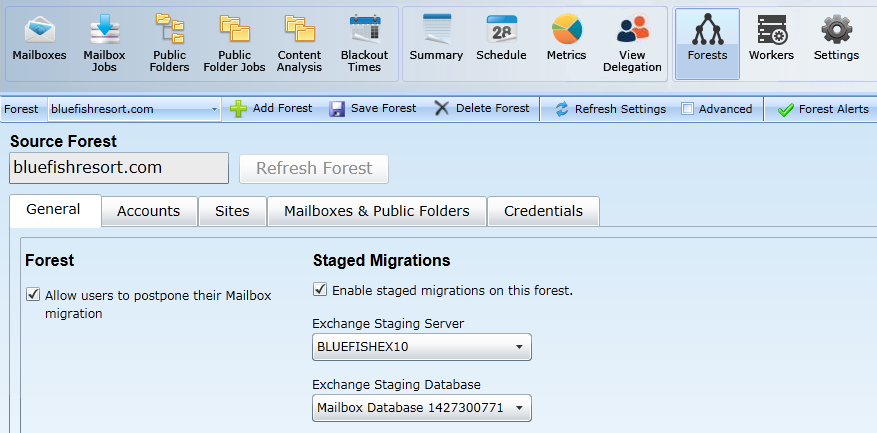
Source Forest Configuration | General Tab
To view or edit the General tab for source forest configuration: From the Forest view toolbar, select a previously defined source Forest from the drop-down list, and then click the General tab. The General tab appears in its default view when the Advanced checkbox option is left unmarked:
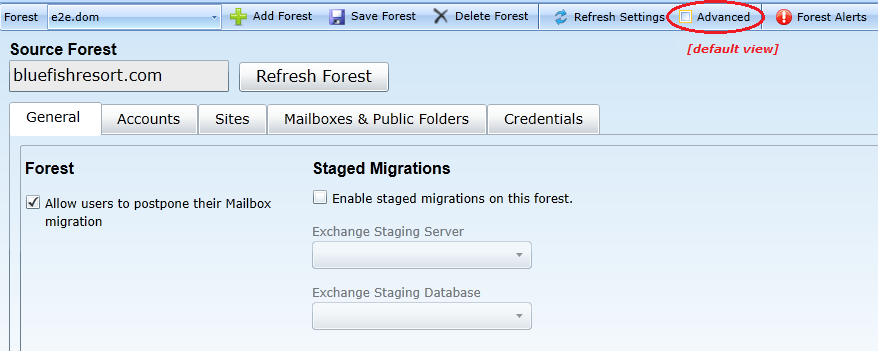
Or, you can mark the Advanced checkbox to view additional options, although most admins simply accept the default values for these Advanced settings:

Forest Section
The default (non-Advanced) view of this tab contains only one setting for the selected forest:
-
Allow users to postpone their Mailbox migration: Mark this checkbox if you want users to be able to set their own migration blackout periods in Migrator Pro for Exchange's User Portal.
|
|
The E2E_Schedulers group in Active Directory (if it exists) will override this user-postpone option. |
These settings, also in the Forest section, appear only in Advanced mode:
-
Detect changed public folders: Mark this checkbox if you want Migrator Pro for Exchange to monitor public folders in the organization to detect forest-level additions, deletions and moves. The option is enabled by default, and we recommend you leave it enabled. If this feature is turned off, the admin and Migrator Pro for Exchange will not know when public folders have changed after the initial sync. This would be irrelevant if you do not intend to re-sync public folders after their initial sync, but would be necessary to permit future syncs.
-
Change Detection Tolerance: The spinner control lets you set a wait period for Migrator Pro for Exchange's Detect feature (above, if enabled), specifying a number of seconds for Migrator Pro for Exchange to ignore changes to public folders after the time MAPI reports the most recent sync. For example, if set to 5 seconds, any changes detected within 5 seconds of the last sync are ignored. The default (and recommended) value is 2 seconds.
-
Apply mailbox blackouts to: Blackout periods can be defined in Migrator Pro for Exchange's Blackout Times view (see the Blackout Times topic for more information). The drop-down list here lets you specify one of three options for applying blackout times to the forest:
-
Entire Migration (default, and recommended): All Mailbox jobs are affected by blackouts during the entire migration.
-
Initial Migration: Mailbox jobs marked as "Suspend when ready to complete" are affected by blackouts until the migration reaches 95% complete (pre-AutoSuspend). All other mailbox jobs are affected by blackouts during the entire migration. Choose this setting when you want blackouts to be enforced during the pre-staging process, but not for the cutover process.
-
Final Migration\Cutover: Mailbox jobs marked as "Suspend when ready to complete" are affected by blackouts after the migration reaches 95% complete (post-AutoSuspend, cutover). All other mailbox jobs are affected by blackouts during the entire migration. Choose this setting when you want all mailbox jobs to be prevented from Cutover during the blackout period, but you want to allow “Suspend Until Ready to complete” jobs to continue working up to the 95% complete stage (pre-staging).
-
Source Forest Configuration | Accounts Tab
To view or edit the Accounts tab for source forest configuration: From the Forest view toolbar, select a previously defined source Forest from the drop-down list, and then click the Accounts tab. On this tab, all fields are displayed whether or not the Advanced checkbox is marked.

Active Directory Section
Enter the User Name and Password for the account Migrator Pro for Exchange should use for Active Directory calls, and specify the Global Catalog for this forest.
You can mark the Auto-detect a Global Catalog checkbox to have Migrator Pro for Exchange scan your environment and determine the Global Catalog for you, or manually enter the Global Catalog into the text box. Make sure that the designated GC is physically close to the Migrator Pro for Exchange server. (If you know of another GC that is physically closer than the one found by the Auto-detect feature, you may want to disable Auto-detect and manually specify the nearer option.)
PowerShell Section
Enter the User Name and Password for the account Migrator Pro for Exchange should use for PowerShell calls. This account should have PowerShell Remoting access within the Exchange organization.
Leave the Auto-detect PowerShell Hosts checkbox marked if you want Migrator Pro for Exchange to automatically find and specify the PowerShell hosts, or unmark the checkbox if you want to manually specify the hosts in the respective text boxes: Exchange 2010 Host, Exchange 2013 Host and Exchange 2016 Host. Make sure the designated PS hosts are physically close to the Migrator Pro for Exchange server. (If another PS Host is physically closer than the one found by the Auto-detect feature, you may want to disable Auto-detect and manually specify the nearer option.)
|
|
A PowerShell host must be specified here as a Fully Qualified Domain Name (FQDN). An IP address will generate an SSL certificate error. |
If you specify PowerShell hosts manually, be sure to click the Verify PowerShell Host(s) button to test connectivity to the PowerShell host servers.
Exchange (MAPI) Section
These settings are required only when migrating public folders in cross-forest migrations where no trusts exist.
Enter the User Name, Password and Email Address for the account Migrator Pro for Exchange should use for Exchange (MAPI) calls, and select the Outlook Profile.
SMTP Section
These settings are necessary for Migrator Pro for Exchange to use SMTP (Simple Mail Transfer Protocol), which is the Internet standard for electronic mail transmission across Internet Protocol (IP) networks.
Complete the fields here, and then click the Send Test Email button to verify connectivity. When you Send Test Email, Migrator Pro for Exchange posts a status response:
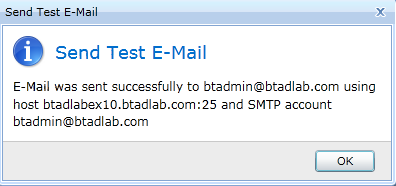
If the test succeeds, click OK to continue. If the test fails, modify the above SMTP settings and test again.
- Herramientas de autoservicio
- Base de conocimientos
- Notificaciones y alertas
- Soporte de productos
- Descargas de software
- Documentación técnica
- Foros de usuarios
- Tutoriales en video
- Aviso de actualizaciones de páginas web (RSS)
- Comuníquese con nosotros
- Obtenga asistencia con las licencias
- Soporte Técnico
- Ver todos