
To forward mail from G Suite to Microsoft 365, you must register your domain with both providers. You must register the domain you are using to forward mail from G Suite due to a restriction of the Google APIs used by ODME. The Google APIs will only allow forwarding addresses for registered domains or subdomains of the primary G Suite account. Adding a domain for mail destined for Microsoft 365 may seem counter to normal migration practices, but is a required step. Please note that registering a domain with G Suite does not impact mail routing for the domain.
After registering your domain, the procedure for setting up mail routing for G Suite is the same if Microsoft 365 is the target email service, but slightly different if the target is Exchange 2010.
For infomormation about setting up mail forwarding and available forwarding actions, see Setting Up Mail Forwarding.
Registering your Domain with Google Domains and Microsoft 365
To set forwarding from G Suite to Microsoft 365, you need a domain that is registered with Google Domains and with Microsoft 365. The Google APIs used by ODME require that the domain is registered with Google Domains. To receive mail for the forwarded messages from G Suite, you need email addresses with this domain for your Microsoft 365 Exchange accounts. The following procedures walk you through registering your forwarding domain with Google Domains and registering your domain with Microsoft 365.
To register your domain with Google Domains:
- Log in to your Google Admin console (https://www.google.com/a/example.com/) and go to Domains > Add/remove domains page.
- Click Add a domain or a domain alias.
- Select the Add another domain option and enter the domain name.
- Click CONTINUE AND VERIFY DOMAIN OWNERSHIP.
You are prompted to sign in to your domain name provider to verify your ownership of the domain. A helper app may be available, but we recommend completing the process manually by adding a TXT record.
- Click Add a TXT record.
- Complete the steps for creating a DNS record that proves to Google that you own the domain.
- Return to the Google domain registration page and click Verify.
If you have entered all the information correctly you should receive a conformation message. The next step is to activate your domain.
- Click Continue and go to the Domains > Add/remove domains page again.
You should see your domain listed with an exclamation mark,
- Click Skip Google MX setup since you don't want mail to route to G Suite for this domain.
- In the Route mail to another server box, click I use another mail server.
Next you need to register the domain with Microsoft 365.
To register your domain with Microsoft 365:
- Go to https://portal.microsoftonline.com/ and login as an administrator to your Microsoft 365 portal.
- Select Admin > Office365 and then select Domains on the left hand navigation tree.
- Select Add a domain and add the same domain to Microsoft 365 that you added to G Suite.
This opens a wizard which prompts you to add another TXT record to verify ownership.
- After proving the domain name in the wizard, complete the remaining steps for verifying your ownership of the domain by creating another TXT record.
When finished, you should have two TXT records in my DNS, one for G Suite and one for Microsoft 365.
- Return to the Microsoft 365 portal and click Done, verify now.
If you have entered all the information correctly you should receive a conformation message.
- Click Finish.
The next step offered is Add users and assign licenses.
- Click Start step 2.
- Since this is a subdomain for mail routing, select I don't want to add users right now.
- Click Next.
- Click Start step 3.
This opens the “how do you want to use…” page.
- Check the Exchange Online option since you just want to setup this domain for Exchange Online, and then click Next.
This opens the “add these dns records” page.
- Follow the instructions for adding the TXT record.
- Add the CNAME for autodiscover.
- Click Done, go check.
If you have entered all the information correctly you should receive a conformation message.
|
|
Note: To add a subdomain to a domain that's set up for federated authentication, do the following:
New-MSOLFederatedDomain -DomainName:<subdomain>" |

Mail Routing between G Suite and Microsoft 365
To set up mail routing between G Suite and Microsoft 365, you must configure per-mailbox forwarding in conjunction with subdomain forwarding. This prevents email duplication and subdomains appearing in the Reply Address on any message, either internal or external.
To set up mail routing between G Suite and Microsoft 365:
- Configure both G Suite and Microsoft 365 to accept mail from the same domain, for example, “example.com.” For how to set up MX records for G Suite and Microsoft 365, refer to https://support.google.com/a/answer/140034?hl=en and https://technet.microsoft.com/en-us/library/mt595791(v=exchg.150).aspx.
In addition, MX records point to G Suite. Though MX can direct email at either system, it is best to have mail delivered to the server with the largest number of users. This means that at the start of the migration, MX points to G Suite, and at the halfway point of the migration, the MX records switch to point to Microsoft 365. Note that the system receiving the mail must know about all users in both systems.

The first step is to create two subdomains used for routing.
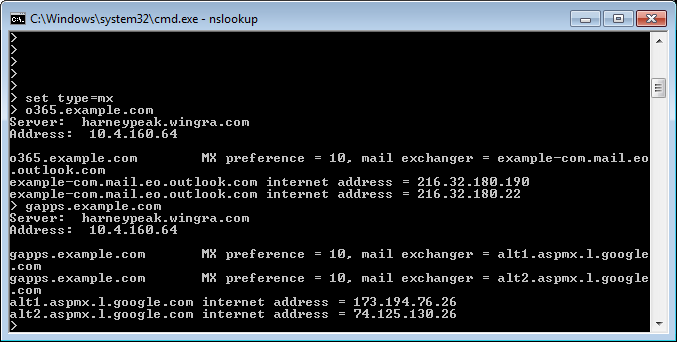
- Create an MX record for each domain, which allows each system to send mail to the other.
For example, the domain “O365.example.com” directs mail to Microsoft 365, while the domain “gapps.example.com” directs mail to G Suite.
- After you create the MX records, set up each system to accept mail for the new subdomains.
In Microsoft 365, you add this domain as a new Accepted Domain. In G Suite, you add this as a new Domain Alias.
By default, all users on G Suite will have aliases for this subdomain. However, with Microsoft 365, you must configure each user with the routing domain, either manually or via a powershell script.
- Create representative mailboxes in Microsoft 365 for each user that is presently in G Suite.
This allows users who are migrated to Microsoft 365 to see a GAL that is populated with all the users, as well as facilitate message forwarding for users still homed in G Suite.
- After all the users have mailboxes in Microsoft 365, set forwarding on them that will remain until the user is migrated.
The setting of forwarding can be done with the ODME per-user mail forwarding feature, as described in the section Setting Up Mail Forwarding.
- When migrating users, flip forwarding so that new mail is delivered to the Microsoft 365 mailbox, and not the G Suite mailbox.
With the ODME per-user mail forwarding option, you now need to select to remove forwarding from the target as well as setting forwarding in the source. It is important to remove the target forwarding to prevent the creation of a mail loop.
Mail Routing between G Suite and Exchange 2010
To set up mail routing between G Suite and Exchange 2010, you must configure per-mailbox forwarding in conjunction with subdomain forwarding. This prevents email duplication and subdomains appearing in the Reply Address on any message, either internal or external.
To set up mail routing between G Suite and Exchange 2010:
- Configure both G Suite and Exchange 2010 to accept mail from the same domain, for example, “example.com.”
In addition, MX records point to G Suite. Though MX can direct email at either system, it is best to have mail delivered to the server with the largest number of users. This means that at the start of the migration, MX points to G Suite, and at the halfway point of the migration, the MX records switch to point to Exchange 2010. Note that the system receiving the mail must know about all users in both systems.
The first step is to create two subdomains used for routing.
- Create an MX record for each domain, which allows each system to send mail to the other.
For example, the domain “ex2010.example.com” directs mail to Exchange 2010, while the domain “gapps.example.com” directs mail to G Suite.
- After you create the MX records, set up each system to accept mail for the new subdomains.
In Exchange 2010, you add this domain as a new Accepted Domain. In G Suite, you add this as a new Domain Alias.
By default, all users on G Suite will have aliases for this subdomain. However, with Exchange 2010, you must go to the Exchange Management Console and configure the recipient policy to include this domain for all the users.
- Create representative mailboxes in Exchange 2010 for each user that is presently in G Suite.
This allows users who are migrated to Exchange 2010 to see a GAL that is populated with all the users, as well as facilitate message forwarding for users still homed in G Suite.
- After all the users have mailboxes in Exchange 2010, set forwarding on them that will remain until the user is migrated.
The setting of forwarding can be done with the ODME per-user mail forwarding feature, as described in the section Setting Up Mail Forwarding.
At this point, mail routing is configured and operational between Exchange 2010 and G Suite.
- When migrating users, flip forwarding so that new mail is delivered to the Exchange 2010 mailbox, and not the G Suite mailbox.
With the ODME per-user mail forwarding option, you now need to select to remove forwarding from the target as well as setting forwarding in the source. It is important to remove the target forwarding to prevent the creation of a mail loop.
