
Database Attach Method
The Database Attach method of upgrading SharePoint involves creating a separate 2013 "upgrade" farm and then attaching the content databases from the 2010 farm into the 2013 farm.
Upgrade Steps
The following table outlines the steps involved in upgrading SharePoint 2010 with StoragePoint to SharePoint/StoragePoint 2013 using the database attach method:
|
# |
Step |
Description |
|
1 |
Ensure 2013 upgrade farm is established. |
The 2013 farm should be provisioned and functioning (without any upgrade content). Any non-StoragePoint 3rd party solutions/features/web parts, etc. should be installed into the farm. |
|
2 |
Document and disable source StoragePoint profile jobs. |
For each StoragePoint storage profile, make note of any timer jobs configured to run on a set schedule, as well as any archiving configurations. Also note the frequency of Content Migrator and Capacity Monitor on General Settings, if they apply to your configuration. For all StoragePoint Profiles that will be migrated, disable all jobs for those profiles. # Disable all StoragePoint timer jobs
If upgrading is abandoned, the following script can be used to to re-enable timer jobs. # Enable all StoragePoint timer jobs |
|
3 |
Backup/Restore StoragePoint database to new farm. |
A backup of the StoragePoint database from the 2010 farm should be restored in the new 2013 farm. It is not recommended you share a copy of this database between the 2010 and 2013 farms. |
|
4 |
Install StoragePoint for SharePoint 2013. |
StoragePoint for SharePoint 2013 should be installed in the 2013 upgrade farm. When prompted for the database name and location, ensure that the database copy established in step #3 is specified. EBS is no longer supported in 2013. So all profiles needs to be upgraded to RBS before this upgrade process. *It is imperative that all StoragePoint jobs be double-checked as disabled on the migration target prior to continuing. |
|
5 |
Copy the blob store(s) for profiles that are being migrated. (OPTIONAL) |
A copy of the blob stores for profiles being migrated needs to be made if the 2010 farm will remain functional after the upgrade. If the 2010 farm will retire the content databases that are being upgraded, then this step is not necessary. |
|
5a |
Update endpoint connection paths to point to blob store copy. (OPTIONAL) |
The endpoints need to be edited to reflect the new blob store copy location established in step #6. This step may be skipped if step #5 was skipped. |
|
6 |
Attach content database(s) from 2010 farm to 2013 farm. |
The content database(s) from the 2010 farm should be attached into the 2013 farm. Please see the Microsoft documentation for more information. |
|
7 |
Re-link Web Application scoped profiles. (ONLY if using Web Application scoped profiles) |
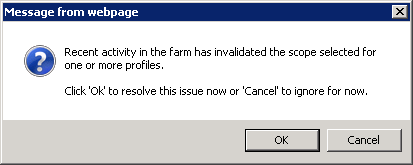
When using the database attach upgrade method, the web application IDs on the 2013 farm will not match the IDs on the 2010 farm. To fix the profile links, follow these steps on the 2013 upgrade farm: a)Go to the Storage Profiles screen in StoragePoint. b)A popup should alert you that some of the profiles have become unlinked from their Web Application: c)Click OK on the popup to be taken to the Storage Profile Fixup screen. d)Click on the profile scope name under the Profile Scope column to manually fix the linkage. *DO NOT* click Fix Automatically as it will not work in this case. e)A warning will display about issues with manually fixing a profile scope - click the OK button. f)On the Select Web Application screen that pops up, select the Web Application on the 2013 farm that the profile should be associated with. |
|
8 |
Re-establish any StoragePoint timer job definitions. |
StoragePoint timer job schedules and settings will not be migrated to the 2013 farm automatically. These must be setup manually. Key timer jobs to check: ·Orphan BLOB Cleanup Job. This job is usually run on a weekly or daily schedule. It must be scheduled for each profile. This timer job can be accessed from the Jobs link on the Profile page, under Advanced Configuration. ·BLOB Health Analysis Job. This job is usually run on a weekly or daily schedule. It must be scheduled for each profile. This timer job can be accessed from the Jobs link on the Profile page, under Advanced Configuration. ·Externalize/Recall/Bulk Migrate. These jobs are not normally run on a schedule but if your environment had them running on a schedule, be sure to reestablish them. This timer job can be accessed from the Jobs link on the Profile page, under Advanced Configuration. ·Archiving Rules and Jobs. If any archiving configurations were setup in the 2010 farm, these must be reestablished on each profile. ·Content Migrator/Endpoint Capacity Monitor. These jobs are scheduled by default during the installation for 5 minute run intervals. If you wish a more or less frequent schedule, you may modify it on the General Settings screen. ·Librarian Timer Job. This is found under the Librarian settings. |
|
9 |
IISRESET and start/stop Timer Service |
It is required that an IISRESET and stop/start of the SharePoint 2013 Timer service, SPTimmerV4, be done on each server in the farm after the upgrade is complete. |
|
10 |
Test! |
Thoroughly test each profile to ensure that it is storing and retrieving content appropriately. Contact StoragePoint support if you encounter any issues. |
|
11 |
Take Source Content Offline |
Once the migration checks out, take the source content offline for each migrated profile: For web application-scoped profile(s): Remove Web Application(s) from Central Administration on source. For content database-scoped profile(s): Remove Content Database(s) from Central Administration on source. |
Converting from EBS to RBS
The ability to convert from EBS technology to RBS technology is built into StoragePoint. This provides a degree of future proofing use EBS now and convert to RBS in the future.
The process for converting a profile from EBS to RBS varies slightly depending on the profile type with the content database profile type being the most straightforward to convert.
This feature is only available on SharePoint 2010. If a profile was initially configured to use EBS, there will be a link allowing for a one-time upgrade.
|
|
NOTE: A conversion from EBS to RBS is a bulk externalization job. If content has been recalled to the content database, and no filters are applied to prevent future externalization of that content, recalled content within the scope of the profile will be externalized when the EBS to RBS conversion takes place. |

Please keep in mind the following when considering whether to convert a profile to RBS:
·The conversion from EBS to RBS must be done on the SharePoint 2010 farm BEFORE any upgrade steps to SharePoint 2013 are done.
·RBS requires the Enterprise Edition of SQL Server 2008 or 2008 R2. It will not work with SQL Server Standard Edition.
·EBS is fully supported on SharePoint 2010. Microsoft has discontinued EBS in SharePoint 2013. Within StoragePoint there is no functionality difference when using EBS as opposed to RBS.
·RBS supports only content database or Web Application scope profiles. Site collection option is not available when using RBS.
Converting from EBS to RBS for StoragePoint Prior to 5.1.3305
This feature is only available on SharePoint 2010 for content database or web app scoped profiles. If a profile was initially configured to use EBS, there will be a link allowing for a one-time upgrade.
|
|
NOTE: If the version of StoragePoint is prior to 4.1, contact Quest to upgrade StoragePoint. |
|
|
NOTE: A conversion from EBS to RBS is a bulk externalization job. If content has been recalled to the content database, and no filters are applied to prevent future externalization of that content, recalled content within the scope of the profile will be externalized when the EBS to RBS conversion takes place. |
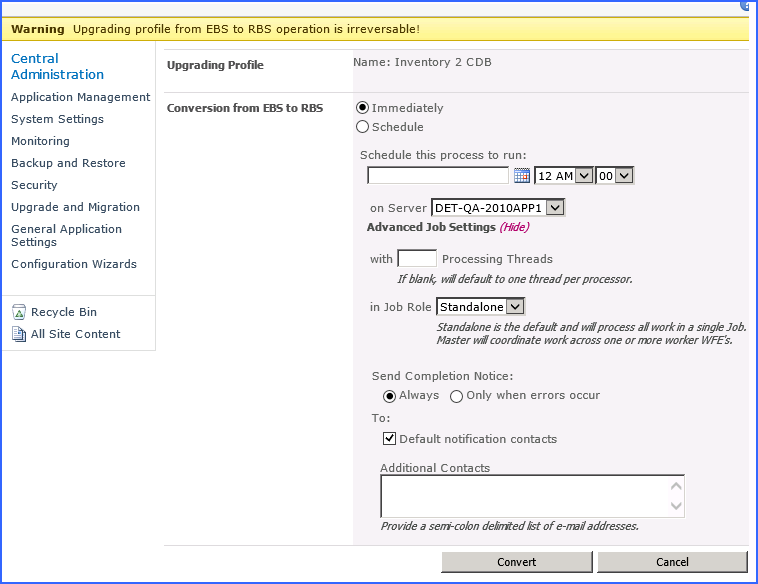
To upgrade an EBS-based content database or web application profile to RBS, follow these steps within Central Administration:
1.On the Edit Storage Profile page, click the Upgrade from EBS to RBS link.
A new window will open.

2.Schedule the conversion, or leave Immediately selected. (Optional) Click Show to open the Advanced Job Settings and configure processing threads, Controller/Worker setup, and completion notice information. Click Convert.
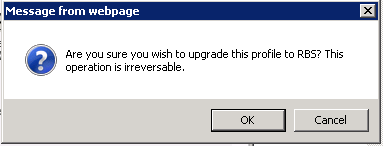
3.Click OK on the prompt to confirm.
4.Click OK on the confirmation prompt.

5.The page is returned to the profile page. Note the change to the profile scope.

6.On the Job Summary page, there will be an entry for the EBS to RBS Conversion timer job.
