
Steps to perform Azure Turbo Mode Migration
Follow these steps in order to perform Azure Turbo Mode Migration.
1.From within Essentials, initiate a migration as you typically would and continue through the Migration wizard until you reach the final page with the Advanced Options section. (For more information about various Migration wizard options see one of the Site Migration Wizard section, and any of its dependent sections)
|
|
NOTE: Please note that the user account provided requires Site Collection Administrator access to each destination SharePoint Online Site Collection. |

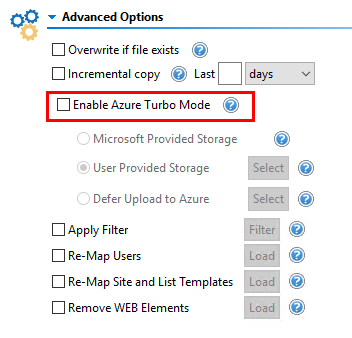
2.Under the Advanced Options section of most migration wizards there is a option labeled "Enable Azure Turbo Mode". Select this option.
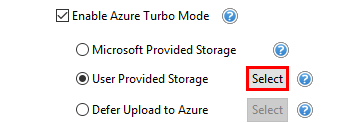
3.Next to the User Provided Storage Option, click the Select button. This will a window that will allow you to connect to your Azure account.
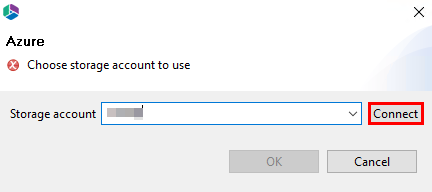
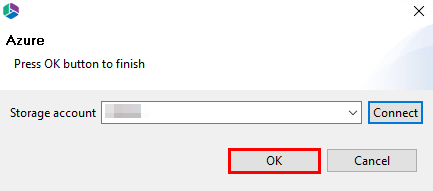
4.In the Azure window, enter your Storage Account name. For information on how to get the account key name see this section. Click Connect.
5.In the next Connect to Azure window enter the Account Key for the Storage Account you entered in the previous step. For information on how to get the account key see this section. Click Connect.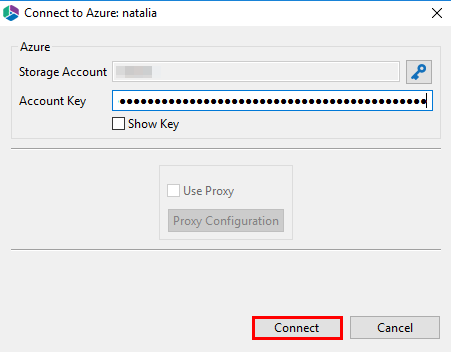
6.If both values are correct, you will return to the original dialog where the OK button will now be enabled, Click Ok. If either of the values entered was incorrect, you will receive an authentication failure message and you will have an opportunity to try again.
7.Once the Enable Azure Turbo Mode option is enabled and the correct values have been provided (if the option is enabled and no values are supplied, then Azure Turbo Mode will not be used for this migration), you may continue with the migration wizard.
8.For future migrations, you may decide to save the Azure Storage User Account key into Essentials by clicking the lock icon next to the Storage Account Name. While this step is optional, it may save some time in configuring future migrations.
In order to do this you must know your Password - to manage the password go to the Help tab, select Profile Manager, and then go to the Advanced tab and Password Management section.

Monitoring Azure Turbo Migration
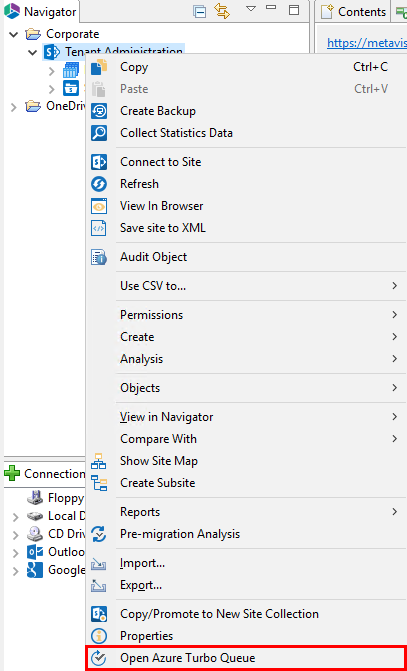
To see more information about the queued jobs, their status, GUIDs, results, and more, simply select the destination SharePoint Online site from the Navigator tree, right click and select Open Azure Turbo Queue.
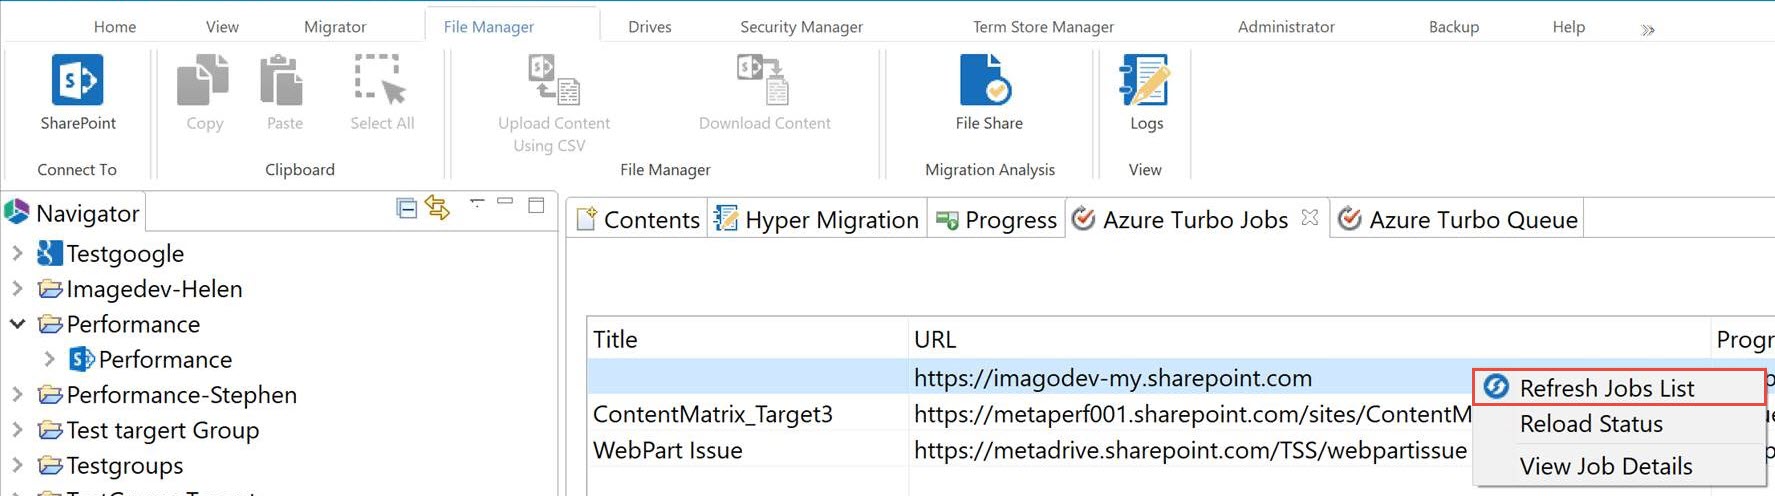
The Azure Turbo Queue perspective options in Essentials allows you to see a wealth of information related to each job that is in the queue. Here you can sort the jobs by each column, or you can simply use the "search by GUID" bar to easily navigate to a specific Azure Turbo job.
|
|
NOTE: If you do not see any jobs then either they have not been queued yet (it can take anywhere from 2 to 5+ minutes for the first job to be queued) or you need to refresh the list since it has not done so in real time. |

As jobs complete (and their status reloads), the status will change from Queued to Processing to Completed.
|
|
NOTE: Job Status is not updated in real time, so you should select one or more jobs and choose the option "Reload Job List" or "Refresh Queue List" to view the current state. |
Once it reaches the Completed state, the content should now have been migrated to SharePoint Online.
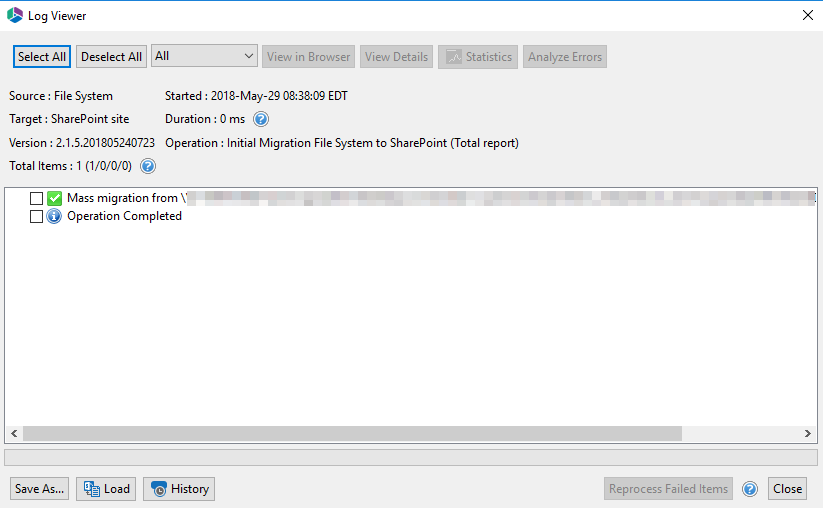
For additional log details, select this or any completed job and choose the option View Job Log.
This will open the log file that the Migration API generated,, which includes a very detailed report pertaining to this operation.
Supported Specification for Essentials Azure Turbo Mode
Essentials' Azure Turbo Mode utilizes Microsoft API, as Microsoft updates the API for both optimization as well as additional support, so too will Essentials be updated.
Currently supported and required:
·Azure Storage Account
oAn Azure Storage Account of your own is required. If you already have a subscription then you can utilize it, however if you do not this may require an additional license that would be purchased from Microsoft. Some Office 365 plans include Azure Storage, so check with your Plan or IT manager first.
·Content Only (but the rest still migrates too)
oThe SharePoint Online Migration API at this time is designed to handle content and content related attributes (metadata and item permissions) only. Site creation, permissions, views, workflows, content types and countless other objects that makeup SharePoint will still be created using a number of other available APIs outside of this new functionality. This means you should not expect to see an increase in performance around these other objects, but they will still be migrated the same as they were before or without the Azure Turbo Mode option.
·Queue Times and Processing
oWe dont control the process, order or operation of the Azure queue. Once Essentials submits the job to the queue, it has been completely handed over to the Microsoft function and we no longer have any ability to predict the order or processing times of any job. In fact, once the Essentials log appears letting you know they have been queued, you can shut down our application and the queue will still process in Azure. This means the job may immediately be picked up and processed or it may sit and wait for its turn before beginning (could be minutes or hours).
·File Size Limitation
oAt present the SharePoint Online Migration API only supports files up to 15GB in size.
Synchronous and Asynchronous mode
Users can select whether Azure Turbo Process is performed in Synchronous or Asynchronous mode. To change this setting to one or the other, do the following:
1.Within Essentials, go to the Help tab, and select Profile Manager.

2.In the profile manager, navigate to Global Variables, and use the drop down beside the Azure Turbo Process option to select Synchronous or Asynchronous.
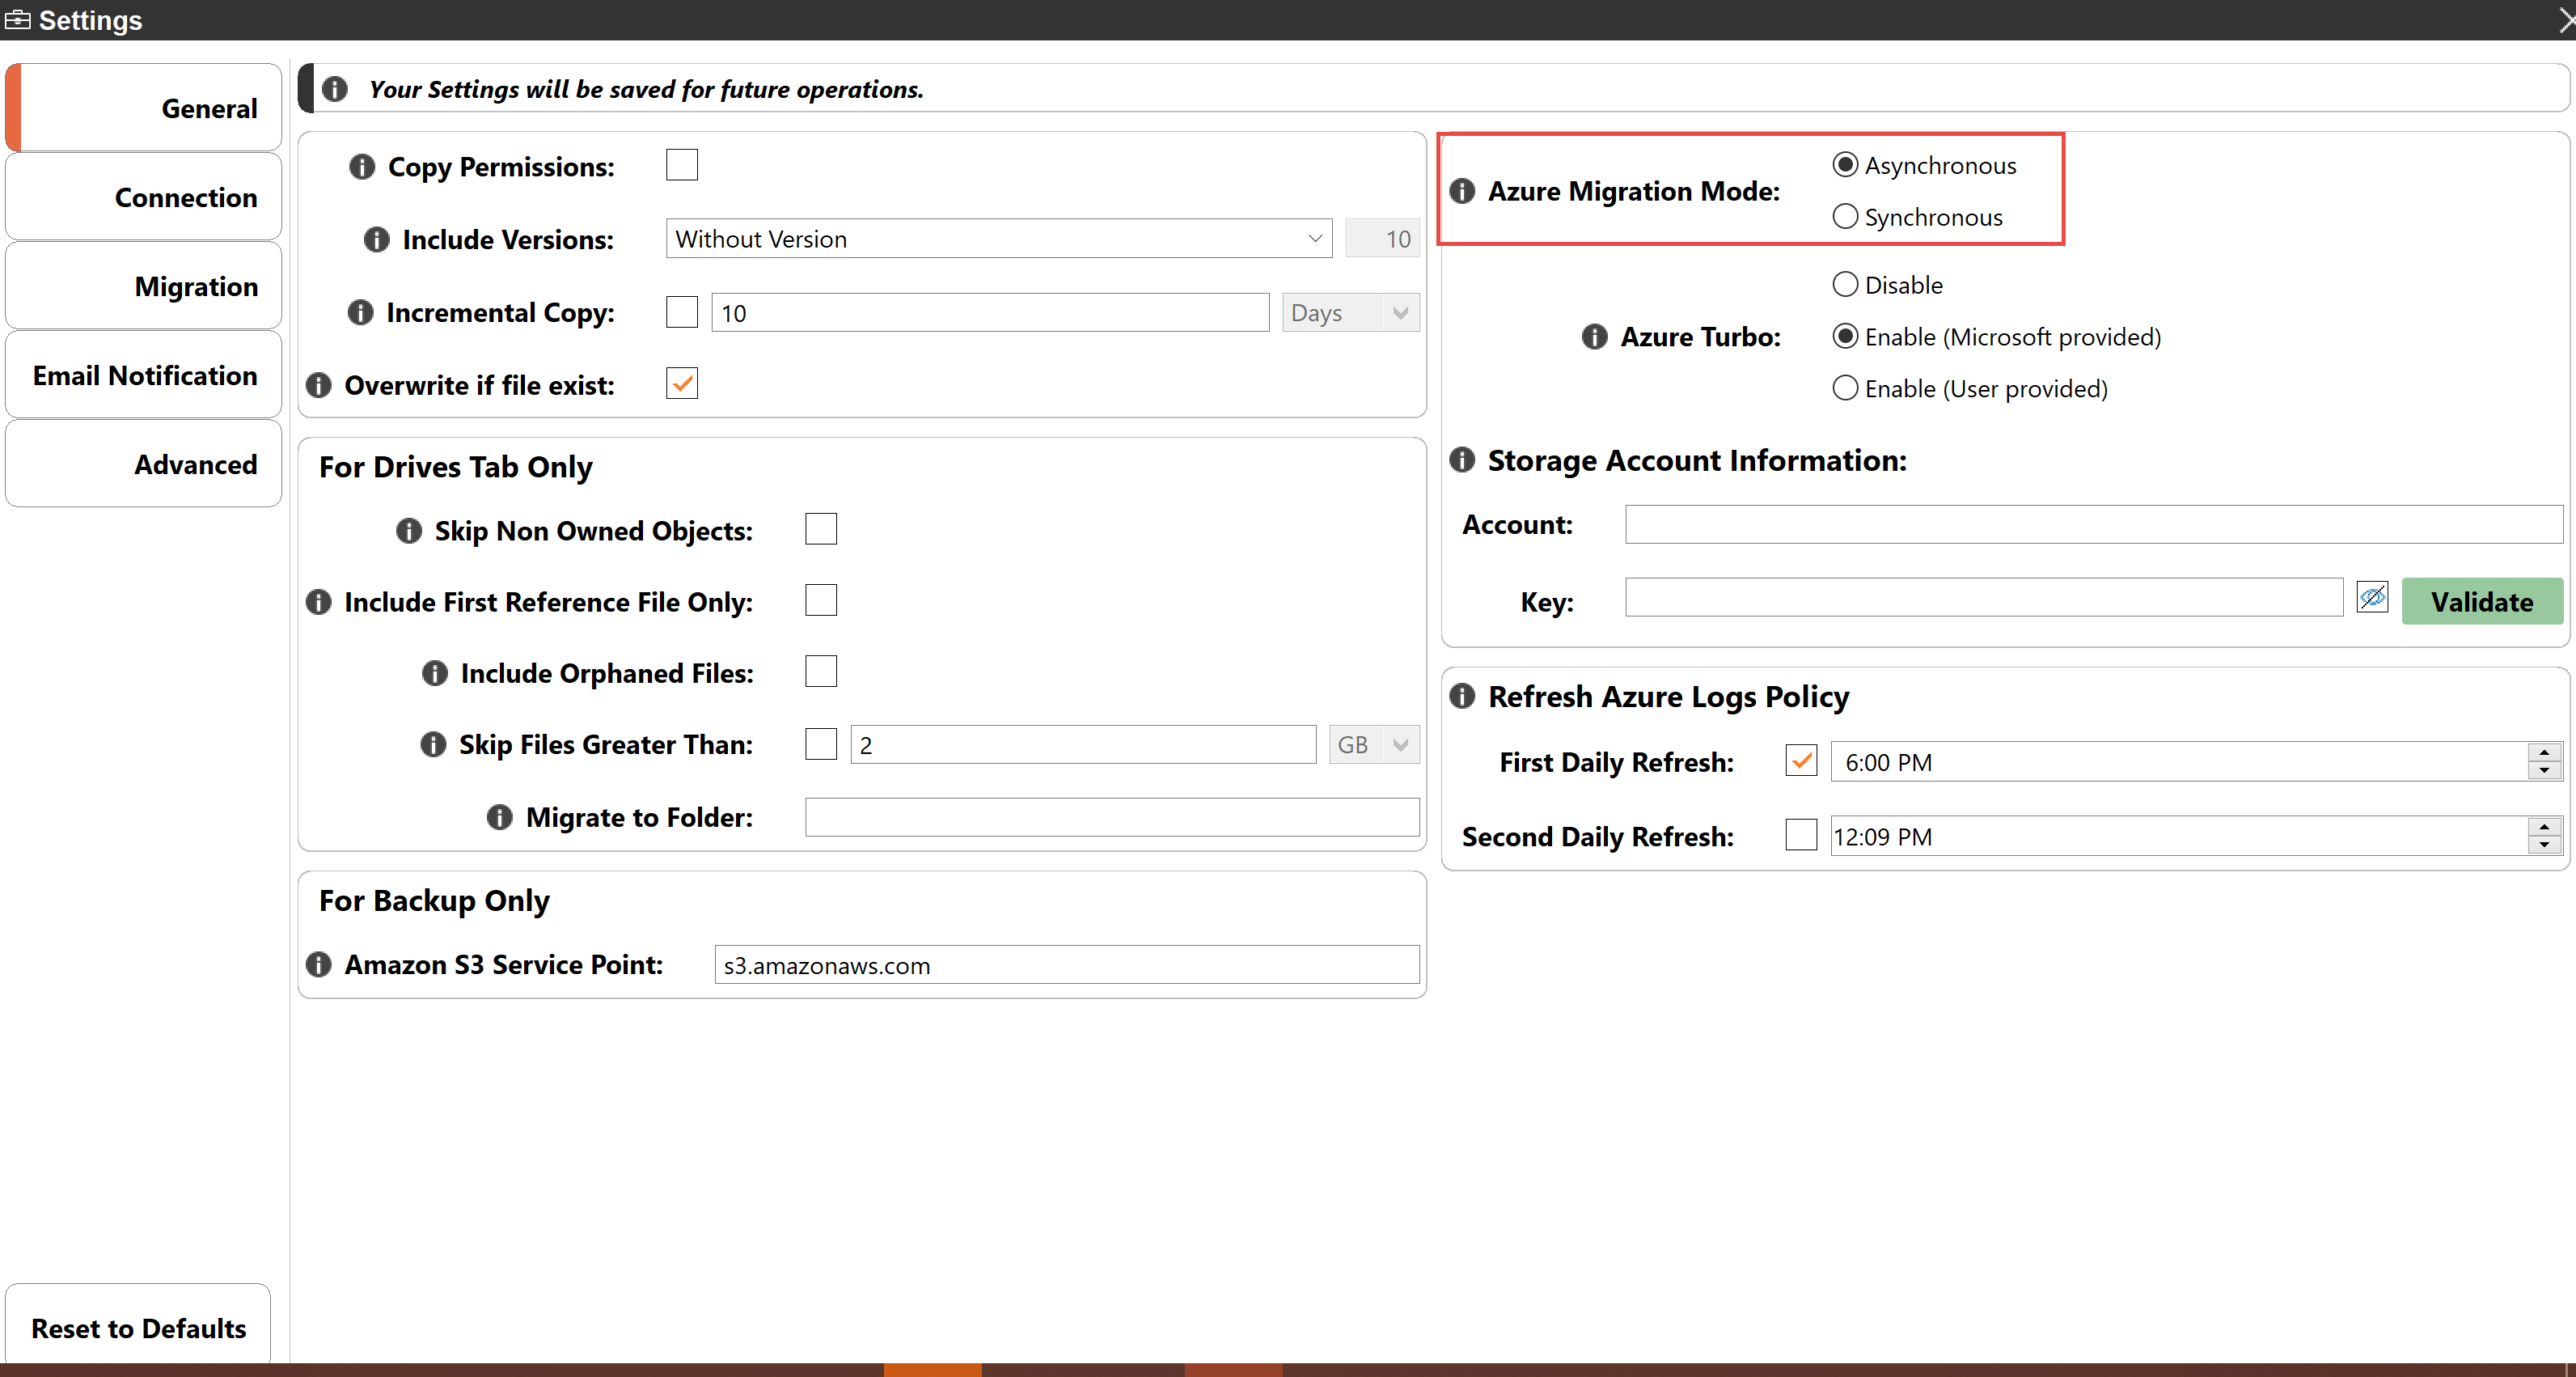
When in Asynchronous mode, the job is reported as finished when all packages created from the source are uploaded to Azure, and added to the import queue. The job completion is not an indication that all content is copied to the target library. The log viewer in Asynchronous mode will display the status of items during the package creation and upload to Azure Pipeline. This option is recommended when a speedier migration is important. To view the actual status of the item when the azure batches are processed there is an option of refresh logs from the azure turbo window to check statuses at the end of the work day, therefore allowing you to manually refresh azure logs and synchronize them with essential's post-migration logs, or use Azure Logs Refresh Policy for Hyper Mode jobs.
When in Synchronous mode, the job is reported as finished when all packages created from the source are uploaded to Azure, and all azure batch processing statuses are returned as complete. However, the job progress will take longer in this mode, but when it has finished it is an indication that all content is copied to the target library. The log viewer in Synchronous mode will display the status of items during package creation and the migrated content on the target.
Note: The next job created in a Hyper migration will start once the previous job operation along with logs update is complete. Therefore it is considered a slower process vs Asynchronous mode and recommended as the option when there is a need to monitor individual migrations before starting a new one.