
Copy, Move, and Tag SharePoint Content
The following details the steps required to Copy, Move and Tag SharePoint Content when the Classic Navigator Mode is enabled in the Profile Manager.
SharePoint uses three primary methods for categorizing content:
·The hierarchy of sites, lists and folders (which is similar to how file systems store files in folders) and;
·Metadata (via content types and fields) to tag or classify content for find-ability and filtering.
·AutoTagging (via fields) to automatically 'tag' or classify documents by their contents. For more information about AutoTag see Field Value Selection Screen.
|
|
NOTE: Auto Tagging is not available to Power User products. |

Essentials has been designed to categorize content in bulk by leveraging one or all of the above mentioned methods. This section will walk you through the process of re-locating content to specific site collections, sites, lists and folders. You may also re-classify your content during the copy/move process. In combination, both processes significantly reduce the burden of organizing your content and making it easier to locate within the SharePoint environment.
1.In the navigator pane, locate the lists containing the content you wish to move or copy. Double-click on the list to load its contents into the Contents pane. If the site containing your content is not available in the navigator pane, follow the instructions for Connect to SharePoint.
2.From the list of items in the List/Library Contents pane, select all the items that you wish to transfer to a different location. Hold down the CTRL key to select multiple individual items or SHIFT key to select multiple consecutive items.

3.After you have selected the source list of items, there are several ways to copy and paste the items:
·You may simply Drag-and-Drop the items to the target.
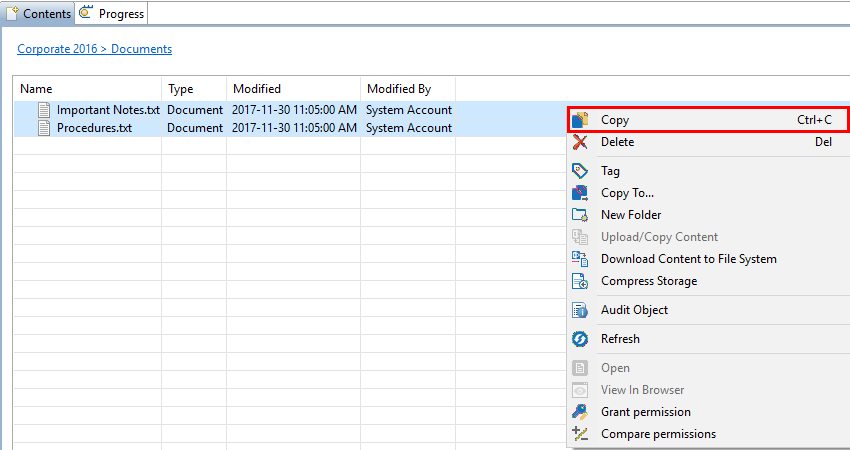
·You can use the Copy option in the right click menu.
This option would require you to right click on the destination folder within the Navigator, and select Paste from its right click menu.

·You can use the Copy and Paste buttons in the Clipboard section of the Migrator tab.

·You can use the Copy To... option in the upper right hand tab of the Content's pane.

·You can use the Copy To... option in the right click menu.
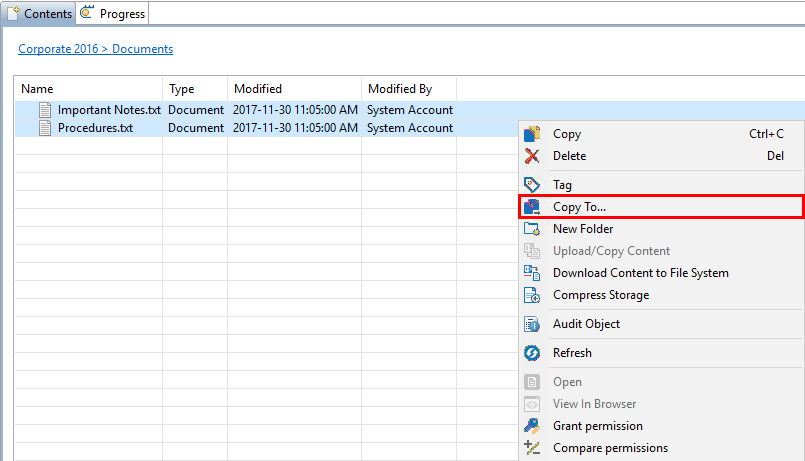
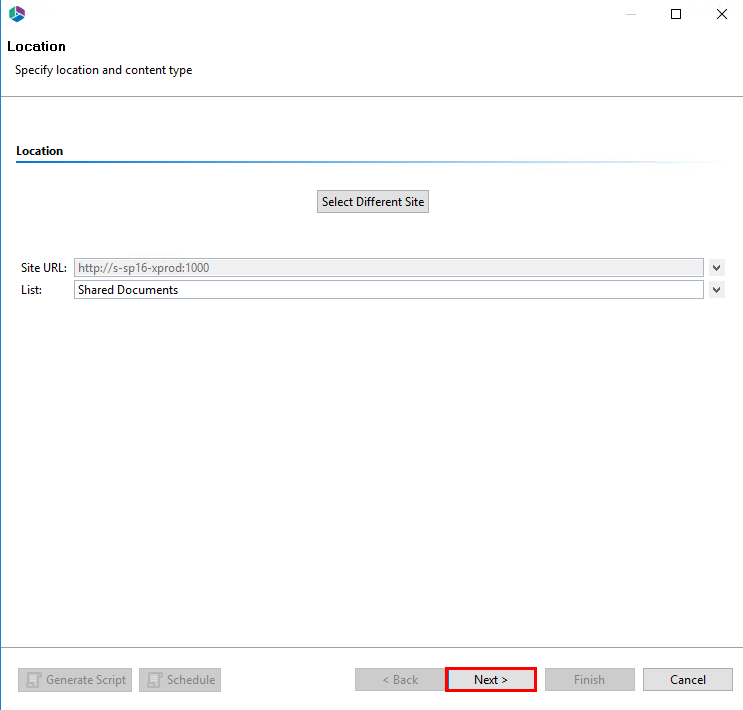
4.Once a user has copy and pasted an item to a destination, or selected the "Copy To..." option, the Tagging/Copy Content Wizard appears. On the Location screen verify or change the site and list target location. Click Next.
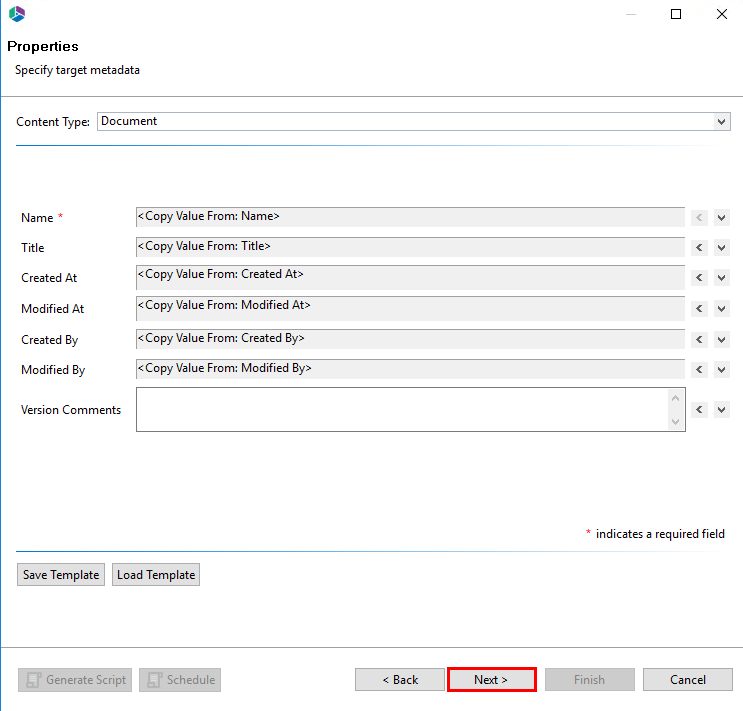
5.The Wizard will generate the same Properties window that is used for the tagging process. Please follow the instructions in the Classification Properties Screen section and the Field Value Selection Screen if you wish to re-classify your content at the same time as migrating it. Once this is done press the Next.
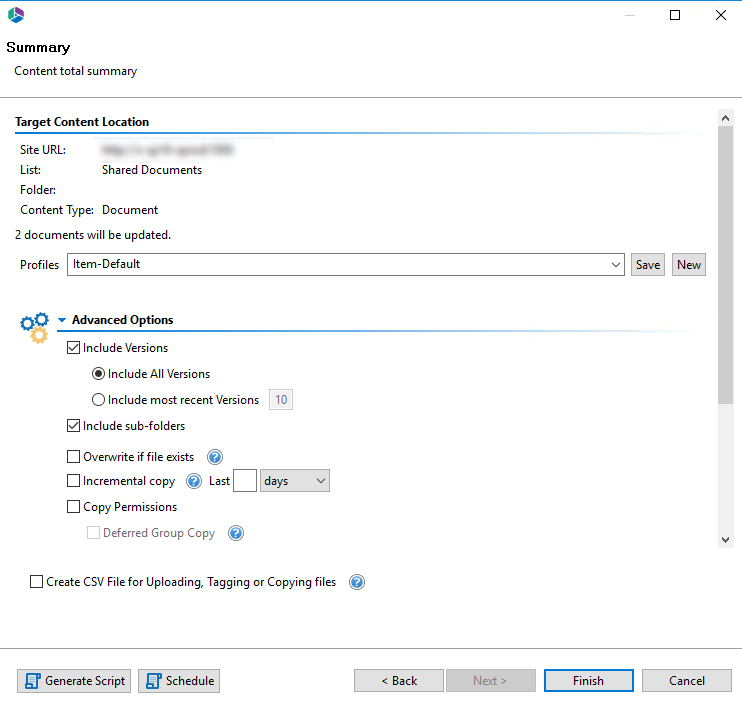
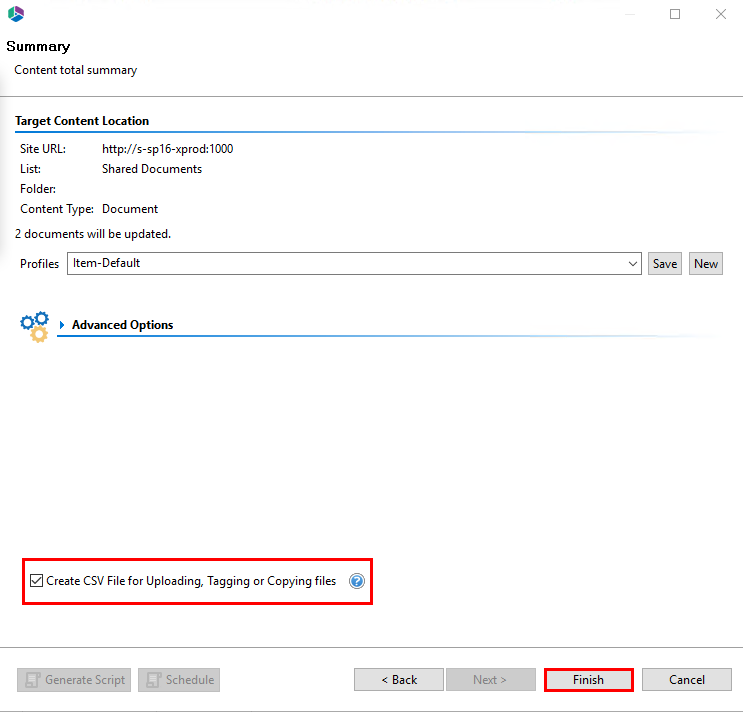
6.The Summary page has an Advanced Options area, specify any options you wish to include as part of your migration. On this page you can also select the "Create CSV File for Uploading, Tagging or Copying Files" option - this option is described in detail in this section. Once you are satisfied with the settings, click Finish.
|
|
NOTE: ·For Migrator Version, in the event any errors are thrown, you may reprocess any failed items after resolving the underlying issues. ·For lists with Content Approval enabled, an Approval Status field will be displayed. This field can be used to bulk approve/reject selected content. |
Classification Properties Screen
The Classification Properties Screen contains the following content:
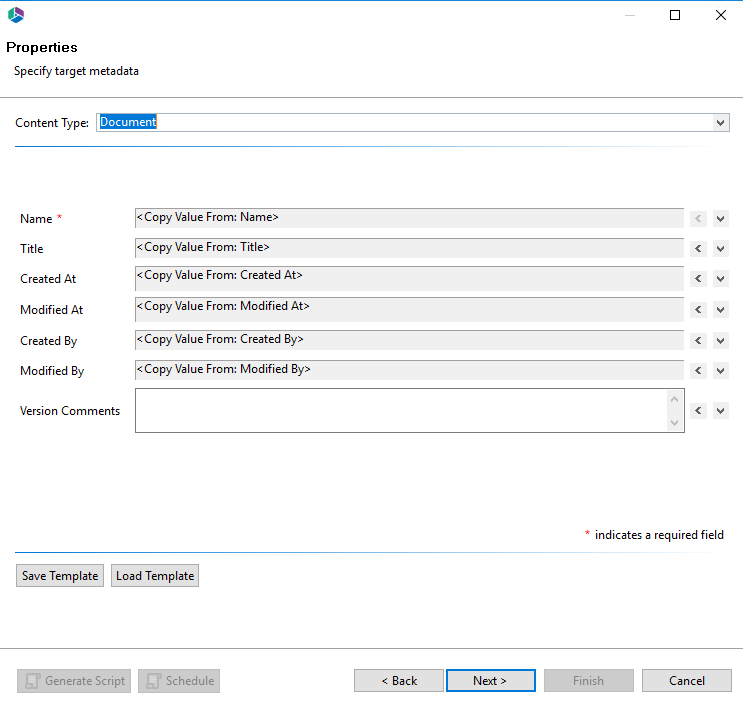
·Content Type - By default, the wizard preloads the default content type for the destination location. The user may select an alternate content type by using the drop-down button. If a new content type is selected, the list of fields below will be updated correspondingly. The application will automatically attempt to match the fields from the source content type(s) to the destination. This option allows you to retain existing content type(s) for selected items. This is useful when moving or copying a set of items from multiple content types.
|
|
NOTE: this is only available when Data Analysis Mode is disabled. |
·Tagging/Classification - Essentials Migrator provides several methods for "smart" tagging, which is accomplished through the use of two buttons located to the right of each field.
oLeft-Arrow Button - One way to efficiently tag content is to group items that need to be tagged with a common value. For examples, you may have a set of files that share a common project name or number, a choice, check box or lookup value, (Yes/No) or a common user name. The left-arrow button provides access to directly enter or modify the value of the field. The wizard will automatically provide controls corresponding to the type of field being worked on.
oDown-Arrow Button - Pressing this button will generate the Field Value Selection window which is intended to allow the user more control over tagging. The functionality for this window is described in the Field Value Selection Screen section.
oPlus Button - This button is only shown for multi-valued fields. When enabled, any new values are appended to existing ones. When disabled, new values will replace existing ones.
|
|
NOTE: Because the Name field in a Library must have a unique value, only the down-arrow is enabled. This allows the user to change the value of this field by mapping to another normalized field. |
·Save Template/Load Template buttons - Many classification operations are done over and over again for different sets of content. These buttons allow the user to store and recall all the tagging parameters set in this window.
Field Value Selection Screen
This screen is generated by clicking on the down-arrow next to a specific field in the Classification Properties Screen. All actions within this screen only apply to that field (its name is displayed at the top of the window).
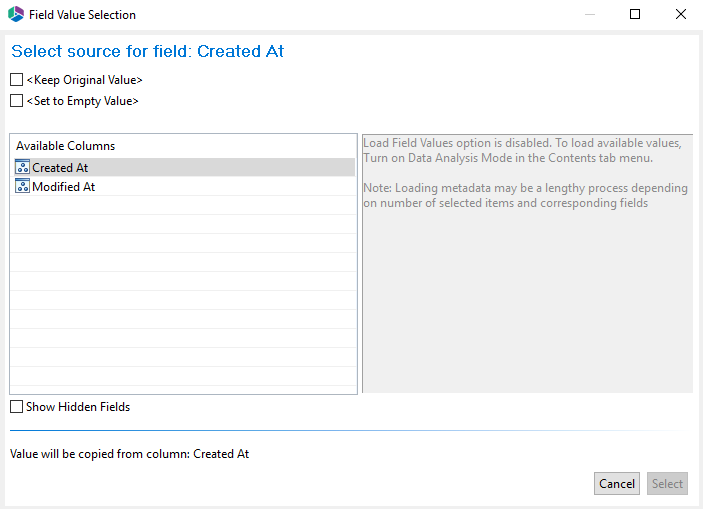
·Keep Original Value - Selecting this check box will retain the value in the source for this field.
·Set to Empty Value - Selecting this check box will remove any existing value from the field.
·Available Columns - Selecting a field name from this list will designate it as the "source" and result in the metadata values from this field to be transferred to the destination for each item.
·Available Values - When a "source" field is selected from the Available Columns list, the metadata values for all the items are displayed in the Available Values list.
Note: This option is only available if Data Analysis Mode 
The user may select any of these specific values to be copied to all items involved in the operation. If none of the values is selected, the functionality will follow the logic described in Available Columns.
·Show Hidden Fields - Selecting this check box will display any Hidden Fields (located in the source system) in the Available Columns area. These fields can be used for mapping to the current field.
Copy and Tag SharePoint Items Using CSV
This option allows the user to create a CSV file that will copy files located within SharePoint rather than in a file system. A typical scenario for this is to copy many files but with unique metadata changes for each file. This can be done by creating and modifying the CSV file and then using the Upload Copy Content Using CSV option.
1.To run this operation follow the instructions in the Copy, Move, and Tag SharePoint Content section. Don't forget to select the "Create CSV File for Uploading, Tagging or Copying files" option on the final summary page of the wizard. Click Finish.
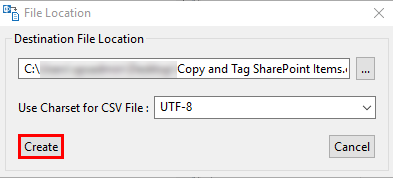
2.Enter the location and name of the CSV file in the provided dialogue and press the Create button. Please reference CSV Column Reference Guide for additional information.
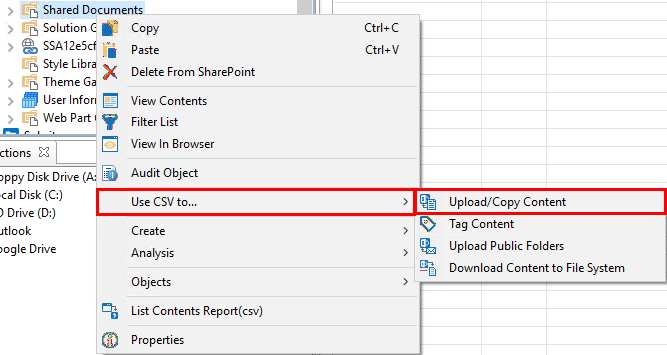
3.In order to upload/copy content using the CSV you just created, you need to select a Library or Folder from within the Navigator Pane and right-click. Select "Use CSV to..." and then select Upload/Copy Content from the right-click menu.
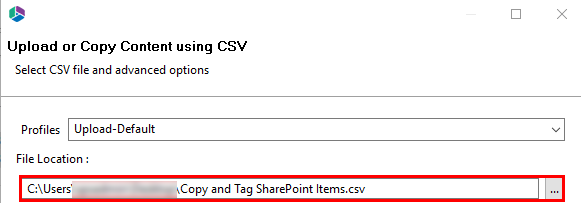
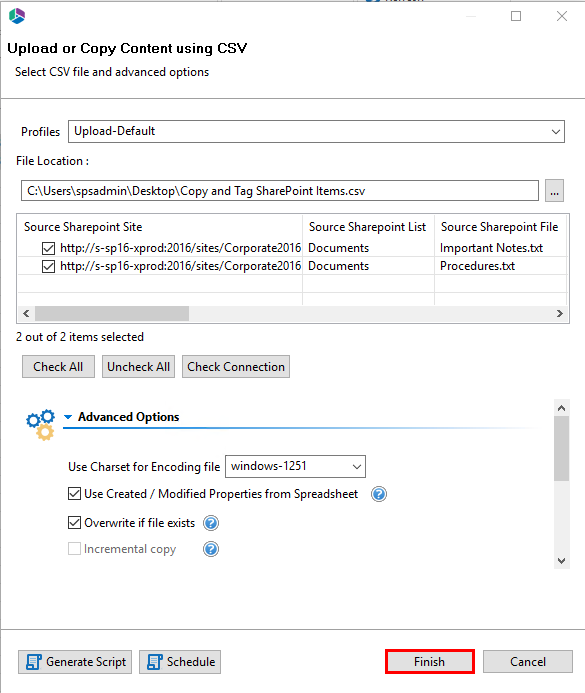
4.In the Upload or Copy files using CSV wizard, identify the destination of the CSV file created in step 2.
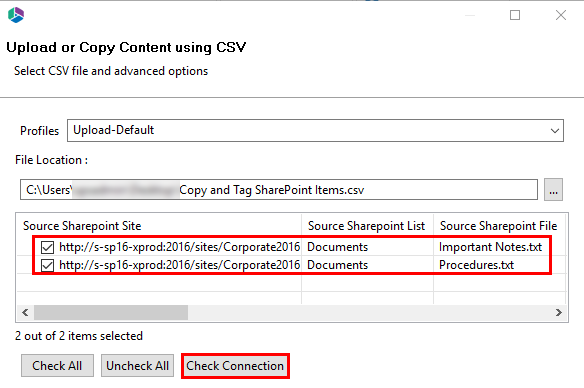
5.Select the Source SharePoint Sites from the list that your CSV provided. You may check individual items or the Check All button at the bottom to select everything. Click Check Connection to check the connection to the source sites.
6.Specify any options you wish to include as part of your migration. Click Finish.
|
|
NOTE: When copying/tagging a library with versioned documents, using the CSV will apply the information entered for the file to each of the versions. |
Copy of items using CSV is available in the following suites:
·Architect Suite
·Migration Suite
·Office 365 Bundle
Copying items via CSV is also available in the following standalone products:
·Migrator for SharePoint
·Change Manager