
Preparing Your Environment for Using ControlPoint Sentinel
Before ControlPoint Sentinel can begin collecting data for Anomalous Activity Detection:
A.SharePoint auditing must be enabled on all site collections for which Anomalous Activity detection will be performed.
B.Anomalous Activity Detection must be enabled to run:
§via the ControlPoint Anomalous Activity Detection job
OR
§as part of the ControlPoint Scheduled Job Review.
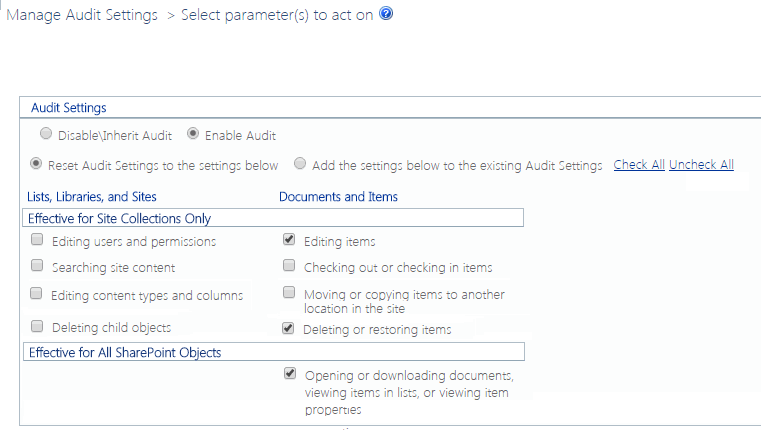
Enabling SharePoint Auditing
ControlPoint Sentinel analyzes the following SharePoint audit log events for Anomalous Activity Detection:
·Editing items
·Deleting or restoring items
You can enable these settings for individual site collections from within SharePoint or, for a larger scope, using the ControlPoint Manage Audit Settings action.
Enabling the Anomalous Activity Detection Job
1From SharePoint Central Administration, select Monitoring, then choose Timer Jobs > Review job definitions.
2Select ControlPoint Anomalous Activity Detection Job.

By default, the job is scheduled to run daily, at 5:00 am (local server time). You may however, change the schedule to run more frequently. Note that, the more frequently the job is run, the sooner an alert may be generated when an Anomalous Activity Limit is reached.
3Click [Enable].
Enabling Anomalous Activity Detection via the ControlPoint Scheduled Job Review
As an alternative to using the Anomalous Activity Detection Job, you can choose to have anomalous activity detection performed as part of the ControlPoint Scheduled Job Review (which, by default, runs every 10 minutes). ControlPoint Application Administrators can enable this option by changing the ControlPoint Configuration Setting Enable Options That Require Anomalous Activity Detection from False to True.
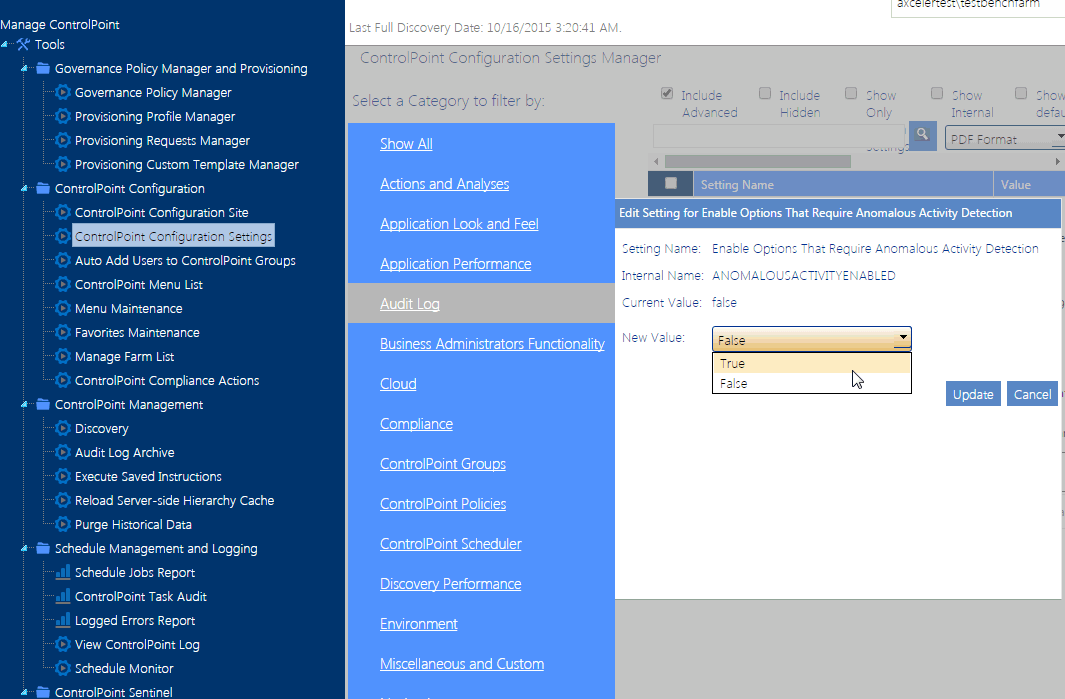
Refer to the ControlPoint Administration Guide for more detail on modifying ControlPoint Configuration Settings.
Reporting Anomalous Activity
The ControlPoint Sentinel Report lets you view anomalous activity events for which an Alert has been specified on the Sentinel Setup - Anomalous Activity Rules page. You can also filter results by user and/or date range.
To report anomalous activity:
1From the Manage ControlPoint tree choose ControlPoint Sentinel > Sentinel Report.
2If you want to narrow your results, enter one or more user(s) in the People Picker and/or enter a date range.
NOTE: If you leave the From and To Dates blank, all available results will be returned.
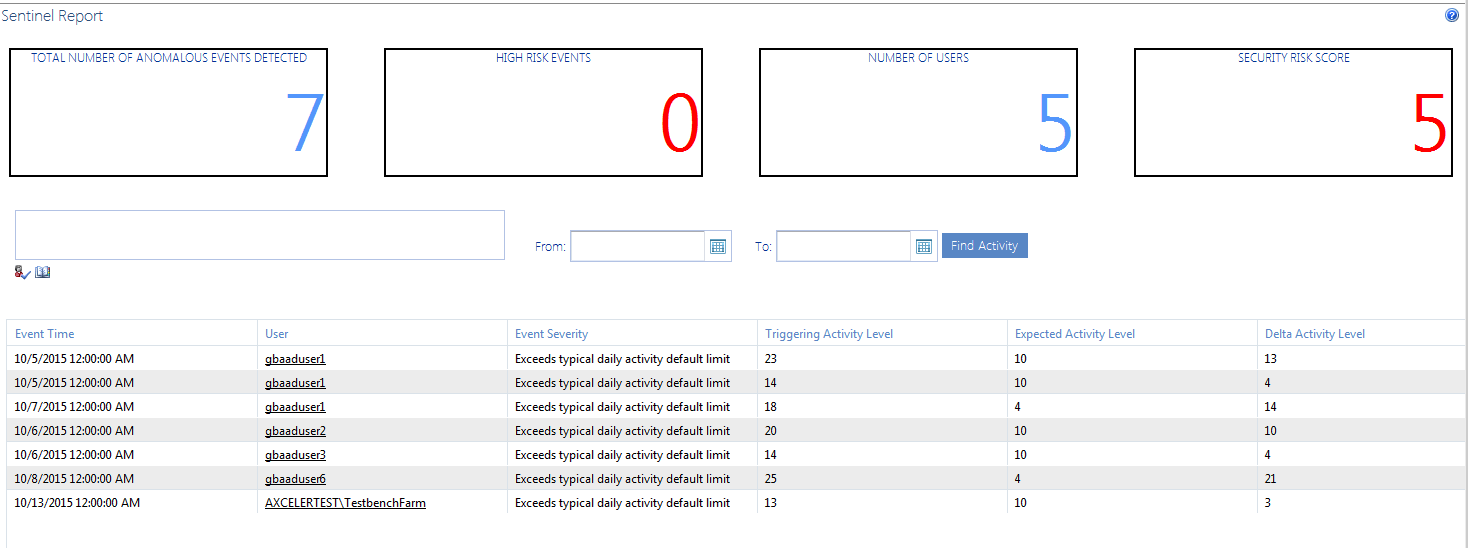
The tiles at the top of the report highlight the following statistics:
·The Total Number of Anomalous Activities Detected
·The number of High Risk Events as characterized by ControlPoint Sentinel
·The Number of Users with anomalous activity
·The Security Risk Score (which is derived by the Severity of each activity within the date range covered by the report)
For each anomalous event detected, report detail displays:
·the Event Time (that is, the date and the time when the ControlPoint Anomalous Activity Detection Job captured the event)
·the User whose activity triggered the anomalous activity detection alert
·the Event Severity (as defined on the Sentinel Setup - Anomalous Activity Limits page)
·the Triggering Activity Level that resulted in the anomalous activity detection alert:
§for Default daily activity, activity above the specified limit for the Event Severity
§for Personal daily activity, the amount of activity for the Event Severity to which the specified deviations above from the user's "typical" usage pattern have been applied.
·the Expected Activity Level:
§for Default daily activity, the specified limit for the Event Severity
§for Personal daily activity, "typical" usage pattern as calculated by ControlPoint Sentinel
·the Delta Activity Level (that is, the difference between Triggering Activity Level and the Expected Activity Level).
To view detailed audit log data for a user:
Click the User link to generate a ControlPoint Audit Log analysis.
Provisioning SharePoint Site Collections and Sites
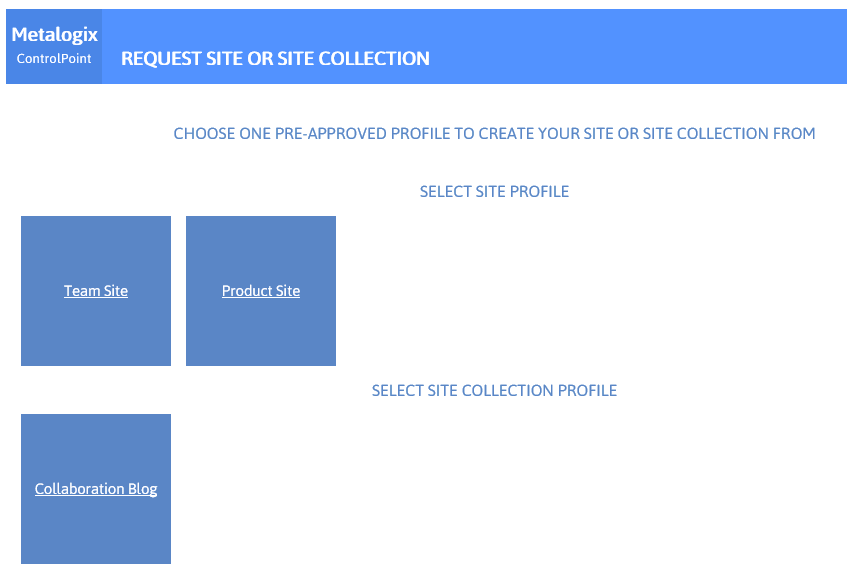
ControlPoint Site Provisioning functionality automates the management of end user requests for new site collections and sites, which are based on "Provisioning Profiles" that you define. You can use ControlPoint's built-in functionality to associate specific site collection-, site-, and list-level properties with a particular Profile, and enforce their usage within the site collections or sites that use it. You can even attach one or more ControlPoint Governance Policies to a Profile.
NOTE: This feature is not available for Non-Standard installations.
Managing Site Provisioning Profiles
Before an end user can request a new site collection or site, at least one Provisioning Profile must have been created. Once created, the Provisioning Profile becomes available to end users when a request for a new site collection or site is initiated.
To launch the ControlPoint Provisioning Profile Manager:
From the Manager ControlPoint panel, choose Governance Policy Manager and Provisioning > Provisioning Profile Manager.

To create a Provisioning Profile:
1From the Provisioning Profile Manager main page, choose [Create].
2Complete the fields on the Build New Provision Profile page as follows:
§Enter the Profile Name as you want it to display in the Provisioning Profile Manager list.
§Enter the End User Description as you want it to display in the Request a Site or Site Collection page.
§Enter the Profile Description as you want it to display in the Provisioning Profile Manager list.
§Select a Profile Type (Site Collection or Sub Site)
§Select a Base SharePoint Template.
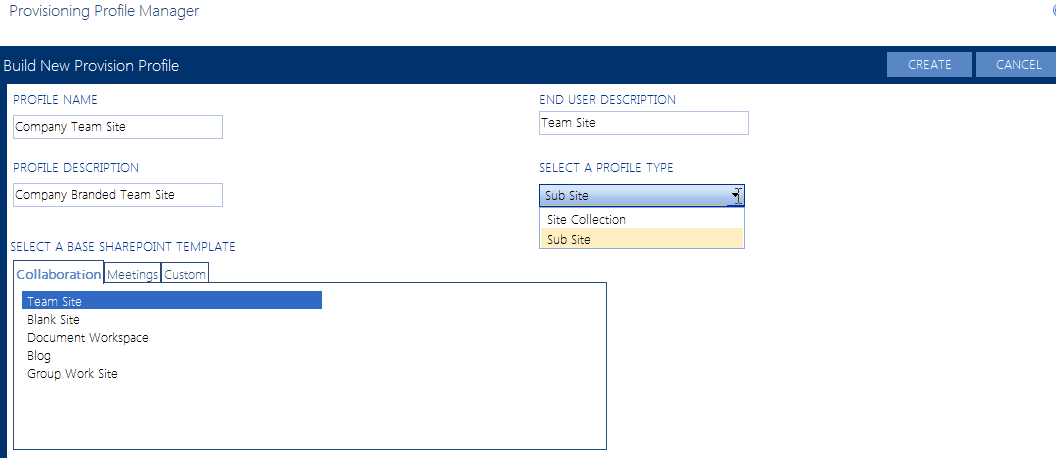
NOTE: If you want to be able to select a template based on a site definition (such as a Publishing site or a custom site definition that has been deployed to the farm), the feature for that site definition must be activated on the ControlPoint Configuration Site collection.
3If you want to Attach Additional Profile Settings:, you can
§Click the appropriate linkSet Site Collection Properties (if available), Set Site Properties, or Set List Propertiesand complete the applicable window.
NOTE: If you select Enforce Policy and schedule the operation to run on a recurring basis, it will be enforced for any site collection or site created using that Profile.
§If you want to attach one or more existing ControlPoint Governance Policies to the Provisioning Profile, select from the available Governance Polices
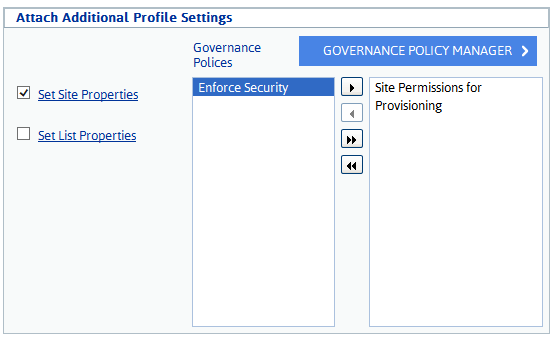
NOTE: If the Governance Policy that you want to attach to the Profile does not appear in the list, click [Governance Policy Manager], and create a new Governance Policy. When you return to the Build New Provision Profile page , click [Create], then edit the Profile see the new Governance Policy in the list.
NOTE: To access instructions for completing the applicable ControlPoint operation, click the Help icon (
4Click [Create].
To edit a Provisioning Profile:
1From the Provisioning Profile Manager main page, check the box to the left of the Profile that you want to edit.
2Click [Edit].
3Edit the fields on the Edit Provision Profile page as appropriate.
4Click [Update].
To delete one or more Provisioning Profiles:
1From the Provisioning Profile Manager main page, check the box to the left of the Profile(s) that you want to delete.
2Click [Delete]
You will be prompted to confirm your action before continuing.