
Identifying Checked Out Documents
The Checked Out Documents analysis lets you identify all files that are currently checked out of SharePoint for a selected scope.
NOTE: If you want to identify only those files that have been checked out over a given date range, use the Activity by Document analysis.
Note About "Common" File Names
Lists of "common file names" and "common file extensions" are maintained in XML file ActivityByUserOrDoc_ExcludedFileNames_2010.xml located on the Web front-end server where ControlPoint is installed, in the following SharePoint hive subdirectory: \TEMPLATE\LAYOUTS\Axceler\App_Data.
The purpose of this list is to give you the option of either including or excluding frequently used files from analysis results. You can customize the XML files to include file names specific to your environment. For example, you may want to filter out image files used on many pages that do not reflect actual patterns of user activity. You can also remove any of the default file names provided by Metalogix.
NOTE: Names in this file will populate the Exclude File Names parameter. By default, this file includes SharePoint internal files. When you specify the parameters for your analysis, you can exclude some or all of the file names in this list.
IMPORTANT: Changes that you make to these files must be copied to any additional Web front-end servers in your farm. Also, whenever you install a ControlPoint update or patch, these files are overwritten with files containing the default lists. Therefore, if you choose to make modifications, it is recommended that you keep a backup of the file in a different location so that you can replace the default version after an update or patch.
To generate a Checked Out Documents analysis:
1Select the object(s) on which you want to perform the analysis.
2Choose Activity > Checked Out Documents.
3Specify the parameters for your analysis.
In addition to "standard" parameters (and the ability to exclude files, as described above), you can choose to Include Documents with no checked-in version. When this box is checked, documents for which a checked-in version does not exist (which may happen, for example, if a document was uploaded but a value was not provided for a required property) will also be included in results and will be flagged.

Now you can:
·run the operation immediately (by clicking the [Run Now] button)
OR
·schedule the operation to run at a later time or on a recurring basis.
OR
·save the operation as XML Instructions that can be run at a later time.
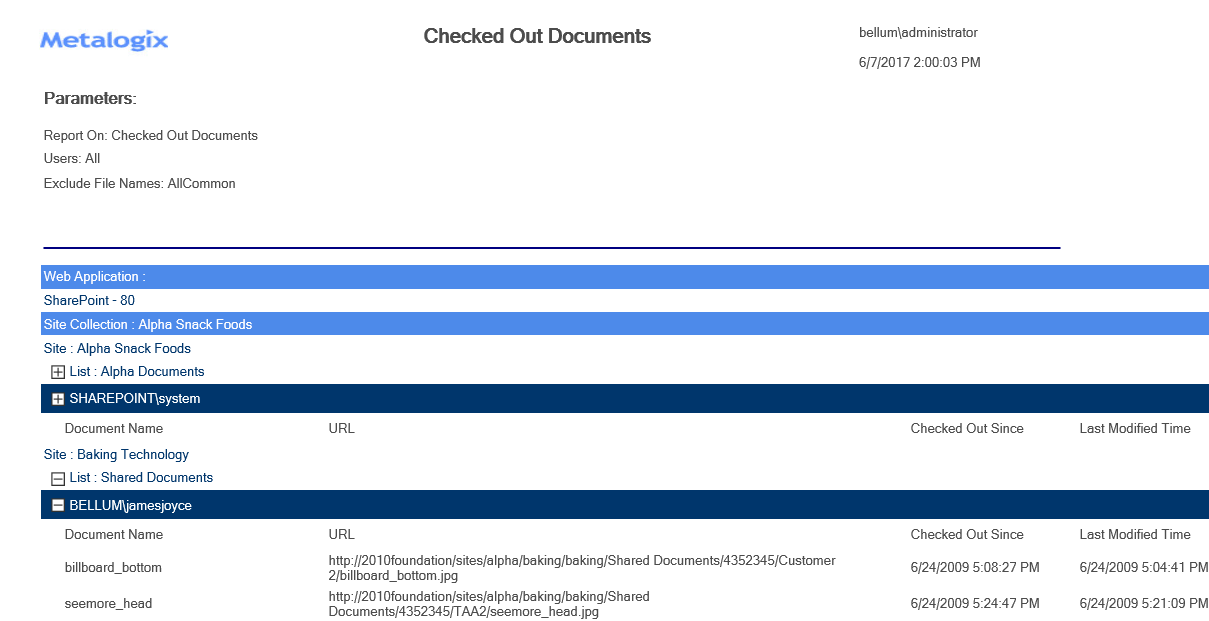
For each user who has checked out documents, analysis results display the following information for each:
·the Document Name (with a link to the ControlPoint Audit Log analysis for the specified date)
NOTE: If SharePoint auditing is not enabled for the check in/check out event, the Audit Log analysis will show No Results to Display.
·the URL to the document within the library
·the date and time that the document has been Checked Out Since
·the Last Modified Time
If you chose to Include Documents with no checked-in version, documents that meet that criteria (if any) will also be included in analysis results, flagged by the symbols ###.
Identifying Inactive Users
The Inactive User analysis identifies users who have had no SharePoint activity for a selected scope and date range.
ControlPoint compiles this list by finding all unique users with permissions then eliminating those with activity within the time period covered by the analysis:
Total Users with Permissions includes:
§Web application Service Accounts
§Users granted permissions through Web application policies
§Site Collection Administrators
§Users within Active Directory groups to which the ControlPoint Service Account has access (that is, within the same domain or forest, in a different domain/forest for which with a two-way trust exists, or in a different domain/forest with a one-way outgoing trust that ControlPoint can authenticate via the ControlPoint Manage Forest Access feature. Disabled Active Directory accounts are included in this total. If an Active Directory user has been renamed but still has permissions in SharePoint under the old name, each name will be counted as a separate user.
·Excluded from this total are built-in groups and special accounts, such as nt authority\authenticated users (or any account that begins with "nt authority") and sharepoint\system, and users granted permissions via augmented Claims or alternate authentication providers.
To generate an Inactive Users analysis:
1Select the object(s) for which you want to find inactive users.
2Choose Activity > Inactive Users.
3Specify the parameters for your analysis.
Now you can:
·run the operation immediately (by clicking the [Run Now] button)
OR
·schedule the operation to run at a later time or on a recurring basis.
OR
·save the operation as XML Instructions that can be run at a later time.
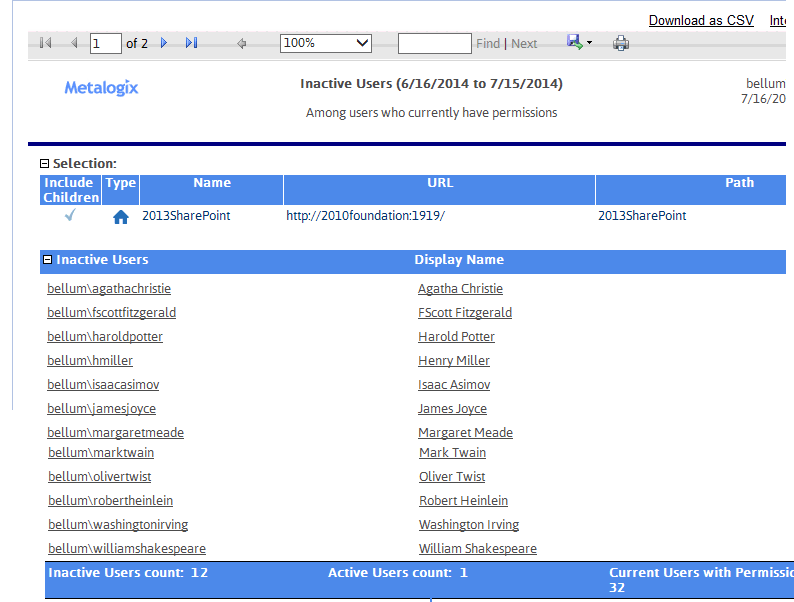
Analysis results include:
·a listing of inactive users.
AND
·the total number of:
§inactive users
§active users, and
§users with permissions.
Analyzing Social Activity (SharePoint 2010 Server)
The Social Activity Analysis provides a summary of user activity for one or more of the following social features within a SharePoint 2010 Server farm:
·for a specified date range and scope:
§ratings
§tags (as long as they have not been marked private)
§notes or comments
·the user's profile status message(s) over the last 14 days.
By default, the results are presented as a high-level "scorecard" with the total number of users and instances of activity for each social feature. You have the option of also including details, which may be grouped by user or by feature.
NOTE: To run this analysis, the User Profile Service Application must be enabled and used by each of the Web applications that you want to analyze. If more than one instance of this Service Application is in use by a Web applicationor if the scope of your analysis includes Web applications that use different User Profile Service Applicationsa Web application's default instance will always be used.
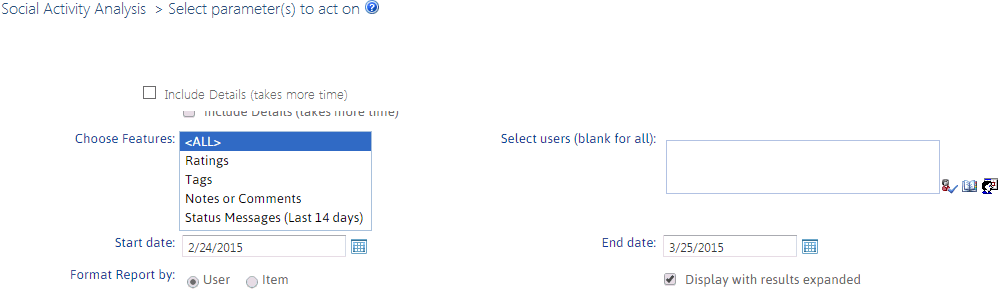
To generate a Social Activity Analysis:
1Select the object(s) for which you want to analyze social activity.
2Choose Activity > Social Activity Analysis.
3Specify the parameters for your analysis.
NOTE: Ratings, Tags, and Notes or Comments are for SharePoint objects within the selected scope and date range. Status Messages are from a user's profile and only those that have been modified within the past 14 days, regardless of the date range specified.
4If you want to include details about each instance of social activity, click Include Details.
NOTE: If you check this box, ControlPoint must iterate through all user activity. Depending on the scope of your analysis and the number of users selected, processing time may increase noticeably.
Note that, if you chose to include details, you have the option to Format Report by User or Item.
Now you can:
·run the operation immediately (by clicking the [Run Now] button)
OR
·schedule the operation to run at a later time or on a recurring basis.
OR
·save the operation as XML Instructions that can be run at a later time.
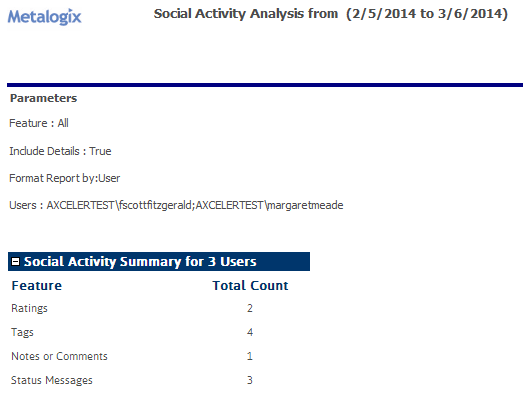
Analysis results identify:
·the number of users within the scope of your analysis that have user profiles within the default User Profile Service, and
·Total Count of activity instances by those users for each feature listed.
If you chose to Include Details, the following additional information displays for each user/feature.
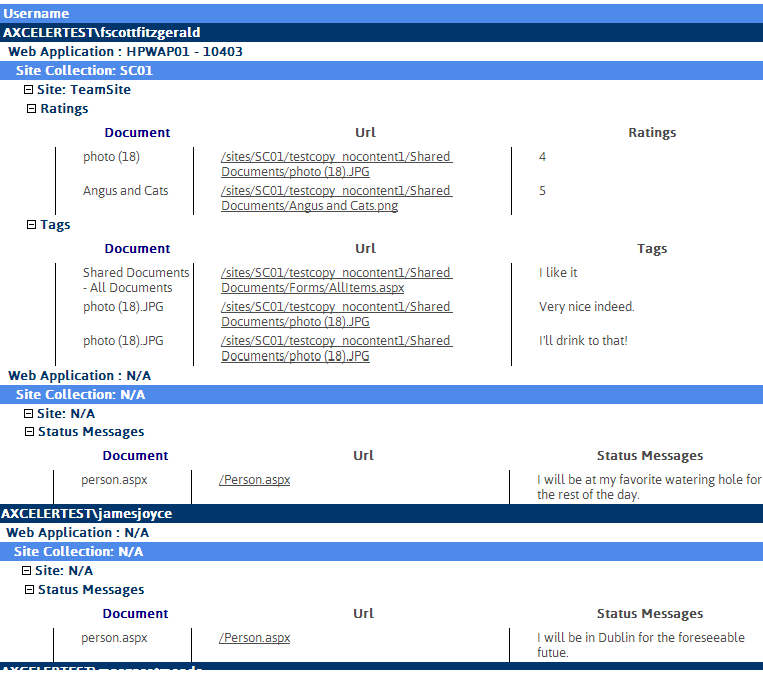
If grouped by user:
·the Username of the user whose social activity is being reported
· the Web Application, Site Collection, and Site where the social activity occurred
·for each line item:
§the Document and Document URL where the social activity occurred
§the actual content of the social activity instance.
NOTE: In the case of Ratings, the number is the rating itself, not a count of the ratings.
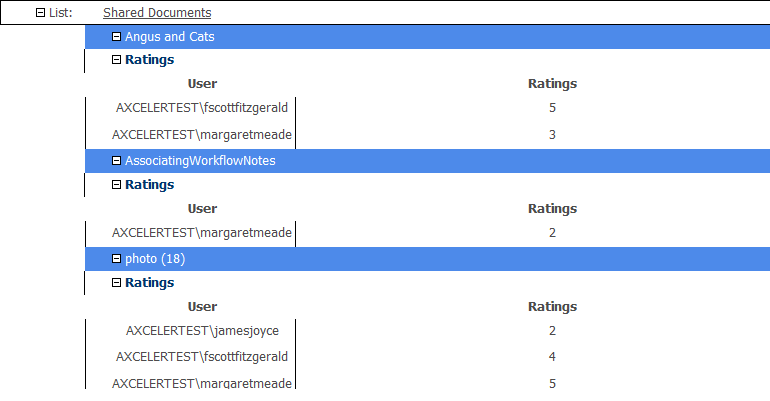
If grouped by item:
·the Web Application, Site Collection, Site, List, and Item/Document where the social activity occurred
·the type of social activity (Ratings, Notes or Comments, or Status Messages)
·for each line item:
§the Document and Document URL where the social activity occurred
§the User whose social activity is being reported
§the actual content of the social activity instance.
NOTE: In the case of Ratings, the number is the rating itself, not a count of the ratings.
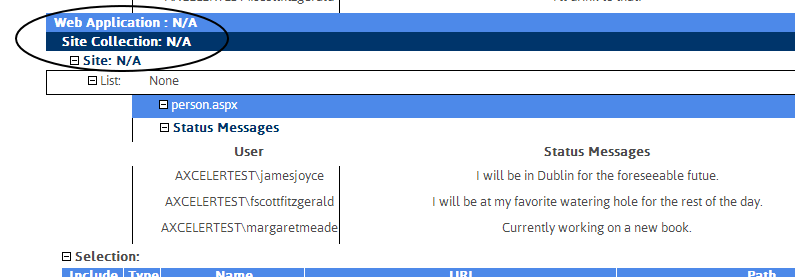
Additional Information About Status Messages
·Status Messages will display only if the status message has been updated within the past 14 days.
·The SharePoint User Profile Change cleanup job renders status messages that are older than 14 days unretrievable. Therefore, if a user has not modified his/her status message within 14 days, it will not be included in analysis results.
·If the user does not have a My Site (that is, the message exists in the user's profile only), N/A will display for the Web application, site collection, and site.
Analyzing Blog Post Activity
The Blog Post Activity analysis provides activity statistics about blog posts created by SharePoint users over a specified period of time, including the post's author, date published, and the number of unique visitors.
To generate a Blog Post Activity analysis:
1Select the object(s) containing the blog(s) whose posts you want to analyze.
2Choose Activity > Blog Post Activity.
3Specify the parameters for your analysis
NOTE: In addition to the "standard" parameters you have the option of grouping results for each blog post By Post or By Author.
Now you can:
·run the operation immediately (by clicking the [Run Now] button)
OR
·schedule the operation to run at a later time or on a recurring basis.
OR
·save the operation as XML Instructions that can be run at a later time.
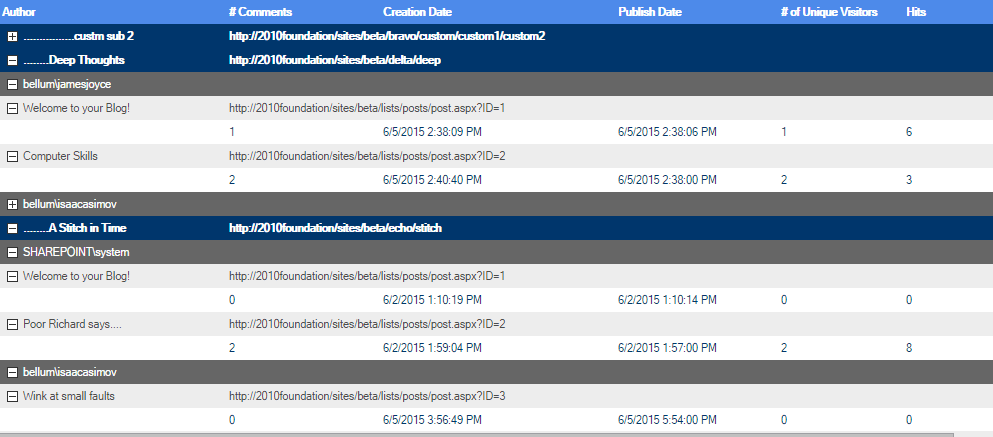
The top level of the analysis shows all of the blog sites within the selected scope. As you drill-down, the following information displays for each post or author (depending on the Group By parameter you chose) within the specified date range:
·#Comments
·Creation Date
·Publish Date
·#Unique Visitors
·# Hits (that is, the total number of visits to that page).
Note that SharePoint considers the date and time when the post was initiated (even before the [Publish] button was clicked) to be the original Publish Date. Therefore, if the post is published immediately, the Publish Date/time may actually be earlier than the Creation Date.

Blog post that was created and published immediately
If the post was not published immediately (for example, the post was scheduled to be published at a later time or Saved as a Draft), the Publish Date/time will be later than the Creation Date/time. If it is saved as a draft, the Publish Date reflects the date and time when the draft was saved. The Publish Date will be updated when the draft is re-saved, published, or scheduled to be published.

Blog post that was created and Saved as a Draft
In the case a post for which was scheduled to be published, the Publish Date will reflect the scheduled Date/time, even if it is in the future.
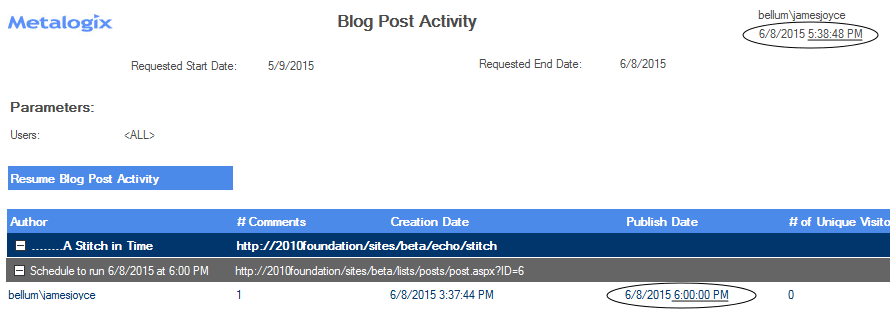
Blog post that was scheduled to be published in the future.