
Removing a Workflow from One or More Lists (or Sites)
The Remove a Workflow action lets you remove workflows from multiple lists or sites in a single operation. The operation "matches" a workflow selected as the "source," to workflows within your "target" selection. Workflows can be matched by name only, template only, or both.
TIP: You can generate a ControlPoint Workflow Analysis.
NOTES:
·This action will delete both the workflow definitions and all instances (including running instances).
·Site-level workflows apply only for SharePoint Server 2010 farms.
To remove a workflow:
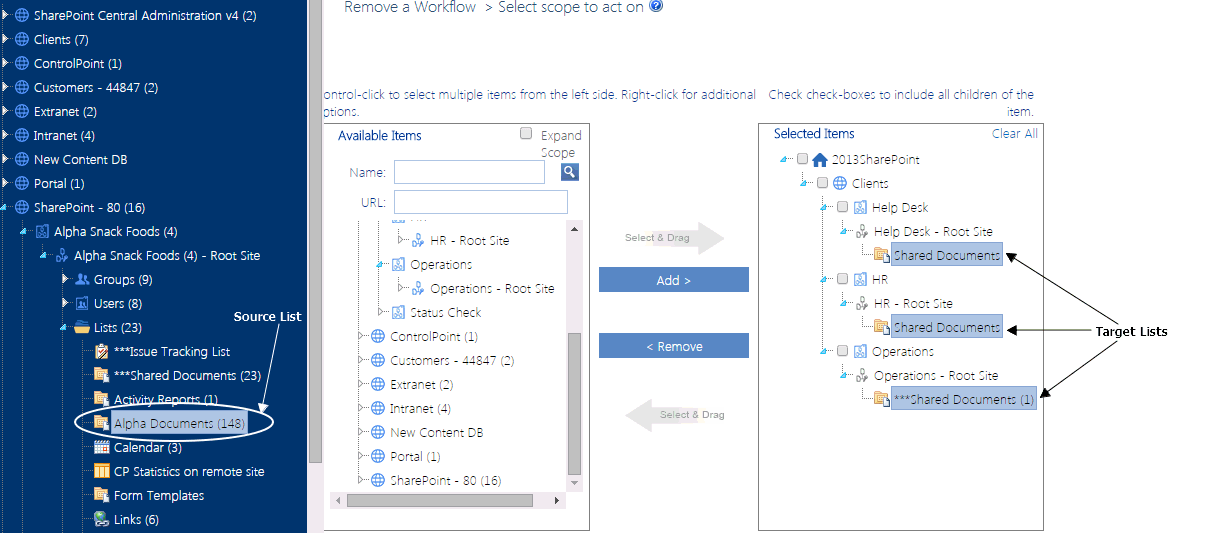
1Select the list (or site, if appropriate) containing the workflow you want to use as the "source" (that is, a workflow that "matches" the workflow(s) you want to remove from target lists or sites).
2Choose Change Management > Remove a Workflow.
3From the Available Items list, select the objects from which you want workflows removed and move them to the Selected Items list.
NOTE: The workflow will not be removed from the source object by default. If you also want to remove the workflow from the source object, you must also include it in your Target Selection.
§In the case of a site workflow, all of the child sites within the selection will be included.
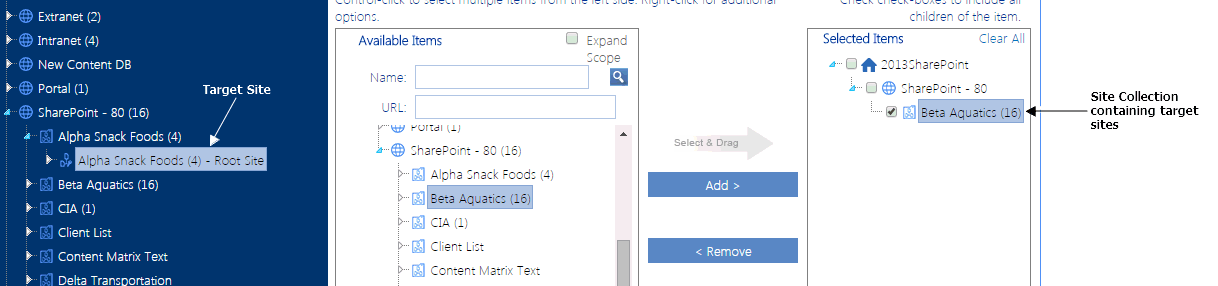
§In the case of a list workflow, you will have the opportunity to further define which lists within the selection will be included.
4When you have finished selecting target objects, click [Apply].
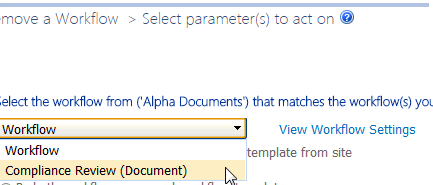
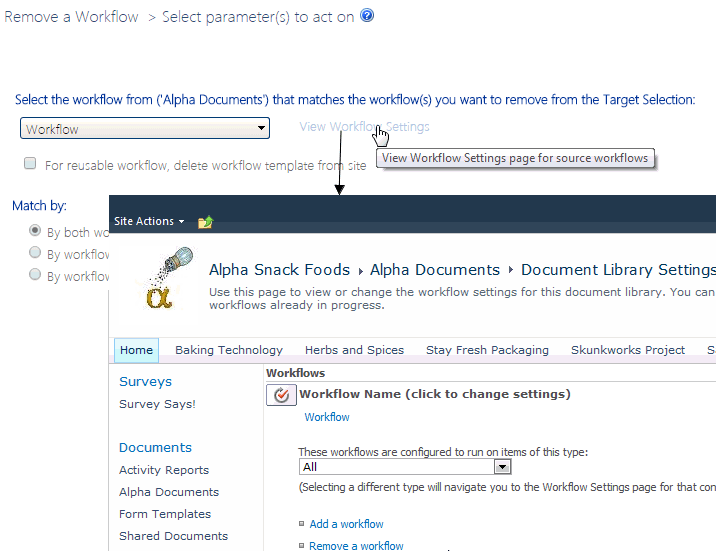
5Select the Parameters tab then select the workflow that you want to remove from the Target Selection from the drop-down.
If you want to examine workflow properties, click the View Workflow Settings link to open the SharePoint Workflow Settings page for the object.
6For list-level workflows only, you can choose to Limit target selection by any of the following criteria:
§For Run on items with Content Type name: you can choose to have the workflow removed only from items within the list(s) of the specified content type.
NOTE: You can only specify a single content type using its full name.
§If the scope of your target selection includes more than one list, you can limit to lists:
§whose List name contains a specified text string
§One or more List type(s)
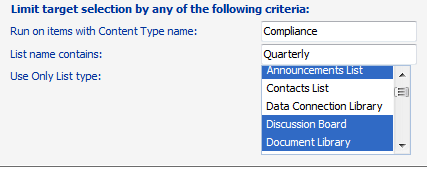
When a combination of selection options is used, all lists specified through any of these criteria (though not necessarily all criteria) will be included in the operation.
Now you can:
·run the operation immediately (by clicking the [Run Now] button)
OR
·complete the Enforce Policy section and schedule the operation to run at a later time.
OR
·save the operation as XML Instructions that can be run at a later time.
If you chose the Run Now, option, after the operation has been processed:
·a confirmation message displays at the top of the page, and
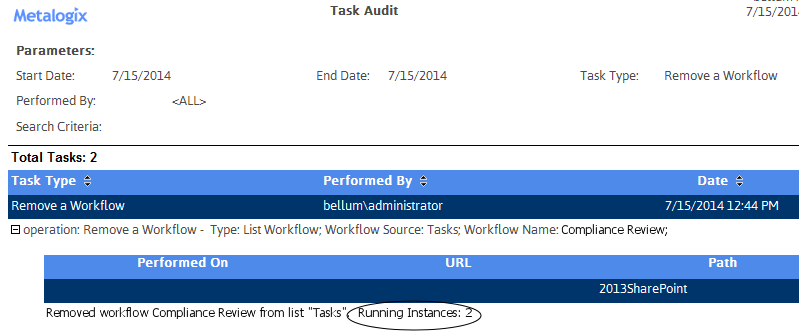
·a ControlPoint Task Audit is generated for the operation and displays in the Results section.
If you schedule the operation, a link to the Task Audit is included in the scheduled action notification email.
See also The ControlPoint Task Audit.
Note that the Task Audit will record the number of running instances of the workflow (if any) that were removed from an object.
Using ControlPoint Policies to Control Your SharePoint Environment
You can use ControlPoint Policies to prevent and/or send out a notification when an attempt is made to:
·delete a subsite
·exceed a quota imposed on a subsite
·delete documents/items
·create content
·upload a file that exceeds a specified size limit
§create a subsite
§create a subsite with a specific template
§create a subsite after a certain depth
§create or delete a list (optionally, with a specific template)
§upload files of one or more specific types
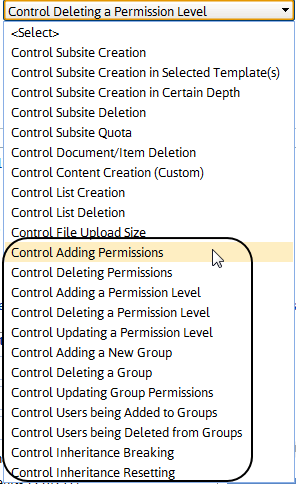
·additionally, for SharePoint 2013 and later farms:
§add or delete a permission
§add, delete, or update a Permissions Level
§add, delete, or update a SharePoint group
§add or delete SharePoint group members
§break or restore permissions inheritance
You can configure your policy to
·include in the policyor exclude from the policyeither:
§all users
§specific users and Active Directory groups
§users in one or more SharePoint groups
OR
·exclude from the policy users with a specified Permissions Level.
If Sensitive Content Manager is installed in your environment, you are a member of the Compliance Administrators group, and the options are enabled, you can also create policies to scan content for sensitive content whenever an item or document is added toor updated ina SharePoint list or library.
IMPORTANT: If you have upgraded to version 2.0 or later of Metalogix Sensitive Content Manager from an earlier version and have existing policies to scan content, you may have to re-create or re-register these policies. Contact Quest Support for assistance.
In a multi-farm environment, you can create and manage ControlPoint policies for the home farm only.
Factors to Consider When Creating ControlPoint Policies
Policies that can be Created:
For SharePoint 2010 and later farms, you can create ControlPoint polices to control:
·subsite creation
·creation of subsites with specific templates
·creation of subsites after a certain depth
·subsite deletion
·the creation and deletion of lists
·the enforcement of subsite-level quotas
·the deletion of documents/items (and optionally, attachments)
·content creation, using a custom Web service
·the uploading of files over a specified size
·the uploading of files of one or more specific types
·if Sensitive Content Manager is installed in your environment, you are a member of the Compliance Administrators group, and the options have been enabled, the submission of a document/item for sensitive content analysis whenever it is added toand/or updated ina list or library.
IMPORTANT: If you have upgraded from Sensitive Content Manager 1.9 and have existing policies to scan content, you may have to re-create or re-register these policies. Contact Quest Support for assistance.
Additionally, for SharePoint 2013 and later farms:
·the adding or deleting of permissions
·the adding, deleting, or updating of Permissions Levels
·the adding, deleting, or updating SharePoint groups
·the adding or deleting of SharePoint group membership
·permissions inheritance breaking or restoring
Excluding Specific Users from All Policies
ControlPoint Application Administrators can exclude selected userssuch as farm administratorsfrom all policies via the ControlPoint Configuration Setting Users to Exclude from All ControlPoint Policies (CPPOLICYSUPERUSERS). Refer to the ControlPoint Administration Guide for details.
NOTE: Users specified in this setting will always be excluded from all policies, even if they are explicitly added to a policy.
How Policies Impact Operations Performed in ControlPoint
Any action on a SharePoint site that is initiated through ControlPoint is actually carried out by the ControlPoint Service Account rather than the logged in user. Therefore, if the ControlPoint Service Account is included in a policy, the policy will be enforced for any ControlPoint action that is restricted by that policy (for example, Delete Site and Copy/Move Site--which involves site creation/deletion), regardless of the user who initiated it.
When "Include Children" Applies to Your Scope
Most policies created at the site collection level or above will include all child sites by default. If a policy is created for a site (other than the root site) or subsite, by default the policy will apply to the selected site and not its child sites. This behavior is consistent with the model for Selecting Objects on Which to Perform a ControlPoint Operation.
EXCEPTION: Because the action applies specifically to the creation of child sites, Control Subsite Creation in Certain Depth will always include child sites, regardless of whether "Include Children" is explicitly checked in the Selection panel.
Including and Excluding Users and Active Directory Groups
You can either include or exclude users and/or Active Directory groups from a policy.
Creating Policies That Control Subsite Quota
Subsite-level quotas do not supersede the quota set for an entire site collection. That is, once a site collection quota is reached, no more content can be added.
NOTE: Because the contents of Recycle Bins are managed at the site collection level, they are not considered in a subsite-level quota.
Creating Policies That Affect Users Based on Permissions Level
You can only exclude (not include) a SharePoint permissions level from a policy.
Creating Policies Involving Site Templates
If you want to control the creation of sites that use one or more specific templates, you can choose from any template that has been deployed for the entire farm. The creation of a site using a certain template cannot literally be "prevented," since it is only upon successful creation of the site that ControlPoint can evaluate the template. The way ControlPoint enforces this type of policy is by deleting a site that is in violation immediately after it is created.
Creating Content Insertion Policies Using a Custom Web Service
You can create a policy to invoke a custom Web service whenever content in a SharePoint list or library is inserted or updated. For example, you may want documents and attachments to be scanned for sensitive content and have a notification sent when the policy is violated.
A content insertion policy can be created if:
·the Web service includes the logic necessary to integrate with ControlPoint and is accessible by ControlPoint Service account. (Details can be found in the guide Running ControlPoint Actions Programmatically.)
AND
·the ControlPoint Configuration Setting Content Creation Policy URL (POLICYSERVICEURL) is populated with the path to the Web Service asmx file. (Details can be found in the ControlPoint Administration Guide.)
NOTE: The ControlPoint policy cannot prevent content that violates a policy from being added.
Users Subject to Multiple Polices
If a user is restricted by more than one similar policy, all policies, including the most restrictive one, will be enforced.
EXCEPTION: If a policy is created at the list level, any similar policies at a higher scope will be ignored.
Updating or "Re-Registering" a Policy When a New Site Collection or Subsite is Added to the Scope
Whenever you add a Web application or site collection to the scope covered by a policy, you must "re-register" the policy so that the new site collection will be included. This assigns the new object to the SharePoint event handlers that watch for the actions covered by the policy. When a subsite is created the event handlers are automatically propagated to the new site.
See Re-Registering a New Site Collection for a Policy.
Creating a ControlPoint Policy
Before creating a ControlPoint policy, it is recommended that you review Factors to Consider When Creating ControlPoint Policies.
To create a ControlPoint policy:
1Select the object(s) for which you want to create the policy.
2Choose Automation > Create a ControlPoint Policy.
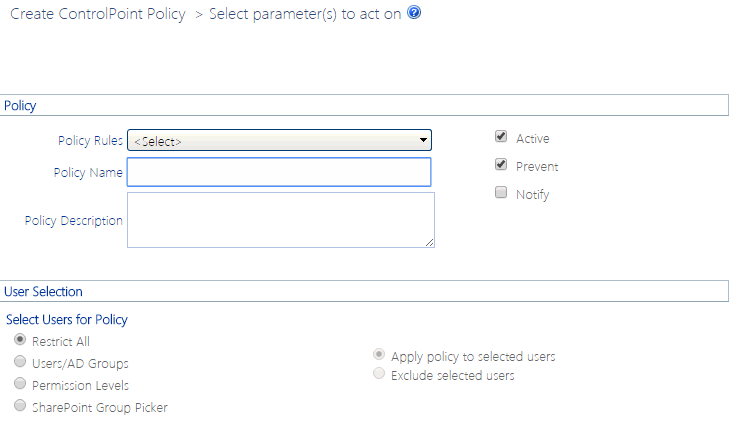
3Complete the Policy section as follows:
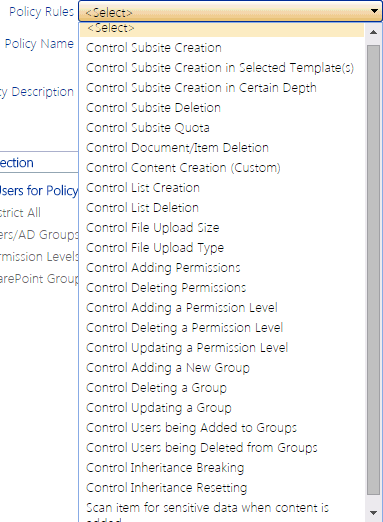
a)Select one of the Policy Rules. Use the information in the following table for guidance.
|
If you want to ... |
Then ... |
|---|---|
|
control the creation of all new sites |
select Control Subsite Creation. |
|
control the creation of sites based on one or more specific templates
|
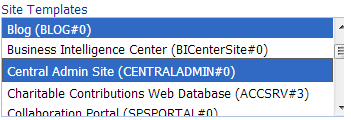
Select Control Subsite Creation in Selected Template. Highlight each of the Site Templates you want to include in the policy. REMINDER: The Site Templates list contains all of the templates that have been deployed for the entire farm, and ControlPoint can only "prevent" a policy violation by deleting the site soon after it is created. |
|
control the creation of sites beyond a certain depth |
§Select Control Subsite Creation in Certain Depth. §Enter the maximum Site Depth you want the policy to allow. |
|
control the deletion of a site |
select Control Subsite Deletion. |
|
control a subsite-level quota* |
§Select Control Subsite Quota. §Enter the quota (in MB) that you want to set. REMINDER: Subsite-level quotas do not supersede the quota set for an entire site collection. That is, once a site collection quota is reached, no more content can be added. |
|
control the deletion of documents and list items* |
§Select Control Document/Item Deletion. §If you want to allow attachments to be deleted from list items, check the Allow Attachments to be Deleted box. NOTE: If you leave this box unchecked, users subject to the policy are prevented from both the item itself and any attachments to items. |
|
control the creation of content based on a rule defined for your organization |
Select Control Content Creation (Custom). REMINDER: You can only notify but not prevent content in violation of the policy from being created for a policy that uses this rule to be created, the ControlPoint Configuration Setting Content Creation Policy URL (POLICYSERVICEURL) must contain the service url for the rule. Details can be found in the ControlPoint Administration Guide. |
|
control the creation of a list
|
·Select Control List Creation. ·If you want to limit the policy to certain types of lists, highlight on or more List Templates. |
|
control the deletion of a list
|
·Select Control List Deletion. ·If you want to limit the policy to certain types of lists, highlight on or more List Templates. |
|
control the uploading of any file that exceed a specified size |
·Select Control File Upload Size. ·Enter an Upload Size Limit (in megabytes). |
|
control the changing of: ·Permissions OR ·Permissions Levels OR ·SharePoint group permissions or group membership OR ·Permissions inheritance
(SharePoint 2013 and later) |
Select the applicable option from the drop-down: |
|
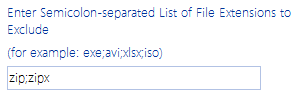
control the uploading of files of a particular type
|
·Select Control File Upload by Type. ·Enter one or more file type extension(s). (Enter multiple extensions as a semicolon-separated list.) |
|
If Sensitive Content Manager is installed in your environent, you are a member of the Compliance Administrators group, and the options are enabled | |
|
·submit a new document/item for scanning whenever it is added to a list or library AND ·have ControlPoint automatically apply a Compliance Action based on the results of the scan. |
A.Select Scan item for sensitive data when content is added. B.Select a Profile for the scan from the drop-down. NOTE: Checked out files are not scanned. You can run a Checked Out Documents analysis to identify these files. (When a file is uploaded and checked in for the first time, it will be scanned as part of a Scan item for sensitive data when content is updated or saved policy.) See also Using Sensitive Content Manager to Analyze SharePoint Content for Compliance. |
|
·submit a document/item for scanning whenever it is updated or saved in a list or library AND ·have ControlPoint automatically apply a Compliance Action based on the results of the scan. |
A.Select Scan item for sensitive data when content is updated or saved. B.Select a Profile for the scan from the drop-down. NOTE: Checked out files are not scanned. You can run a Checked Out Documents analysis to identify these files. (When a file is uploaded and checked in for the first time, it will be scanned as part of this policy.) See also Using Sensitive Content Manager to Analyze SharePoint Content for Compliance. |


*If you are creating a policy to control subsite quota, content creation, or document/item deletion, ControlPoint must process every event that the policy covers. Therefore, if the scope of the policy is exceptionally large (for example, it covers an entire farm with hundreds of sites, lists, and libraries) or the policy includes sites with a high volume of activity, performance of both ControlPoint and SharePoint may be impacted.
b)Enter a Policy Name and Policy Description.
c)Select either or both of the options described in the following table.
|
If you want to ... |
Then ... |
|---|---|
|
prevent users from violating the policy |
leave the Prevent box checked. If you uncheck this box, the Notify box must be checked, which means that users will be able to carry out the controlled action, but a notification will be sent to the violator and/or user(s) of your choice. NOTE: The Prevent option is not available for Control Content Creation. |
|
have an email notification sent to one or more specified users (and optionally, the violator of the policy) |
check the Notify box. |
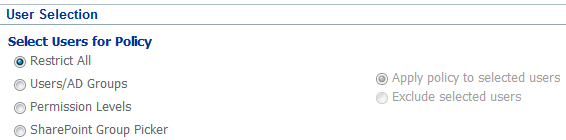
4Complete the User Selection section as described in the following table.
REMINDER: Any user that the ControlPoint Application Administrator has specified as a "super user" in the ControlPoint Configuration Setting Users to Exclude from All ControlPoint Policies (CPPOLICYSUPERUSER) will be excluded from the policy regardless of whether that user is explicitly included in the policy.
|
If you want the policy to ... |
Then ... |
|---|---|
|
include all SharePoint users |
select Restrict All. |
|
include or exclude one or more SharePoint users or Active Directory groups |
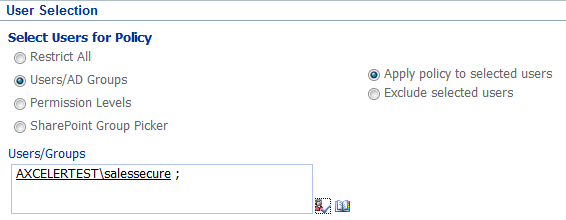
·Select Users/AD Groups. ·Select either Apply policy to selected users or Exclude selected users. ·Select the user(s) and/or AD group(s) you want to include in or exclude from the policy. |
|
exclude a specific Permissions Level |
· one of the Permissions Levels from the drop-down. REMINDER: You cannot include a permissions level in a ControlPoint policy. |
|
include or exclude one or more SharePoint groups |
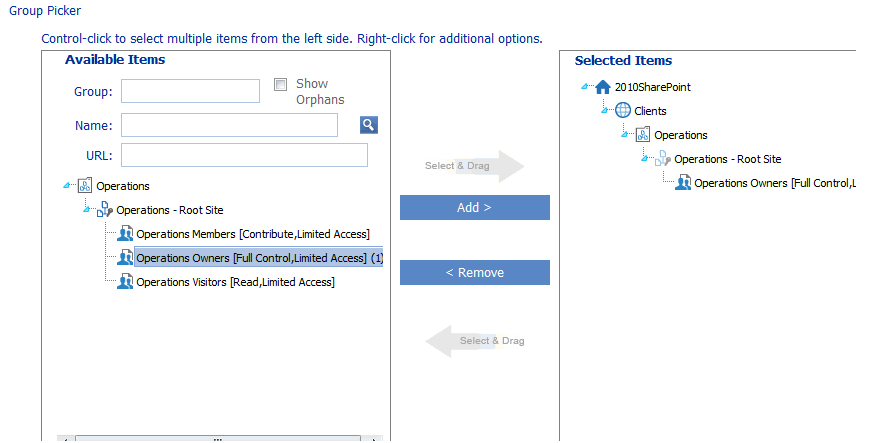
·Select SharePoint Group Picker. ·Select either Apply policy to selected users or Exclude selected users. ·From the Group Picker, select the SharePoint group(s) that you want to include in or exclude from the policy. |
5If you checked the Notify box, select the Enforce Policy tab and complete the Distribution Details as described in the following table.
|
If, when the policy is violated ... |
Then ... |
|---|---|
|
you want an email sent to one or more specified recipients |
·In the Send To field, select the user(s) you want to notify of a policy violation. ·Complete the Subject and Message fields. |
|
you want a notification of the policy violation to be posted to a document library as a text file |
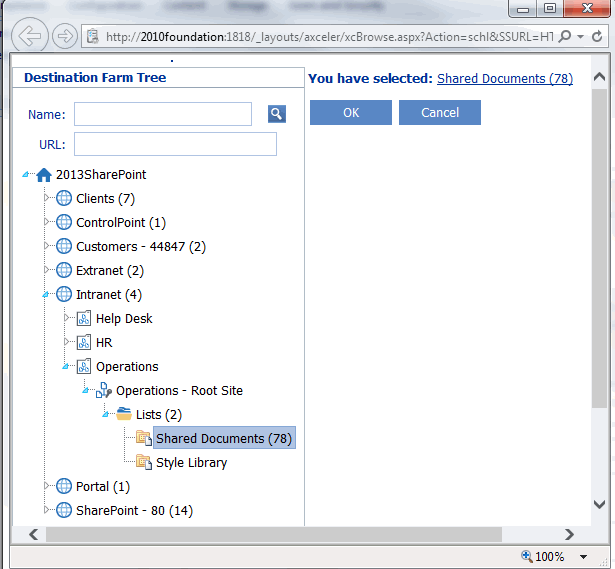
·Complete the Subject and Message fields ·Complete the Add to Library or List field as follows: §Click [Select] to display the Destination Selection Page pop-up dialog, and select a document library from the Destination Farm Tree. (Note that only lists and libraries within the current farm for which you have Full Control access display). §Select a library from the tree. (You can also enter a full or partial Name or URL to narrow your selection.) ·Click [OK] to dismiss the dialog and populate the field with the full url path to the selected library. NOTE: The title of the text file includes the Policy Name along with a date and time stamp. |
|
you want any policy violators to receive an email notification |
check the Send To Violator box. |
|
you want any policy violator to receive a customized message |
·Check the Use Custom Message To Violator box. ·Complete the Subject and Message fields. NOTE: If you leave this box unchecked, violators will receive the same email as any other specified recipient(s). |
6Click [Run Now].
After the action has been processed:
·a confirmation message displays at the top of the page, and
·a ControlPoint Task Audit is generated for the action and displays in the Results section.
See also The ControlPoint Task Audit.