
Others tab
The following AMAC preferences can be managed from this tab:
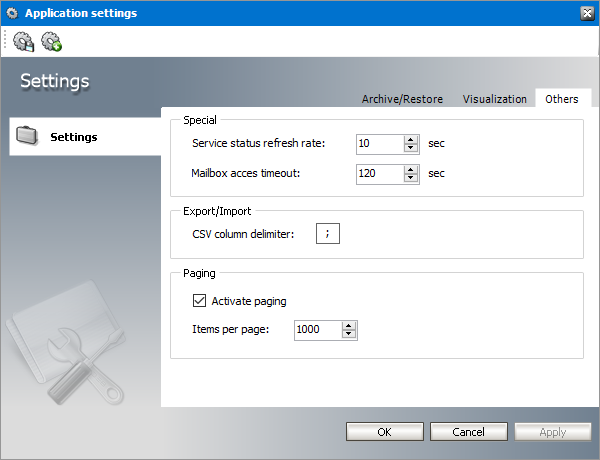
Special
Service status refresh rate - The default is 10 seconds. This means that every 10 seconds the status of the services will be checked and the list of services displayed in the Status view will be refreshed.
Mailbox access timeout - The default is 120 seconds. Timeout value for all open mailboxes across the application.
Export/Import
CSV column delimiter - The column delimiter can be set to a comma (,) or to a semicolon (;) for all export or import processes. You should check your MS Office settings first, and then set it accordingly.
Paging
Paging activates a faster response time when loading large sets of items in the Mailboxes, Archives, Public Folders and Public Folders Archive lists. You can set how many items can be displayed on one page.
Activate paging - select this check box to activate paging.
Items per page - the number of items that are displayed in each set or page. The default value is 1000.
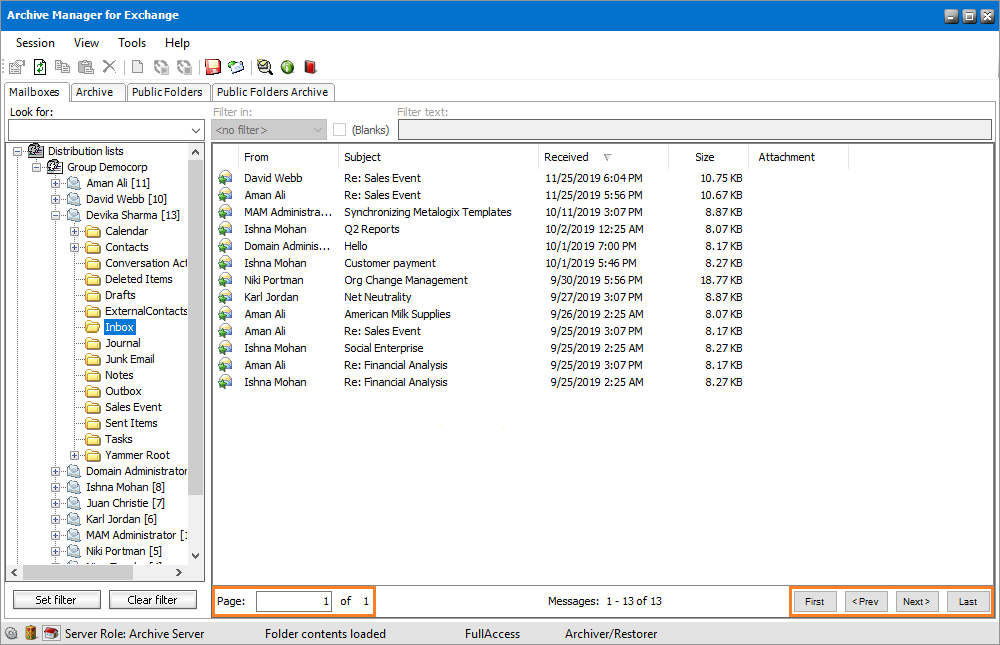
When paging is activated, the current page is displayed in the Page field at the bottom of the list. The administrator can navigate the pages in one of two ways: by entering a specific page in the Page field or by clicking the First, Prev (previous), Next or Last buttons to sequentially iterate through the pages.
Consider the scenario where each mailbox has over 50,000 emails items. Listing all the emails at once would require a significant amount of time. With paging activated, only a part of the list is displayed with navigation aids at the bottom of the list. When the administrator navigates through the pages, only a subset of the list is displayed and the time required to display the subset is greatly reduced.
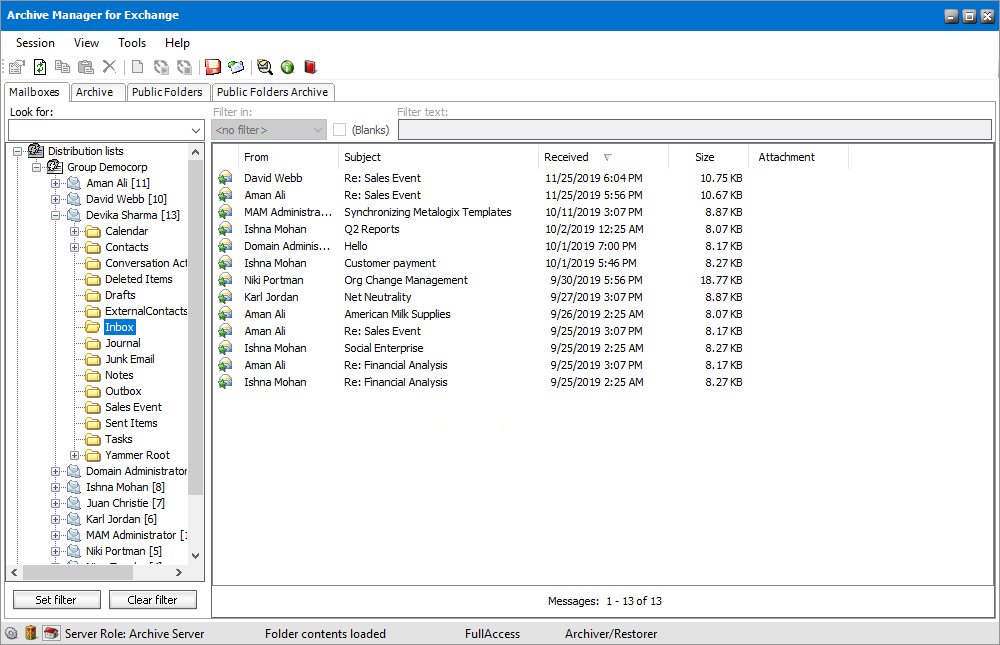
If the average set of email items per user is less that 1000, you may choose to deactivate this feature. The navigation aids will not be displayed at the bottom of the list as shown below.
Paging is activated by default and we recommend that you should keep paging activated.
Manager view
Manager view is an important part of Archive Manager for Exchange. In this view you may define the type of jobs used for automated archiving; global parameters; you may set automated email archiving not only for groups but for individual users (mailboxes) as well, etc. All such settings can be specified on the following tabs: Groups, Settings, Public folders, Jobs, Retention and Locations.
Automated archiving is done via jobs. You, therefore, first need to define jobs (see Jobs tab ). With jobs, archiving is done in the background with predefined settings. We will get to that later. Let us now describe what the above-mentioned tabs are used for.
Groups tab
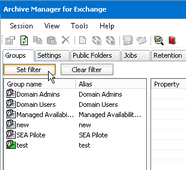
By clicking on the Groups tab a list of all synchronized groups will be displayed in the left pane. At times when you only want to display some of the groups, it is good to use a filter, especially when the list of synchronized groups is too long.
On the Groups tab you may set your own archiving criteria for each group. Double-click the desired group to open its Properties window. Then, in the Properties window, set your criteria for archiving that specific group on its General, Scheduler, Folders, Classes and Script tabs. (See the section Setting criteria for group archiving.)
Let us first describe how to display only desired groups.
How to set a filter to display only desired groups
On the Groups tab you may have a large number of groups displayed. To display only the desired ones, use filters while specifying multiple logical conditions.
To create a filter, follow these steps:
1.In Manager view on the Groups tab, click on the Set filter button. The Filter window opens.
2.Select any or none of the following: RDN, ALIAS, DISPLAYNAME, or EMAILADDRESS in the first dropdown menu; then select any or none of the following: =, STARTSWITH, ENDSWITH, or CONTAINS in the second dropdown menu; and then enter text in the text box next to the Add button. Then click Add.
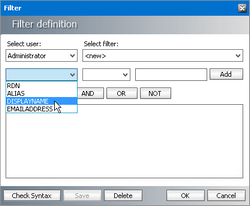
EXAMPLE: If you select DISPLAYNAME in the first drop-down menu; CONTAINS in the second dropdown menu; and if you enter act in the third dropdown menu located next to the Add button, then you have created the following filter: DISPLAYNAME CONTAINS act. With this filter all groups with DISPLAYNAME containing act will be displayed on the Groups tab.
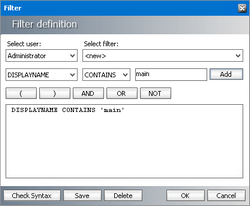
By clicking the Add button the filter will be displayed in the text box below, as seen on the following figure.
You can even check the syntax by clicking on the Check Syntax button.
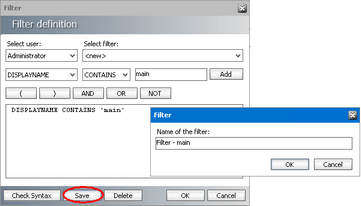
3.Click Save.
4.If the filter you have created is a new one then, upon clicking on the Save button, another dialog window opens where you can enter the name in the Name of the filter text box, e.g. Filter act. Confirm by clicking OK. A filtered list of groups will be displayed on the Groups tab. (i.e. groups whose DISPLAYNAME contains act)
The figure below shows only those groups whose DISPLAYNAME contains act (Filter act from the above mentioned example).
|
|
NOTE: Instead of creating a filter you may want to use someone elses. In that case, upon clicking on the Set filter button select the desired name in the Select user drop-down menu and the desired filter in the Select filter drop-down menu. The selected filter will be displayed in the text box below. Confirm by clicking OK in the Filter window. |
