Setup
This topic describes how to set up the Power 365 Domain Move Project, how to deploy the Directory Sync Agent and how to configure the Directory Sync Integration.
Power365
This section explains how to add a Microsoft 365 tenant and configure a Migration project using Power365. During project setup an Office 365 Global Administrator account is initially required to add each tenant to the project.
Setting up the Domain Move Project
Follow these steps to setup the Domain Move Project.
-
Log in to Power365.
-
Once the Binary Tree Power 365 module is loaded, click on the Tenant to Tenant icon in the main dash view.
-
Click the New Project button and bring up the project setup wizard
-
Provide a name and description for the project and click Next
-
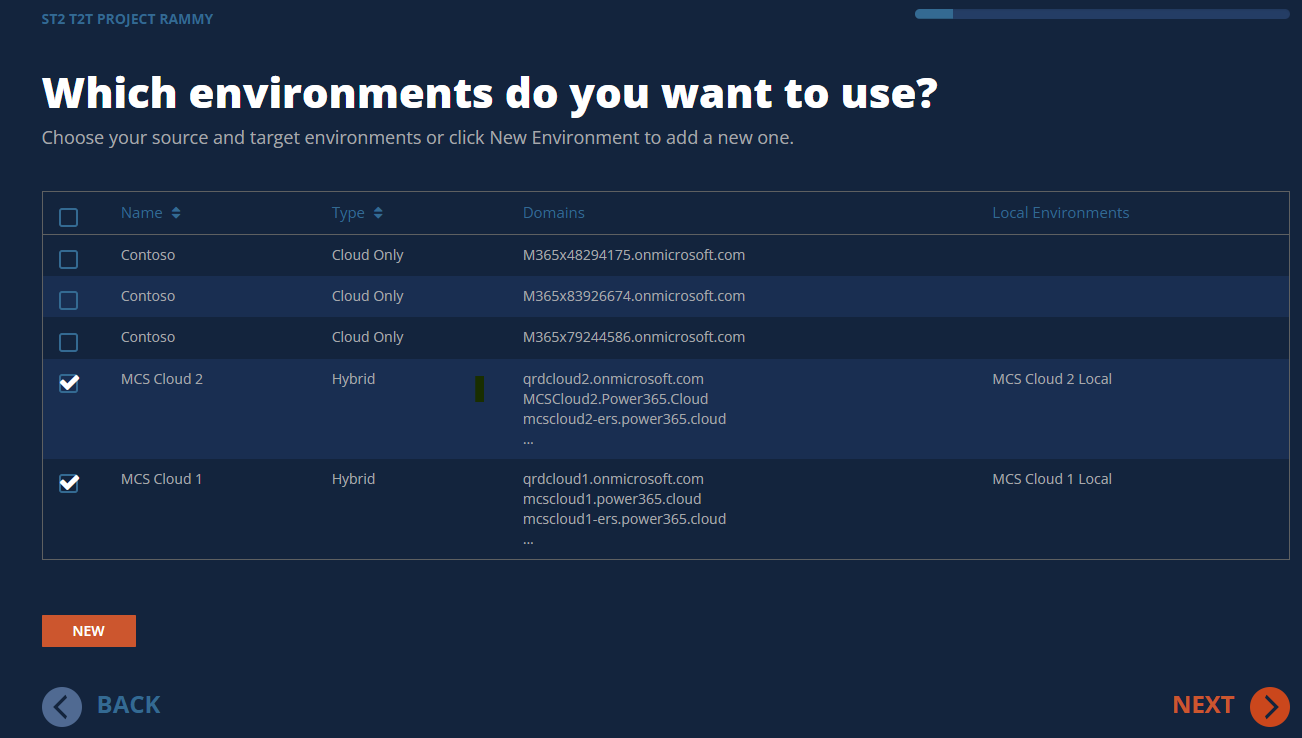
Click on the New button to create a new environment or choose any existing environments from the list. Click Next once you have at least two environments selected.
-
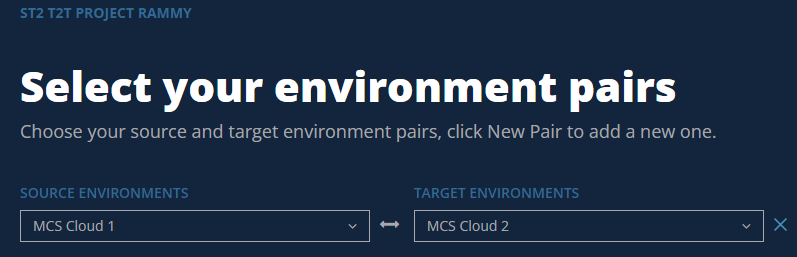
Choose the source and target environments from the dropdown menu and click Next.
-
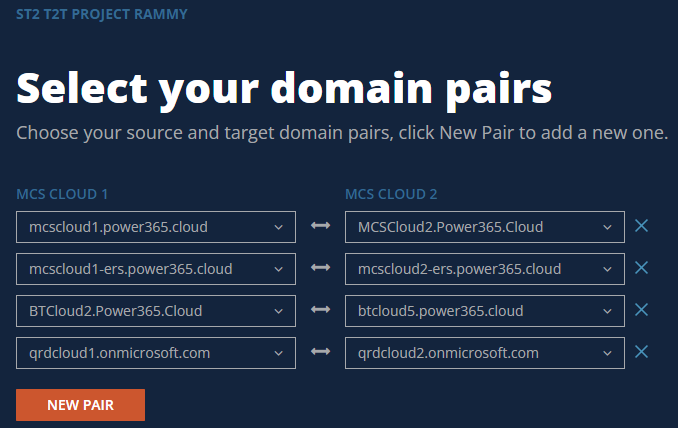
Configure the domain mapping for your project and click Next.
Important Tip: Domain Mapping will be used to match objects and allows Power 365 to add the source domain to all matched target objects during the domain move.
-
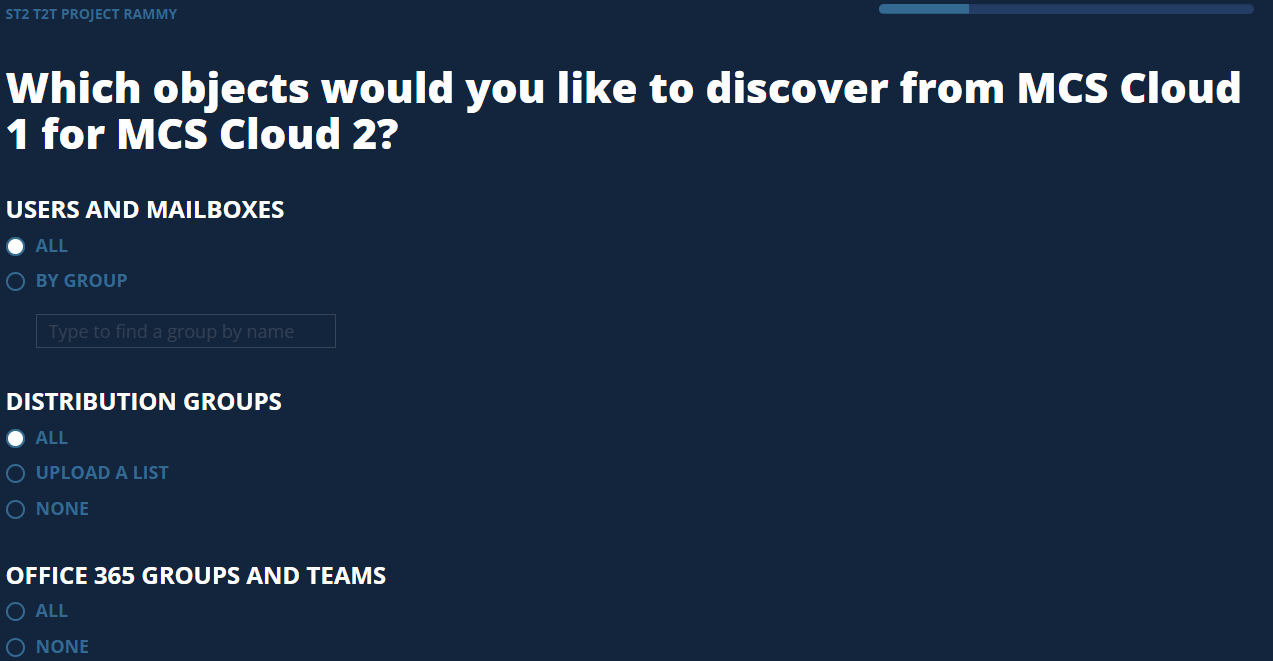
Choose which objects would you like to discover from source and target environment, click Next.
-
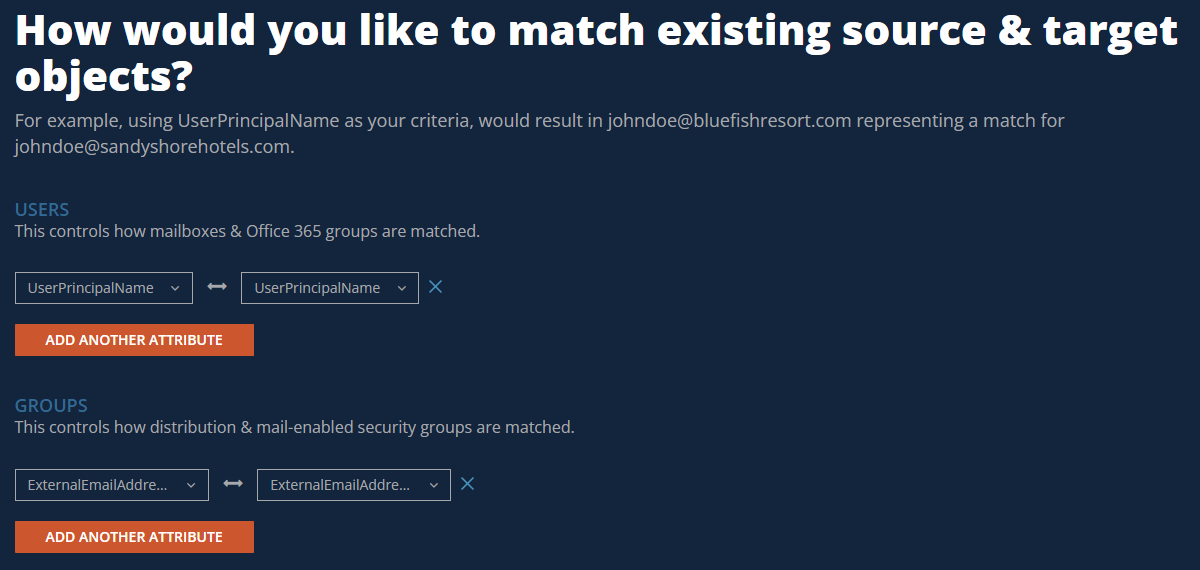
Configure the attributes to use to match users and groups. Once complete, click Next.
-
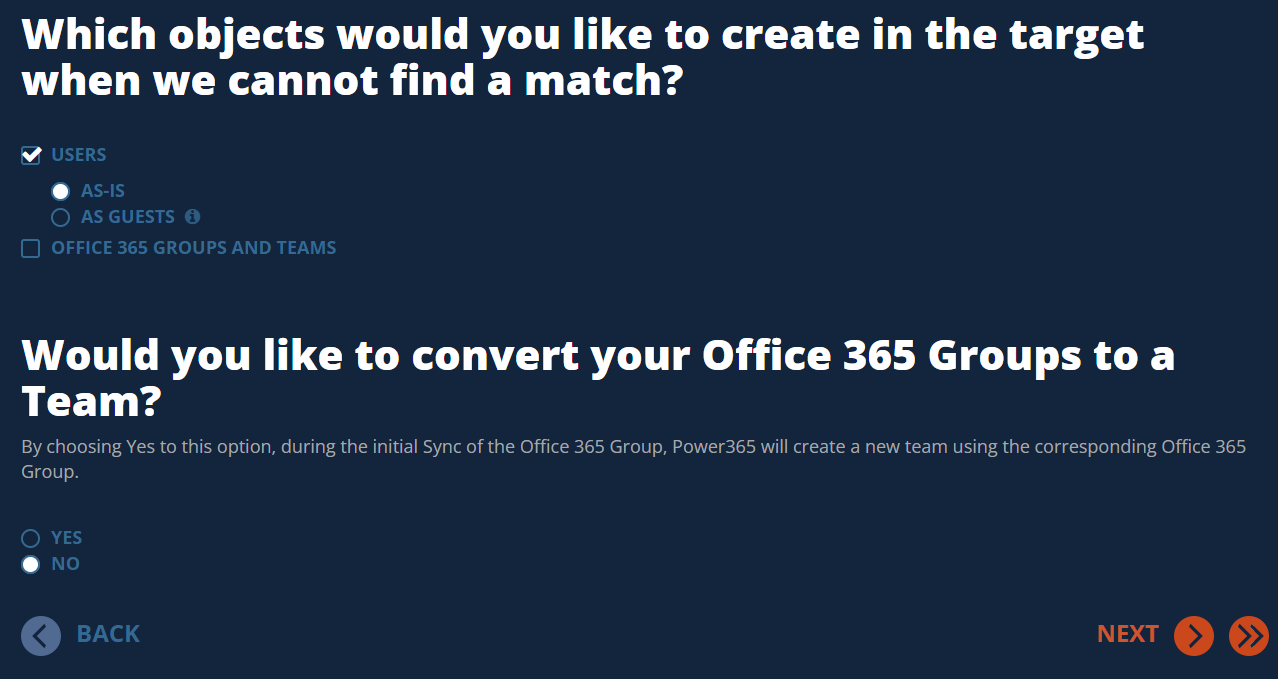
Select type of objects you would like to create in the target when we cannot find a match and also choose if you would like to convert your Office 365 Groups to a Team.
-
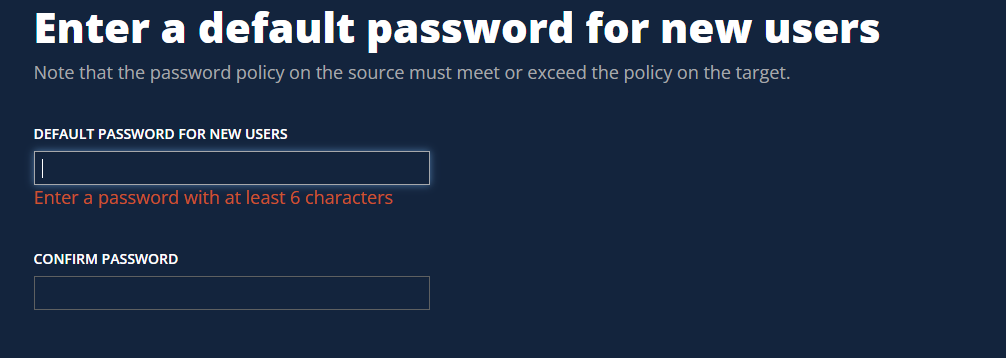
Enter a Default password for the new users.
-
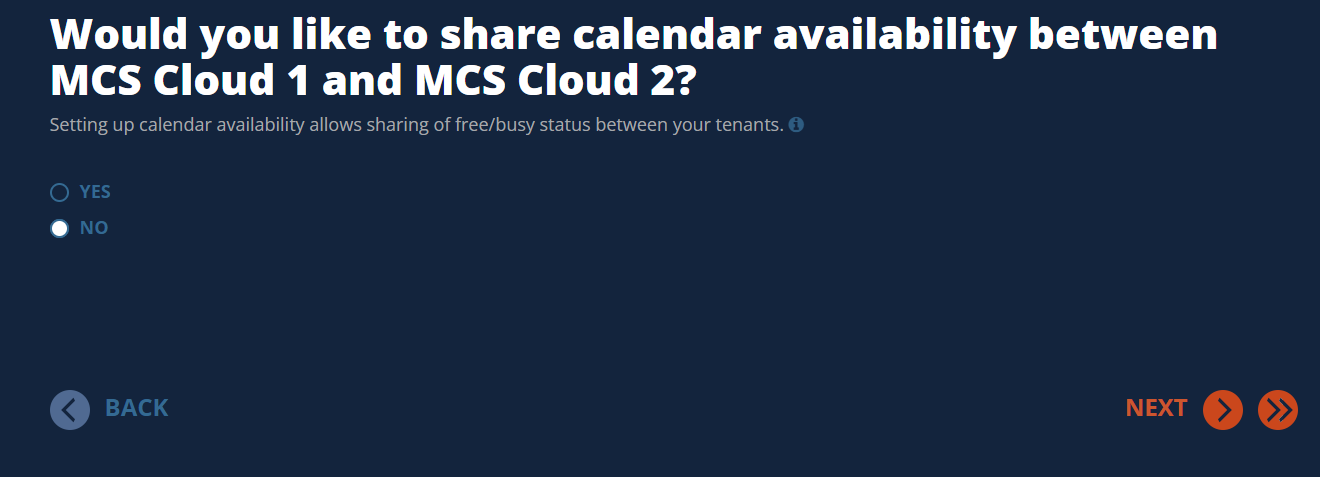
Verify if you would like to share calendar availability between source and target?
-
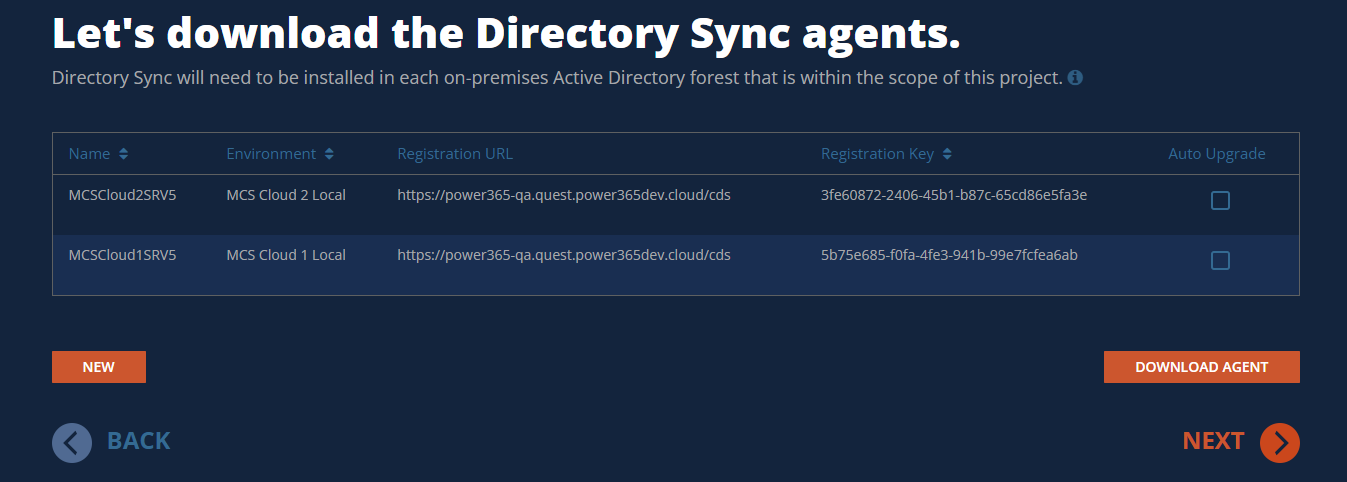
Copy the Directory Sync agent Registration URL and Registration Key and click Next. NOTE: this information can be obtained again after the project is configured.
-
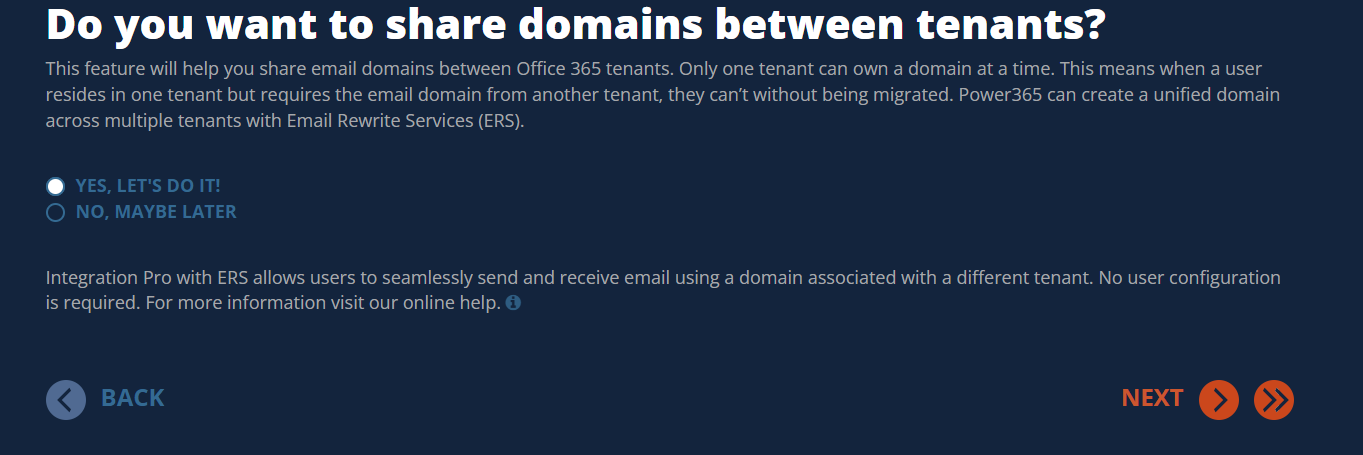
Verify if you would like to share domains betweens tenants.
-
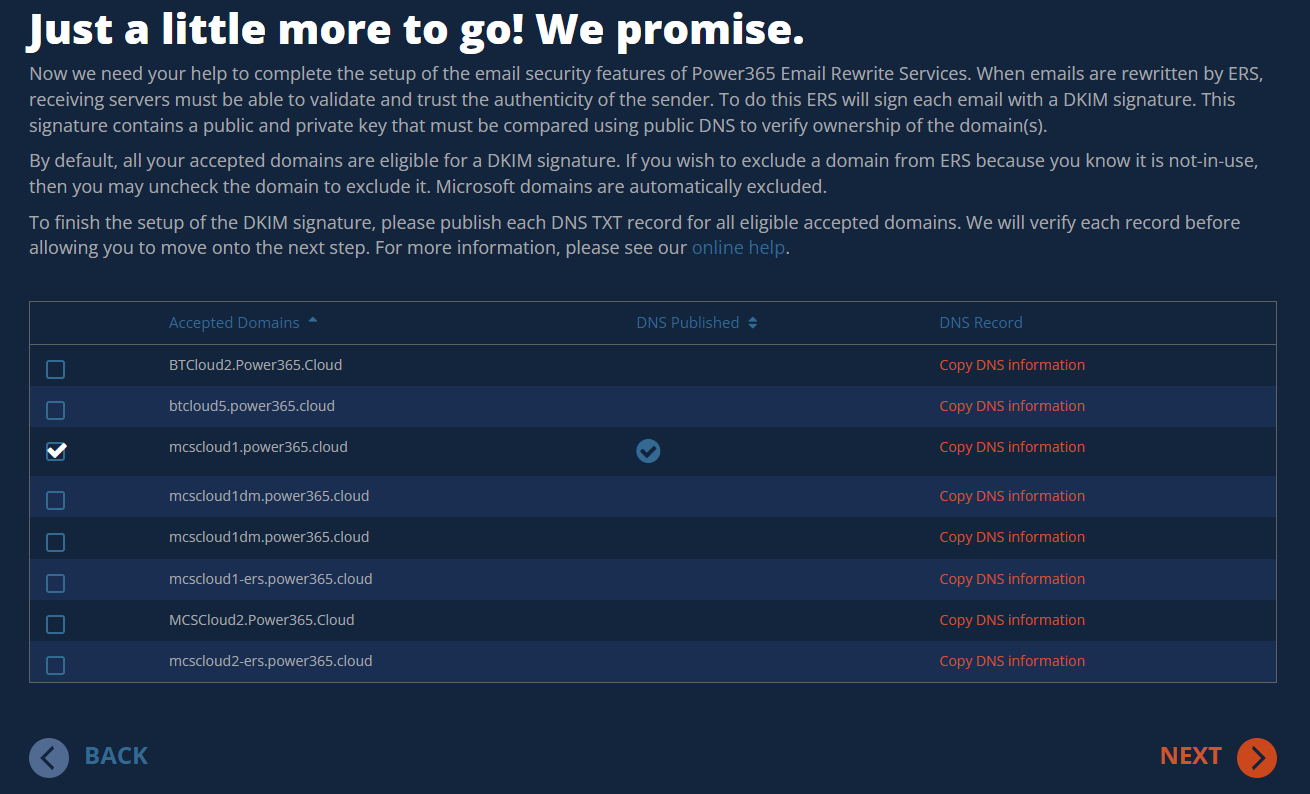
Publish DNS TXT records to sign each email with DKIM signature.
-
Upload a SSL Certificate for each environment. Power365 will ensure mail delivered during a domain move is always encrypted, secure and private by using this SSL Certificate. Click Next once the certificates are uploaded.
-
Review the project configuration settings and click Next
-
Enter an email address and click on Start Discovery to finish the project setup

Configure Directory Sync Agents
This section provides a step-by-step guide on how to deploy and configure the Directory Sync Agents.
-
Log in to Power365.
-
Select Tenant to Tenant from maid dashboard menu.
-
Select the Domain Move project previously configured.
-
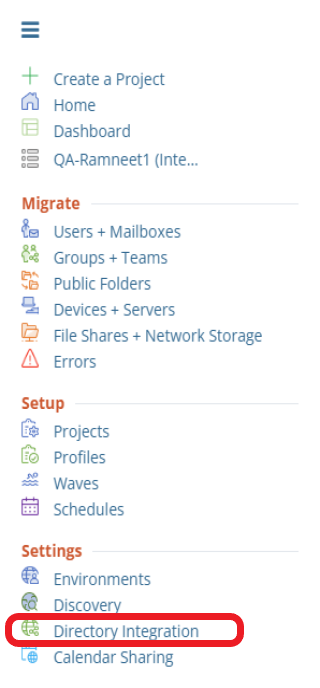
Click on Directory Integration link via the hamburger menu.
-
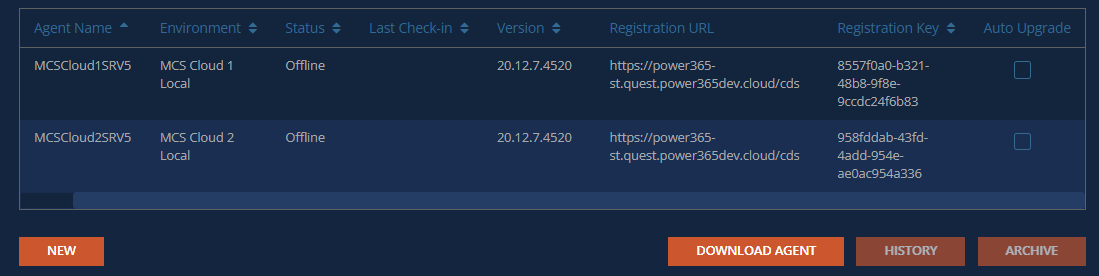
Download the Directory Sync Agent.
-
Copy the agent file to a dedicated directory sync server for the source tenant and run the installer.
-
Click Next when the installer loads.
-
Accept the License agreement, Click Next.
-
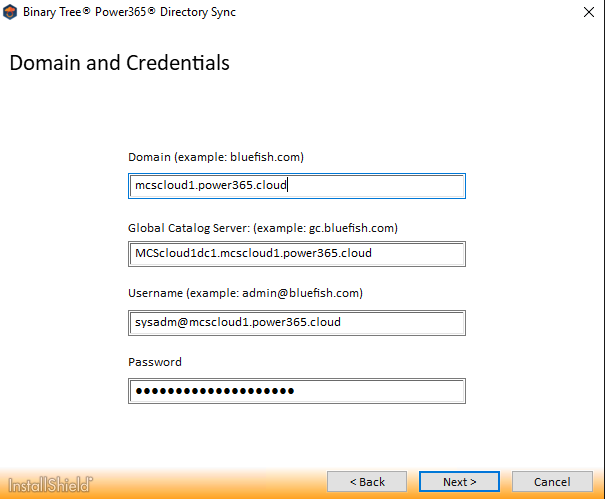
Enter the domain, GC, and credential for the service account, click Next.
-
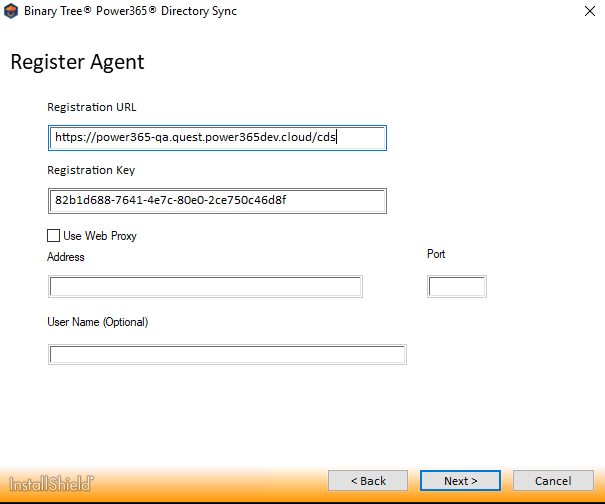
Enter the Registration URL and Registration Key for the agent associated with the source tenant, click Next.
-
Select Run as System Account option, click Next.
-
Skip the SID History Migration setting and Click Next.
-
Allow the agent to be installed and close the installer.
-
Repeat Steps 1-13 for the target tenant Directory Sync agent.
Configure Directory Integration
This section provides a step-by-step guide on how to deploy and configure the Directory Integration for Domain Move Project.
-
Log in to Power365.
-
Once the Binary Tree Power 365 module is loaded, click on the Tenant to Tenant icon in the main dash view.
-
Select the Domain Move project previously configured.
-
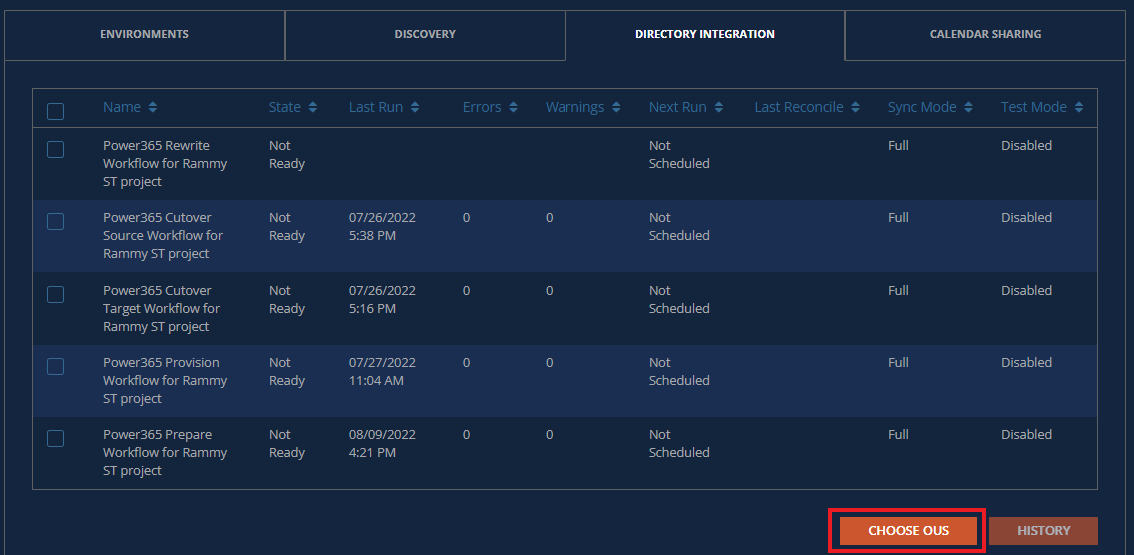
Click on Directory Integration link via the hamburger menu.
-
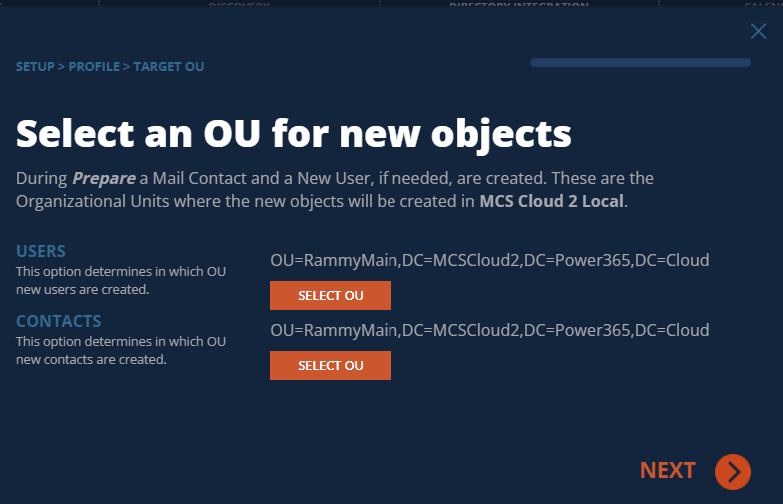
Click Choose OUs to finish the On-Prem Active Directory integration.
-
In the pop-up window, click the Select OU button and choose an OU for the Users and Contacts in the target Active Directory. Click Next and choose the OU for the source Active Directory. Click Finish to close the pop-up window.
Validating Object Matches
This section provides a step-by-step guide on how to validate object matching.
-
Log in to Power365.
-
Select Tenant to Tenant from main dashboard.
-
Select the Domain Move project previously configured.
-
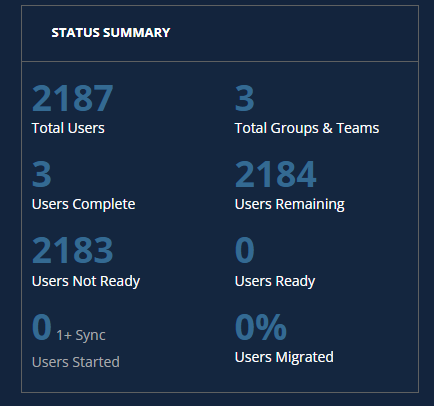
From the Domain Move Project dashboard, verify the Users, Groups and Domain Matching information:
-
Click on the total users link to see all Users, then click on Filter and select the Matched checkbox.
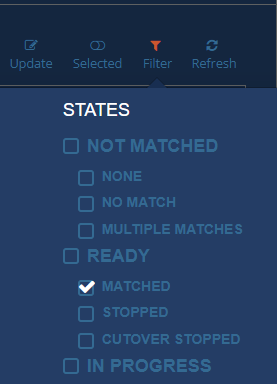
-
Validate that the users are correctly matched, as shown below.
-

-
Repeat step 10 - 12 for Groups.
Moving a Domain
This section explains how to move a domain between two Microsoft tenants using Power365. Be sure to review the frequently asked questions in the FAQ & Known Limitations section.
Start the Domain Cutover (Step 1)
-
Log in to Power365.
-
Select Tenant to Tenant.
-
Select the Domain Move project previously configured.
-
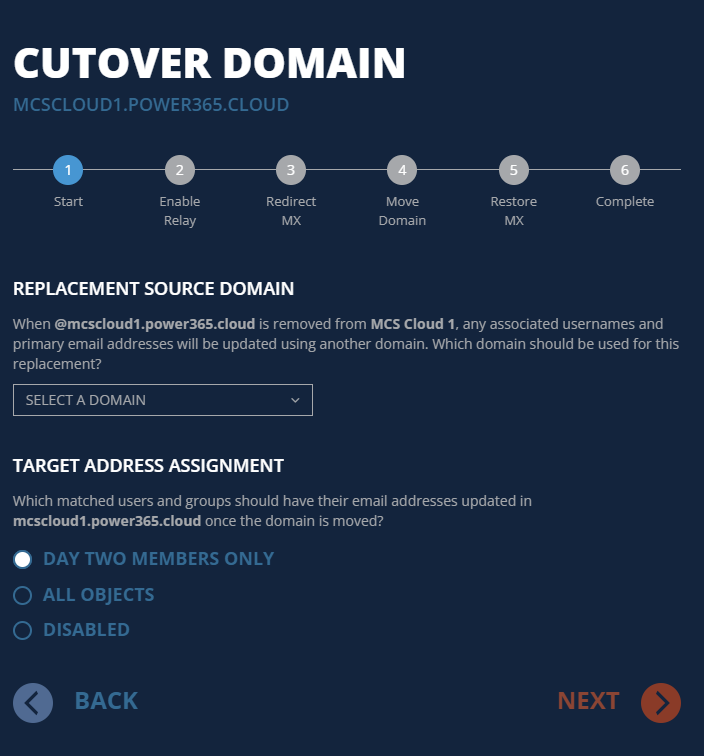
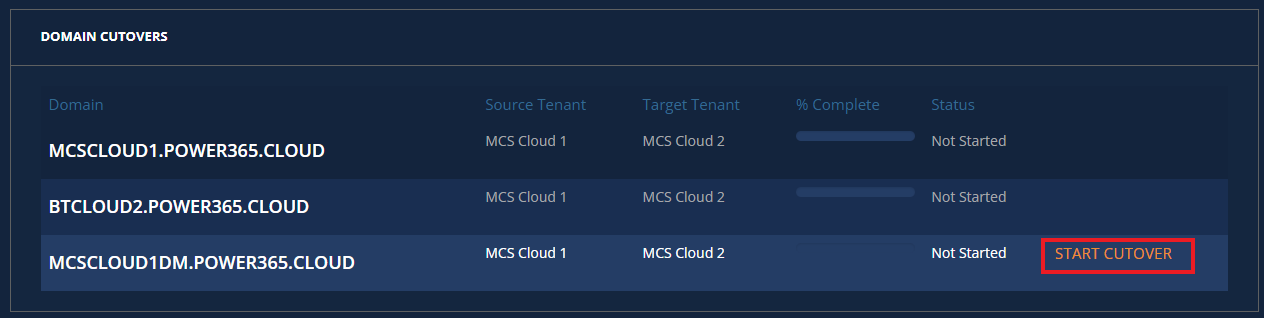
Select the Domain from the Domain Cutover Dashboard and click on Start Cutover.
-
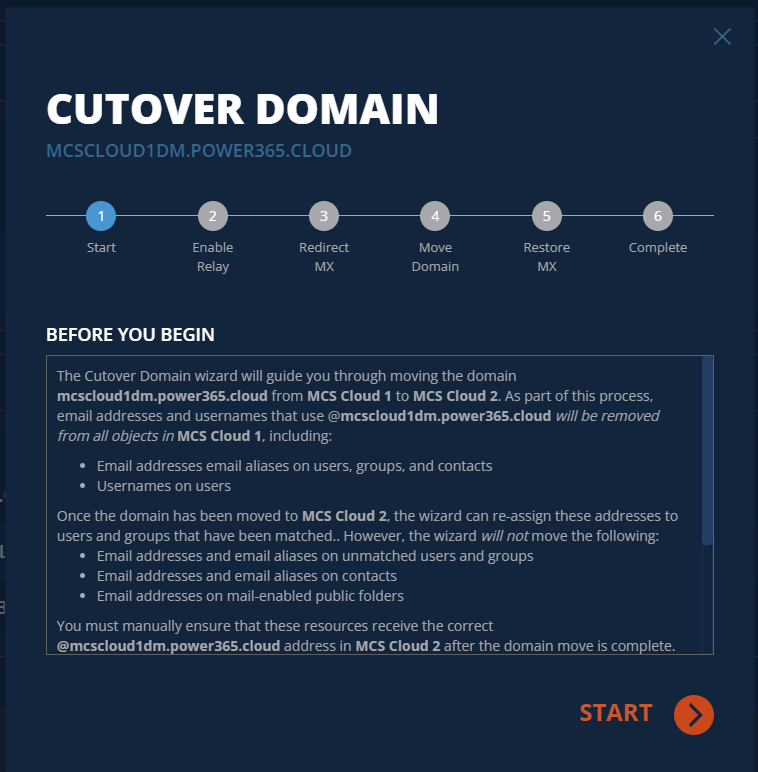
Review the Before You Begin Guide in the pop-up window, and once finished click Start.
-
Review the Warning messages regarding unmatched objects and Click Next.
-
Select a replacement domain from the dropdown menu and then choose Target Address Assignment from the list of options below and click Next.
-
Day Two Members Only – Domain will be added as the primary email address to day two members and will replace the existing primary email address from objects.
-
All Objects – Domain will be added to all the objects as a primary email address for objects.
-
Disabled – Domain will not be added for matched objects
-