Setup
Workflows
What is a Workflow?
A workflow is a configurable series of steps that provides an easy automation framework to connect and manage Directory object synchronization. Activities such as creating, updating and deleting objects along with property/attribute synchronization and transformation. In addition, workflows may also include a PowerShell script to be executed based on the workflow rules. Providing greater flexibility and extensibility to the workflow automation.
Where do I manage Workflows?
To manage workflows, simply open the left navigation menu and click Workflows, located under Setup, see figure 1.

Figure 1: Directory Sync Setup and Settings Menu
What should be entered as the Workflow Name?
You can name your workflow anything you'd like but remember that you may be referencing the same environment in multiple workflows. We suggest a name that generally describes the flow of objects. Then use the description field for the distinguishing characteristics. After this step, the wizard will guide you through all the necessary components that will make up your workflow.
What should be selected for Workflow Type?
The workflow type choice determines which default set of workflow steps that the wizard will guide you through. No matter what choice you make here, you can always customize your workflow steps at any time, so if you aren't sure, start with a one-way sync. Once you have learned what settings work best for a particular project, you may want to enter those settings in an XML file and import it here so that you can easily recreate the steps for similar workflows. You can download the sample file and then customize to your needs, then import it.
What are the steps to create a Workflow?
When you create a new workflow, the wizard will ask you to choose a type of workflow. It will then prepopulate a workflow for you with the appropriate steps. You can modify this, or, start from scratch. We will start from scratch, to examine the possible steps that you will need for any workflow.
- First is Read From. Here is where you will choose the environments that have the objects that you would like to use for matching and mapping, and ultimately for possible migration to a target environment. If you plan a many to one migration, you would choose several sources here. You have to have at least one environment to read from in any workflow. One Read From step can include several sources, so you don’t need a separate read from step for each one.
Match objects is next. Here is where you choose the environments to compare, AND, the criteria that Power365 Directory Sync will use to decide if an object in one environment is the same object as found in another environment, which we call a match. If you don’t read from an environment, you cant choose it here.
Important: Objects created by Directory Sync will not be matched until they are read and matched by running the Read and Match workflow task.
- The Stage Data step is required next. Stage Data is where you customize your workflow action. You will be asked to choose a template. A template contains specifc preferences that you can reuse, such as password options, and attribute mappings. You will choose your source and target environment pairs here. And again, you will only be able to choose those environments that you have read from. You will be able to choose your source OUs and even set up some OU filters if you want to narrow your scope.
- And finally, you need to include at least one Write To environment. After data has been matched, mapped and filtered, what is your target, where do you want to place the new objects, and/or sync objects that were considered a match?
How is a Workflow scheduled?
You can run your workflow manually or choose to run at specific time intervals. Or choose a time of day. The minimum time interval is 15 minutes. No matter what you choose as part of the wizard, you can always trigger a manual run of a workflow from the welcome screen. You can access the welcome screen at any time by clicking the Power365 Directory Sync logo at the top left.
The set interval can be changed on the Discover tab of the Local Environment settings.
Can objects be deleted?
A Delete Objects step is also available. If an object is removed from scope and/or deleted from the Source, any matching object on the Target will be deleted. To configure this step, you must enter Source/Target endpoint pairs and a threshold (the max number of objects to delete per pair).
Can a PowerShell script be run?
An optional additional step would be the run PowerShell script step, in which you can choose a PowerShell script that will run each time the workflow is run.
Additional Information
Templates
What is a template?
Templates contain common mappings and settings used to sync Users, Contacts, Devices, Groups, Office 365 Groups and Microsoft Teams. A template can then be applied to any workflow with a Stage Data step.
Where do I manage templates?
To manage templates, simply open the left navigation menu and click Templates, located under Setup, see figure 1.
Figure 1: Directory Sync Setup and Settings Menu
How do I configure the template to update target objects if they are already mailbox enabled?
You can configure Directory Sync to update mailbox enabled target objects via Templates under Objects and General tab. You should also review the mapping configuration to ensure mail attributes mappings are configured correctly per your project's need to avoid unwanted mail disruption.
What do mappings do?
A mapping entry defines a relationship between an attribute in the source, and an attribute in the target. It tells Power365 Directory Sync where to place the value from a source attribute, and how to modify it if necessary.
Normally this is a one-to-one relationship, for example the value found in the employeeID attribute in the source environment will be written to the employeeID attribute in the target.
Note: By default, msExchMailboxGUID and msExchArchiveGUID are not included in the default mapping template, customer may add them to the template if they wish to sync these attributes.
How do you change a mapping?
You can modify this mapping by double-clicking on it.
For example, suppose that this project was an acquisition, where the target environment company acquired the source. And in the source company, they use the employee ID field as a unique identifier, but in the target company they user employee number instead of employee ID. The first thing to do would be to remove the employee ID attribute entry as we don’t want that source value to be written as is.
Then, we would modify the employee number mapping, so that source will be the employeeID, and it would be written to employee number.
You can hold down your control key and select one or more mappings to remove if you don't want them. More options can be found under the advanced button.
When importing the mappings file, can the column order be changed?
If you choose to export and edit the mappings file and then import the file, the columns must remain in the same order or no mappings will be imported.
Additional Information
Agents
What is the Power365 Directory Sync agent?
The Power365 Directory Sync agent is the key component that communicates between a local Active Directory environment and the Power365 Directory Sync service.
Where do you install the agent?
The agent must be installed in every forest that you plan to include as a Power365 Directory Sync environment. We suggest that you create a virtual machine exclusively for this purpose. Review the Power365 Directory Sync Requirements for the minimal hardware and software requirements.

How do I download and install the agent?
First, choose the environment that the agent will be associated with.
You will be able to download the latest version of the agent from the Power365 Directory Sync agent screen. Copy the URL and the access key that will be needed during the install of the agent. The downloadable executable is the same for all projects, it is the Registration URL and Registration Key that makes the agent unique when it is installed.
To install of the agent enter credentials that have read or read\write access to the domain, depending on the direction of synchronization.
Copy and paste the information from the Power365 Directory Sync agent screen.
No further action is needed on the workstation. A look at services confirms that the Power365 Directory Sync agent is running.
A list of agents appears on summary screen, including status information as well as the registration URL and access keys should you need them again in the future.
Where do I manage agents?
To manage agents, simply open the left navigation menu and click Agents, located under Setup, see figure 1.
Figure 1: Directory Sync Setup and Settings Menu
How do I manage the agents?
On the Agents page, you can check the current status of your current agents or add new ones. Select an agent for additional options. You have the option to copy the Registration URL or the Registration Key if you need to reinstall the agent for any reason. The History button will give you details on the run history. When the agent is updated, any agent using the old version will offer you the upgrade option so that you can update your current agent installation.
Do I need to configure a Local Directory Sync agent if my tenant is a hybrid with local Active Directory attached?
A Local Directory Sync agent is only required when working with Hybrid MailUsers (a mailuser object synced with a local active directory object). A Directory Sync agent is used to configure the mail-forwarding rule on the local AD object when working with Hybrid MailUsers. A Directory Sync agent is not required when working with Mailbox and Cloud Only Objects as mail-forwarding rules are configured via EXO PowerShell.
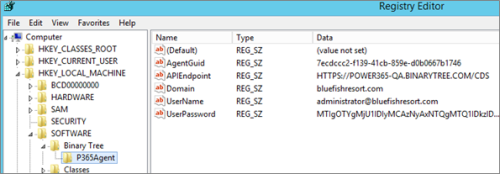
How do I uninstall an agent?
If you need to uninstall an agent from any machine, in order to reinstall on the same machine, you must first delete the registry folder located at HKEY_LOCAL_MACHINE> SOFTWARE> Binary Tree> P365Agent and then uninstall.
Afterwards, simply create a new agent (with a new access key) under Agents managements from the left navigation menu before re-installing on the same machine.