
Section 6. Rooms and Resources Database Migration
The Rooms and Resources database consists of multiple calendars. You cannot migrate all Rooms and Resources at once because multi-calendar databases are not supported in Microsoft Exchange. For this reason, you need to import each room and resource from this database separately into the server.
The Rooms and Resource Import process will create individual nsf files for the migration of the specific calendar data for the entry to be migrated. The location of these nsf files can be configured on the Settings – Rooms & Resources tab.
|
|
The Excel import process cannot be used for Rooms and Resources because there is additional processing required to extract the specific calendar information for each room or resource from the Domino reservation application. |
|
|
The import and creation of the room or resource .nsf files with the extraction of the calendar data is a point-in-time process and will not automatically pick up changes to bookings after the import is completed. The items to be migrated should be imported as close to the migration time as possible. |

The Rooms and Resources database can be migrated either to a .pst file or to the Exchange server. Migrating the Rooms and Resources database to a .pst file is considered an easier method as it doesn’t require manually matching or resolving the database to the Exchange server.
In this section, you will learn to prepare the Rooms & Resources database for migration and migrate rooms and resources to a .pst file as well as to the Exchange server.
|
|
Irrespective of which method is employed to migrate the Rooms & Resources database, the preparation steps remain common to both the methods. |
6.1 Preparing for Rooms and Resource Migration
To prepare for Rooms and Resources migration:
-
Expand the Rooms & Resources Migration | Preparation | Import and Copy view in the Navigation Pane:

-
Click the Import Rooms & Resources button in the Data Pane:
Source Count indicates the number of resources that might be necessary to migrate.
-
The Select Resource Type to Import from NAB dialog box appears; Room is selected by default; click OK:
-
The Rooms dialog box appears; select a room and click OK:
Rooms Dialog Box
-
A message box appears displaying the rooms you selected in the previous step; click OK to continue
-
A confirmation box appears; click OK
The Data Pane displays the rooms that are imported:
-
Click the Import Rooms & Resources button, select Resource and click OK to import from NAB
-
The Resources dialog box appears. Select a room and click OK
Resources Dialog Box
-
A message box appears displaying the resources you selected in the previous step; click OK to continue
-
A confirmation box appears; click OK
-
The Data Pane displays the resources that are imported:


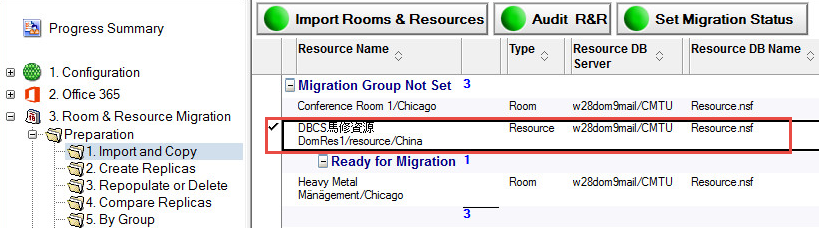
Before moving to the next step, if you need to set or clear migration statuses, select users in the Data Pane and then click the Set Migration Status button:

The Set Migration Status button allows you to:
-
Assign a migration status to selected rooms and resources
-
Assign a migration group to selected rooms and resources
-
Assign a migration workstation to selected rooms and resources
-
Clear migration status, group, and workstation assigned to selected rooms and resources
-
If you want to set the migration status to Ready to Process, for example, select the Set Migration Status drop-down menu option
-
From the Set Migration Status dialog box, select Ready to Process and click OK:
The Set Migration Status box appears; click Yes to set the status; notice that the selected rooms and resources are now listed under the applied status:
-
Select a room/resource and then click the Set Migration Group drop-down menu option to set the group:


-
Specify the migration group name in the Migration Group dialog box, and click OK:
-
Click Yes to confirm setting the migration group. Notice that the selected rooms and resources are now listed under the newly created group:
-
To set a workstation, select users and then click Set Migration Status | Set Migration Workstation
-
From the Set Migration Workstation dialog box, select a workstation on which to run the selected users’ migrations, and then click OK:
-
A confirmation box appears; click Yes to confirm that you want the selected migration workstation to be set for selected rooms and resources


In the same way, you can clear set migration status, migration group and migration workstation by selecting appropriate options. If you do not set the migration workstation manually, Migrator for Notes will automatically farm the migration job out to the next available worker in the migration farm.
6.2 Rooms and Resources Replicas
Rooms and Resources staging replicas can be created and managed if Replication is required and enabled. Note that Replication must be enabled and configured in the Replica Settings tab of Settings. Replication views do not appear if Replication is disabled.
|
|
|
To manage replication:
-
Expand Preparation and click Create Replicas:
Create Replicas View
-
To create replicas, select one or more entries and click the Create Replicas button; this will create individual replicas; a Quick Push Replication option is also available in this view
-
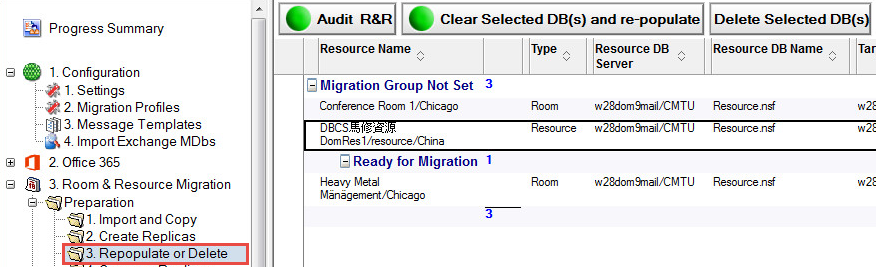
You may clear and repopulate or delete selected databases from the Repopulate or Delete view if necessary
Repopulate or Delete View
-
Click Compare All Replicas. The replica comparison will allow you to compare the Room or Resource and the staging replica.
-
Select an option form the Verify Actions drop-down menu. A Quick Push Replication option is also available. Click the Help button for more information about the replica comparison view.

The following table describes the function of each menu option.
|
Option |
Description |
|
Run Replica Comparison For Selected Users |
Allows you to select entries and compare replicas |
|
Set Verification Flag for Selected Users |
Allows you to select entries and set a verification flag for them |
|
Remove Verification Flag for Selected Users |
Allows you to select entries and remove the verification flag for them |
-
Click Preparation | By Group:
By Group View
-
This view gives you the ability set migration status and migration group
-
During the matching process, user that encounter an error are moved to the Check Errors folder in the Navigation Pane
Check Errors View


|
|
|
6.3 Provisioning Rooms and Resources
Refer to the Provisioning View screenshot below and set up the Office 365 mailboxes in the following steps:
-
Expand Preparation and click Provisioning in the Navigation Pane
-
Select the appropriate resource in the Data Pane
-
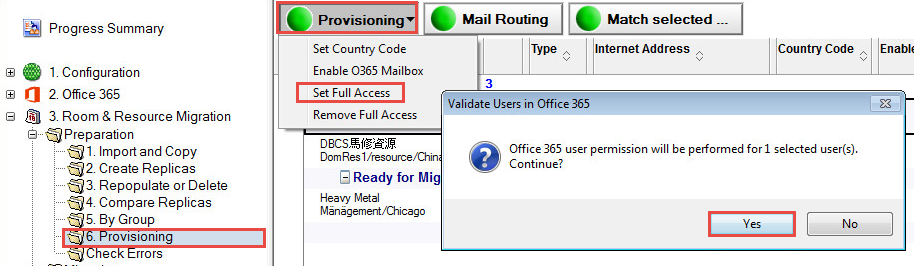
Select one or more entries and then click the Provisioning button and choose Set Country Code from the dropdown menu. Select a country code from the dropdown list in the Set BPOS Location window and click OK. This will add a value to the Country Code column for the selected items:
Provisioning View
-
Next, select one or more entries and then click the Provisioning button and choose Set Full Access from the dropdown menu; click Yes in the Validate Users in Office 365 window and then enter your password in the Windows PowerShell credential request dialog box that appears; click OK:
-
Finally, select one or more entries and then click the Provisioning button and choose Enable O365 Mailbox from the dropdown menu; enter your password in the Administrator: Windows PowerShell window and press Enter:
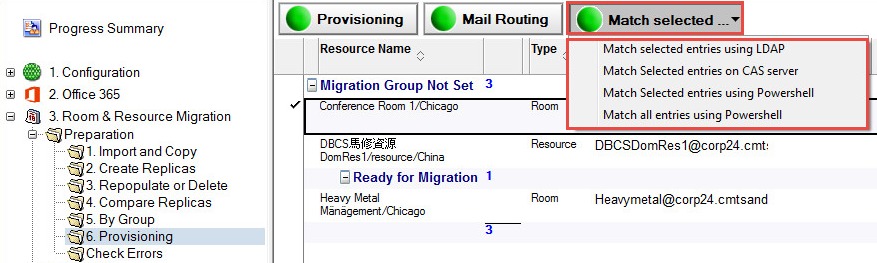
To match the selected Rooms and Resources:


-
While in the Preparation | Provisioning view, click the Match selected… button
-
The drop-down menu displays four menu options:
The following table describes each menu option:
|
Option |
Description |
|
Match selected entries using LDAP |
Matches selected Rooms and Resources with their corresponding entries in AD using LDAP |
|
Match Selected users on CAS server |
Matches selected Rooms and Resources with their corresponding entries in AD on the Exchange CAS server |
|
Match Selected entries using PowerShell |
Matches selected Rooms and Resources using PowerShell |
|
Match all entries using PowerShell |
Matches all Rooms and Resources using PowerShell |
|
|
|
|
|
|
Once the migration is completed, you can update mail routing
-
Click the Mail Routing button to set mail routing to Office 365; the Set Mail Routing from Office 365 Back to Notes option is for rolling back if needed:

6.3 Provisioning Rooms and Resources
6.2 Rooms and Resources Replicas
Rooms and Resources staging replicas can be created and managed if Replication is required and enabled. Note that Replication must be enabled and configured in the Replica Settings tab of Settings. Replication views do not appear if Replication is disabled.
|
|
|
To manage replication:
-
Expand Preparation and click Create Replicas:
-
To create replicas, select one or more entries and click the Create Replicas button; this will create individual replicas; a Quick Push Replication option is also available in this view
-
You may clear and repopulate or delete selected databases from the Repopulate or Delete view if necessary
Repopulate or Delete View
-
Click Compare All Replicas. The replica comparison will allow you to compare the Room or Resource and the staging replica.
-
Select an option form the Verify Actions drop-down menu. A Quick Push Replication option is also available. Click the Help button for more information about the replica comparison view.
The following table describes the function of each menu option.
|
Option |
Description |
|
Run Replica Comparison For Selected Users |
Allows you to select entries and compare replicas |
|
Set Verification Flag for Selected Users |
Allows you to select entries and set a verification flag for them |
|
Remove Verification Flag for Selected Users |
Allows you to select entries and remove the verification flag for them |
-
Click Preparation | By Group:
By Group View
-
This view gives you the ability set migration status and migration group
-
During the matching process, user that encounter an error are moved to the Check Errors folder in the Navigation Pane
Check Errors View
|
|
|
6.3 Provisioning Rooms and Resources
Refer to the Provisioning View screenshot below and set up the Office 365 mailboxes in the following steps:
-
Expand Preparation and click Provisioning in the Navigation Pane
-
Select the appropriate resource in the Data Pane
-
Select one or more entries and then click the Provisioning button and choose Set Country Code from the dropdown menu. Select a country code from the dropdown list in the Set BPOS Location window and click OK. This will add a value to the Country Code column for the selected items:
Provisioning View
-
Next, select one or more entries and then click the Provisioning button and choose Set Full Access from the dropdown menu; click Yes in the Validate Users in Office 365 window and then enter your password in the Windows PowerShell credential request dialog box that appears; click OK:
-
Finally, select one or more entries and then click the Provisioning button and choose Enable O365 Mailbox from the dropdown menu; enter your password in the Administrator: Windows PowerShell window and press Enter:
To match the selected Rooms and Resources:
-
While in the Preparation | Provisioning view, click the Match selected… button
-
The drop-down menu displays four menu options:
The following table describes each menu option:
|
Option |
Description |
|
Match selected entries using LDAP |
Matches selected Rooms and Resources with their corresponding entries in AD using LDAP |
|
Match Selected users on CAS server |
Matches selected Rooms and Resources with their corresponding entries in AD on the Exchange CAS server |
|
Match Selected entries using PowerShell |
Matches selected Rooms and Resources using PowerShell |
|
Match all entries using PowerShell |
Matches all Rooms and Resources using PowerShell |
|
|
|
|
|
|
Once the migration is completed, you can update mail routing
-
Click the Mail Routing button to set mail routing to Office 365; the Set Mail Routing from Office 365 Back to Notes option is for rolling back if needed: