
Add All Names to Translation Table
A Name Translation Table contains email addresses of Notes users and their corresponding SMTP and/or Exchange legacy Distinguished Name (legacyExchangeDN). The translation information contained in the table is used by the Migrator for Notes migration engine to look up every entry in the Domino Directory and convert it to an SMTP style address or Exchange legacyDN. Every email address found in every mail message, calendar entry, contact, or task being migrated is translated to its corresponding SMTP address (Internet address) and/or Exchange legacyDN (if available). This is required for migrated items in Exchange to have the correct email address format so that users can reply to the emails or calendar items in Outlook using the Exchange email address format.
This is required for migrated items in Office 365 to have the correct email address format so that users can reply to the emails or calendar items in Outlook using the Exchange email address format.
For migrations to Exchange mailboxes, the legacyExchangeDN is recommended and does require matching of the entries in the Name Translation table to the mail-enabled user or mailbox-enabled user accounts. For PST only archive migrations where there will not be any data uploaded into Exchange mailboxes, the legacyExchangeDN is not required and the SMTP address can be used for the translation of Notes addresses.
|
|
|

Migrator for Notes will use the Notes Common Name for the translated Display Name. This applies to recipients on migrated messages with the SMTP or legacyExchangeDN applied for the mail routing address in Exchange mailboxes.
Migrator for Notes allows you to enable free/busy information in Outlook after migration because the users in the Name Translation Table are resolved to the legacyExchangeDN instead of the SMTP address. This allows Outlook to utilize the native free/busy functionality on migrated documents.
The name resolution process is used to apply the Exchange legacyDN during the migration of messages to Notes formatted recipients. This results in migrated entries resolving to the user mailbox in Exchange, therefore making correctly-populated free/busy information available after migration.
A typical Exchange legacyDN follows the pattern displayed below:
/o=DomainName/ou=Exchange Administrative Group (FYDIBOHF23SPDLT)/cn=Recipients/cn=LegacyName
Following is an example of a properly resolved Name Translation document:
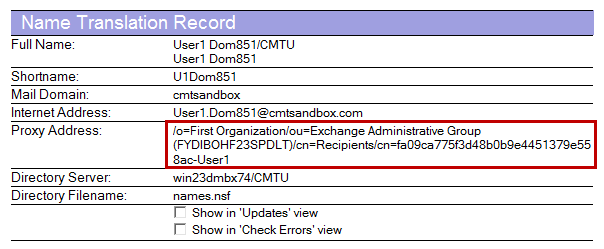
Names Translation Document
-
To create the Name Translation Table from the Domino directory, expand Email Repliability in the Navigation Pane
-
Click the Add Names to Translation Table | Add Names to the Translation Table button:
Add Names to Translation Table Button
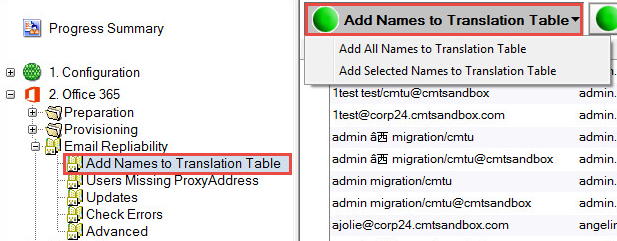
The following table describes each setting in the drop-down menu:
|
Settings |
Description |
|
Add All Names to Translation Table |
Adds all the names in the Domino directory to the Translation Table |
|
Add Selected Names to Translation Table |
Adds only the selected names from the Domino directory to the Translation Table |
|
|
Adding all Domino users’ names to the Translation Table is the recommended method of populating the Name Translation Table. The Translation Table should contain every email address for every user that may have sent an email to any other user. Please note, this is not a list of users to be migrated. It is a list used to translate addresses in migrated messages, calendars, and other migrated documents, so it needs to be as exhaustive as possible. |
|
|
It is recommended to perform regular updates to the Translation Table as new users may be added to the Domino Directory throughout the migration process. |
-
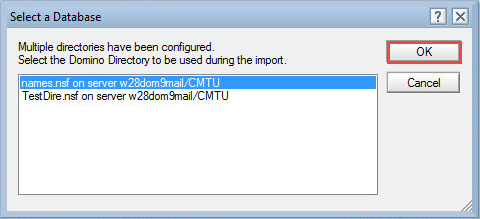
Click Add All Names to Translation Table
-
If more than one Domino directory has been defined, select a directory from the list and click OK:
-
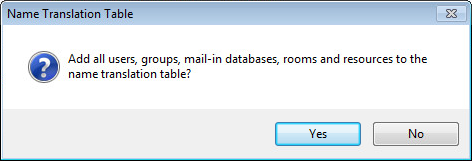
A confirmation box appears. Click Yes to confirm that all entries will be added to the Name Translation Table:
-
After you have selected the entries to add, depending on the number of name entries, this process could take from a few seconds to several minutes; after it’s completed, a confirmation box appears stating that all users have been added to the Translation Table
-
Click OK
-
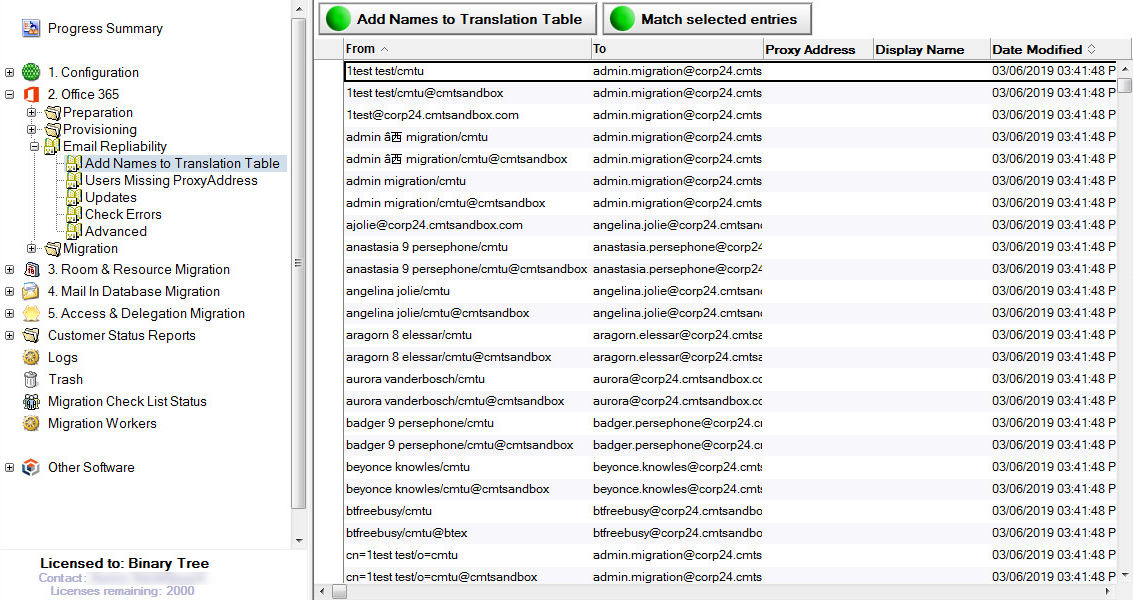
The Data Pane displays that all the names with a Person document found in the Domino directory have been added to the Name Translation Table
-
Notice that each user has multiple entries; these are all the possible addresses that the user is using and a corresponding SMTP address for each of these addresses is provided in the Name Translation Table:
Add Names to Translation Table View
Add Selected Names to Translation Table
-
Click Add Selected Names to Translation Table.
-
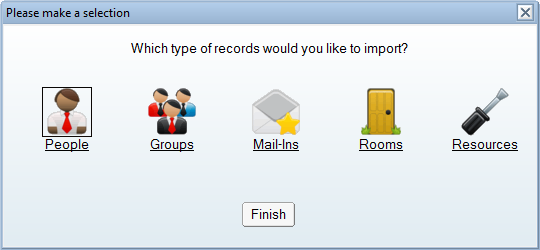
If more than one Domino directory has been defined, the selection dialog box appears with a drop-down list of Domino directories. Select a Domino Directory from the drop-down list, click the type of records to add, and then click Finish:
If a single Domino directory has been defined, the selection dialog box without a drop-down list of Domino directories appears; click the type of records to add and click Finish:
-
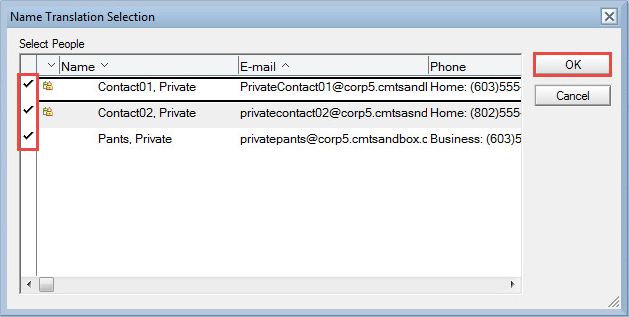
The correct view for the record type selected appears; select the intended records and click OK:
Name Translation Selection Dialog Box
-
A confirmation box appears stating that the selected records have been added to the Translation Table; click OK

|
|
|
Matching Selected Entries
After the Domino objects are added to the translation table from the Domino directory, you need to resolve these Domino entries to their Exchange entries.
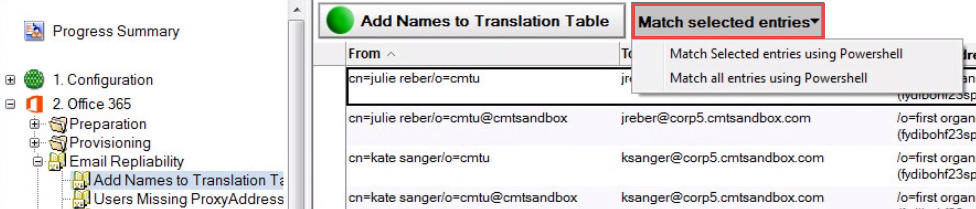
There are several method options for matching entries; click the Match selected entries button:
The following table describes each drop-down menu option:
|
Settings |
Description |
|
Match Selected entries using PowerShell |
Uses PowerShell to resolve selected Domino users listed in the view to Exchange |
|
Match all entries using PowerShell |
Uses PowerShell to resolve all Domino users listed in the view to Exchange |
|
|
PowerShell is required if you are migrating to Office365. The Display Name column in the translation table view within the Migrator for Notes database is a static representation of the displayName attribute in Active Directory and is for reference only. It will not reflect any changes made to the displayName attribute after the translation table has been built. If the PowerShell authentication account is entered and Modern Authentication is enabled for PowerShell processing (Settings | Additional) the matching will use the Email Repliability bulk processing. This will split the matching into the batch size specified and create new PowerShell sessions for each batch. |
Matching Entries using PowerShell
-
Select one or more entries in the Data Pane
-
Click the Match selected entries using PowerShell or Match all entries using PowerShell drop-down menu option
-
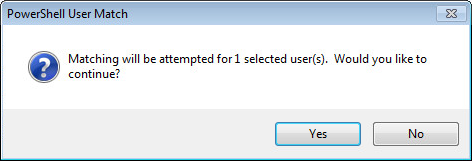
The Powershell User Match confirmation box appears; click Yes:
-
Enter the requested password in the dialog box:
-
The matching completes; click OK:


Updating a Translation Table
Once the Translation Table is created, you can update it whenever there are new entries added or removed from the Domino directory or user accounts are renamed in the Domino Directory.
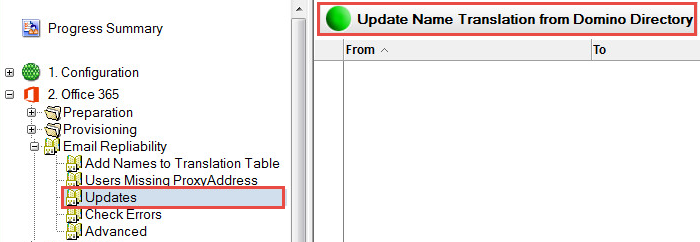
To update the Translation table, click Updates | Update Name Translation from Domino Directory:
Updates View
|
|
|
Checking Errors of a Translation Table
Items that could not be imported will be displayed in the Check Errors view.
-
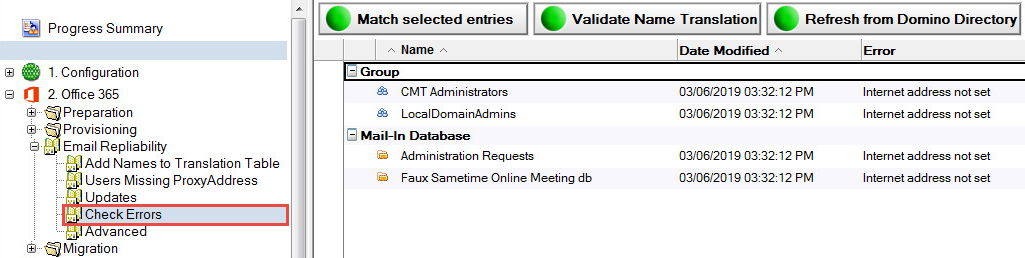
To view translation errors, click Check Errors in the Navigation Pane:
Check Errors View
|
|
It is recommended to check accounts in Domino and verify the corresponding entries in Active Directory. All items to be translated require an Internet Address (SMTP) in Domino, but some items, like Domino system groups, will not be expected to have these and can be safely ignored. If you cannot resolve the error or need assistance determining why an error occurred, contact Product Support. |
Add Selected Names to Translation Table
A Name Translation Table contains email addresses of Notes users and their corresponding SMTP and/or Exchange legacy Distinguished Name (legacyExchangeDN). The translation information contained in the table is used by the Migrator for Notes migration engine to look up every entry in the Domino Directory and convert it to an SMTP style address or Exchange legacyDN. Every email address found in every mail message, calendar entry, contact, or task being migrated is translated to its corresponding SMTP address (Internet address) and/or Exchange legacyDN (if available). This is required for migrated items in Exchange to have the correct email address format so that users can reply to the emails or calendar items in Outlook using the Exchange email address format.
This is required for migrated items in Office 365 to have the correct email address format so that users can reply to the emails or calendar items in Outlook using the Exchange email address format.
For migrations to Exchange mailboxes, the legacyExchangeDN is recommended and does require matching of the entries in the Name Translation table to the mail-enabled user or mailbox-enabled user accounts. For PST only archive migrations where there will not be any data uploaded into Exchange mailboxes, the legacyExchangeDN is not required and the SMTP address can be used for the translation of Notes addresses.
|
|
|
Migrator for Notes will use the Notes Common Name for the translated Display Name. This applies to recipients on migrated messages with the SMTP or legacyExchangeDN applied for the mail routing address in Exchange mailboxes.
Migrator for Notes allows you to enable free/busy information in Outlook after migration because the users in the Name Translation Table are resolved to the legacyExchangeDN instead of the SMTP address. This allows Outlook to utilize the native free/busy functionality on migrated documents.
The name resolution process is used to apply the Exchange legacyDN during the migration of messages to Notes formatted recipients. This results in migrated entries resolving to the user mailbox in Exchange, therefore making correctly-populated free/busy information available after migration.
A typical Exchange legacyDN follows the pattern displayed below:
/o=DomainName/ou=Exchange Administrative Group (FYDIBOHF23SPDLT)/cn=Recipients/cn=LegacyName
Following is an example of a properly resolved Name Translation document:
Names Translation Document
-
To create the Name Translation Table from the Domino directory, expand Email Repliability in the Navigation Pane
-
Click the Add Names to Translation Table | Add Names to the Translation Table button:
Add Names to Translation Table Button
The following table describes each setting in the drop-down menu:
|
Settings |
Description |
|
Add All Names to Translation Table |
Adds all the names in the Domino directory to the Translation Table |
|
Add Selected Names to Translation Table |
Adds only the selected names from the Domino directory to the Translation Table |
|
|
Adding all Domino users’ names to the Translation Table is the recommended method of populating the Name Translation Table. The Translation Table should contain every email address for every user that may have sent an email to any other user. Please note, this is not a list of users to be migrated. It is a list used to translate addresses in migrated messages, calendars, and other migrated documents, so it needs to be as exhaustive as possible. |
|
|
It is recommended to perform regular updates to the Translation Table as new users may be added to the Domino Directory throughout the migration process. |
Add All Names to Translation Table
-
Click Add All Names to Translation Table
-
If more than one Domino directory has been defined, select a directory from the list and click OK:
-
A confirmation box appears. Click Yes to confirm that all entries will be added to the Name Translation Table:
-
After you have selected the entries to add, depending on the number of name entries, this process could take from a few seconds to several minutes; after it’s completed, a confirmation box appears stating that all users have been added to the Translation Table
-
Click OK
-
The Data Pane displays that all the names with a Person document found in the Domino directory have been added to the Name Translation Table
-
Notice that each user has multiple entries; these are all the possible addresses that the user is using and a corresponding SMTP address for each of these addresses is provided in the Name Translation Table:
Add Names to Translation Table View
Add Selected Names to Translation Table
-
Click Add Selected Names to Translation Table.
-
If more than one Domino directory has been defined, the selection dialog box appears with a drop-down list of Domino directories. Select a Domino Directory from the drop-down list, click the type of records to add, and then click Finish:
If a single Domino directory has been defined, the selection dialog box without a drop-down list of Domino directories appears; click the type of records to add and click Finish:
-
The correct view for the record type selected appears; select the intended records and click OK:
Name Translation Selection Dialog Box
-
A confirmation box appears stating that the selected records have been added to the Translation Table; click OK
|
|
|
Matching Selected Entries
After the Domino objects are added to the translation table from the Domino directory, you need to resolve these Domino entries to their Exchange entries.
There are several method options for matching entries; click the Match selected entries button:
The following table describes each drop-down menu option:
|
Settings |
Description |
|
Match Selected entries using PowerShell |
Uses PowerShell to resolve selected Domino users listed in the view to Exchange |
|
Match all entries using PowerShell |
Uses PowerShell to resolve all Domino users listed in the view to Exchange |
|
|
PowerShell is required if you are migrating to Office365. The Display Name column in the translation table view within the Migrator for Notes database is a static representation of the displayName attribute in Active Directory and is for reference only. It will not reflect any changes made to the displayName attribute after the translation table has been built. If the PowerShell authentication account is entered and Modern Authentication is enabled for PowerShell processing (Settings | Additional) the matching will use the Email Repliability bulk processing. This will split the matching into the batch size specified and create new PowerShell sessions for each batch. |
Matching Entries using PowerShell
-
Select one or more entries in the Data Pane
-
Click the Match selected entries using PowerShell or Match all entries using PowerShell drop-down menu option
-
The Powershell User Match confirmation box appears; click Yes:
-
Enter the requested password in the dialog box:
-
The matching completes; click OK:
Updating a Translation Table
Once the Translation Table is created, you can update it whenever there are new entries added or removed from the Domino directory or user accounts are renamed in the Domino Directory.
To update the Translation table, click Updates | Update Name Translation from Domino Directory:
Updates View
|
|
|
Checking Errors of a Translation Table
Items that could not be imported will be displayed in the Check Errors view.
-
To view translation errors, click Check Errors in the Navigation Pane:
Check Errors View
|
|
It is recommended to check accounts in Domino and verify the corresponding entries in Active Directory. All items to be translated require an Internet Address (SMTP) in Domino, but some items, like Domino system groups, will not be expected to have these and can be safely ignored. If you cannot resolve the error or need assistance determining why an error occurred, contact Product Support. |
Matching Selected Entries
A Name Translation Table contains email addresses of Notes users and their corresponding SMTP and/or Exchange legacy Distinguished Name (legacyExchangeDN). The translation information contained in the table is used by the Migrator for Notes migration engine to look up every entry in the Domino Directory and convert it to an SMTP style address or Exchange legacyDN. Every email address found in every mail message, calendar entry, contact, or task being migrated is translated to its corresponding SMTP address (Internet address) and/or Exchange legacyDN (if available). This is required for migrated items in Exchange to have the correct email address format so that users can reply to the emails or calendar items in Outlook using the Exchange email address format.
This is required for migrated items in Office 365 to have the correct email address format so that users can reply to the emails or calendar items in Outlook using the Exchange email address format.
For migrations to Exchange mailboxes, the legacyExchangeDN is recommended and does require matching of the entries in the Name Translation table to the mail-enabled user or mailbox-enabled user accounts. For PST only archive migrations where there will not be any data uploaded into Exchange mailboxes, the legacyExchangeDN is not required and the SMTP address can be used for the translation of Notes addresses.
|
|
|
Migrator for Notes will use the Notes Common Name for the translated Display Name. This applies to recipients on migrated messages with the SMTP or legacyExchangeDN applied for the mail routing address in Exchange mailboxes.
Migrator for Notes allows you to enable free/busy information in Outlook after migration because the users in the Name Translation Table are resolved to the legacyExchangeDN instead of the SMTP address. This allows Outlook to utilize the native free/busy functionality on migrated documents.
The name resolution process is used to apply the Exchange legacyDN during the migration of messages to Notes formatted recipients. This results in migrated entries resolving to the user mailbox in Exchange, therefore making correctly-populated free/busy information available after migration.
A typical Exchange legacyDN follows the pattern displayed below:
/o=DomainName/ou=Exchange Administrative Group (FYDIBOHF23SPDLT)/cn=Recipients/cn=LegacyName
Following is an example of a properly resolved Name Translation document:
Names Translation Document
-
To create the Name Translation Table from the Domino directory, expand Email Repliability in the Navigation Pane
-
Click the Add Names to Translation Table | Add Names to the Translation Table button:
Add Names to Translation Table Button
The following table describes each setting in the drop-down menu:
|
Settings |
Description |
|
Add All Names to Translation Table |
Adds all the names in the Domino directory to the Translation Table |
|
Add Selected Names to Translation Table |
Adds only the selected names from the Domino directory to the Translation Table |
|
|
Adding all Domino users’ names to the Translation Table is the recommended method of populating the Name Translation Table. The Translation Table should contain every email address for every user that may have sent an email to any other user. Please note, this is not a list of users to be migrated. It is a list used to translate addresses in migrated messages, calendars, and other migrated documents, so it needs to be as exhaustive as possible. |
|
|
It is recommended to perform regular updates to the Translation Table as new users may be added to the Domino Directory throughout the migration process. |
Add All Names to Translation Table
-
Click Add All Names to Translation Table
-
If more than one Domino directory has been defined, select a directory from the list and click OK:
-
A confirmation box appears. Click Yes to confirm that all entries will be added to the Name Translation Table:
-
After you have selected the entries to add, depending on the number of name entries, this process could take from a few seconds to several minutes; after it’s completed, a confirmation box appears stating that all users have been added to the Translation Table
-
Click OK
-
The Data Pane displays that all the names with a Person document found in the Domino directory have been added to the Name Translation Table
-
Notice that each user has multiple entries; these are all the possible addresses that the user is using and a corresponding SMTP address for each of these addresses is provided in the Name Translation Table:
Add Names to Translation Table View
Add Selected Names to Translation Table
-
Click Add Selected Names to Translation Table.
-
If more than one Domino directory has been defined, the selection dialog box appears with a drop-down list of Domino directories. Select a Domino Directory from the drop-down list, click the type of records to add, and then click Finish:
If a single Domino directory has been defined, the selection dialog box without a drop-down list of Domino directories appears; click the type of records to add and click Finish:
-
The correct view for the record type selected appears; select the intended records and click OK:
Name Translation Selection Dialog Box
-
A confirmation box appears stating that the selected records have been added to the Translation Table; click OK
|
|
|
After the Domino objects are added to the translation table from the Domino directory, you need to resolve these Domino entries to their Exchange entries.
There are several method options for matching entries; click the Match selected entries button:
The following table describes each drop-down menu option:
|
Settings |
Description |
|
Match Selected entries using PowerShell |
Uses PowerShell to resolve selected Domino users listed in the view to Exchange |
|
Match all entries using PowerShell |
Uses PowerShell to resolve all Domino users listed in the view to Exchange |
|
|
PowerShell is required if you are migrating to Office365. The Display Name column in the translation table view within the Migrator for Notes database is a static representation of the displayName attribute in Active Directory and is for reference only. It will not reflect any changes made to the displayName attribute after the translation table has been built. If the PowerShell authentication account is entered and Modern Authentication is enabled for PowerShell processing (Settings | Additional) the matching will use the Email Repliability bulk processing. This will split the matching into the batch size specified and create new PowerShell sessions for each batch. |
Matching Entries using PowerShell
-
Select one or more entries in the Data Pane
-
Click the Match selected entries using PowerShell or Match all entries using PowerShell drop-down menu option
-
The Powershell User Match confirmation box appears; click Yes:
-
Enter the requested password in the dialog box:
-
The matching completes; click OK:
Updating a Translation Table
Once the Translation Table is created, you can update it whenever there are new entries added or removed from the Domino directory or user accounts are renamed in the Domino Directory.
To update the Translation table, click Updates | Update Name Translation from Domino Directory:
Updates View
|
|
|
Checking Errors of a Translation Table
Items that could not be imported will be displayed in the Check Errors view.
-
To view translation errors, click Check Errors in the Navigation Pane:
Check Errors View
|
|
It is recommended to check accounts in Domino and verify the corresponding entries in Active Directory. All items to be translated require an Internet Address (SMTP) in Domino, but some items, like Domino system groups, will not be expected to have these and can be safely ignored. If you cannot resolve the error or need assistance determining why an error occurred, contact Product Support. |
Matching Entries using PowerShell
A Name Translation Table contains email addresses of Notes users and their corresponding SMTP and/or Exchange legacy Distinguished Name (legacyExchangeDN). The translation information contained in the table is used by the Migrator for Notes migration engine to look up every entry in the Domino Directory and convert it to an SMTP style address or Exchange legacyDN. Every email address found in every mail message, calendar entry, contact, or task being migrated is translated to its corresponding SMTP address (Internet address) and/or Exchange legacyDN (if available). This is required for migrated items in Exchange to have the correct email address format so that users can reply to the emails or calendar items in Outlook using the Exchange email address format.
This is required for migrated items in Office 365 to have the correct email address format so that users can reply to the emails or calendar items in Outlook using the Exchange email address format.
For migrations to Exchange mailboxes, the legacyExchangeDN is recommended and does require matching of the entries in the Name Translation table to the mail-enabled user or mailbox-enabled user accounts. For PST only archive migrations where there will not be any data uploaded into Exchange mailboxes, the legacyExchangeDN is not required and the SMTP address can be used for the translation of Notes addresses.
|
|
|
Migrator for Notes will use the Notes Common Name for the translated Display Name. This applies to recipients on migrated messages with the SMTP or legacyExchangeDN applied for the mail routing address in Exchange mailboxes.
Migrator for Notes allows you to enable free/busy information in Outlook after migration because the users in the Name Translation Table are resolved to the legacyExchangeDN instead of the SMTP address. This allows Outlook to utilize the native free/busy functionality on migrated documents.
The name resolution process is used to apply the Exchange legacyDN during the migration of messages to Notes formatted recipients. This results in migrated entries resolving to the user mailbox in Exchange, therefore making correctly-populated free/busy information available after migration.
A typical Exchange legacyDN follows the pattern displayed below:
/o=DomainName/ou=Exchange Administrative Group (FYDIBOHF23SPDLT)/cn=Recipients/cn=LegacyName
Following is an example of a properly resolved Name Translation document:
Names Translation Document
-
To create the Name Translation Table from the Domino directory, expand Email Repliability in the Navigation Pane
-
Click the Add Names to Translation Table | Add Names to the Translation Table button:
Add Names to Translation Table Button
The following table describes each setting in the drop-down menu:
|
Settings |
Description |
|
Add All Names to Translation Table |
Adds all the names in the Domino directory to the Translation Table |
|
Add Selected Names to Translation Table |
Adds only the selected names from the Domino directory to the Translation Table |
|
|
Adding all Domino users’ names to the Translation Table is the recommended method of populating the Name Translation Table. The Translation Table should contain every email address for every user that may have sent an email to any other user. Please note, this is not a list of users to be migrated. It is a list used to translate addresses in migrated messages, calendars, and other migrated documents, so it needs to be as exhaustive as possible. |
|
|
It is recommended to perform regular updates to the Translation Table as new users may be added to the Domino Directory throughout the migration process. |
Add All Names to Translation Table
-
Click Add All Names to Translation Table
-
If more than one Domino directory has been defined, select a directory from the list and click OK:
-
A confirmation box appears. Click Yes to confirm that all entries will be added to the Name Translation Table:
-
After you have selected the entries to add, depending on the number of name entries, this process could take from a few seconds to several minutes; after it’s completed, a confirmation box appears stating that all users have been added to the Translation Table
-
Click OK
-
The Data Pane displays that all the names with a Person document found in the Domino directory have been added to the Name Translation Table
-
Notice that each user has multiple entries; these are all the possible addresses that the user is using and a corresponding SMTP address for each of these addresses is provided in the Name Translation Table:
Add Names to Translation Table View
Add Selected Names to Translation Table
-
Click Add Selected Names to Translation Table.
-
If more than one Domino directory has been defined, the selection dialog box appears with a drop-down list of Domino directories. Select a Domino Directory from the drop-down list, click the type of records to add, and then click Finish:
If a single Domino directory has been defined, the selection dialog box without a drop-down list of Domino directories appears; click the type of records to add and click Finish:
-
The correct view for the record type selected appears; select the intended records and click OK:
Name Translation Selection Dialog Box
-
A confirmation box appears stating that the selected records have been added to the Translation Table; click OK
|
|
|
Matching Selected Entries
After the Domino objects are added to the translation table from the Domino directory, you need to resolve these Domino entries to their Exchange entries.
There are several method options for matching entries; click the Match selected entries button:
The following table describes each drop-down menu option:
|
Settings |
Description |
|
Match Selected entries using PowerShell |
Uses PowerShell to resolve selected Domino users listed in the view to Exchange |
|
Match all entries using PowerShell |
Uses PowerShell to resolve all Domino users listed in the view to Exchange |
|
|
PowerShell is required if you are migrating to Office365. The Display Name column in the translation table view within the Migrator for Notes database is a static representation of the displayName attribute in Active Directory and is for reference only. It will not reflect any changes made to the displayName attribute after the translation table has been built. If the PowerShell authentication account is entered and Modern Authentication is enabled for PowerShell processing (Settings | Additional) the matching will use the Email Repliability bulk processing. This will split the matching into the batch size specified and create new PowerShell sessions for each batch. |
-
Select one or more entries in the Data Pane
-
Click the Match selected entries using PowerShell or Match all entries using PowerShell drop-down menu option
-
The Powershell User Match confirmation box appears; click Yes:
-
Enter the requested password in the dialog box:
-
The matching completes; click OK:
Updating a Translation Table
Once the Translation Table is created, you can update it whenever there are new entries added or removed from the Domino directory or user accounts are renamed in the Domino Directory.
To update the Translation table, click Updates | Update Name Translation from Domino Directory:
Updates View
|
|
|
Checking Errors of a Translation Table
Items that could not be imported will be displayed in the Check Errors view.
-
To view translation errors, click Check Errors in the Navigation Pane:
Check Errors View
|
|
It is recommended to check accounts in Domino and verify the corresponding entries in Active Directory. All items to be translated require an Internet Address (SMTP) in Domino, but some items, like Domino system groups, will not be expected to have these and can be safely ignored. If you cannot resolve the error or need assistance determining why an error occurred, contact Product Support. |