
Software:
Additional Requirements
-
Azure Active Directory Module for Windows PowerShell (64-bit version)
-
Accounts:
-
1 or 2 (recommended) Global Administration Tenant-only Accounts in Office 365
-
1 Standard Tenant-only Mailbox Enabled Account for every two workstations. These accounts are configured through the Connectivity Tester for use in Outlook by the migration worker or in an Outlook profile named ‘Migrate’ for Modern Authentication (OAuth) enabled tenants. These accounts have to be in an Office 365 Mail Enabled Security group for Full Access permissions access to the target mailboxes.
-
The migration workstation needs a Windows local admin account to login.
Additional Procedures
In addition to the typical procedures to prepare for migrations, the following steps are needed for migrations to Office 365:
-
Create Full Access Security Groups in Office 365 - this is used for the Set Full Access process which should be run just after an account is activated and enables permission access for the migration worker Outlook account to the user’s Exchange online mailbox. The system default name for this group is FullAcessAdmin but can be changed on the Settings | Office 365 tab.
To create a security group in Office 365:
-
Log into the Office 365 portal at https://portal.microsoftonline.com/ after and then click the “Admin” drop down menu and select “Exchange”.
-
Click on the “Groups” link to refresh the page.
-
To create a security group, click the “New” (Plus Sign) action.
-
:

-
To populate the membership list with all the proper accounts, click the “Add” action under the “Members” section.
-
An Address List will appear. Perform a broad search term for all the accounts you require and then elect all the accounts you would like to add.
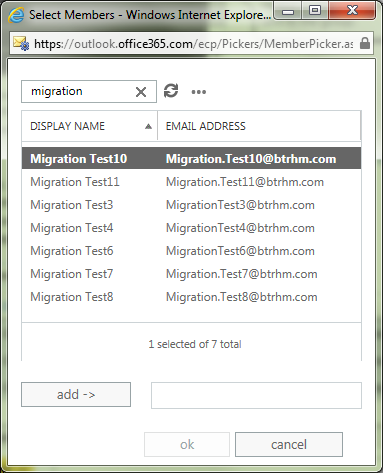
-
Click the “Add” action to populate the field.
-
Click the “OK” action to populate the form.
-
Once the add list closed, select the “Save” action at the bottom of the New Group form.
-
Once the form is saved and closed, select the group you just created from the Distribution List view.
-
Double click the entry to display the group’s properties.

-
Place a check mark in the “Hide this group from the shared address book” option in order to prevent end-users from using the group for email purposes.
-
Click the “Save” action to complete the process.
-
If you have additional members to add in the future follow this process but now expand the membership list to add or remove certain accounts from the group.
-
Set up remote PowerShell - To run any cmdlets in Office 365, an account that has the "Global Administrator" role assigned to it is required.
To setup a workstation to access everything via PowerShell:
-
Launch PowerShell as an administrator. At the prompt, type:
Set-ExecutionPolicy Unrestricted
-
To authenticate using Remote PowerShell of O365-MT:
$Cred = Get-Credential "accountname@yourdomain.onmicrosoft.com"
$Session = New-PSSession -ConfigurationName Microsoft.Exchange -ConnectionUri https://ps.outlook.com/powershell/ -Credential $Cred -Authentication Basic –AllowRedirection
Import-PSSession $Session
Accounts:
Additional Requirements
Software:
-
Azure Active Directory Module for Windows PowerShell (64-bit version)
-
-
1 or 2 (recommended) Global Administration Tenant-only Accounts in Office 365
-
1 Standard Tenant-only Mailbox Enabled Account for every two workstations. These accounts are configured through the Connectivity Tester for use in Outlook by the migration worker or in an Outlook profile named ‘Migrate’ for Modern Authentication (OAuth) enabled tenants. These accounts have to be in an Office 365 Mail Enabled Security group for Full Access permissions access to the target mailboxes.
-
The migration workstation needs a Windows local admin account to login.
Additional Procedures
In addition to the typical procedures to prepare for migrations, the following steps are needed for migrations to Office 365:
-
Create Full Access Security Groups in Office 365 - this is used for the Set Full Access process which should be run just after an account is activated and enables permission access for the migration worker Outlook account to the user’s Exchange online mailbox. The system default name for this group is FullAcessAdmin but can be changed on the Settings | Office 365 tab.
To create a security group in Office 365:
-
Log into the Office 365 portal at https://portal.microsoftonline.com/ after and then click the “Admin” drop down menu and select “Exchange”.
-
Click on the “Groups” link to refresh the page.
-
To create a security group, click the “New” (Plus Sign) action.
-
:
-
To populate the membership list with all the proper accounts, click the “Add” action under the “Members” section.
-
An Address List will appear. Perform a broad search term for all the accounts you require and then elect all the accounts you would like to add.
-
Click the “Add” action to populate the field.
-
Click the “OK” action to populate the form.
-
Once the add list closed, select the “Save” action at the bottom of the New Group form.
-
Once the form is saved and closed, select the group you just created from the Distribution List view.
-
Double click the entry to display the group’s properties.
-
Place a check mark in the “Hide this group from the shared address book” option in order to prevent end-users from using the group for email purposes.
-
Click the “Save” action to complete the process.
-
If you have additional members to add in the future follow this process but now expand the membership list to add or remove certain accounts from the group.
-
Set up remote PowerShell - To run any cmdlets in Office 365, an account that has the "Global Administrator" role assigned to it is required.
To setup a workstation to access everything via PowerShell:
-
Launch PowerShell as an administrator. At the prompt, type:
Set-ExecutionPolicy Unrestricted
-
To authenticate using Remote PowerShell of O365-MT:
$Cred = Get-Credential "accountname@yourdomain.onmicrosoft.com"
$Session = New-PSSession -ConfigurationName Microsoft.Exchange -ConnectionUri https://ps.outlook.com/powershell/ -Credential $Cred -Authentication Basic –AllowRedirection
Import-PSSession $Session
Additional Procedures
Additional Requirements
Software:
-
Azure Active Directory Module for Windows PowerShell (64-bit version)
-
Accounts:
-
1 or 2 (recommended) Global Administration Tenant-only Accounts in Office 365
-
1 Standard Tenant-only Mailbox Enabled Account for every two workstations. These accounts are configured through the Connectivity Tester for use in Outlook by the migration worker or in an Outlook profile named ‘Migrate’ for Modern Authentication (OAuth) enabled tenants. These accounts have to be in an Office 365 Mail Enabled Security group for Full Access permissions access to the target mailboxes.
-
The migration workstation needs a Windows local admin account to login.
In addition to the typical procedures to prepare for migrations, the following steps are needed for migrations to Office 365:
-
Create Full Access Security Groups in Office 365 - this is used for the Set Full Access process which should be run just after an account is activated and enables permission access for the migration worker Outlook account to the user’s Exchange online mailbox. The system default name for this group is FullAcessAdmin but can be changed on the Settings | Office 365 tab.
To create a security group in Office 365:
-
Log into the Office 365 portal at https://portal.microsoftonline.com/ after and then click the “Admin” drop down menu and select “Exchange”.
-
Click on the “Groups” link to refresh the page.
-
To create a security group, click the “New” (Plus Sign) action.
-
:
-
To populate the membership list with all the proper accounts, click the “Add” action under the “Members” section.
-
An Address List will appear. Perform a broad search term for all the accounts you require and then elect all the accounts you would like to add.
-
Click the “Add” action to populate the field.
-
Click the “OK” action to populate the form.
-
Once the add list closed, select the “Save” action at the bottom of the New Group form.
-
Once the form is saved and closed, select the group you just created from the Distribution List view.
-
Double click the entry to display the group’s properties.
-
Place a check mark in the “Hide this group from the shared address book” option in order to prevent end-users from using the group for email purposes.
-
Click the “Save” action to complete the process.
-
If you have additional members to add in the future follow this process but now expand the membership list to add or remove certain accounts from the group.
-
Set up remote PowerShell - To run any cmdlets in Office 365, an account that has the "Global Administrator" role assigned to it is required.
To setup a workstation to access everything via PowerShell:
-
Launch PowerShell as an administrator. At the prompt, type:
Set-ExecutionPolicy Unrestricted
-
To authenticate using Remote PowerShell of O365-MT:
$Cred = Get-Credential "accountname@yourdomain.onmicrosoft.com"
$Session = New-PSSession -ConfigurationName Microsoft.Exchange -ConnectionUri https://ps.outlook.com/powershell/ -Credential $Cred -Authentication Basic –AllowRedirection
Import-PSSession $Session
Appendix B: Preparing for Office 365 Modern Authentication
The following additional configurations and procedures are required when preparing for migrations where the target location is Office 365 and Modern Authentication (OAuth) will be used. These do require the option to migrate to Office 365 to be enabled.