
LDAP Settings
4.1. Configuring Required Settings
Domino Settings
The Migrator for Notes Settings document displays. In the Settings document, the Required Settings -> Domino tab displays by default.
|
|
You can view the description of each field in each tab by clicking its corresponding question mark icon |


 next to the Mail Server field to read its description.
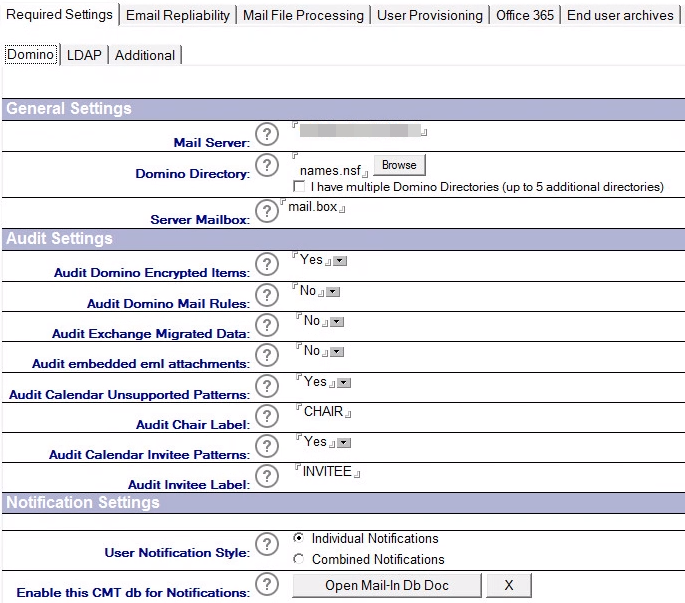
Before any migration can be performed, the Required Settings tab must be completed. Two of the most important entries in this tab are the Mail Server and the Domino Directory. The specified Mail Server name is used to access the Domino Directory. The Domino Directory is used to retrieve the information required to import and create the User Mail, Rooms & Resources Databases, Mail-in Databases, and Discussion & Document Library Databases control documents.
These control documents are critical to the migration process and in their absence, migration information cannot be collected for a given item, and therefore, the item cannot be migrated. The control documents are used extensively during the remaining migration processes.
The following table describes the values for each setting.
|
Settings |
Description |
|
Mail Server |
The Domino server that Migrator for Notes will use for importing users and for sending Migration Messages. |
|
Domino Directory |
The Domino Directory name that Migrator for Notes will use for importing users, as found on the Domino server. Up to five additional Domino directories can be set by checking the box. |
|
Server Mailbox |
The mailbox filename that Migrator for Notes uses for sending Migration-related messages to selected users (for example, mail.box). |
|
Audit Domino Encrypted Items |
When running Audit on user mail file, specifying Yes will check for encrypted items in the mail file. If encrypted items are found, you can either send the user an email message with a button that decrypts encrypted items so that they can be migrated, or you can send the user a message with document links to the encrypted items so that they can print them prior to migration. You can even do both if you have some reason to want a list of messages that had been encrypted before the decryption agent was run. |
|
Audit Domino Mail Rules |
When running Audit on user mail file, specifying Yes will check for the number of rules in the mail file. If rules are found, you can send users a list of their Rules that will help them in creating the rules in Outlook after migration. |
|
Audit Exchange Migrated Data |
Enables auditing of migrated data in Exchange. Exchange Auditing should be enabled before data is migrated. Audit reports can be found the \logs directory on the migration workstation(s). This is a post-migration validation process that indicates the state of documents which have been migrated by Migrator for Notes. This feature can be useful in environments as a validation check for data integrity. In addition, this can be used to audit results to reduce the size of user Domino mail files or archive databases after the migration phase on the Domino servers and user's workstation replicas. For example, removing documents with a Migration Status of 1 would leave only non-migrated data or documents that could not be migrated completely due to malformation or size restrictions in Exchange from a source database. Important: Consult your organizations data retention policies and regulatory compliance requirements before modifying source data. Full backups of the original source data may be required (and maintained post migration) before modifying working replicas to ensure regulatory compliance. |
|
Audit embedded eml attachments |
Enables auditing of eml attachments inside the message bodies to assist with migration troubleshooting. Results will be reported on the user document in EMM. This is not required for migration processing unless directed to enable this by Binary Tree's Product Support. Additionally, a flag can be enabled and adds the field BTFoundEML to documents in source mail files where auditing finds eml attachments inside the message bodies. |
|
Audit calendar unsupported patterns |
Enables auditing of calendar items where the user is the Chair for Notes custom repeating meetings and generates document links for meetings that are not supported by Outlook. This will use the Migration Date if set or the current date and include meetings from the date specified and future meetings. The audit adds the reported data to the Calendar audit RTF report for the account and can be sent to end users with the Remediation Summary Message Template. If enabled the audit can be specified to verify meetings where the user is the Chair, an Invitee or both. Additionally, label text can be added to the reported data to specify if the user is the Chair or the Invitee. |
|
User Notification Style |
Individual Notifications: Select if you want to send individual notification to each user and each mail/form will only have script for one action.
Combined Notifications: Select if you want to send one migration notification to each user and the notification/message to contain multiple selected forms, such as decrypting encrypted messages and synchronizing contacts and journals (notebooks) with mail file. |
|
Enable this CMT db for Notifications |
Click this button to create a Mail-In database document on the Domino Server for the Migrator for Notes database, and enable the database to receive User Notification responses. This database must be hosted on a Domino server. |
Mail-enabling Migrator for Notes Database
A Mail-in Database Document is required for mail to be delivered to the newly created server copy of the Migrator for Notes database. The procedure copies the database to the server and creates a Mail-In database document for the Migrator for Notes database.
-
Create a mail-in database for Migrator for Notes database. Click on the Server Db Copy and Mail-In Db Doc button to create a copy of the Migrator for Notes database on the Domino server and configure the Mail in Database document

-
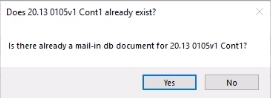
The Does Migrator for Notes already exist? dialog box opens; click Yes (and skip to step 5):

-
If you are working with a local copy of the Migrator for Notes database, then click No. The Create a db copy? dialog box opens.
-
Click Yes to create a copy of the local Migrator for Notes database on the server:

-
If you clicked Yes in the Does Migrator for Notes CMT already exist? dialog box, the Choose Application dialog box opens. Locate the Migrator for Notes database in the CMT folder on the server, and then click Open.
-
The process will ask if there is already a mail-in db document in the Domino directory. If this has been created already then click Yes to run a search for the entry in the directory. This is case sensitive for the Migrator for Notes application name on the Notes Migrator.nsf file. Click No to create a mail-in db document.
The Fullname for the mail-in db doc dialog box confirms that the mail-in database for the selected server-based Migrator for Notes database does not exist, and prompts you to specify a name for the mail-in database. After specifying the name, click OK.
-
In the Open the new mail-in doc? dialog box, click Yes to open the mail-in database.
The mail-in database document for Migrator for Notes opens.

-
To verify the creation of the mail-in database, you can also launch Domino Administrator, open the Domino server, and access the Mail-In Databases and Resources folder under the People & Groups tab:

-
Double-click the document to open and review
-
Once the mail-in database is successfully created, the Open Mail-In Db Doc button replaces the Server Db Copy and Mail-In Db Doc button. Clicking it opens the database document for a review. Clicking the button with the X sign on it will remove all pointers to the location of the mail-in database.

|
|
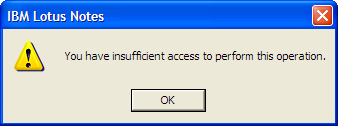
If you do not have the appropriate access rights to perform this action, see the onsite Domino System Administrator for help. |
-
It is recommended that after copying the database to the server, you delete the database from the local client folder. To remove it, right-click on Migrator for Notes on Local. Select Database, and then Delete. The Lotus Notes client prompts that the database and related documents will be permanently deleted. Click Yes to delete the local database.
Modifying the Inbound Processing Agent
Once you have mail-enabled the database, you need to modify the Inbound Processing agent to view the updates. Perform the following steps to run the agent.
-
Install Domino Designer on the workstation where Migrator for Notes Domino database is located
-
Launch Migrator for Notes Domino database in Domino Designer
-
Expand Shared Code and select Agents
-
Select the InboundProcessing agent as shown below:

-
Double-click InboundProcessing to open the InboundProcessing Agent Properties
-
Click the Security tab
-
The Administrator should be listed in the Run on behalf of section
-
In the Set Runtime security level: field, select Allow Restricted Operations with full administration rights
-
Once you've edited the agent, close the Properties box
-
Close the Inbound Processing – Agent tab
-
Save the changes
-
Click Sign
|
|
This agent runs before new mail arrives and the Domino router must be set to allow these types of agents to run. To enable this option, go to Router/SMTP -> Restrictions and Controls -> Delivery Controls tab and set the Pre-delivery agents option to Enabled. |
|
|
The Notes ID that signs this agent does require security rights on the Domino server to run agents. |
-
Click LDAP under the Required Settings tab:
In this tab, specify the Active Directory information to resolve users by matching them between source and destination platforms via Lightweight Directory Access Protocol (LDAP). To use this option, specify the required details.
|
|
LDAP configuration is not specifically required for Office 365 only migrations. |

Use the following table to enter the correct values for each field:
|
Settings |
Description |
|
Domain |
The common name of the Active Directory domain. For example, binarytree rather than binarytree.com. |
|
LDAP IP Address or Host Name |
The fully qualified LDAP server name, IP Address, or resolvable DNS name of the Active Directory server. (e.g. PC-XP-01. binarytree.com or 192.163.15.12). |
|
LDAP Port |
Specify the LDAP port. The default port for LDAP is 389. The default port for SSL LDAP is 636. |
|
Login ID |
The AD domain account that has read rights to the target AD domain. For example: administrator and not <domain>\administrator |
|
Password |
The password associated with the ID specified in Login ID. |
|
Validate Settings |
Click to validate the specified values to ensure that you are able to connect to the domain in Exchange where the end users will be eventually migrated. |
|
LDAP Directory Base (Base DN) |
If LDAP settings result in a successful connection, then this field is automatically updated. Specify the directory base for all LDAP queries. The query settings will enable the search in AD to ensure that users are getting resolved against the right container ‘directory’ within AD. Example: DC=btexchange2k7,DC=com |
|
Quick Check Full Check |
If you want to search only the first ten users, select Quick Check; and if you want to search all the users, select Full Check. |
|
Validate Query Settings |
Click to validate the values specified in LDAP Directory Base to ensure that query string is resolving users and returning the number of resolved users. |
-
Specify the connection settings and then validate them by clicking the Validate Settings button:

-
The LDAP Connection Settings Test Results message box displays indicating that the settings were validated and the connection was successful; click OK:

-
Notice that the LDAP Directory Base (Base DN) field is automatically populated
To ensure that the specified directory base, where all LDAP searches will be conducted, is correct; you should validate this setting as well; click the Validate Query Settings button:

-
The LDAP Query User Settings Test Results message box displays; the query setting is validated and some records are returned; in a production environment, ten records should be returned always; click OK:

Additional Settings
-
Click the Additional tab under Required Settings
-
Configure these settings with the names of the views to locate and import User and Mail-in Databases information. Also, specify the Migration Status Codes that can be assigned to users’ mail and databases control documents. You can assign a code to a user to update its status and view users based on their status codes. This helps in providing a better picture of the migration progress.

The following table describes the values for each setting:
|
Settings |
Description |
|---|---|
|
CMT Migration Server |
Specify the network hostname or IP address of the machine that is running the migration server. |
|
CMT Program Directory |
Specify the complete program directory path to Migrator for Notes installation. This location will be used to launch the migration engine when the migration is triggered off.
Note: During the installation of Migrator for Notes, if you had specified a destination folder path other than the default (C:\Program Files\Binary Tree\CMT Exchange), then you must replace the default path specified in the CMT Program Directory field with the modified path. In failing to do so, the migration engine will not launch when the migrations are set to go off. |
|
Use Secure Web Services |
Specify whether the web service calls are made to an XML server configured for secure access. Note that additional steps are required to secure the web services. The default selection is “Yes” which uses the CMT eService COM object to access the XML server.
Refer to Appendix D: Securing Migrator for Notes Web Services with Windows Authentication for additional steps if you select Yes. |
|
I have multiple control Centers |
This option appears if the multiple Migration Control Center advanced feature is enabled on the Other Setting tab. Check this option to define the IP addresses of the Control Centers. When enabled, the Set Migration Status options include Set Migration MCC and Clear Migration MCC options. |
|
Migration Server Control Center IPs |
Appears if “I have multiple control Centers” is checked. This field is used by the Set Migration Status agent. Values must be entered as follows: Workstation#=IP address of Migrator for Notes Control Center For example: 1=192.168.1.0 2=192.168.1.1 3=192.168.1.2 |
|
User Import View |
Specify the view in the Domino directory that Migrator for Notes database will use for importing users. Use the People view unless there is a custom view that you have created. |
|
Mail-In Databases Import View |
Specify the view in the Domino directory that Migrator for Notes database will use for importing mail-in databases and resources. Use the Mail-In Databases view unless there is a custom view that you have created. |
|
Mail-In Databases View Category |
This is the NAB Mail-In database view category used for importing Mail-in Databases and Resources. Use the “Databases” default unless Domino is using a language other than English. Change this value to what is displayed in the NAB Mail-in Databases view. |
|
Migration Status Codes |
Specify a personalized list of status codes that will be used during the migration project. These codes can be assigned to users’ mail and databases control documents. If these status codes are assigned during the different phases of the migration process, timely status reports can be produced. These status reports will help provide a better picture of the migration progress. With this type of information, you have more control over the migration project and can react quickly to any identified issue. Adjustments can be made to help fine tune the migration schedule by adding more or different resources. Status codes must be separated by a new line. A list of status codes has been specified for you. You can either retain or change these status codes depending on your need. |
|
CAS Server |
Specify the Exchange Client Access Server (CAS) name. If a name is specified, then the matching process will use the following URL to resolve users. https://[servername]/autodiscover/autodiscover.xml
However, if you have specified the full URL to the Autodiscover service, then the URL will be used to resolve users.
This field is required for delegation migrations. |
|
Username |
If only the CAS Server name or IP address is specified in the CAS Server field, then you must specify a valid username for the authentication process that takes place on the CAS server. Note that the username should be in the following format for on-premises Exchange: <domain>\<username>. For Office 365 the format should be username@domain.com.
If you have specified a full URL (with https://) in the CAS Server field, then you can leave this field blank for on-premise migrations. |
|
Password |
Specify the password associated with the username provided in the previous field.
If you specified a full URL (with https://), then you can leave this field blank for on-premise migrations. |
|
Powershell Admin Credentials |
For on-premise Exchange servers, the credentials are of the form [Domain]\[Username]. For Office 365, the credentials are the SMTP address used to pass credentials to Office365 for remote access, for example o365Admin@tenant.onmicrosoft.com |
|
Powershell Admin Password |
Use the Set PowerShell Password button to update this field. This will request the password and record it using the AsSecure PowerShell method. This is not required for clicking the Migrator for Notes PowerShell buttons, if this is not entered the buttons (such as Set Full Acccess) will ask for the password when processed. |
|
PowerShell Logging Path |
The MS PowerShell used when generating, executing, and logging PS1 script. This path can be edited on User Provisioning tab. |
|
Default Reporting Path for Matching |
Specify the reporting path used by the matching process. The default path is C:\Matching\. |
|
Enable PowerShell Modern Auth |
Set to Yes to enable the use of the Microsoft Graph and Exchange Online modules for PowerShell processing. This will use Modern Auth connectivity to Microsoft Online services, removing the Basic Auth connection processing. Review Appendix E Microsoft Graph Application ID for additional configuration that is required to use Modern Authentication with an Azure AD Application ID. |
|
Enable Modern Auth for Migration |
Set to Yes to enable the use of Modern Authentication for Migrations. The Office 365 tenant must be configured to use Modern Authentication. Note: PowerShell matching using Modern Auth must be enabled for Modern Auth migrations to online mailboxes or archives. |
|
Autodiscover Username |
Autodiscover credentials to be used during creation of the profile used by the migration engine. For on-premise Exchange servers, the credentials entered should be the UPN (User Principal Name), for example: UserName@Example.Microsoft.com For Office 365, the credentials are the SMTP address of an account in the Office 365 domain, for example: o365Admin@tenant.onmicrosoft.com.
Note: This is used if a migration worker does not have an account specified and is a fall back option. This is not required if a migration farm is being built using AWD. |
|
Autodiscover Password |
Enter the password associated with the Autodiscover account entered above. |
|
Customer Name |
Specify the Customer name that you would like in the status report. |
|
Send Customer Status Report To |
Specify the Group Name or SMTP addresses of the persons that should receive the status report. |
|
Send Operator Status Report To |
Specify the Group Name or SMTP addresses of the persons that should receive the full status report. |
|
Migration Status Report Path |
Specify the working path for migration status reports. |
|
Create a combined report for multiple Migration Management databases (up to 5 additional) |
Check this option to specify up to five additional migration management databases to include in a combined report. |

Additional Settings
4.1. Configuring Required Settings
Domino Settings
The Migrator for Notes Settings document displays. In the Settings document, the Required Settings -> Domino tab displays by default.
|
|
You can view the description of each field in each tab by clicking its corresponding question mark icon |
Before any migration can be performed, the Required Settings tab must be completed. Two of the most important entries in this tab are the Mail Server and the Domino Directory. The specified Mail Server name is used to access the Domino Directory. The Domino Directory is used to retrieve the information required to import and create the User Mail, Rooms & Resources Databases, Mail-in Databases, and Discussion & Document Library Databases control documents.
These control documents are critical to the migration process and in their absence, migration information cannot be collected for a given item, and therefore, the item cannot be migrated. The control documents are used extensively during the remaining migration processes.
The following table describes the values for each setting.
|
Settings |
Description |
|
Mail Server |
The Domino server that Migrator for Notes will use for importing users and for sending Migration Messages. |
|
Domino Directory |
The Domino Directory name that Migrator for Notes will use for importing users, as found on the Domino server. Up to five additional Domino directories can be set by checking the box. |
|
Server Mailbox |
The mailbox filename that Migrator for Notes uses for sending Migration-related messages to selected users (for example, mail.box). |
|
Audit Domino Encrypted Items |
When running Audit on user mail file, specifying Yes will check for encrypted items in the mail file. If encrypted items are found, you can either send the user an email message with a button that decrypts encrypted items so that they can be migrated, or you can send the user a message with document links to the encrypted items so that they can print them prior to migration. You can even do both if you have some reason to want a list of messages that had been encrypted before the decryption agent was run. |
|
Audit Domino Mail Rules |
When running Audit on user mail file, specifying Yes will check for the number of rules in the mail file. If rules are found, you can send users a list of their Rules that will help them in creating the rules in Outlook after migration. |
|
Audit Exchange Migrated Data |
Enables auditing of migrated data in Exchange. Exchange Auditing should be enabled before data is migrated. Audit reports can be found the \logs directory on the migration workstation(s). This is a post-migration validation process that indicates the state of documents which have been migrated by Migrator for Notes. This feature can be useful in environments as a validation check for data integrity. In addition, this can be used to audit results to reduce the size of user Domino mail files or archive databases after the migration phase on the Domino servers and user's workstation replicas. For example, removing documents with a Migration Status of 1 would leave only non-migrated data or documents that could not be migrated completely due to malformation or size restrictions in Exchange from a source database. Important: Consult your organizations data retention policies and regulatory compliance requirements before modifying source data. Full backups of the original source data may be required (and maintained post migration) before modifying working replicas to ensure regulatory compliance. |
|
Audit embedded eml attachments |
Enables auditing of eml attachments inside the message bodies to assist with migration troubleshooting. Results will be reported on the user document in EMM. This is not required for migration processing unless directed to enable this by Binary Tree's Product Support. Additionally, a flag can be enabled and adds the field BTFoundEML to documents in source mail files where auditing finds eml attachments inside the message bodies. |
|
Audit calendar unsupported patterns |
Enables auditing of calendar items where the user is the Chair for Notes custom repeating meetings and generates document links for meetings that are not supported by Outlook. This will use the Migration Date if set or the current date and include meetings from the date specified and future meetings. The audit adds the reported data to the Calendar audit RTF report for the account and can be sent to end users with the Remediation Summary Message Template. If enabled the audit can be specified to verify meetings where the user is the Chair, an Invitee or both. Additionally, label text can be added to the reported data to specify if the user is the Chair or the Invitee. |
|
User Notification Style |
Individual Notifications: Select if you want to send individual notification to each user and each mail/form will only have script for one action.
Combined Notifications: Select if you want to send one migration notification to each user and the notification/message to contain multiple selected forms, such as decrypting encrypted messages and synchronizing contacts and journals (notebooks) with mail file. |
|
Enable this CMT db for Notifications |
Click this button to create a Mail-In database document on the Domino Server for the Migrator for Notes database, and enable the database to receive User Notification responses. This database must be hosted on a Domino server. |
Mail-enabling Migrator for Notes Database
A Mail-in Database Document is required for mail to be delivered to the newly created server copy of the Migrator for Notes database. The procedure copies the database to the server and creates a Mail-In database document for the Migrator for Notes database.
-
Create a mail-in database for Migrator for Notes database. Click on the Server Db Copy and Mail-In Db Doc button to create a copy of the Migrator for Notes database on the Domino server and configure the Mail in Database document
-
The Does Migrator for Notes already exist? dialog box opens; click Yes (and skip to step 5):
-
If you are working with a local copy of the Migrator for Notes database, then click No. The Create a db copy? dialog box opens.
-
Click Yes to create a copy of the local Migrator for Notes database on the server:
-
If you clicked Yes in the Does Migrator for Notes CMT already exist? dialog box, the Choose Application dialog box opens. Locate the Migrator for Notes database in the CMT folder on the server, and then click Open.
-
The process will ask if there is already a mail-in db document in the Domino directory. If this has been created already then click Yes to run a search for the entry in the directory. This is case sensitive for the Migrator for Notes application name on the Notes Migrator.nsf file. Click No to create a mail-in db document.
The Fullname for the mail-in db doc dialog box confirms that the mail-in database for the selected server-based Migrator for Notes database does not exist, and prompts you to specify a name for the mail-in database. After specifying the name, click OK.
-
In the Open the new mail-in doc? dialog box, click Yes to open the mail-in database.
The mail-in database document for Migrator for Notes opens.
-
To verify the creation of the mail-in database, you can also launch Domino Administrator, open the Domino server, and access the Mail-In Databases and Resources folder under the People & Groups tab:
-
Double-click the document to open and review
-
Once the mail-in database is successfully created, the Open Mail-In Db Doc button replaces the Server Db Copy and Mail-In Db Doc button. Clicking it opens the database document for a review. Clicking the button with the X sign on it will remove all pointers to the location of the mail-in database.
|
|
If you do not have the appropriate access rights to perform this action, see the onsite Domino System Administrator for help. |
-
It is recommended that after copying the database to the server, you delete the database from the local client folder. To remove it, right-click on Migrator for Notes on Local. Select Database, and then Delete. The Lotus Notes client prompts that the database and related documents will be permanently deleted. Click Yes to delete the local database.
Modifying the Inbound Processing Agent
Once you have mail-enabled the database, you need to modify the Inbound Processing agent to view the updates. Perform the following steps to run the agent.
-
Install Domino Designer on the workstation where Migrator for Notes Domino database is located
-
Launch Migrator for Notes Domino database in Domino Designer
-
Expand Shared Code and select Agents
-
Select the InboundProcessing agent as shown below:
-
Double-click InboundProcessing to open the InboundProcessing Agent Properties
-
Click the Security tab
-
The Administrator should be listed in the Run on behalf of section
-
In the Set Runtime security level: field, select Allow Restricted Operations with full administration rights
-
Once you've edited the agent, close the Properties box
-
Close the Inbound Processing – Agent tab
-
Save the changes
-
Click Sign
|
|
This agent runs before new mail arrives and the Domino router must be set to allow these types of agents to run. To enable this option, go to Router/SMTP -> Restrictions and Controls -> Delivery Controls tab and set the Pre-delivery agents option to Enabled. |
|
|
The Notes ID that signs this agent does require security rights on the Domino server to run agents. |
LDAP Settings
-
Click LDAP under the Required Settings tab:
In this tab, specify the Active Directory information to resolve users by matching them between source and destination platforms via Lightweight Directory Access Protocol (LDAP). To use this option, specify the required details.
|
|
LDAP configuration is not specifically required for Office 365 only migrations. |
Use the following table to enter the correct values for each field:
|
Settings |
Description |
|
Domain |
The common name of the Active Directory domain. For example, binarytree rather than binarytree.com. |
|
LDAP IP Address or Host Name |
The fully qualified LDAP server name, IP Address, or resolvable DNS name of the Active Directory server. (e.g. PC-XP-01. binarytree.com or 192.163.15.12). |
|
LDAP Port |
Specify the LDAP port. The default port for LDAP is 389. The default port for SSL LDAP is 636. |
|
Login ID |
The AD domain account that has read rights to the target AD domain. For example: administrator and not <domain>\administrator |
|
Password |
The password associated with the ID specified in Login ID. |
|
Validate Settings |
Click to validate the specified values to ensure that you are able to connect to the domain in Exchange where the end users will be eventually migrated. |
|
LDAP Directory Base (Base DN) |
If LDAP settings result in a successful connection, then this field is automatically updated. Specify the directory base for all LDAP queries. The query settings will enable the search in AD to ensure that users are getting resolved against the right container ‘directory’ within AD. Example: DC=btexchange2k7,DC=com |
|
Quick Check Full Check |
If you want to search only the first ten users, select Quick Check; and if you want to search all the users, select Full Check. |
|
Validate Query Settings |
Click to validate the values specified in LDAP Directory Base to ensure that query string is resolving users and returning the number of resolved users. |
-
Specify the connection settings and then validate them by clicking the Validate Settings button:
-
The LDAP Connection Settings Test Results message box displays indicating that the settings were validated and the connection was successful; click OK:
-
Notice that the LDAP Directory Base (Base DN) field is automatically populated
To ensure that the specified directory base, where all LDAP searches will be conducted, is correct; you should validate this setting as well; click the Validate Query Settings button:
-
The LDAP Query User Settings Test Results message box displays; the query setting is validated and some records are returned; in a production environment, ten records should be returned always; click OK:
-
Click the Additional tab under Required Settings
-
Configure these settings with the names of the views to locate and import User and Mail-in Databases information. Also, specify the Migration Status Codes that can be assigned to users’ mail and databases control documents. You can assign a code to a user to update its status and view users based on their status codes. This helps in providing a better picture of the migration progress.
The following table describes the values for each setting:
|
Settings |
Description |
|---|---|
|
CMT Migration Server |
Specify the network hostname or IP address of the machine that is running the migration server. |
|
CMT Program Directory |
Specify the complete program directory path to Migrator for Notes installation. This location will be used to launch the migration engine when the migration is triggered off.
Note: During the installation of Migrator for Notes, if you had specified a destination folder path other than the default (C:\Program Files\Binary Tree\CMT Exchange), then you must replace the default path specified in the CMT Program Directory field with the modified path. In failing to do so, the migration engine will not launch when the migrations are set to go off. |
|
Use Secure Web Services |
Specify whether the web service calls are made to an XML server configured for secure access. Note that additional steps are required to secure the web services. The default selection is “Yes” which uses the CMT eService COM object to access the XML server.
Refer to Appendix D: Securing Migrator for Notes Web Services with Windows Authentication for additional steps if you select Yes. |
|
I have multiple control Centers |
This option appears if the multiple Migration Control Center advanced feature is enabled on the Other Setting tab. Check this option to define the IP addresses of the Control Centers. When enabled, the Set Migration Status options include Set Migration MCC and Clear Migration MCC options. |
|
Migration Server Control Center IPs |
Appears if “I have multiple control Centers” is checked. This field is used by the Set Migration Status agent. Values must be entered as follows: Workstation#=IP address of Migrator for Notes Control Center For example: 1=192.168.1.0 2=192.168.1.1 3=192.168.1.2 |
|
User Import View |
Specify the view in the Domino directory that Migrator for Notes database will use for importing users. Use the People view unless there is a custom view that you have created. |
|
Mail-In Databases Import View |
Specify the view in the Domino directory that Migrator for Notes database will use for importing mail-in databases and resources. Use the Mail-In Databases view unless there is a custom view that you have created. |
|
Mail-In Databases View Category |
This is the NAB Mail-In database view category used for importing Mail-in Databases and Resources. Use the “Databases” default unless Domino is using a language other than English. Change this value to what is displayed in the NAB Mail-in Databases view. |
|
Migration Status Codes |
Specify a personalized list of status codes that will be used during the migration project. These codes can be assigned to users’ mail and databases control documents. If these status codes are assigned during the different phases of the migration process, timely status reports can be produced. These status reports will help provide a better picture of the migration progress. With this type of information, you have more control over the migration project and can react quickly to any identified issue. Adjustments can be made to help fine tune the migration schedule by adding more or different resources. Status codes must be separated by a new line. A list of status codes has been specified for you. You can either retain or change these status codes depending on your need. |
|
CAS Server |
Specify the Exchange Client Access Server (CAS) name. If a name is specified, then the matching process will use the following URL to resolve users. https://[servername]/autodiscover/autodiscover.xml
However, if you have specified the full URL to the Autodiscover service, then the URL will be used to resolve users.
This field is required for delegation migrations. |
|
Username |
If only the CAS Server name or IP address is specified in the CAS Server field, then you must specify a valid username for the authentication process that takes place on the CAS server. Note that the username should be in the following format for on-premises Exchange: <domain>\<username>. For Office 365 the format should be username@domain.com.
If you have specified a full URL (with https://) in the CAS Server field, then you can leave this field blank for on-premise migrations. |
|
Password |
Specify the password associated with the username provided in the previous field.
If you specified a full URL (with https://), then you can leave this field blank for on-premise migrations. |
|
Powershell Admin Credentials |
For on-premise Exchange servers, the credentials are of the form [Domain]\[Username]. For Office 365, the credentials are the SMTP address used to pass credentials to Office365 for remote access, for example o365Admin@tenant.onmicrosoft.com |
|
Powershell Admin Password |
Use the Set PowerShell Password button to update this field. This will request the password and record it using the AsSecure PowerShell method. This is not required for clicking the Migrator for Notes PowerShell buttons, if this is not entered the buttons (such as Set Full Acccess) will ask for the password when processed. |
|
PowerShell Logging Path |
The MS PowerShell used when generating, executing, and logging PS1 script. This path can be edited on User Provisioning tab. |
|
Default Reporting Path for Matching |
Specify the reporting path used by the matching process. The default path is C:\Matching\. |
|
Enable PowerShell Modern Auth |
Set to Yes to enable the use of the Microsoft Graph and Exchange Online modules for PowerShell processing. This will use Modern Auth connectivity to Microsoft Online services, removing the Basic Auth connection processing. Review Appendix E Microsoft Graph Application ID for additional configuration that is required to use Modern Authentication with an Azure AD Application ID. |
|
Enable Modern Auth for Migration |
Set to Yes to enable the use of Modern Authentication for Migrations. The Office 365 tenant must be configured to use Modern Authentication. Note: PowerShell matching using Modern Auth must be enabled for Modern Auth migrations to online mailboxes or archives. |
|
Autodiscover Username |
Autodiscover credentials to be used during creation of the profile used by the migration engine. For on-premise Exchange servers, the credentials entered should be the UPN (User Principal Name), for example: UserName@Example.Microsoft.com For Office 365, the credentials are the SMTP address of an account in the Office 365 domain, for example: o365Admin@tenant.onmicrosoft.com.
Note: This is used if a migration worker does not have an account specified and is a fall back option. This is not required if a migration farm is being built using AWD. |
|
Autodiscover Password |
Enter the password associated with the Autodiscover account entered above. |
|
Customer Name |
Specify the Customer name that you would like in the status report. |
|
Send Customer Status Report To |
Specify the Group Name or SMTP addresses of the persons that should receive the status report. |
|
Send Operator Status Report To |
Specify the Group Name or SMTP addresses of the persons that should receive the full status report. |
|
Migration Status Report Path |
Specify the working path for migration status reports. |
|
Create a combined report for multiple Migration Management databases (up to 5 additional) |
Check this option to specify up to five additional migration management databases to include in a combined report. |
4.2. Configuring Email Repliability
Click the Email Repliability tab to specify the appropriate values for the Domino environment:

Refer to the table given below for a brief description of all the settings in the Email Repliability tab.
|
Settings |
Description |
|---|---|
|
Past and Present Domino Domains |
The Domino domain names that are stripped from the email addresses and result in a valid and reply-able address regardless of domain name changes over the years. Enter a comma-separated list of all domain names in Domino, including the Notes Integration domain – no @ character is necessary. Note: These are Domino domains, not SMTP or Internet domains, so it would more likely be ACME or ACME-NOTES, rather than acme.com. |
|
Last Name Translation Update |
This field is automatically populated during the Name Translation Update Process. This value will indicate the last time the Domino Directory was searched for updates. |
|
Name Translation Database |
The Name Translation Database field allows you to browse for the primary database to use for Name Translation lookups. This would typically be the current Notes Migrator.nsf. A warning will appear if you attempt to save the configuration without defining the Name Translation Database. |
|
Name Translation Failover |
The Name Translation Failover field allows you to optionally set the path to the primary failover database used for Name Translation lookups. The failover database is used if the primary database is inaccessible. This database should reside on the Domino server. If a local (workspace) path is used, the EMM database must be replicated to the same relative path on all workstations. |
|
Powershell bulk matching batch size |
When using the two-step bulk PowerShell matching process for address translation entries, this is the number of records that will be presented in each matching .csv file. The default value is “2000”. Note: this option is only available to Exchange on-premise migrations. |
|
Skip reprocessing users that have previously failed, Reprocess successful matches |
These options can be enabled to skip reprocessing previously failed users and/or reprocess successful matches. These options are disabled by default. |
|
Table |
The Name Translation Database table allows you to set the Name Translation Databases and Name Translation Failover Databases on multiple workstations. Click Set selected to define a Name Translation Database and Name Translation Failover for the selected workstation to use instead of the primary (default) databases defined above. |
4.3. Configuring Mail File Processing
Click the Mail File Processing tab to specify the appropriate values for the Domino environment.
|
|
Mail File Processing works with the assumption that Integration for Notes is configured between Domino and Exchange. The Email Forwarding Only option can be used if Integration for Notes is not deployed. This allows for standard Domino email forwarding functions. You must configure this section prior to using the Maintain Transitional Calendar Workflow (MTCW) agent. This agent gathers recurrence pattern information for meetings and copies that information into the BTCache.nsf, which allows calendar workflow to behave as expected regardless of migration status of the chairperson or attendees. |

Refer to the table given below for a brief description of all the settings in the Mail File Processing tab:
Email Routing
|
Settings |
Description |
|---|---|
|
Present Domino Domain |
Specify the existing Domino domain. |
|
Exchange Foreign Domain |
This is the name of the Lotus Notes foreign domain that was configured to route mail from the Domino infrastructure to Exchange. |
|
Write Person Doc Changes to |
Select which server you want to use when writing changes after a user is created in Exchange. Whether you choose the Domino Admin Server or the Home Mail Server depends on the existing infrastructure and replication frequency. |
|
Enable alternate server NAB |
If the filename of the Name and Address Book (NAB) listed on the Required Settings tab is different, enter the alternate filename in this field. If enabled, this value will be used for all mail routing change operations. This is common when an organization is using a global directory from multiple domains and address books. In these cases, the global directory’s filename may not be names.nsf. |
|
Enabled Calendar Domain? |
Select Yes to update the CalendarDomain field in the selected Person document. A selection of No will result in no change occurring to that field. |
|
Retain Mail File & Server Info? |
When running Routing Update functions, the Mail File Name and Mail Server information is removed from the Person Documents for the selected users. If you wish to retain this information, select Yes. If you select No, if Mail Routing is reverted back to Notes then the data will be restored from the values recorded in the Migrator for Notes Person document. Otherwise, the Mail File and Mail Server will not be updated assuming the values already exist in the NAB Person document. |
|
Apply ShortName? |
Default is ‘No.’ When running Routing Update functions, the ShortName maybe used for mail forwarding in Coexistence. The Person, Mail-In and Resource Documents can be checked for this field and updated if this is not set. If you wish to have the ShortName check please select Yes. If you select No this will be checked assuming the values already exist in the NAB documents or are not used for Coexistence. Not: this will not alter the ShortName in any cases if the field is present and has an existing value. |
|
ShortName Data Source? |
When ‘Apply ShortName?’ is set to ‘Yes,’ this field will appear. When checking the ShortName and applying a value, if that is not set on the Domino Directory Documents, choose the method to create a ShortName. This can be automatically generated as a unique value using (@Unique), taken from the Internet Address Local Part (left of the @ sign) or set to the Full Name. |
|
| |
|
Disable Directory Synchronization? |
When running Routing Update functions, the Directory Synchronization is disabled. If you wish this to remain enabled, select No. By selecting Yes, the person document will be disabled from directory synchronization operations. |

Email Forwarding Only

|
Settings |
Description |
|---|---|
|
Modify Forwarding Address? |
If using mail forwarding for mail routing to Office 365 or Exchange during the coexistence period without Integration, then select this option. This option will only update the Mail Forwarding Address in the selected Person document(s) rather than the Domain and Mail Type as the above operation performs. If No is selected then no changes will occur and the normal operations will be executed. |
|
Enter New Address Parameters |
If using mail forwarding for mail routing to Office 365 or Exchange during the coexistence period the address will need to be built correctly. Enter the new domain and select the correct address name part. If selecting custom field then the forwarding address will be built based on the value of this custom field in the Domino Directory. If the field value contains a valid RFC 821 Internet address then that address will be used otherwise it will use whatever value plus the configured domain. |
Domino Directory Replication Options
|
Settings |
Description |
|---|---|
|
Enable Replication |
If you wish replication to be executed after the changes are made to the Domino Directory select Yes. By selecting No, updates will occur on the selected Domino Directory but replication of these changes will happen during normal scheduled replication between servers. |
|
Replication Type |
If you select to enable replication, select One Way Sync or Two Way Sync. |
Enable Replication default is ‘No.’ When set to ‘Yes,’ options will expand:

Migration History Settings

|
Settings |
Description |
|---|---|
|
Migration History Method |
Select the method for determining migration history. The Classic – NoteID option uses Migrator for Notes migration history table, stored on the XML server. The Discover History from Migrated Data option scans the migrated data (mailbox, archives, etc.) to find messages previously migrated from Notes. The default selection is ‘Discover History from Migrated Data’. |
|
Additional sources for Migration History |
Appears if Discover History from Migrated Data is clicked; choose the checkboxes of the data courses to be scanned when the migration history is discovered from previously migrated data:
Mailbox – user’s main mailbox Archive – archive message store PSTs – filenames or path to PST files
The target will always be searched for migration history.
Note: When migrating archives ensure that the Archive option is enabled.
Note: If Modern Authentication is enabled for the data migration then the discovered history will only use the target mailbox, archive or PST for migration history. This will not display the options for which mailbox should be scanned as it will only check the target that the data is being migrated into.
For accounts that are re-migrated any previously migrated Notes items that were deleted in Outlook and removed from the Outlook Trash will be migrated again. |
Notes Archive Database Processing

|
Settings |
Description |
|---|---|
|
Create Migration Docs in this Stage |
Specify whether you want to create migration documents during the Audit, Match, Notify, or Migration stage. |
Exchange Archive Migration

|
Settings |
Description |
|---|---|
|
Create Exchange Archive Documents |
Select Yes to create Exchange Archive Migration documents during the matching phase if you will be migrating data to Exchange Archives. Exchange Archive Migration documents will only be created if the user has an archive in Exchange or Office 365. |
Lotus Notes Migration ID

|
Settings |
Description |
|---|---|
|
Notes ID used to access mail files |
Specify the Notes ID file to use during the migration process. This is the ID configured for all migration workstations. |