Mail-enabling Migrator for Notes Database
A Mail-in Database Document is required for mail to be delivered to the newly created server copy of the Migrator for Notes database. Follow the procedure detailed in the Configuring Required Settings: Mail-enabling Migrator for Notes Database section of the Migrator for Notes Installation and Configuration Guide to copy the database to the server and create a Mail-In database document for the Migrator for Notes database.
Local Archive Discovery
The Archive Migration is configured in the Settings under 1. Configuration. Configure the Local Archive Discovery settings under the End user archives tab.

-
Local Archive Migration Profile: Select the migration profile that will be used for the migration. The selected migration profile from the Migration Control Center (MCC) being used for the migrations. This setting will automatically set all created person documents to the selected migration profile. This setting allows scheduled migrations to occur without the need to manually set the migration profile for each user.
|
|

-
Templates to Search For: The list of templates to search for on the end user machine. This list should include the template names being used for local archives in the organization. Use the template name, such as "inotes6" or "dwa6"; not the template filename. Typically, this list should not need to be changed. However, the name of any custom corporate mail templates being used should be added.
-
Decrypt content when copied: Select one of the below options from the drop-down list.
-
Yes: During the replication process, encrypted documents are decrypted for data migration. This option does not affect the encryption settings on the source. This is the recommended option.
-
No: During the replication process, encrypted documents are not decrypted for data migration.
-
User: The end user will be presented with the option decrypt documents when using the Local Archive Discovery application.
-
-
Mailin CMTe DB SMTP: Add the SMTP address that will be used by the Archive Migration to send information back to the Migrator for Notes. The SMTP address can be found in the Migrator for Notes mail-in database document. Open the Required Settings - Additional tab and click on the Open Mail-in Db Doc button to retrieve the SMTP address.
-
Archive Staging Server: The Domino server where the archives will be created. All users must have permissions to create databases and templates. Only one server can be selected. If this setting is not defined, archives will be stored on the end user's hard drive.
-
Top Level Archive Path: The folder path where the archives will be created on the Archive Staging Server. This is the "top level" folder name for all archives created by the Local Archive Discovery application on the server’s data directory. Note that under this folder, the user’s Short name (recommended option) will be used as the next folder name level to categorize the archives by user. This also prevents issues with two users have the same archive file name. This option can be changed in the next setting, Archive Path folder identifier.
-
Archive Path folder identifier: Select one of the below options from the drop-down list.
-
SMTP address: Each user archive folder will be identified by SMTP address.
-
Short name: Each user archive folder will be identified by Short name. This is the recommended option.
-
Full name: Each user archive folder will be identified by Full name. If your organization has multiple individuals with the same full name, it is recommended to use SMTP address or Short name which must be unique.
-
-
Migration Account Canonical Name: Select the Domino Account being used on the migration workstation. This will be added to all ACL when they are replicated to the Domino server. This account is also used to configure the Notes clients on the migrations workers. This migration account must have Archive Database ACL permissions – “Manager Access”.
-
Archive Migration Process: This value determines what to do with the migration after the user has completed the discovery and replicated data to the central Domino server. Select one of the below options from the drop-down list:
-
Automatically schedule archives for migration: After the user has completed the discovery and replicated data to the central Domino server, the migration documents will be created and automatically sent to the Migration Control Center. If multiple control centers are configured, the field "Archive Migration Control Center" is used to define which control center is used for migration. No administrator action is required for the migration to start and will just require monitoring of the migrations. This is the recommended option.
-
-
Manually migrate archives: After the user has completed the discovery and replicated data to the central Domino server, the migration documents will be created and set to the step "2.Mail File Migration/Migration/2.Migrate" with a status of "Ready to migrate" This will require the administrator to take ownership of managing the migration and submit them to the MCC for data migration.
-
Enable scheduled agent/Disable scheduled agent: Enables or disables the agent from polling for migration documents that can be migrated.
If Enable scheduled agent is selected, by default the agent will be enabled on the copy of the Migrator for Notes database, which usually is located on the Domino server.
To “automatically schedule archives for migrations," the scheduled agent cannot be enabled on the Domino server copy because it will not be able to access the SQL database on the controller. You must make a local replica of the database in the controller machine’s data directory. To make a local replica of the database, follow the steps below:
-
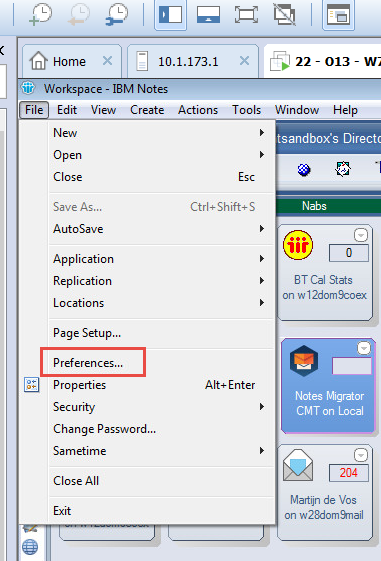
Navigate to the Domino server and open the Migrator for Notes database; then choose File > Replication > New Replica:

-
Create a local, non-encrypted replica:

-
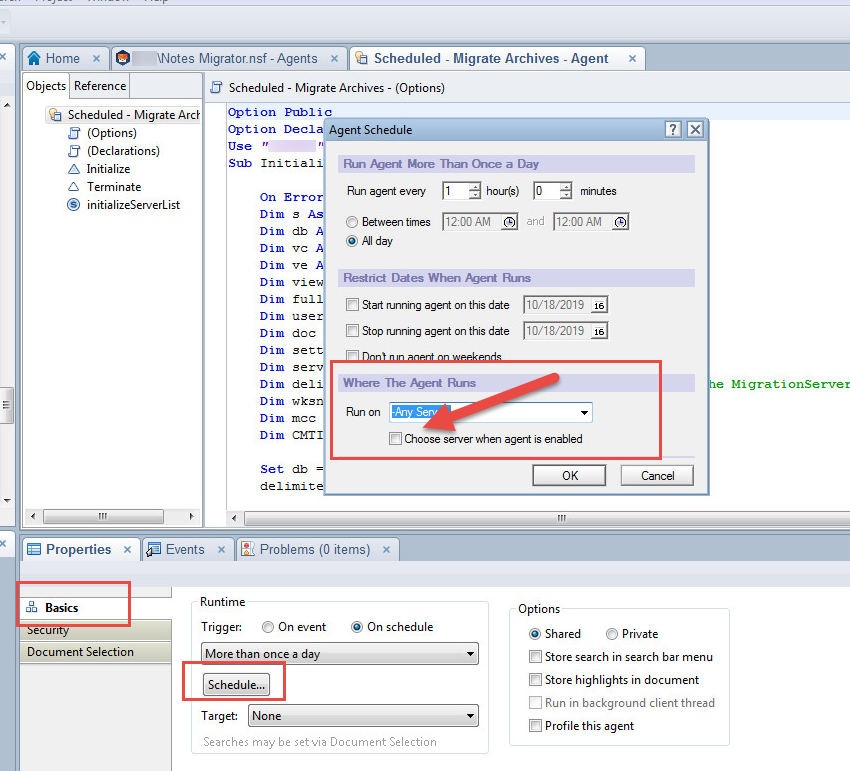
Once created, open the local replica in the Notes Designer client and choose Code > Agents; then double-click the agent Scheduled – Migrate Archives:

-
On the Basics tab, click the Schedule button; when the Agent Schedule dialog box appears, select the Choose server when agent is enabled checkbox; click OK and save the agent:
-
Next, to be sure local agents are enabled on the Notes client on the controller, do the following:
-
Choose File > Preferences from the Notes menu:
-
-
Choose Basic Note Client Configuration; click the Enable scheduled local agents checkbox and click OK:
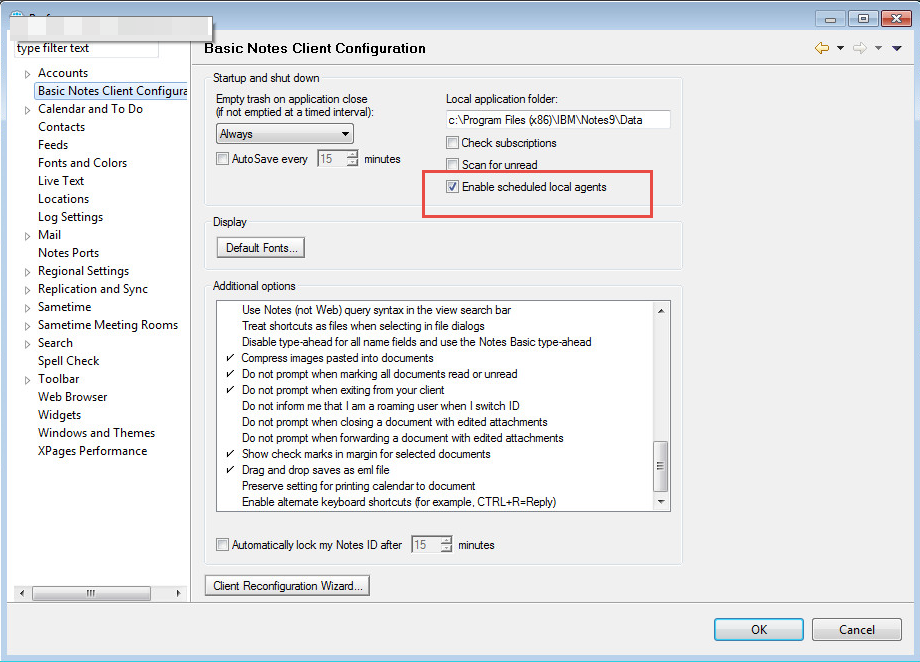
Note: You may have to restart the Notes Client of the change to take effect
-
Next, follow the steps below to schedule the local replication for the database:
-
Go to the replicator page on the Notes client and choose Set Replication/Sync Schedule:
-

-
Configure the frequency of replication from the server copy of Migrator for Notes to the local copy. The agent can only process documents located on the local copy of Migrator for Notes:

-
Once this is all done, when you enable the scheduled agent in the server-based copy of the Migrator for Notes database, choose ‘Local’ as the server to run on.
The Notes client should be running on the Migration Control Centre for the agent to process automatically.
-
Migrate data to: This setting is used only when migrating to an Exchange server. The destination path Database GUID is set in the created migration document and this setting determines the database to use based on the match used on the user’s Production Migration document. Select one of the below options from the drop-down list.
-
Mailbox or pst file: When migrating to an Exchange server, the archive is migrated to a production mailbox or pst file based on the destination set in the Migration Profile Destination Options tab.
-
Exchange Archive (if available): When migrating to an Exchange server, the archive is migrated to an online Exchange Archive if one is available for the user. If an Exchange Archive is not available, the archive is migrated to the production mailbox.
-
-
Attachment Handling: Select one of the below options from the drop-down list.
-
Always detach dlls: The Local Archive Discovery application and dlls will always be detached to the Notes directory when the application is launched.
-
Never detach dlls: The Local Archive Discovery application and dlls will never be detached to the Notes directory when the application is launched. Select this option if the Local Archive Discovery application is being pushed installed to the user workstations.
-
Do not detach dlls if already present: The Local Archive Discovery application and dlls will be detached to the Notes directory when the application is launched only if the dlls are not already present.
-
-
Allow Opt Out: Select one of the below options from the drop-down list.
-
Yes: The user will be presented the option to not have archives migrated.
-
No: The user is not given the option to not have archives migrated.
-
-
Allow mail file replication: Select one of the below options from the drop-down list.
-
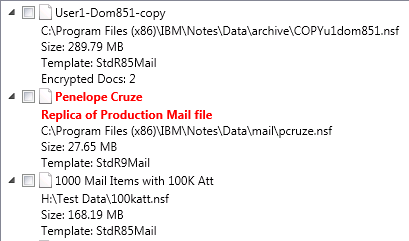
Yes: The user is allowed to discover and upload the local replicas of their production mail file. The replicas will appear in red text in the Local Archive Discovery application.
-
No: The user is not allowed to discover and upload the local replicas of their production mail file.
-
-
Archive migration control center: Select the control centers where the archive migration will be performed. If more than one control center is selected, user files will be distributed round-robin style among the migration servers. All archives for a user is migrated on the same migration server. This setting appears only when multiple Control Centers are enabled.
Section 5: Sending the Local Archive Discovery Message
After the Local Archive Discovery settings are set and the user has been migrated, go to Post Migration Actions (2.Mail File Migration/Migration/3. Post Migration Actions) and send the Local Archive Discovery message template to the users. After sending, monitor user responses on the "Pending Responses".
|
|

Section 6: End User Experience
The end user will receive the message providing them with the option to prepare their archives for migration. If Opt Out is allowed, the administrator is notified if the end user decides to opt out.

The Local Archive Discovery application will launch in a new window. The user will then walk through the steps to select the files to migrate.
|
|
-
Click Next on the Welcome screen.
-
The user will select the ID to use for the discovery process. Note that encrypted data can only be accessed with the original ID.
-
The user checks or unchecks the Decrypt option and clicks Next to continue. This screen only appears if the Decrypt content when copied setting is set to User.
-
The user will select the drives/folders to then click Search to begin the discovery process. The drives can be expanded and specific subfolders or the entire drive (including all subfolders) can be selected. The Add Network Folder button can be used to add existing mapped network folders that are not automatically found.
-
The discovery process will run and complete. The user will select the files to migrate and click Next. Clicking the Nothing to Archive button closes the application, ends the process, and notifies the administrator that the user has no archives to migrate.


The results can be expanded to display the full path of the NSF file, file size, template, and number of encrypted documents. Production mail file replicas are displayed in red text.
-
The user will confirm the files to migrate and click Next to continue and the select file will load as shown below:
-
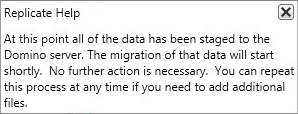
The replication process will run and complete. The application will close when the user clicks Finish. To repeat this process, a new Local Archive Discovery message must be sent to the end user so the end user can relaunch Local Archive Discovery application.