
Introduction - Minimal Permissions Model
Due to security policies, some organizations cannot allow Power365 Exchange Admin level access to the source and/or target tenants. These organizations may require applications running within their Microsoft 365 tenant to use a least privilege model and only allow permission to the mailboxes in scope for migration.
For Power365 to work within these least privilege environments, an alternative to the Exchange Admin role must be provided. This document outlines a permission model for Microsoft 365 tenants that minimizes the permissions required to migrate a mailbox between tenants, while providing all functionality included within a Power365 Basic project.
Solution Overview
This solution sets out the procedures for minimizing the permissions required to perform Power365 Mailbox Migrations for Power365 Basic projects. Therefore, the Exchange Admin role is not required to be given to the service account in the source and/or target tenant.
The solution utilizes Microsoft 365 Admin Roles to minimize the permissions for the service account. Implementing this solution requires the creation of the following Exchange Online components in the Microsoft 365 tenant where the minimal permissions are required:
-
A new Distribution Group dedicated to the migration and has the source/target mailboxes as members
-
A new Management Role Group having the required roles to perform mailbox migrations.
-
A new Management Scope utilizing the distribution group to limit the permissions to the source/target mailboxes in scope for migration
Note: Administrators implementing this permissions model must have Exchange Admin access to the tenant to make the required configuration changes.
All other Power365 Requirements can be reviewed in the Power365 Help Center (https://help.binarytree.com/power365/content/platform%20requirements.htm).
Solution Overview
Due to security policies, some organizations cannot allow Power365 Exchange Admin level access to the source and/or target tenants. These organizations may require applications running within their Microsoft 365 tenant to use a least privilege model and only allow permission to the mailboxes in scope for migration.
For Power365 to work within these least privilege environments, an alternative to the Exchange Admin role must be provided. This document outlines a permission model for Microsoft 365 tenants that minimizes the permissions required to migrate a mailbox between tenants, while providing all functionality included within a Power365 Basic project.
This solution sets out the procedures for minimizing the permissions required to perform Power365 Mailbox Migrations for Power365 Basic projects. Therefore, the Exchange Admin role is not required to be given to the service account in the source and/or target tenant.
The solution utilizes Microsoft 365 Admin Roles to minimize the permissions for the service account. Implementing this solution requires the creation of the following Exchange Online components in the Microsoft 365 tenant where the minimal permissions are required:
-
A new Distribution Group dedicated to the migration and has the source/target mailboxes as members
-
A new Management Role Group having the required roles to perform mailbox migrations.
-
A new Management Scope utilizing the distribution group to limit the permissions to the source/target mailboxes in scope for migration
Note: Administrators implementing this permissions model must have Exchange Admin access to the tenant to make the required configuration changes.
All other Power365 Requirements can be reviewed in the Power365 Help Center (https://help.binarytree.com/power365/content/platform%20requirements.htm).
Implementation
This section outlines the steps required to implement the minimal permissions model in either the source or target tenant. PowerShell is the recommended way of creating the required components, although the Microsoft 365 admin center interface can be used.
Assumptions
-
The Power365 Service Account has been created within the tenant, with the following configuration:
-
E1 or higher license
-
An active Exchange Mailbox
-
-
The authentication method within the Power365 project will be Basic Authentication
Step 1: Create Distribution Group
A Distribution Group is required in the tenant. All mailboxes in scope for migration will be a member of this group. The Management Scope will target this Distribution Group to restrict Power365 access to only the mailboxes that are a member of the Distribution Group.
-
Use PowerShell to create the Distribution Group using the following command:
$AdGroup = New-DistributionGroup -Name "BT-Migrations"
-
Populate the Distribution Group with source or target mailboxes that Power365 will migrate from/to.
Step 2: Create Exchange Online Management Scope
A Management Scope provides a method to limit an Exchange Online Admin Role to a specific set of mailboxes. The new Management Scope can be created using the following PowerShell command:
New-ManagementScope –Name “Power365 Mailboxes” -RecipientRestrictionFilter "MemberOfGroup -eq '$($ADGroup.DistinguishedName)'"
Step 3: Create Exchange Online Management Role Group
A dedicated Management Role Group should be created for the migrations to ensure separation between specialist role groups and BAU role groups. The Exchange Online Management Role Group can be created using the following PowerShell command:
New-RoleGroup -Name "Power365 Mailbox Access" -Description "Mailbox Access Role group for use with Binary Tree Power365 Mail Migrations" -CustomRecipientWriteScope "Power365 Target Mailboxes" -Roles “Mail Recipients”,"Migration"
To complete these tasks in Exchange Online Control panel, use the following steps:
-
Logon to the Exchange Online Admin Center.
-
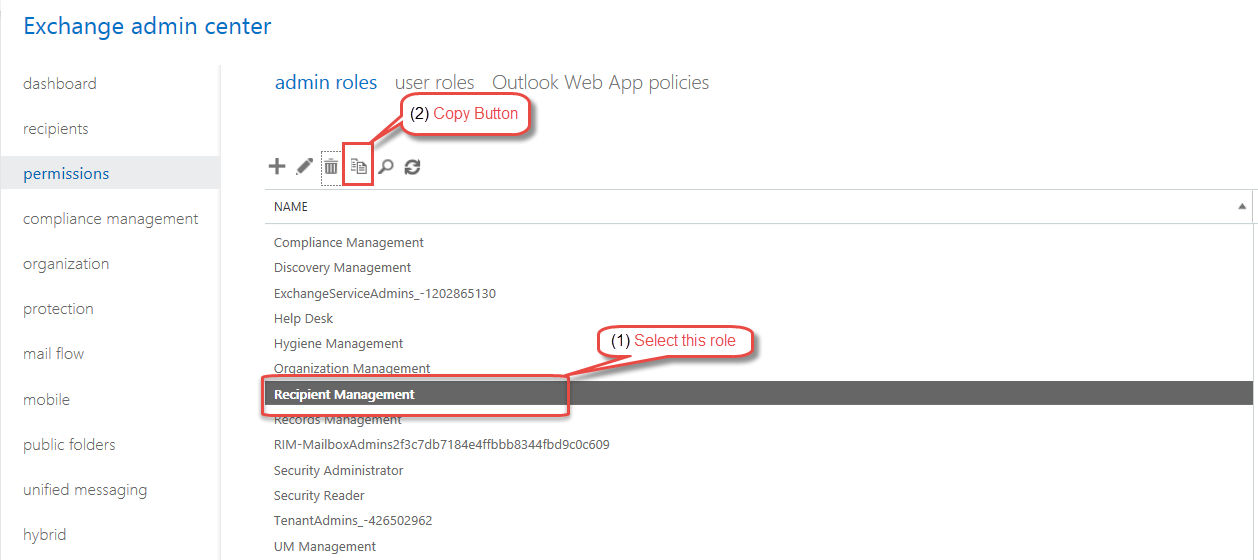
In the Exchange Online Admin Center, select Permissions.
-
Select the default Recipient Management (1) admin role and click the copy button (2).
-
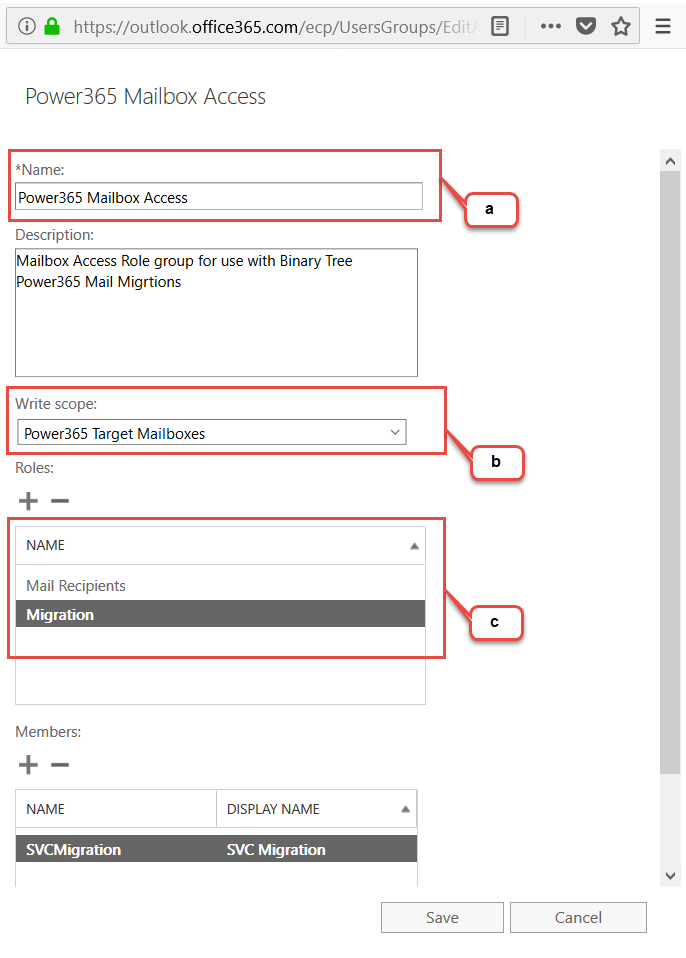
This will create a copy of the Recipient Management Role:
-
Change the Name to “Power365 Mailbox Access”.
-
Set the Write scope to Power365 Target Mailboxes (the name of the management scope) and save the Management role group.
-
Remove all Roles except for:
-
Mail Recipients
-
Migration
-
-
Step 4: Assign the Role Group to the Power365 Service Account
The Power365 Service account must now be assigned to the Management Role Group. By assigning the Service Account to the Role Group, the Service Account will have the required permissions to migrate from or to mailboxes that are a member of the Distribution Group, created in step 1.
To complete this task using PowerShell, use the following command:
Add-RoleGroupMember -Identity "Power365 Mailbox Access" -Member "<Service Account UPN>"
To complete this task using Exchange Online Control Panel, use the instructions below:
-
Open the properties of the Power365 Mailbox Access Management Role Group and click the + button under the Members section.
-
From the available list, select the service account and click the add button. Then, click the OK button to add the user as a member of the Management Role Group. Then, save the changes to the Role Group.

Assumptions
This section outlines the steps required to implement the minimal permissions model in either the source or target tenant. PowerShell is the recommended way of creating the required components, although the Microsoft 365 admin center interface can be used.
-
The Power365 Service Account has been created within the tenant, with the following configuration:
-
E1 or higher license
-
An active Exchange Mailbox
-
-
The authentication method within the Power365 project will be Basic Authentication
Step 1: Create Distribution Group
A Distribution Group is required in the tenant. All mailboxes in scope for migration will be a member of this group. The Management Scope will target this Distribution Group to restrict Power365 access to only the mailboxes that are a member of the Distribution Group.
-
Use PowerShell to create the Distribution Group using the following command:
$AdGroup = New-DistributionGroup -Name "BT-Migrations"
-
Populate the Distribution Group with source or target mailboxes that Power365 will migrate from/to.
Step 2: Create Exchange Online Management Scope
A Management Scope provides a method to limit an Exchange Online Admin Role to a specific set of mailboxes. The new Management Scope can be created using the following PowerShell command:
New-ManagementScope –Name “Power365 Mailboxes” -RecipientRestrictionFilter "MemberOfGroup -eq '$($ADGroup.DistinguishedName)'"
Step 3: Create Exchange Online Management Role Group
A dedicated Management Role Group should be created for the migrations to ensure separation between specialist role groups and BAU role groups. The Exchange Online Management Role Group can be created using the following PowerShell command:
New-RoleGroup -Name "Power365 Mailbox Access" -Description "Mailbox Access Role group for use with Binary Tree Power365 Mail Migrations" -CustomRecipientWriteScope "Power365 Target Mailboxes" -Roles “Mail Recipients”,"Migration"
To complete these tasks in Exchange Online Control panel, use the following steps:
-
Logon to the Exchange Online Admin Center.
-
In the Exchange Online Admin Center, select Permissions.
-
Select the default Recipient Management (1) admin role and click the copy button (2).
-
This will create a copy of the Recipient Management Role:
-
Change the Name to “Power365 Mailbox Access”.
-
Set the Write scope to Power365 Target Mailboxes (the name of the management scope) and save the Management role group.
-
Remove all Roles except for:
-
Mail Recipients
-
Migration
-
-
Step 4: Assign the Role Group to the Power365 Service Account
The Power365 Service account must now be assigned to the Management Role Group. By assigning the Service Account to the Role Group, the Service Account will have the required permissions to migrate from or to mailboxes that are a member of the Distribution Group, created in step 1.
To complete this task using PowerShell, use the following command:
Add-RoleGroupMember -Identity "Power365 Mailbox Access" -Member "<Service Account UPN>"
To complete this task using Exchange Online Control Panel, use the instructions below:
-
Open the properties of the Power365 Mailbox Access Management Role Group and click the + button under the Members section.
-
From the available list, select the service account and click the add button. Then, click the OK button to add the user as a member of the Management Role Group. Then, save the changes to the Role Group.