Introduction to Rapid Recovery
Rapid Recovery is a backup, replication, and recovery solution that offers near-zero recovery time objectives and recovery point objectives. Rapid Recovery offers data protection, disaster recovery, data migration and data management. You have the flexibility of performing bare-metal restore (to similar or dissimilar hardware), and you can restore backups to physical or virtual machines (VMs), regardless of origin. Rapid Recovery lets you create backup archives to a wide range of supported systems including archiving to the cloud. With Rapid Recovery, you can replicate to one or more targets for added redundancy and security.
Rapid Recovery offers:
- Flexibility. You can perform universal recovery to multiple platforms, including restoring from physical to virtual, virtual to physical, virtual to virtual, and physical to physical.
- Cloud integration. You can export a VM, archive and replicate to the cloud, and perform bare metal restore from archives in the cloud. Compatible cloud services include Microsoft Azure, Amazon Web Services (AWS), any OpenStack-based provider (including Rackspace), and Google Cloud. US government-specific platforms include AWS GovCloud (US) and Azure Government.
- Intelligent deduplication. You can reduce storage requirements by storing data once, and referencing it thereafter (once per repository or encryption domain).
- Live Recovery. Using the Live Recovery feature of Rapid Recovery Agent, you have instant access to critical data first, while remaining restore operations complete in parallel. You can use Live Recovery to restore data from a recovery point of any non-system volume of a Windows machine, physical or virtual. Live Recovery is not supported for agentlessly protected machines, Linux machines, or cluster-shared volumes.
- File-level recovery. You can recover data at the file level on-premises, from a remote location, or from the cloud.
- File-level search. Using criteria you specify, you can search a range of recovery points for one or more files. From the search results, you can then select and restore the files you want to the local Core machine directly from the Rapid Recovery Core Console.
- Virtual machine export. Rapid Recovery supports one-time virtual export, letting you generate a VM from a recovery point; and virtual standby, in which the VM you generate is continually updated after each backup. Compatible VM hypervisors include VMware vCenter/ESXi, VMware Workstation, Microsoft Hyper-V, Oracle VM VirtualBox, and Microsoft Azure. You can even perform virtual export to Hyper-V cluster-shared volumes.
- Rapid Snap for Virtual support. Enhanced support for virtualization includes agentless protection for vCenter/ESXi VMs and for Hyper-V VMs. Rapid Snap for Virtual includes protection and autodiscovery for VMware ESXi 6.0 and higher with no software agent installed. Host-based protection supports installing Rapid Recovery Agent on a Microsoft Hyper-V host only, letting you agentlessly protect all its guest VMs.
- Application support. Rapid Recovery is built with application support. When you protect SQL Server or Microsoft Exchange machines (whether using Rapid Recovery Agent or agentless protection), the backup snapshots captured are automatically application-aware; open transactions and rolling transaction logs are completed and caches are flushed to disk before creating snapshots. Specific application features are supported, including SQL attachability checks (for SQL Server) and database checksum and mountability checks (for Exchange Server). If you protect Oracle 12c or 18c servers with Rapid Recovery Agent, you can also perform DBVERIFY database integrity checks.
See the following resources for more information about Rapid Recovery.
Command Line Management utility
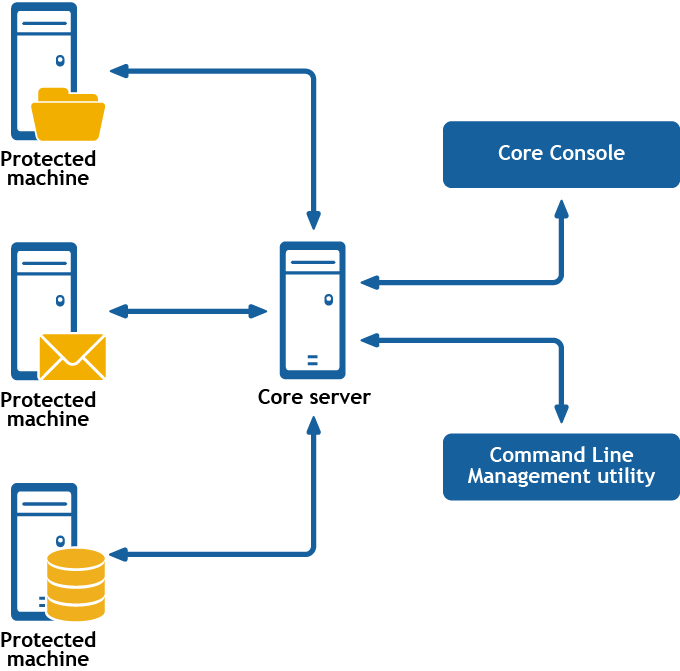
Rapid Recovery consists of several software components. Key components relevant to this topic include the following:
- The Rapid Recovery Core manages authentication for protected machines, schedules for transferring data for backup and replication, export to virtual machines, reporting, and bare metal restore (BMR) to similar or dissimilar hardware.
- The Rapid Recovery Agent is responsible for volume snapshots and fast transfer of the data to the repository managed by the Core.
- The Rapid Recovery Command Line Management utility, cmdutil.exe, provides third-party access to manage system functionality. This tool permits scripting of the Rapid Recovery Core management functions.
Rapid Recovery Command Line Management provides command-line functions
Rapid Recovery Command Line Management is a Windows command line utility that lets users interact with the Rapid Recovery Core server. It offers some of the same functions that the Rapid Recovery Core Console graphic user interface provides. For example, Rapid Recovery Command Line Management utility can mount recovery points or force a snapshot.
The Rapid Recovery Command Line Management utility is embedded in every installation of the Rapid Recovery Core. To open the Command Line Management utility for a default installation, open the Command Prompt with Run as Administrator, and change the directory to the path C:\Program Files\AppRecovery\Core\CoreService\, which is the location of the cmdutil.exe file. From this directory, you can pass action flags to the Rapid Recovery Command Line Management utility through a selection of command options and qualifiers to perform limited management functions.
This section describes the commands and options available for the Rapid Recovery Command Line Management utility.
There may be times when you need to change the Rapid Recovery license applied to a machine, such as when moving from a trial license to a subscription or perpetual license. In such instances, you can change the license in the Command Prompt by using the applylicense command.
Usage
The usage for the command is as follows:
/applylicense -core [host name] -user [user name] -password [password] -licensekey [license key] -licensepath [license file path] -licensenumber [license number] -email [email address]
Command Options
The following table describes the options available for the applylicense command:
Table 1: ApplyLicense command options
-? |
Display this help message. |
-core |
Optional. Remote Core host machine IP address (with an optional port number). By default, the connection is made to the Core installed on the local machine. |
-user |
Optional. User name for the remote Core host machine. If you specify a user name, you must also provide a password. If none is provided, then the credentials for the logged-on user are used. |
-password |
Optional. Password to the remote Core host machine. If you specify a password, you also have to provide a user name. If none is provided, then the credentials for the logged-on user are used. |
-licensekey |
Optional. A 30-character key comprising six groups of five alphanumeric characters, each separate by a hyphen. Use this key when a license file is not available. |
-licensepath |
Optional. The path to the file that ends with the .lic extension. If a license file is available, you can use this option instead of the -licensekey. |
-licensenumber |
Optional. You may have received this nine-digit license number in an order confirmation email. If you provide this number, use the email address that received it for verification. |
-email |
Optional. If you use the -licensenumber, you must include the email address that received it for verification. |
Examples:
Change the license key associated with this Core to JL09F-89FSD-6THFS-DSE34-KS3D5-65DF2:
>cmdutil /applylicense -core 10.10.10.10 -user admin -password 676df#df -licensekey JL09F-89FSD-6THFS-DSE34-KS3D5-65DF2
Change the license key associated with this Core to the key contained in the license file:
>cmdutil /applylicense -core 10.10.10.10 -user admin -password 676df#df -licensepath C:\MyLicenseFile.lic
Change the license number associated with this Core to 111-111-111 using john.doe@example.com to verify the license:
>cmdutil /applylicense -core 10.10.10.10 -user admin -password 676df#df -licensenumber 111-111-111 -email john.doe@example.com
