
Step 6: Enabling FIPS compliant algorithms
Using adcorgpwd.exe to enable FIPS compliant algorithms
- Run adcorgpwd.exe (Default location: C:\Program Files (x86)\Quest\InTrust\Server\ADC\SupportTools) using below command:
adcorgpwd.exe -e
OR
adcorgpwd.exe -enablefips
|
|
Note: If adcorgpwd.exeis not used with the options as mentioned above, the product may still use some non-FIPS compliant algorithms. |

After You Upgrade
The following section describes the necessary steps you need to take after upgrade.
-
Run InTrustFIPSMigratorTool.exe
-
Go to C:\Program Files (x86)\Quest\InTrust\Server\ADC\SupportTools folder.
-
Run InTrustFIPSMigratorTool.exe tool (refer page number 15 of this guide and follow the steps from 2 to 7).
-
-
Update Server ID
-
In Quest InTrust Manager | Configuration | Data Stores | Repositories, right-click on all repositories name individually and select Properties.
-
On the Indexing tab, select InTrust Server and click OK (Attached screenshot for reference)
-
-
Network Access for InTrust_Reports.
-
Go to C:\Users\Public\Documents\Quest folder
-
Right click on Reports folder & go to properties
-
On sharing tab, Click on Advanced Sharing
-
Click on Permissions -> Add
<Server Name>\AMS Readers & <Server Name>\AMS Organization Servers
-
-
After installing the 11.6.0 version, please follow the below-mentioned steps to enable FIPS manually.
-
Using adcorgpwd.exe to enable FIPS compliant algorithms
-
Run adcorgpwd.exe (Default location: C:\Program Files (x86)\Quest\InTrust\Server\ADC\SupportTools) using below command:
adcorgpwd.exe -e
OR
adcorgpwd.exe -enablefips
Note: If adcorgpwd.exe is not used with the options as mentioned above, the product may still use some non-FIPS compliant algorithms. Once FIPS compliant algorithms are enabled, they will remain enabled and cannot be changed back to non-FIPS algorithms.
The Intrust Server and agents are updated to use FIPS approved algorithms and hence if we are adding 11.6.0 server in existing organization with agents and server with 11.4 or below, the communication and authentication cannot succeed..
-
-
Restart the machine.


The following topics describe some differences you may find in InTrust after the upgrade.
Differences in Forwarding Configuration
A new event forwarding engine was introduced in InTrust 11.4. As a result, the following organization parameters fell out of use:
- FORWARDING_RETENTION_PERIOD
- FWD_PARAM_IS_ALIVE_PERIOD_SECONDS
Even though they are still visible in the organization parameter editor, they have no effect in InTrust 11.4 and later.
Changes in Rule Group Structure
In InTrust 11.3.2, the rule group tree was reorganized to put all attack detection rules in an easy-to-locate dedicated group. The upgrade doesn't reconfigure any existing real-time monitoring policies, so if you want to use the rules at their new locations, you need to edit the policies that reference the old rules. Otherwise, the policies will keep applying the rules at their old locations.
IntrustFIPS Migrator Tool
This utility migrates InTrust Task and Job details from previous version to 11.6.
- Install ADC_SERVER_RESOURCE_KIT.11.6.0.xxxx Msi.
- Go to C:\Program Files (x86)\Quest\InTrust\Server\ADC\SupportTools folder.
- Launch InTrustFIPSMigratorTool.exe tool with local admin privilege and the SQL login having SQL admin privilege.
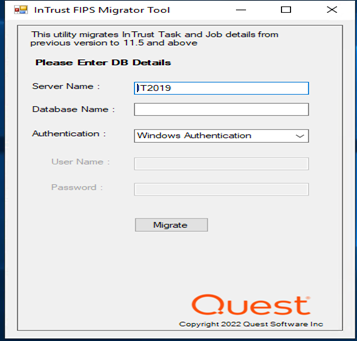
- Enter the correct SQL server and database name.
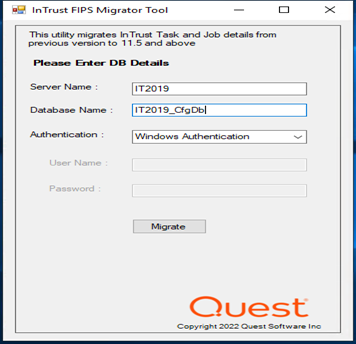
- Select Authentication Type.

- For SQL Server Authentication, we should enter Username & Password

- Click on Migrate Button.

The Migration is successfully completed.
Upgrading with Configuration Database Replication Enabled
If configuration database replication over a WAN link is configured in your InTrust deployment, you need to take a few additional configuration steps. To follow this procedure, you should have the Replication of the InTrust Configuration Database document handy. For details about any steps, see the Technical Details and Procedures topic in that document.
- Complete the preparatory steps from the Before You Start topic.
- Make a backup copy of the configuration database.
- Stop the Quest InTrust Real-Time Monitoring Server and Quest InTrust Server services on the InTrust server that is connected to the Subscriber database.
- Make sure that the configuration databases are fully synchronized. Wait for initial synchronization to complete successfully. To monitor the synchronization status, right-click the name of the subscription you have created and select View Synchronization Status from the shortcut menu to see a message in the Status pane reading:
Waiting 60 second(s) before polling for further changes. - Delete AdcCfgPublication.
- Delete the subscription.
- Note the name of the Subscriber database and remove the database. Important: You will need to specify the same name later.
- Upgrade the Publisher InTrust server the regular way, as described in Upgrade the First InTrust Server in Your InTrust Organization.
- Create AdcCfgPublication on the Publisher SQL server.
- Create a subscription for the Subscriber database. Important: The name of the new Subscriber database must be the same as the name of the database you removed on step 7.
- Make sure that the configuration databases are fully synchronized.
- Connect to the Subscriber SQL server using credentials with the db_owner role for the new InTrust configuration database. Run the configdb.sql script (find it in the Scripts\Database Scripts folder in the InTrust distribution) on that database. You may receive some errors while the script is running, such as:
- Updating columns with the rowguidcol property is not allowed.
- GETMAXVERSION: The parameter 'lineage' is not valid.
- The statement has been terminated.
These errors can be safely ignored.
- Confirm that the Subscriber SQL server is working properly.
- Start the Quest InTrust Real-Time Monitoring Server and Quest InTrust Server services, run InTrust Manager and connect it to the Subscriber InTrust server. Check that the InTrust objects you need are available and their properties are set up correctly. If not, consider contacting Quest Support; you may have made a mistake along the way.
- Upgrade the Subscriber InTrust server the regular way, as described in Step 2: Upgrade the First InTrust Server in Your InTrust Organization. For the rest of the upgrade process, follow the Upgrade the Other Servers topic and subsequent topics.