
Introduction
The following document contains overview of the Alternate Access Server feature. Because archived files must be accessible for users to browse their data from ArchiveWeb7 even if file servers are inaccessible or decommissioned, it is necessary to provide solution that controls the ability of users to view or access archived files.
The purpose of this feature is to establish alternate access to archived files even if the server, from which they have been archived, is not in the environment any more. The feature is available since Archive Manager for Files v7.2. However, it can be utilized also when upgrading from older versions. When upgrading, a special tool must be used to process the folder/file permissions. The tool stores existing file system permissions for archived files in database to enable further work with archived files. The ArchiveWeb interface will be used for preview and download of files.
Basic requirements for the environment where the feature can be used:
·Common database where Archive Manager for Files stores its metadata for all servers that share same ArchiveWeb front-end
·Common HSM server for all servers that share same ArchiveWeb front-end
·Common Search server for all servers that share same ArchiveWeb front-end
Software prerequisites
·.NET Framework 4.0
·Windows Server 2016 / 2019 / 2022
·SQL Server 2014 or higher / Oracle 19c or higher
This feature/tool is installed automatically when the Archive Manager for Files Installer (v7.2 and higher) runs.
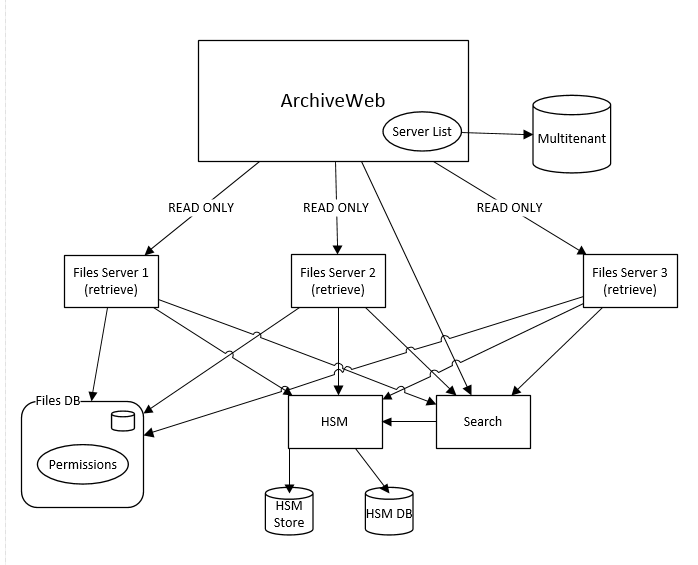
Topology
Archive Manager for Files archive server will offer retrieve functionality in its core components for file access. Core services will be able to handle retrieve access from any client which uses the File Archive API.
Configuration
Alternate access is automatically active in Archive Manager for Files. To provision an alternate server:
·Install two instances of Archive Manager for Files
·Then specify one of the servers as an Archive Server and the second as a Retrieve Server in ArchiveWeb
Steps to set up a Retrieve Server
1.To set the alternate access server, open ArchiveWeb.
2.Click Logged-on-User-Name > Manage Settings > Management > File Management > Archive Servers. The functionality is turned on if any user with rights creates a relationship between Archive server and retrieve server. Retrieve server can be any archive/retrieve server complying with decommission requirements.
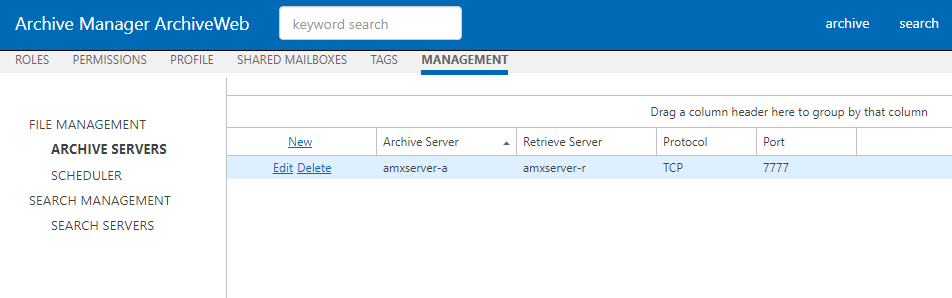
Columns descriptions:
Archive Server - files archive server responsible for archive and data post-processing
Retrieve Server - files retrieve server responsible for data retrieve
Protocol - active communication protocol for data retrieve. Can be archive/files server where for Files core is installed
Port - active Files core communication port for data retrieve
3.Each Archive Server can be added only once and can have only one Retrieve Server.
4.In the list view either:
·Click New to add a new File Archive Server. Enter one server as the Archive Server and the second server as the Retrieve Server. This second server will process requests when the Archive Server is inaccessible or decommissioned completely. An Archive Server that has already been added cannot be added as a Retrieve server.
-or-
·Click Edit for the existing File Archive server and enter the second server as the Retrieve Server.
Permission Update Tool
In case of upgrading, a special tool is utilized. This tool processes user permissions to already archived files and thus enables alternate access also for items archived with previous Archive Manager versions.
Lets say you have been archiving files with Archive Manager for some time already. Now you wish to decommission one of the old file servers in your environment but want to keep its folders and files still available for users. Archive Manager Alternate Access feature allows access to the required folders and files in ArchiveWeb. The tool will process the old server files and establish relevant references to them via active Archive Manager for Files server (with updated permissions).
By default the tool is located here: C:\Program Files (x86)\Quest\Archive Manager for Files\Permission Update Tool\ PermissionsUpdate.exe
|
|
NOTE: The tool is not necessary, if all files have been archived and File permissions changes are tracked (Enterprise Manager / Settings / General / Files permissions changes tracking). |

Steps to use the tool
1.Run the tool from <installdir>\Quest\Archive Manager for Files\Permission Update Tool\ PermissionsUpdate.exe (where <installdir> is installation directory of Archive Manager for Files)
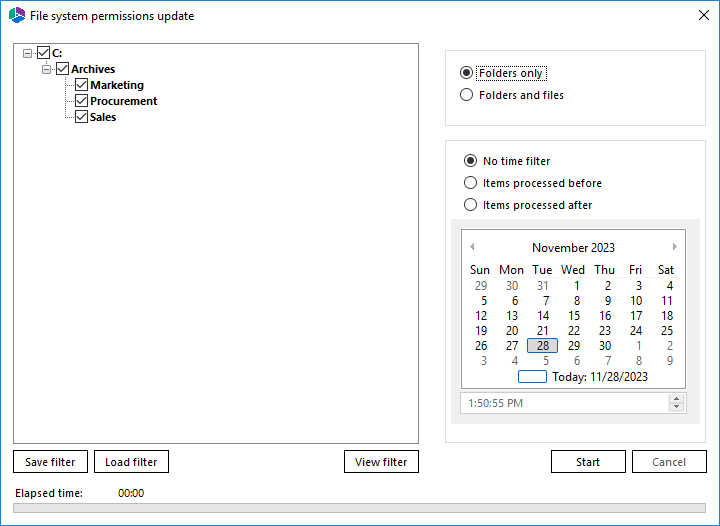
2.By default all folders are selected recursively. Only selected folders will be processed, and these folders will be accessible via ArchiveWeb.
|
|
NOTE: Click the checkbox once to select corresponding folder, click twice to select all subfolders of that folder and clicking once again will remove all checks in the branch. Number of currently selected folders appears under the tree view. |
3.If necessary, define more filters in the right pane:
·Folders only user permissions only on the folders lever will be processed (not so time consuming)
·Folders and files user permissions on both folders and files level will be processed
·Time filtering applicable only in cases when some folders/files have been already processed by this tool; you may have canceled the permission processing and want to continue next day from the point where the tool stopped
4.Save the filter for future use or Start the process. When the process is finished, Results window appears. Click on the Detail link to view result details in separate window:
·Succeeded items with file system permissions successfully updated in database
·Skipped items found in database but not found at disk
·Failed items which file system permissions were not updated for some reason
Running application in silent mode
If application is started with command line argument -run, settings are read from saved filter settings and update process is started automatically.
Running application command: PermissionsUpdate run