Provisioning Teams
The provisioning task help you to perform the following:
- Provision teams in the target tenant.
- Resolve naming conflicts.
Considerations
- After all source teams are discovered you can begin provisioning teams on the target tenant with a Teams Provisioning Task. Verify that all associated accounts are matched or migrated before you create the provision task.
- When teams are provisioned, the account that is assigned the Migration Manager role will be added to the source teams, private channels and shared channels to prepare for migrating the channel settings to the target tenant.
- If one or more new private channels or shared channels are added to a source team after provisioning, then you must re-provision the team in the target tenant to ensure that the SharePoint content is discovered for those new channels.
- When teams are provisioned on the target tenant, a Discover SharePoint Contents Task is run. The task discovers the corresponding SharePoint site collection and its contents listed in the SharePoint Contents tab.
- Teams in the target tenant may take up to 24 hours to be fully provisioned by Microsoft.
To start a Teams Provisioning Task:
- Log in to Quest On Demand and choose an organization if you have multiple organizations.
- From the navigation pane, click Migration to open the My Projects list.
- Create a new project or open an existing project.
- Click Teams from the project tiles, or click Open from the Teams tile to open the Teams dashboard.
- Select one or more teams from the Teams List View.
- Click Provision. The New Teams Provisioning Task wizard opens.
- Step 1: Provision Options

- Choose from the following options if a team with the same name exists on target:
- Provision a new team on the target with the original name plus suffix - Select this option to provision a new team on the target tenant by adding a suffix to the team name.
- New team display name suffix - The default suffix is Migrated. You can specify another suffix.
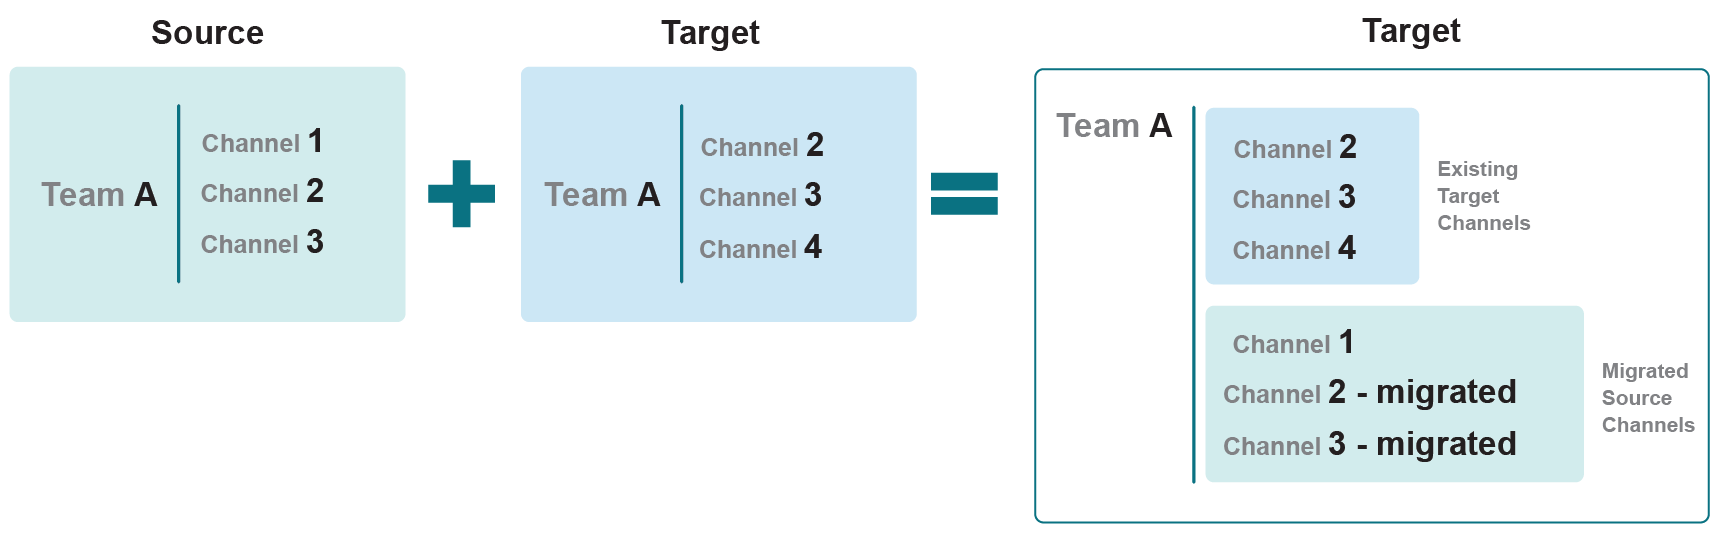
- Merge to the existing team on target - Select this option to merge a team in the source tenant with a team in the target tenant that has the same name. Then select an option if a team channel with the same display name already exists in the target team:
- Provision a new channel on the target with the original name plus suffix - Select this option to provision a new team channel on the target tenant by adding a suffix to the channel name.
- New channel display name suffix - The default suffix is Migrated. You can specify another suffix.
- Merge source channel conversations with the Target channel - Select this option if the target channel is empty.
- Preferred location in target multi-geo tenant - Leave the preferred data location as Default if the target tenant is a multi-geo tenant (see Microsoft 365 Multi-Geo). All teams and groups will be migrated to the same region as the target admin. Alternatively, select the geo location configured for the target tenant.
|

|
TIP: To migrate teams/groups to different regions, the best practice is to create a collection for each region (see Managing Teams with Collections ) and add the teams/groups to the appropriate collection. Example collection names are "Migrate to EUR", "Migrate to JPN" and "Migrate to NAM". Use the collection as a filter to create the provision task. |
- Suppress Group Welcome Message - Select this option to prevent spamming users with welcome messages when Teams are provisioned on the target tenant.
|
|
NOTE: Suppressing these messages may result in performance degradation due to issues with Microsoft’s synchronization behavior. We suggest you check the performance during the pilot migration. |
- Click Next.
- Step 2: Notification
- Send notification email once the task is completed - select this option to send a notification email when a provisioning task completes.
- Only in a case of failure - Select this option to send the email if the provisioning task fails to complete successfully.
- Recipients - enter the email address of the recipients of this email. You can specify multiple recipient email addresses separated by semicolon.
- Click Next.
- Step 3. Schedule
- Choose from one of three options to schedule the task. The scheduler will be activated only after you complete the task wizard.
- Run now - task runs immediately.
- Run later - task must be started manually.
- Schedule - task will be started at a future date and time entered in the corresponding calendar field.
- Click Next.
- Step 4: Summary
- Verify the task specifications as described below:
- Name - name of the task. You can specify a custom name. The default name is Provision Teams.
- Source tenant - name of the tenant in this project.
- Target tenant - name of the target tenant in this project.
- Scheduled start - date and time when the task will start. Now indicates that the task will start immediately.
- Click Back to revise or review a previous step or click Finish to complete the task wizard and start the task as scheduled.
Removing Teams
To manage large lists of teams in a project, you can remove one or more teams from the teams list view that you don't need for migration. The teams that are removed will remain in the source tenant and you must re-discover the teams in the project when you need them for migration.
When teams are removed, all associated items, mappings and migration information will also be removed from the project. When these teams are rediscovered, they will be treated as new teams in the project and the process of provisioning and migration of the teams and related items must be repeated.
- Log in to Quest On Demand and choose an organization if you have multiple organizations.
- From the navigation pane, click Migration to open the My Projects list.
- Create a new project or open an existing project.
- Click the Teams tile, or click Open from the Teams tile to open the Teams dashboard.
- Select the Teams tab and select List View if not already selected.
- Select the teams you want to remove.
|
|
TIP: Use filters, search or collections to quickly navigate through the list of teams. |
- Click More Actions and then click Delete. The New Remove Team Mappings Task wizard starts.
- Step 1: Description
- Click Next.
- Step 2: Notification
- Send notification email once the task is completed - select this option to send a notification email when a discovery task completes.
- Only in a case of failure - select this option to send the email if the discovery task fails to complete successfully.
- Recipients - enter the email address of the recipients of this email. You can specify multiple recipient email addresses separated by semicolon.
- Click Next.
- Step 3: Schedule
- Choose from one of three options to schedule the task. The scheduler will be activated only after you complete the task wizard.
- Run now - task runs immediately.
- Run later - task must be started manually.
- Schedule - task will be started at a future date and time entered in the corresponding calendar field.
- Click Next.
- Step 4: Summary
- Verify the task specifications as described below:
- Name - name of the task. You can specify a custom name. The default name is Remove Teams.
- Source tenant - name of the source tenant in this project
- Target tenant - name of the target tenant in this project.
- Scheduled start - date and time when the task will start. Now indicates that the task will start immediately.
- Click Back to revise or review a previous step or click Finish to complete the task wizard and start the task as scheduled.
Collecting Statistics
The Collect Team Statistics Task for Teams conducts an assessment of all teams in the source tenant and matching teams in the target tenant. It provides information like member count, content size (in GB), planner count and planner task count for the teams in the source tenant, and optionally in target tenant if the team is already provisioned.
Each Collect Team Statistics Task generates events. Events are milestones that a task achieves as it runs. For example, when a Collect Team Statistics Task starts, an event is logged and it appears in the events list. When the number of teams that are selected for assessment is large, the Collect Team Statistics Task divides the total number of teams into manageable sets. Each set is called a batch. When a batch of accounts is assessed, another event occurs.
In this topic:
Starting a Collect Team Statistics Task
- Log in to Quest On Demand and choose an organization if you have multiple organizations.
- From the navigation pane, click Migration to open the My Projects list.
- Create a new project or open an existing project.
- Click the Teams tile, or click Open from the Teams tile to open the Teams workspace.
- Select the Teams tab and then select List View if not already selected.
- Select the teams in the list from where you want to collect statistics. You can use search, filtering or collections to quickly navigate through the list of mailboxes. You can select the check box in the table header to select all the accounts.
- Click Collect Statisticsfrom the Actions ribbon. The New Collect Statistics Task wizard opens.
- Step 1:Collect Statistics Options
- Choose from the following options
- Include collection of statistics from target tenant - select this option to include the same teams from the target tenant and generate the Comparison Report. Statistics will be collected for the target tenant teams only if a provision task was previously run for the teams.
- Collection levels:
- Basic (Fast) - collect statistics about member count and content size (in GB) for the teams selected in the source and target tenant if provisioned.
- Advanced (Slow) - collect statistics about member count and content size (in GB), planner count and planner task count for the teams selected in the source and target tenant if provisioned. The task requires more time to run.
- Click Next
- Step 2: Notification
- Send notification email once the task is completed - select this option to send a notification email when a discovery task completes.
- Only in a case of failure - Select this option to send the email if the discovery task fails to complete successfully.
- Recipients - enter the email address of the recipients of this email. You can specify multiple recipient email addresses separated by semicolon.
- Click Next.
- Step 3:Schedule
- Choose from one of three options to schedule the task. The scheduler will be activated only after you complete the task wizard.
- Run now - task runs immediately.
- Run later - task must be started manually.
- Schedule - task will be started at a future date and time entered in the corresponding calendar field.
- Click Next.
- Step 4: Summary
- Verify the task specifications as described below:
- Name - name of the task. You can specify a custom name. Default name is Collect Team Statistics Task.
- Source tenant - name of the tenant where the statistics will be collected.
- Target tenant - name of the target tenant in this project.
- Scheduled start - date and time when the task will start. Now indicates that the task will start immediately.
- Click Back to revise or review a previous step or click Finish to complete the task wizard and start the task as scheduled.
- Review the statistics collected
- Open the Teams workspace.
- Select the Teams tab and then select List View if not already selected.
- Review the statistics collected for each team. The statistics displayed depends on the option selected in the New Collect Team Statistics Task wizard.
Reviewing the Collect Team Statistics Task
- Open the Tasks tab.
- Select the Collect Statistics task for teams that you want to review.
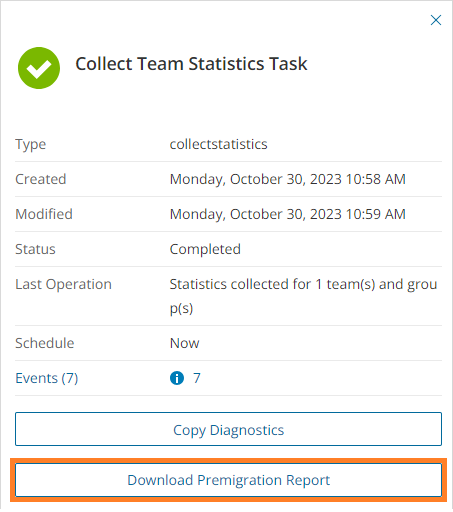
- In the task details pane that opens, the information presented is as described below:
- Type - Type of the task. The type is collectstatistics.
- Created - Date and time when the task was created.
- Modified - Date and time when the task was last updated.
- Status - State of the task.
- Last Operation - The action that was most recently performed in this task.
- Schedule - Date and time when the task started. Now indicates that the task started immediately after the task was created.
- Events (number) - The number of events that the task encountered.
- From the task details pane, click Download Premigration Report. Download and save the ZIP file to a suitable folder, and extract the report.
|
|
NOTE: Premigration reports are also available from the following tasks:
- Discover All
- Discover From File
- Provision
|
Reviewing the events for the Collect Team Statistics Task
- Open the Tasks tab.
- Select a Collect Statistics task for teams that you want to review.
- In the task details pane that opens, click Events (number). The Events tab opens with a filtered list of events for the selected task.
- Select an event that you want to review. In the task details pane that opens, the information presented is as described below:
- Object - name of the team if applicable.
- Task - name of the task.
- Time - date and time when the event occurred.
- Category - type of task. the value is Application.
- Source - the workspace from where the event was generated. The value is Teams Migration.

Premigration Assessment for Teams
On Demand Migration analyzes your environment and tracks potential problems, misconfiguration, and risks that might adversely affect the migration. Use Assessment view to see the summary reports on the discovered data and use the automatic filters to quickly select certain items.
The following reports are available for Teams:
- Workflow - (deprecated) Teams sorted by completed workflow
- Discovered
- Processed
- Migrated
- Teams- Teams sorted by processing status
- Idle
- In progress
- Needs your attention
- Teams By Size
- Teams By Last Activity Time
- Teams By Channel Count
- Teams By Member Count
Once you handle the issues, if any, go to List View screen. You are ready to start the migration.
