
Initial Server Sync Prior to Replicating
September 2023
Initial Server Sync Prior to Replicating
This document covers how to synchronize your web applications prior to replicating, to ensure that both sides match. For instance, you require the same libraries to exist on both your source and target servers in order for changes made on either to replicate bi-directionally.
Setup can be done by copying an entire content database, by queuing content over from one server to another, or by running a site collection backup command.
Copying an entire content database over from one web application to another is the most complete method of backup. It is ideal for setting up a Disaster Recovery scenario where the DR environment needs to be identical to your main environment.
Queuing content over is the method that is focused on setting up your SharePoint environments with specified content. This method allows you to control what events and content you want queued over from one SharePoint environment to the other. It is the method you want to use if you have existing content on both your web applications that you want to preserve in this case you would queue content over bi-directionally.
Using this command and its frequency depends on a lot of factors like the size of the content, how often content changes, how up-to-date you want the site, etc.
Refreshing a Remote Replication Server from a Backup
Refreshing a Remote Replication Server from a Backup
This method is the most complete method of backup. It is ideal for setting up a disaster recovery scenario where the disaster recovery environment needs to be identical to your main environment. Use the method described here to get the second web application up and running using a backup of the SharePoint database from the first web application.
This scenario assumes that there are two servers involved: CorporateOffice and LondonOffice.
Configure Replicator to be in Manual mode:
1. Go to Central Administration on the Corporate Office server.
2. Click Application Management
3. Click Manage Map Families
4. Click the appropriate map family
5. Change the schedule for the map family to �manually�
6. Go to central admin on the London Office server
7. Go to Configure Web Application and disable replication.
8. On London office go back to application management then Manage Map families.
9. Delete the map family for the site collection you will restore on the London office.
Behind the Scenes
Once you have completed the preceding steps, the source server, CorporateOffice, is still queuing packages in the background that will later be applied when the destination LondonOffice is up and accessible.
Changes to the web application data, that Replicator tracks, are captured while your backup is in transport. Later in this document you will see how to start replication and force these packages to run.
Bringing the New Server Up
At this point you are ready to back up your database. You do not need to disable Replicator, but keep in mind that this backup will only be valid for this process, because in the current state you will be backing up Replicator as well.
|
|
NOTE:If you plan to use this backup for purposes other than this procedure, disable Replicator first on the Configure Web application page. |

1. Open SQL Server Management Studio for the source server - CorporateOffice.
2. Right click the content database you wish to back up, and select All Tasks > Backup.
3. Make a full backup, as described in the SQL Server documentation.
4. Once the backup is complete, and ship it to its final destination - in this case, London. Once the backup arrives in London you are ready to restore the database.
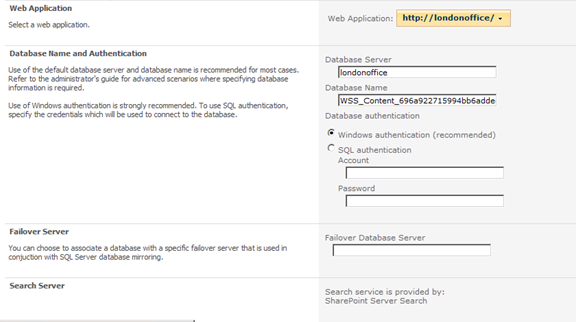
5. On the target server, open Central Administration > Application Management for the target server - LondonOffice. Then click manage content databases.

6. Select the correct web application in the top right hand corner.
7. Then choose the appropriate Content Database.
|
|
CAUTION: Take note of the name of the content database, it is an important part of the process to restore the database using the exact same name. |

9. Change the Database Status to Offline and select Remove Content Database.
10. Click OK.
Restoring the Database
1.Open SQL Server Management Studio on the target server - LondonOffice.
2.Go to SQL Server and restore your backed up content database. Refer to SQL Server documentation for instructions. Be sure to use the same name for the content database as was originally used for the site collection.
|
|
NOTE: When restoring over an existing database, select Overwrite Existing Database. Also, you may need to stop the IIS service on the target server, LondonOffice, in order to restore the database over the previous one, as it will still be locked by SharePoint |
3.Once the database has been restored, navigate to Manage Content Databases page of the target server, LondonOffice.
4.Click Add A Content Database.
5.5. Add the database you just restored.
|
|
NOTE: SharePoint recognizes that the database already exists and adds the database instead of creating a new one. |
6.Click OK.
7.Navigate back to the Central Administration > Application Management > Metalogix Replicator > Configure Web Application for the target server, LondonOffice.
8.You now need to refresh configuration. Do so by enabling replicator, disabling, and then enabling it again. It is important to do this to ensure property enabling after the restore.